Weekender with Wanda – Tim Holtz Mini Clipboard!

Hi everyone! Welcome back to the latest edition of Weekender with Wanda here on the Simon Says Stamp Blog! I’m happy to see you here today. Hope you had a great weekend so far. It’s that time of year for graduations, weddings, and dads. The Summer will be here before we know it. Today is my monthly post using awesome Tim Holtz products! I look forward to this post every month – trying to think up something fun and unique to show you. Today’s project has a lot going on – some dies, some paints, ribbon, metal, stains, wood, fabric…. Should I go on? This project is also very personal to me and I made it to hang in my home. I used the Tim Holtz Mini Clipboard and designed a special beach-themed wall hanging for our bedroom. I adore anything sea/ocean related and my favorite colors are blues and greens like the ocean. My husband and I were married in Cape Cod (Chatham) and I have such wonderful seaside memories of that time and place!
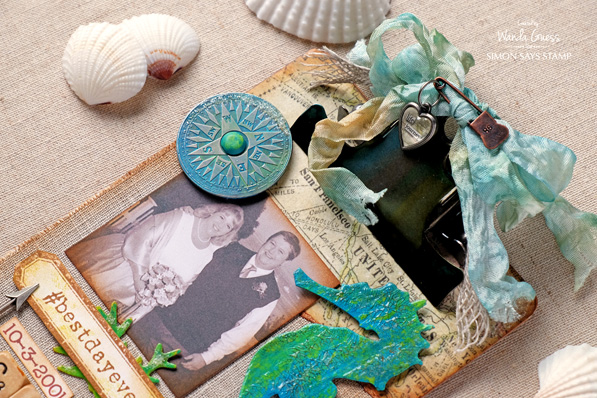
I started the project by printing out one of our wedding photos in black and white with a vintage feeling. If you know Tim Holtz products, you know he sells “found relatives” and they are awesome! So, I turned my husband and I into found relatives! Then I scurried around my studio finding all kinds of crafty things I thought would work for this project. That’s usually my design process. I gather everything and put it on my table and then edit out as I go along. Here is the final result….
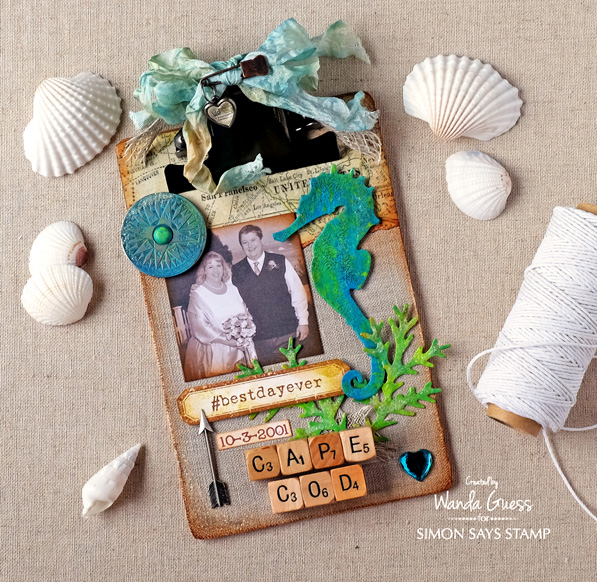
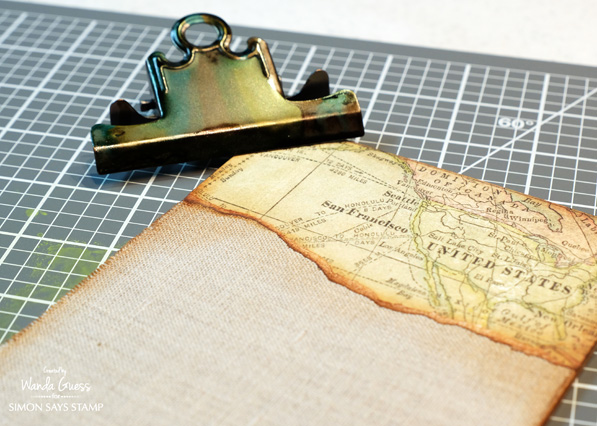
The clipboard comes apart (The clip comes off!) so that you can cover the board easily. Here I used Tim Holtz Patterned Paper (a map) along with the linen “Surfaces” product to cover the board. The linen is backed with adhesive making it super easy to put down. Then I edged the board with a sponge dauber and Vintage Photo Distress Ink.
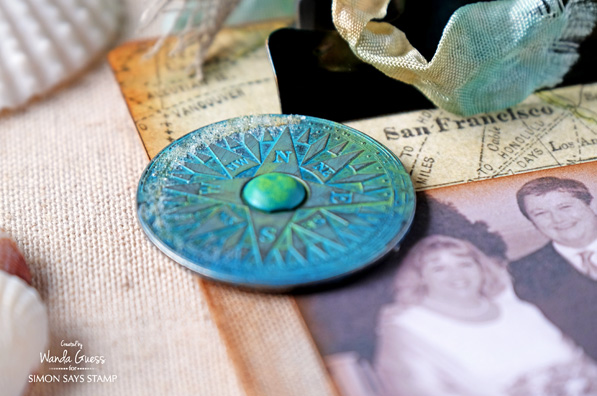
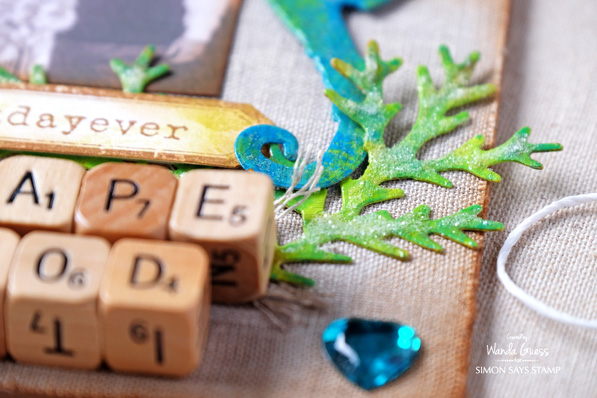
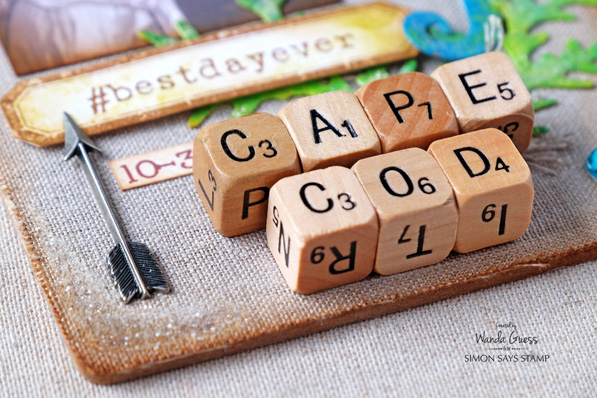
The alphabet dice let you spell out any word or words to customize a project! They also add a great pop of dimension. The compass started off as silver metal and I painted it with a couple of different distress paints using my fingers. Then I rubbed off a little of the paint and added a bit of Rock Candy Distress Glitter.
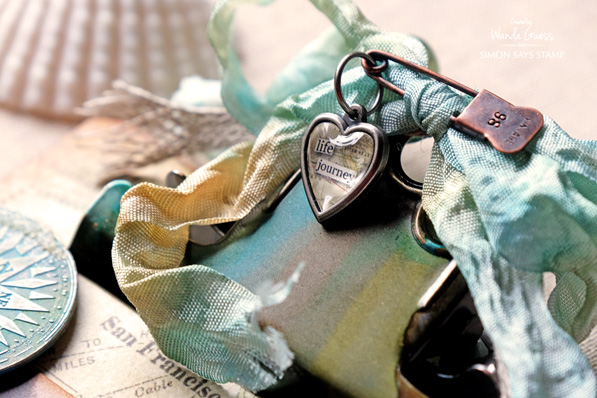
I dyed my own crinkle ribbon by using different colors of Distress Spray Stain (Colors in the supply links). I love how the blues and greens all go together with the brown. I added a bit of linen ribbon to mimic ropes as you would see at the beach.
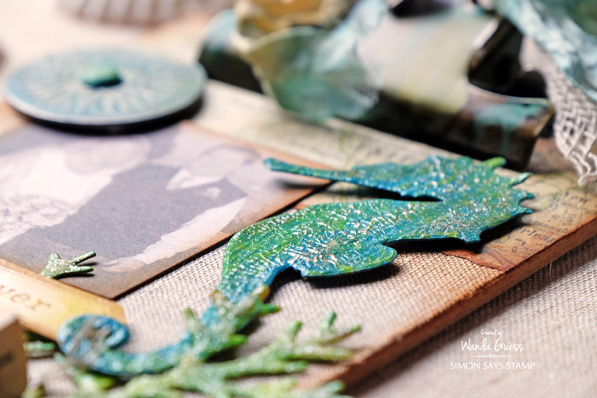
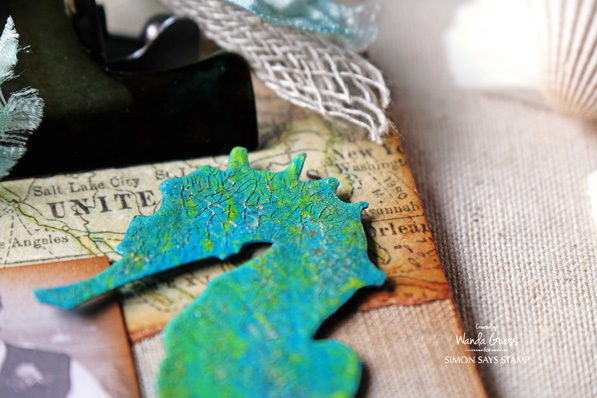
Here is a close up of the seahorse. I die cut the Seahorse from watercolor paper using the Sizzix/Tim Holtz Sand & Sea Dies. (These come in BIGZ and Mini size and I used the BIGZ) Then I painted the seahorse with Twisted Citron, Peacock Feathers and Mermaid Lagoon Distress Paints. After that was dry, I applied a liberal amount of Crackle medium and let it dry overnight. When the crackle was dry, I used Vintage Photo Spray Stain and applied it over the crackle – you can see where it seeped into the cracks. I love how this came out!
Here are the supplies I initially gathered. I didn’t end up using everything because I ran out of room! You can see the screws and bolts for the clipboard in this photo.

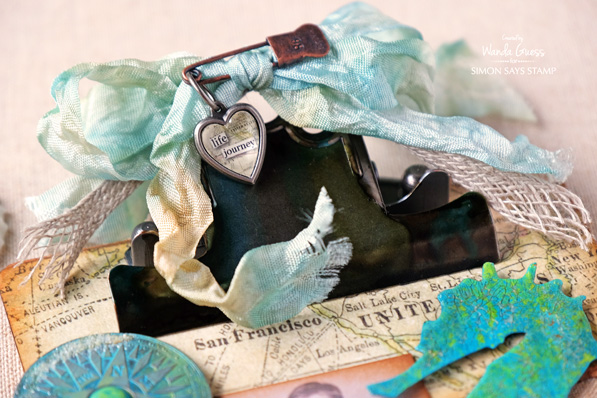
This is what the clipboard looked like before I reattached the clip. The clip was stained using Ranger Alcohol Inks! Super easy! I chose three colors of alcohol ink – Pool, Lettuce, and Mushroom. I laid down some paper towels and just dripped the inks onto the clip. You can sort of see how they all ran together. It came out really cool. You could also paint the clip if you choose. I think that would look great too.
To make the seaweed I repeated the same process as with the seahorse. Then as my last step I added some Rock Candy Glitter. Can you believe the seaweed is actually part of the Tattered Pinecone die set?!
Here is another close up of the crackle effect.
I attached a pretty heart charm to my ribbon at the top of the clipboard. These heart charms are one of my most favorite Tim Holtz products and I use them all the time. They come with different images and words to put inside, or you can make your own image to go inside.
I got out some stamps to make the hashtag and the banner. For the date, I printed that out on my computer. I added bits of glitter here and there… The alphabet dice were glued on using Glossy Accents.
Thank you so much for sharing part of your day with me and for letting me share this personal project with you! I hope you will try one of these mini clipboards because it’s really just too much fun! This is such a great project to personalize – for yourself or as a gift…. Could be for a baby, or a graduation, anything really! The next two weekends, my Weekender with Wanda posts are on Sunday! See you soon friends.
SUPPLIES:
 |
 |
 |
 |
 |
 |
 |
 |
 |
 |
 |
 |
 |
 |
 |
 |
 |
 |
 |
 |
 |
 |
 |
 |
 |
 |
 |
 |
 |
 |
 |
 |
 |
 |
 |
 |
 |
 |

“Look For The Miracles” June Card Kit Reveal
Hello and Happy Saturday everyone! It’s Nina-Marie here with you and today I have the pleasure of revealing the BRAND NEW “Look for the Miracles” June card kit! Are you ready to see what we have in store for you?? Keep reading to find out!
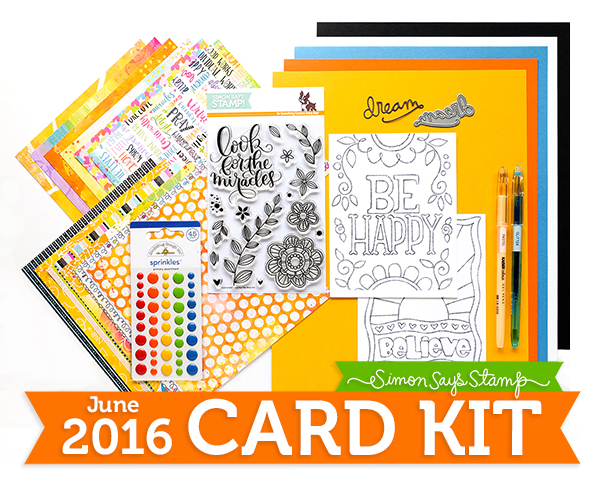
This month’s kit immediately made me think of the words happy and summer when I first saw it… the kit contains the Look for the Miracles stamp set, a lovely “dream” script die, two colorable card fronts and Doodlebug Rainbow candy – just kidding, I mean Sprinkles (but they DO look like candy right?)! Also included are gorgeous patterned papers from BoBunny’s Believe collection, gel and glitter pens from Kaisercraft, and five sheets of Simon’s signature cardstock! Pretty nifty right?
INSPIRATION
Okay, now let’s see what we can create with the Look for the Miracles kit!
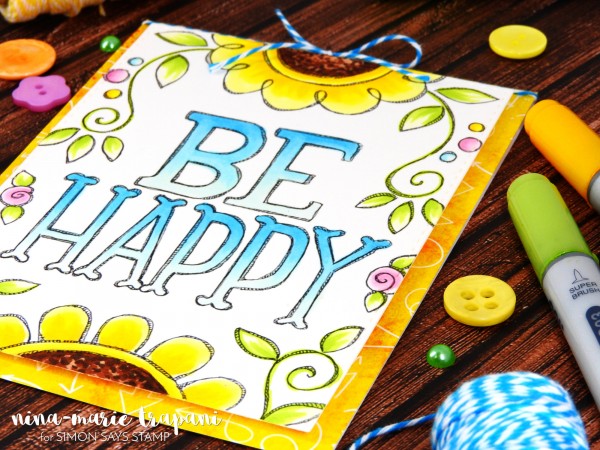
My first card showcases one of the fun Colorable Card Fronts that are included in the kit. The design is printed onto high quality cardstock, perfect for coloring with markers and pencils. I colored the “be happy” card with my Copic markers and I’ll list out the colors for you below for reference:
- pinks: RV10, RV34, RV63
- yellows: Y02, Y06, Y17
- greens: YG0000, YG03, YG23
- blues: BG10, BG01, BG05
- browns: E23, E18, E29, E49
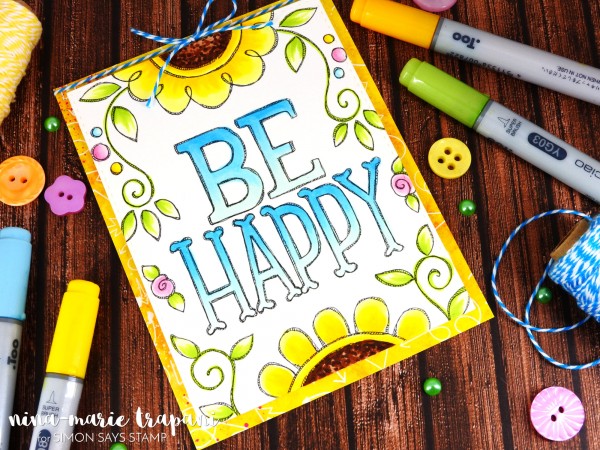
These Colorable Card Fronts make it really easy to create quick and easy cards because the guess work is all done for you! All you need to do is break out some coloring mediums and go to town adding all the colors to the images.
To turn mine into a card, I simply added the card front onto an A2 sized card base that I covered with some of the pattern paper included in the kit, and tied a simple twine bow across the top! Super cute and very fun!
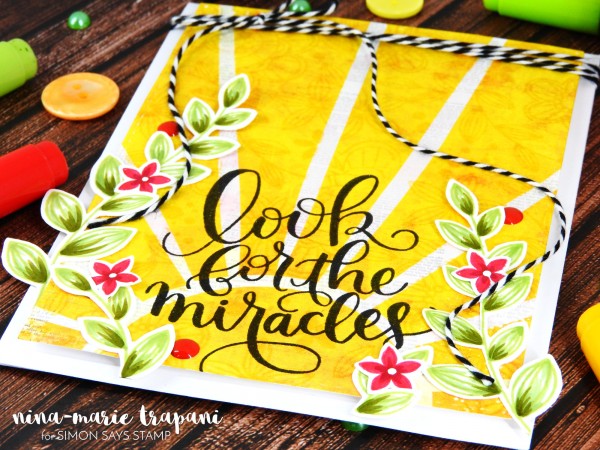
My second card that I have to share with you features the Look for the Miracles stamp set; in my walkthrough video below, I’ll quickly touch on the steps I took to create this card. While the design looks involved, it really was quite simple to create!
I immediately fell in love with the sun ray pattern paper that is included in the BoBunny Believe paper pack; I knew right away I had to make a card with it! So I took the sentiment from the Look for the Miracles stamp set and heat embossed it onto the paper using Simon’s new black pigment ink.
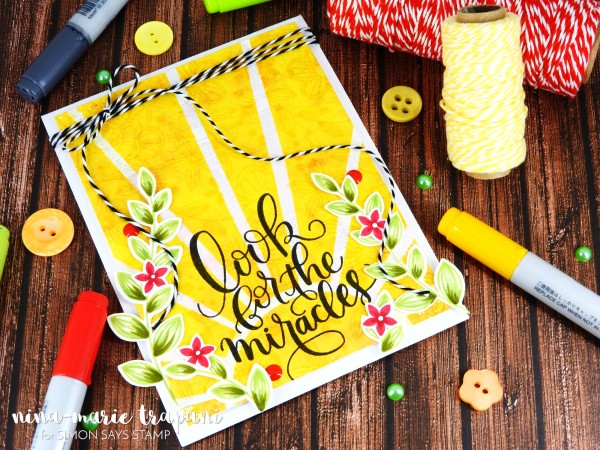
After stamping my sentiment, I began masking off each individual ray and stamping images from the Look for the Miracles stamp set over top using Simon’s Duckling dye ink. After stamping the designs into the sun rays, I stamped some more leaves and flowers onto white cardstock (also included in the kit) using Willow and Crimson dye inks. I added some quick coloring and shading using my Copics and before fussy cutting each image out and layering them onto my card panel. And those Doodlebug Sprinkles (I keep thinking they are candy) were a perfect embellishment to tuck in and around my leaves!
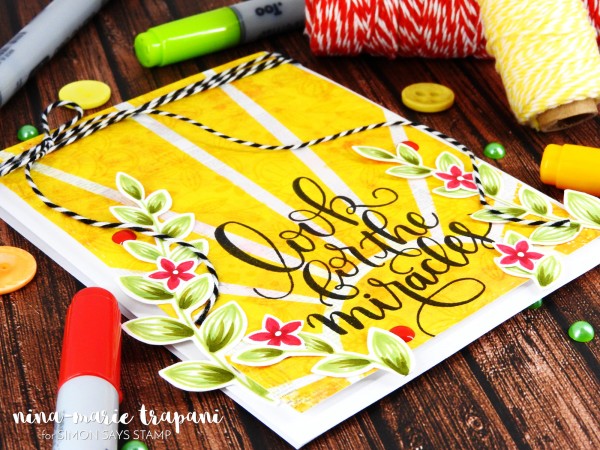
I’ve also put together a video for you that not only takes you through the entire card kit, but also shows you some of the details on how I created this second card! Be sure to check it out below or over on our YouTube channel. And don’t forget to subscribe to our channel for more weekly inspiration and tutorials!
WATCH THE VIDEO:
Remember, you can SUBSCRIBE to our no obligation kits and receive them monthly for $ 24.95, or purchase them each month for $ 29.95 (while supplies last).
If you are a subscriber who used Paypal to purchase your subscription, please be sure to pay the invoice that we send you within 3 business days. We have a limited number of this card kit in stock and don’t want you to miss out. For easier and quicker monthly processing, please contact us via email or telephone and we will put your credit card on file as a courtesy for you. Card kits bill and ship between the 17th and 27th days of every month.
Thanks so much for stopping by today and taking a look at our BRAND NEW (and super fabulous I might add!) June card kit! I hope you’ve enjoyed your visit and I’ll see you again soon!
xoxo, Nina-Marie
Celebratory Ink Blending and Masking
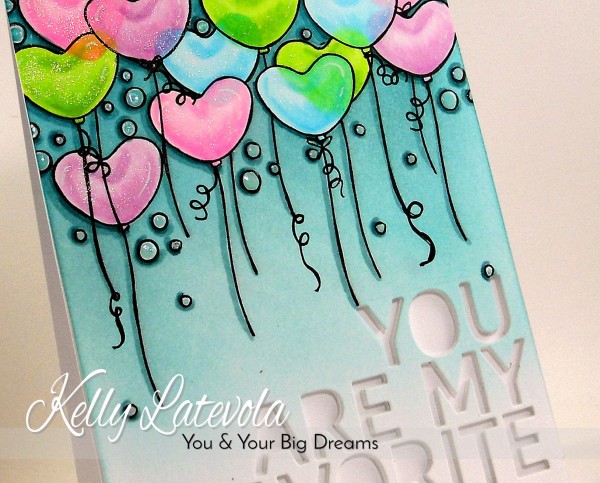
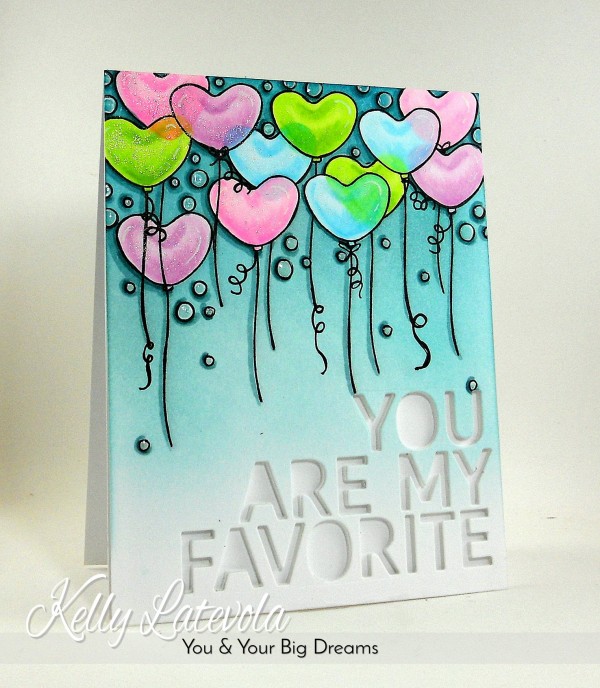
Hi readers! Welcome to our SECOND inspiration on the blog today! Isn’t this card a party on paper? Please welcome Kelly Latevola back to our blog as a guest! I love the maybe somewhat unexpected “You Are My Favorite” sentiment below to really jazz up a just because card for a friend! You could also easily turn this into a beautiful Birthday card! I love the way Kelly utilizes the balloon from our Cuddly Critters Accessories stamp set. Be sure to watch the video for more tips and tricks!
WATCH THE VIDEO:
SUPPLIES:
 |
 |
 |
 |
 |
 |
 |
 |
 |
 |
 |
 |
 |
 |
 |
 |
 |
 |
 |
 |
 |
 |
 |
 |
 |
 |
 |
 |
 |
 |
 |
 |
 |

Blog Candy Alert!! Follow our blog via email and comment on this post for a chance to win a special blog candy!


