BeYOUtiful Card Making Ideas with Concord & 9th
Hi readers! TGIF! We’re so happy to welcome back Angie Backman of Concord & 9th back to our blog as a guest designer! She has whipped up two lovely cards with their newest releases! Read on and enjoy!
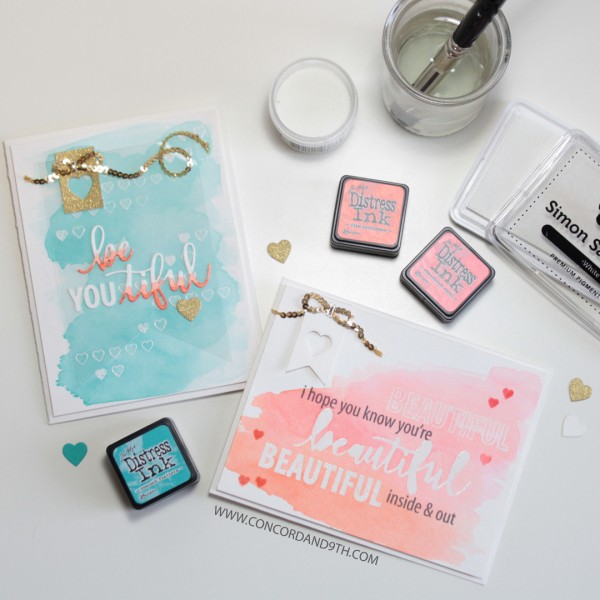
We are so excited to be back on the SSS blog today sharing some of our newer products! I just love the script word ‘beautiful’ from our Beautiful YOU die and the Beautiful Words stamp set has so many different words to build your own sentiments around the word beautiful – you get to customize it! Need a wedding card? Stamp “BEAUTIFUL couple”. Want to tell someone how brave they are? Stamp “bravery is BEAUTIFUL”. Just want to make someone smile? Stamp “smile, it looks BEAUTIFUL on you!”. You get the idea.
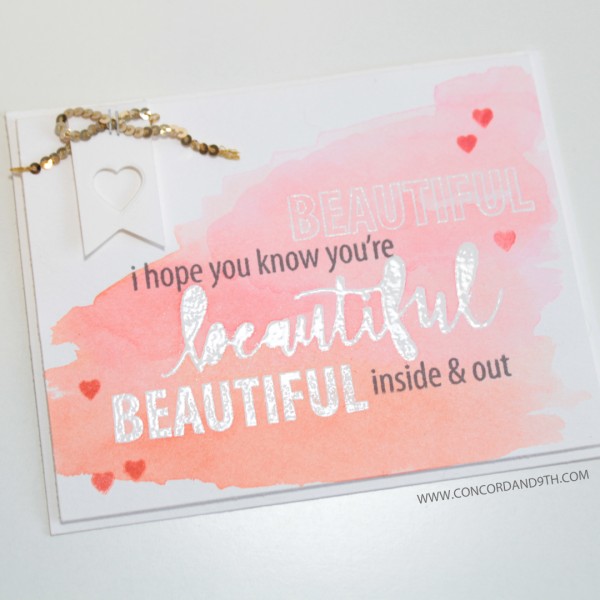
For this card I wanted to use the “beautiful” word die in a different way, so I decided to make it look stamped by embossing it.
1) Die cut “beautiful” from scrap card stock. Use the negative card stock piece that is left over as a mask. Use a temporary adhesive (Dotto) to hold the mask to the watercolor paper. I decided to leave the middles of the letters out (rather than adhering them along with the mask). The only piece I added back in was the piece between the T I F. It looks like an H you’d throw away. Add a little Dotto to the back of this piece and add it between the T I F on the mask.
2) Ink a sponge dauber with Versamark. Daub the ink over the masked pieces of the word.
3) Remove the masked pieces, pour clear embossing powder on top of the word, shake off and then heat with your heat tool.
4) Stamp the outline ‘beautiful’ and the block ‘beautiful’ with white pigment ink on the watercolor paper. Repeat the clear embossing technique.
5) I wanted those 3 words to really pop off the card so I watercolored the card front using Abandoned Coral and Ripe Persimmon Distress Inks, a watercolor brush and water. I love imperfect watercolor washes!
6) After the watercoloring is dry (use a heat tool to speed up the drying process if you want), I stamped “i hope you know you’re” and “inside & out” with a gray ink pad. Then stamped the tiny hearts from the Beautiful Words stamp set the same distress ink colors.
7) I could have called it good, but felt like it needed a little embellishing, so I die cut the heart from Beautiful You die from a strip of Canson watercolor paper. Trimmed the bottom of the paper strip into a banner shape with scissors. It still needed one last thing so I stapled a gold sequin strand to the banner. Gold helps finish everything, doesn’t it?
8) Adhere the card front to the full card using foam tape. This really helps to keep the card straight. It gets a little warped when watercoloring. The dimension of the foam tape looks nice too. Done!
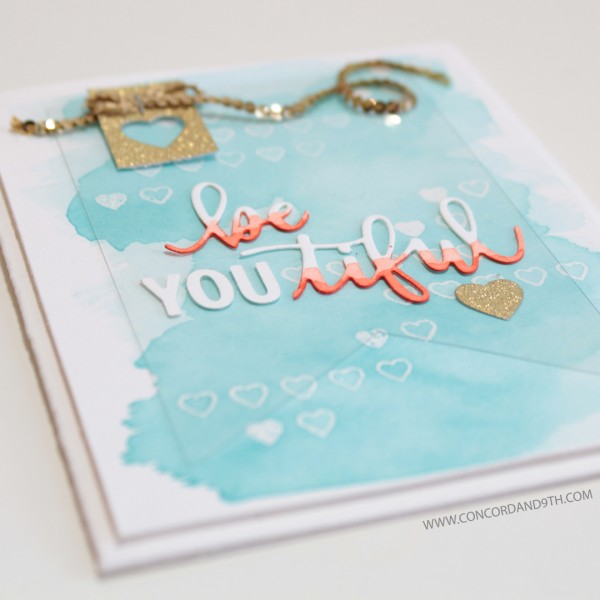
I really liked how the clear embossing turned out on the first card so I did it again, this time with the tiny hearts in the Beautiful Words stamp set. I also wanted to show how the words ‘beautiful’ and ‘YOU’ from our Beautiful You dies can work together in a unique way.
1) Ink the long heart border stamp with white pigment ink (I only inked 5 out of the row of hearts). Stamp on Canson watercolor paper. I wanted a few solid hearts too so I put the individual tiny solid and outlined heart on one block together to ink and stamp at the same time. Repeat these hearts as many times as you want to on the card front.
2) Do the same imperfect watercolor wash technique on the card front. I used Peacock Feathers (one of my fave’s!).
3) Die cut ‘beautiful’ and ‘YOU’ from Canson watercolor paper.
4) Use Ripe Persimmon distress ink to color the bottom portion of the word ‘beautiful’. Coloring only the bottom makes the word look dip-dyed.
5) Use scissors to clip the word ‘beautiful’ after “be” and before “tiful”. Throw away the extra letters. They are replaced with the die cut “YOU”. The sentiment now has a dual meaning!
6) I wanted the “beYOUtiful” to stand out over the embossed hearts. I first tried mounting the words to vellum, but it covered up the background. So, I used a clear acetate (window sheet) instead. Trim the bottom to a banner shape for interest.
7) Adhere the die cut “beYOUtiful” to the acetate sheet using Tombow liquid glue.
8) I added the same small banner in the top left of the card, but with gold glittler paper, 3mm gold sequins and the tiny attacher stapler. Use the gold heart that is die cut out for an extra embellishment. I say it’s a-okay to use the same elements on different cards if you love it!
9) Adhere the clear acetate sheet to the watercolored piece with mini glue dots. I used tiny glue dots and hid them behind the gold heart, and the gold banner piece.
10) Adhere the card front to the full card using foam tape again. It was really fun to use the clear embossing and watercolor techniques on these cards. If you are in a creative rut, go back to old techniques you haven’t tried in a while. It’s fun!
Supplies:
 |
 |
 |
 |
 |
 |
 |
 |
 |
 |
 |
 |
 |
 |
 |
 |
 |
 |
 |
 |
 |
 |
 |

Blog Candy Alert!! Follow our blog via email and comment on this post for a chance to win a special blog candy!
Spotted! March 2016 Edition!

It’s time for another edition of Spotted here on the Simon Says Stamp Blog! Seeing all of the amazing cards and projects featuring the Simon Say Stamp brand that are created by you, our awesome customers, is super fun for us! We love seeing what you are creating. ‘Spotted!’ is a monthly feature on this blog that highlights the talents of all of you! Thank your for bringing our products to life with your creativity and energy! It’s really a treat to share your projects! Today we are happy to introduce you to 5 designers who shared their work and caught our eye for the March 2016 edition of our ‘Spotted’ post! We send each of them a little something special for being “spotted.” Be sure to use the hashtag #simonsayssstamp on your social media accounts so we can spot YOU! We find cards on Instagram, Facebook, Pinterest, Flickr, in our Simon Galleries, and craft blogs.
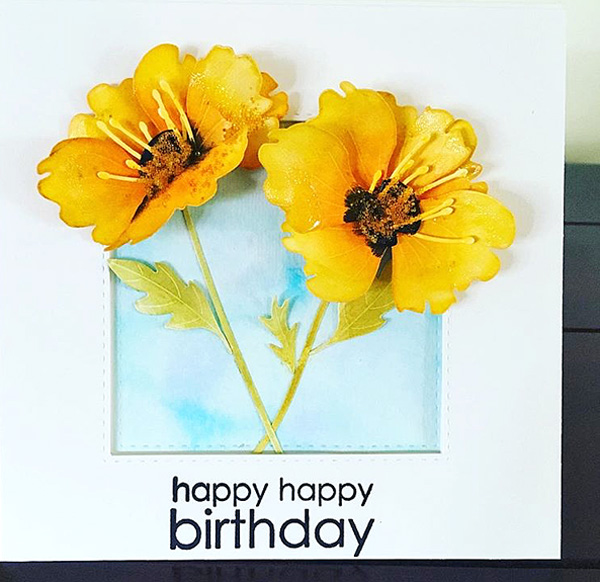
This beautiful and bright card by Karen caught our eye right away on Instagram! It is so fresh and pretty! Love that yellow, and how she brought the die cuts to life in such a pretty way. She used our Simon Says Stamp Exclusive Tattered Poppy Die to create a birthday card that anyone would be happy to receive! Please be sure to check out more of Karen’s creations on her Instagram page.
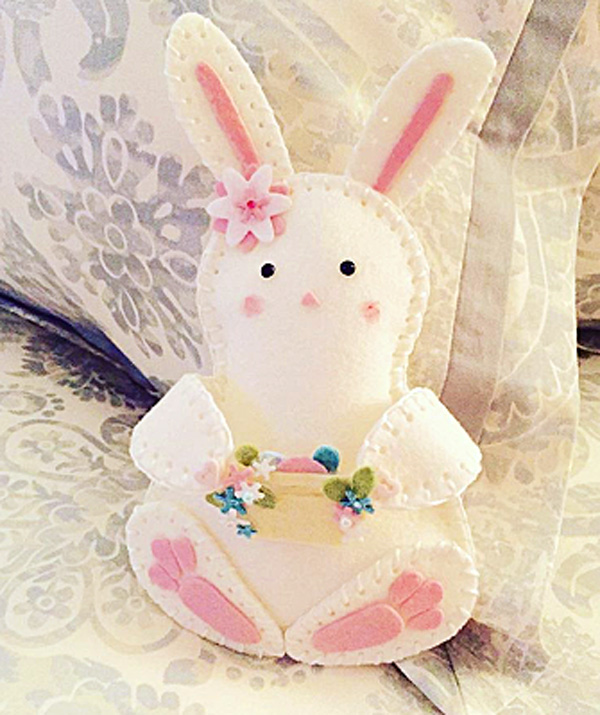
Susie is right on trend with her super cute felt bunny! Felt crafting is all the rage right now and we adore how Susie made this sweet bunny holding a pretty Spring basket of flowers. She used our Exclusive Plush Liam Bunny Die for this project and lots of delicious felt. Please be sure to look up Susie on her Instagram page!
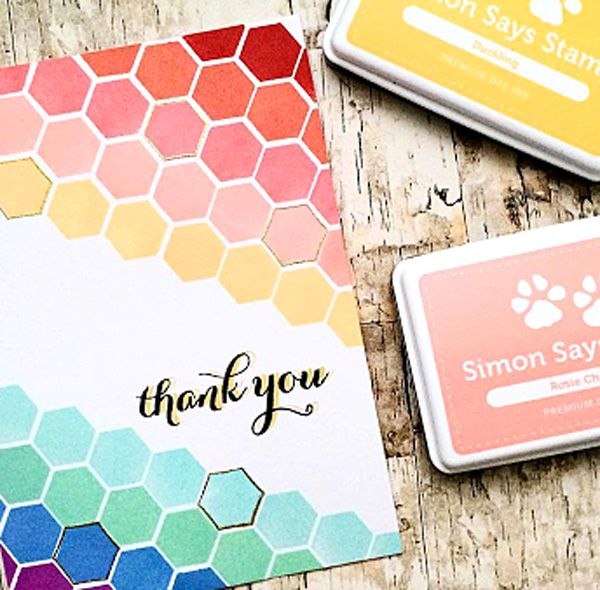
This card by Christina is so creative and clever! We love her gorgeous color combination and how she used the Simon Says Stamp Perfect Shapes Stamps to make a true masterpiece! The crisp black sentiment perfectly sets off all that pretty color. You can find Christina’s work on her website or her Instagram page!
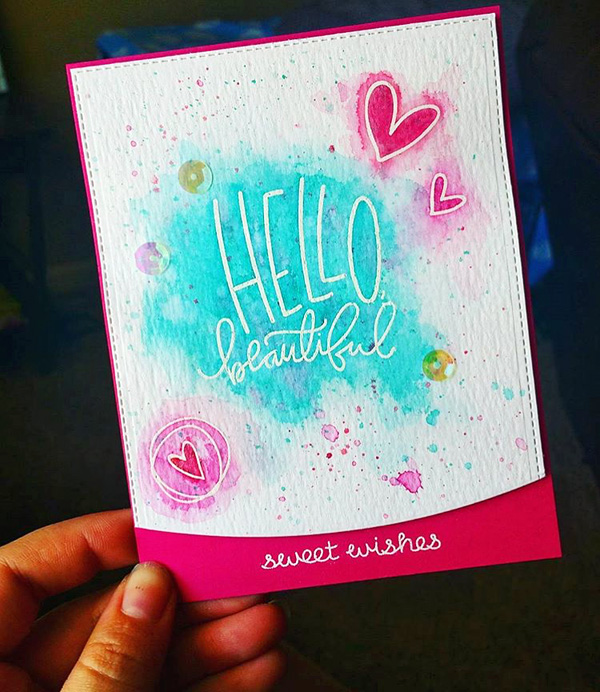
The next Spotted card is this beautiful watercolor creation made by Brooke! We love the fantastic watercolor technique and her clean and simple card layout. This one would bring cheer to any mailbox! That bright pink is so happy! Brooke used our Simon Says Stamp Exclusive Hello Beautiful stamp set to make her card. You can find Brooke on her Instagram page.
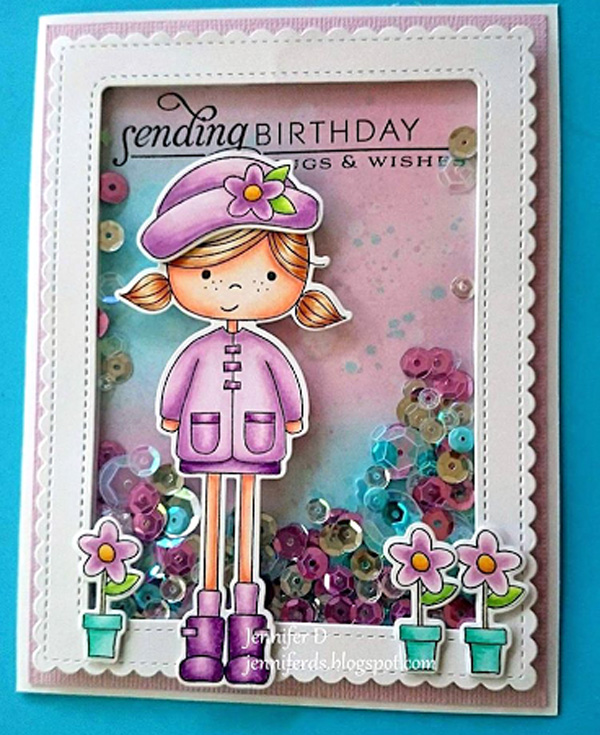
Our final card for this month’s Spotted is an adorable Abby card created by Jenny! We love the purple color scheme and the awesome shaker card design! This card features cute little Abby in her boots and hat from the Simon Says Stamp Exclusive Spring Showers stamp set. This set also has matching dies. To see more of Jenny’s designs, visit her on her fun blog!
Wasn’t that spectacular!? Would you like to be SPOTTED using Simon Says Stamp product? Post your creations to Facebook, Pinterest, Instagram (with hashtag #simonsaysstamp), your blog and/or the Simon Says Stamp online galleries (in the sidebar) and we’ll choose cards or projects to feature each month! We also have a Simon Says Stamp Flickr group here and we would love for you to join us! So many ways for you to play along with us. We can’t wait to see what you are creating!!
Below are some of the Simon Says Stamp exclusive products featured in this post:
 |
 |
 |
 |
 |
 |
 |
 |
 |
 |
Simon Says Stamp White Pigment Inking Techniques
Hello everyone! It’s Shari here with something a little different for you. I’m taking a look at some techniques that are possible using the Simon Says Stamp White Pigment ink.
The most common techniques for this ink would be to stamp on color cardstock to create light images or as the ink to use white embossing powder. But I want to take it little further and show you a few things you can also do with it.
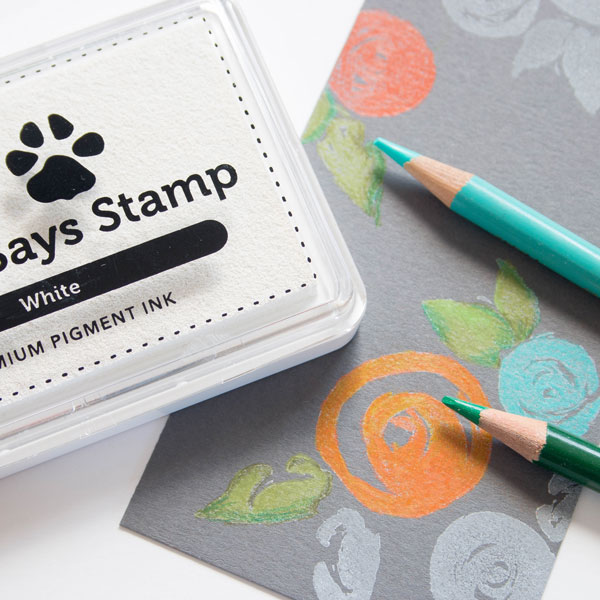
Try using it on dark cardstock as a base for color pencils. A lot of the time when you try to color with pencils on darker cardstock, the color gets lost. With the white base, your colors pop! This technique works best with bold or solid type stamp images, and gives you a chance to use your pencils with an image you otherwise wouldn’t use.
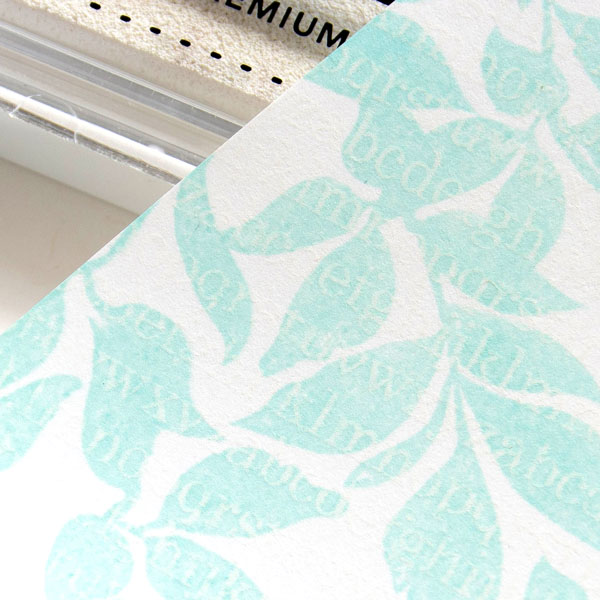
Another fun technique is Velveteen stamping. How this is done is to stamp an image using the white ink onto white cardstock. Then stamp another image on top. The white ink almost resists the dye ink, leaving you with both images. This technique works best when using a fine or detail stamp with the white ink and a bolder more solid image with your colored ink on top.
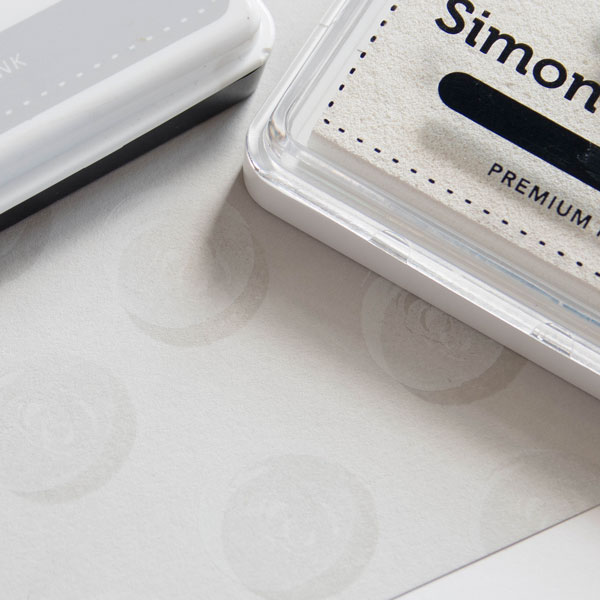
One of my favorite techniques is to do ghost stamping which creates a drop shadow. This technique is done by using the same stamp, first using white and in this case my second image is stamped with Fog ink. I typically like to have my ink color match my cardstock color, so I’ve used Fog cardstock as the base. This technique is most effective with bold type images, even messages with a heavy font.
I’ve shot a video showing how to do these techniques which you can watch below or on our YouTube channel.

Blog Candy Alert!! Follow our blog via email and comment on this post for a chance to win a special blog candy!
Thanks for stopping by today!
 |
 |
 |
 |
 |
 |
 |
 |
 |
 |
 |


