Weekender with Wanda – Tim Holtz Product Spotlight!
Happy Saturday! It’s time for the latest edition of “Weekender with Wanda” here on the Simon Says Stamp blog! I’m happy to see you today! It’s one week until Easter and Spring has sprung. It’s nice to create with vivid, happy colors right now and get in the mood. Today I’m sharing a card I made with loads of new Tim Holtz products. The Simon Says Store is stocked to the brim with everything new from CHA that Tim created for Sizzix and Ranger. It’s all fun! I finally got my hands on the Distress Crayons and wanted to make something to share here with you, and talk about them a little bit.
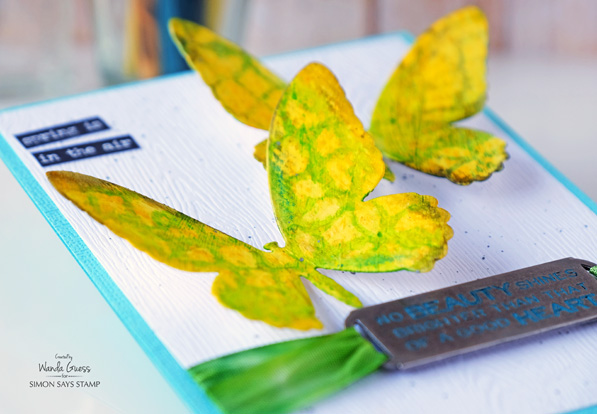
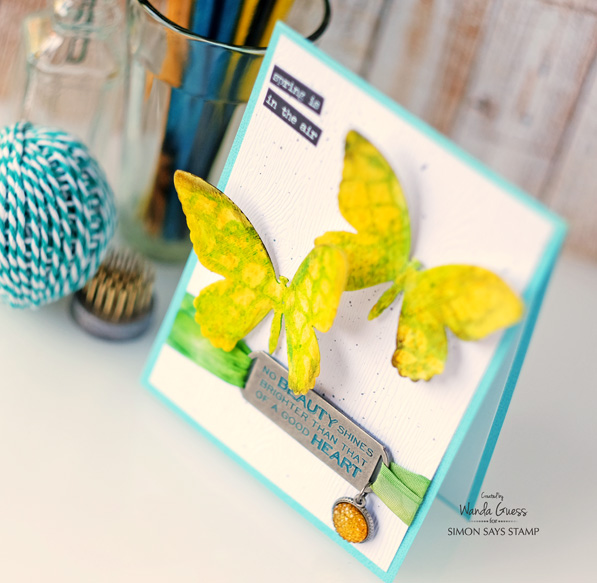
My card is a really bright color scheme that just kind of happened when I mixed some of the crayons together….and I thought butterflies would be nice for this time of year.
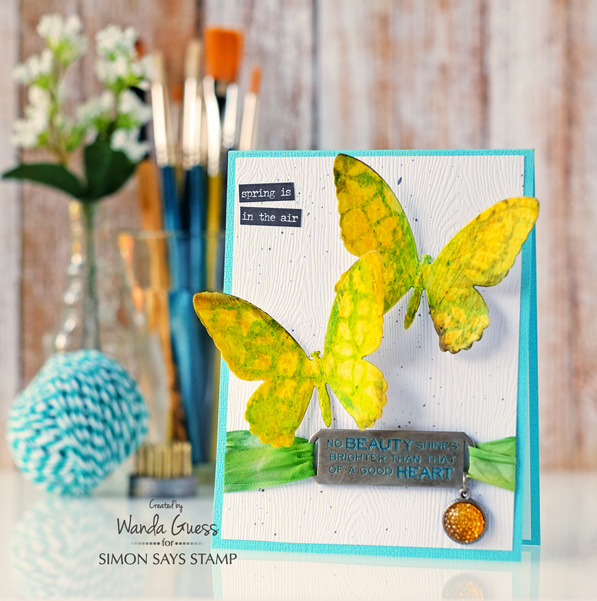
The Detailed Butterflies dies are the perfect size and scale for cards. I die cut two butterflies out of watercolor paper to use as my focal point. The background layer is the new Woodgrain cardstock! It’s pretty awesome. Great for adding some texture and great for ‘nature’ theme cards.
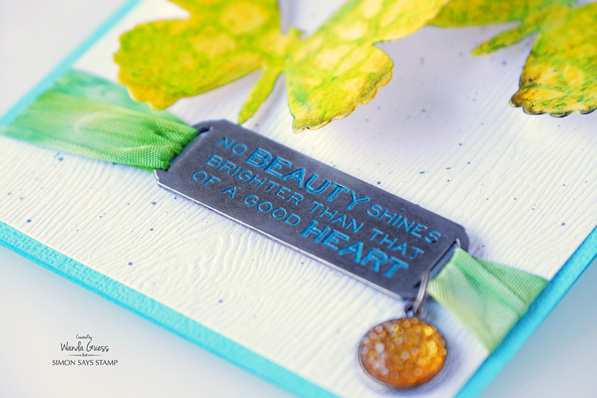
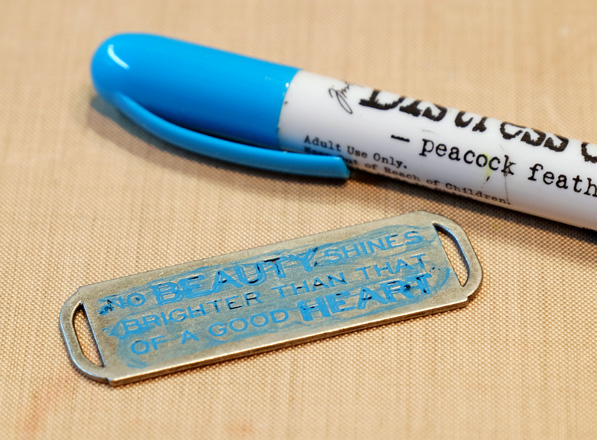
The newest addition to the metal word bands are these big quotes. LOVE this for the front of a card. I used the Distress Crayons to color in the words to make them match my project. The Crinkle ribbon was hand dyed using Distress Spray Stains.
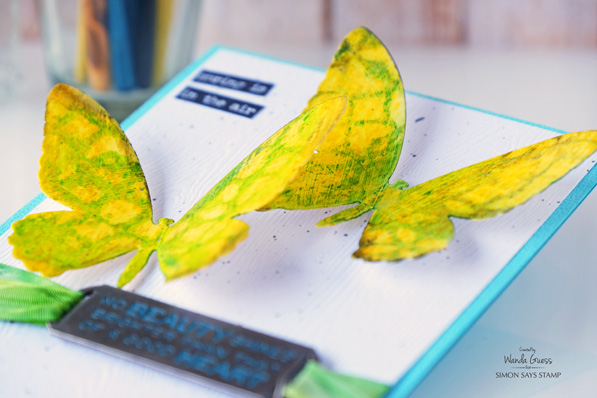
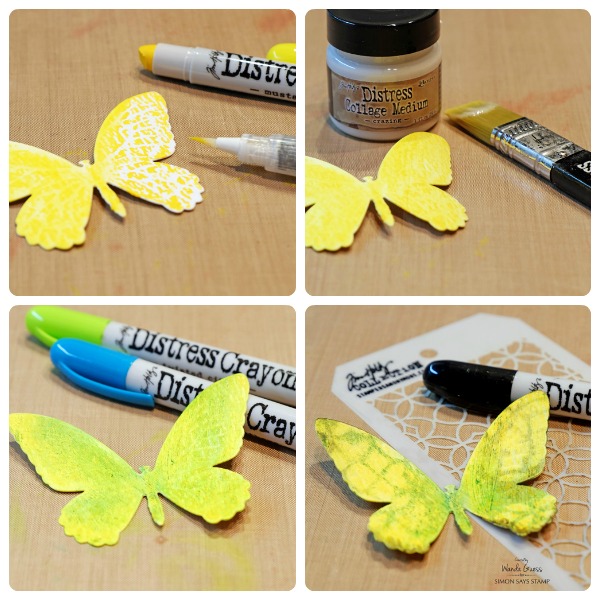
The new Distress Crayons are so unique and fantastic to work with. There are so many techniques you can try. I used a few different techniques for the butterflies. The crayons are almost the exact texture and consistency of a lipstick. They are super smooth and glide over the paper. They are loaded with pigment! For my butterflies I first rubbed the crayons over the watercolor paper and then moved it around with a water brush. Next I applied a thin layer of Distress Collage Medium (Crazing) and let that dry. The collage medium sealed the yellow color for me so I could use that as my base. Next I applied some blue and green Distress Crayons over the yellow and smudged it with my fingers to meld the colors together. The next technique is something that Tim demo’d at CHA and I loved it! I laid a Mini Stencil over the butterfly and then gently wiped with a baby wipe to remove the color in the shape of the stencil. Finally I used a bit of the black Distress Crayon on my fingers to edge the butterflies.
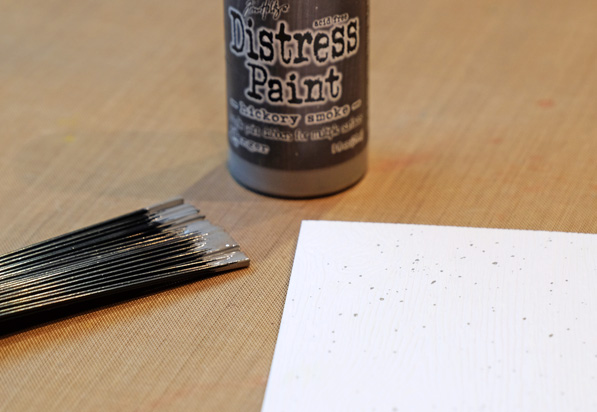
For the white background layer I used Hickory Smoke Distress Paint and the Splatter brush to make speckles. The Splatter brush makes it really easy. Just apply some paint onto your craft sheet and then tap or pull the bristles to make the special effect you desire.
Since the Crayons have body to them it makes it simple to get into the grooves and letters of the quote band/word band. Here you can see how I applied it to the metal. Then I simply wiped the excess away with a dry towel.
Some word stickers are always nice!
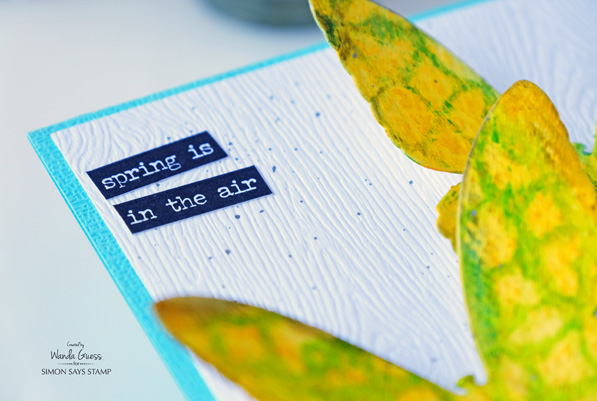
The butterflies are attached to the card with foam squares. Then I gently lifted their wings up to add dimension and movement. The card will lay flat for mailing still, though.
Thanks so very much for spending part of your weekend here with me!
SUPPLIES:
 |
 |
 |
 |
 |
 |
 |
 |
 |
 |
 |
 |
 |
 |
 |
 |
 |
 |
 |
 |
 |
 |
 |
|
 |

Mini Cards with Paper Artsy!
Happy Friday everyone! I have some fun mini cards for you today using some awesome Paper Artsy stamps.
These images were screaming Artist Trading Card or mini’s… something small to help the images really stand out. I went with 3″x 4 1/4″ so they can be given as is or mounted to a full size card.
For my first mini-card, I used the Jofy 42 Garden of Life stamps. I love this little girl, her hair buns are just adorable! I stamped her on white cardstock using Simon Says Stamp Intense Black ink and colored her with Copics.
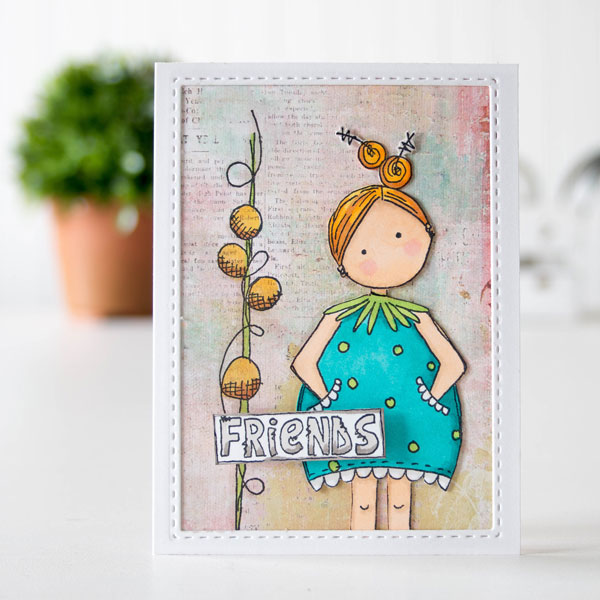
After coloring, I mounted her to a piece of Prima Royal Menagerie paper and used the Stitched Rectangle dies to create a frame.

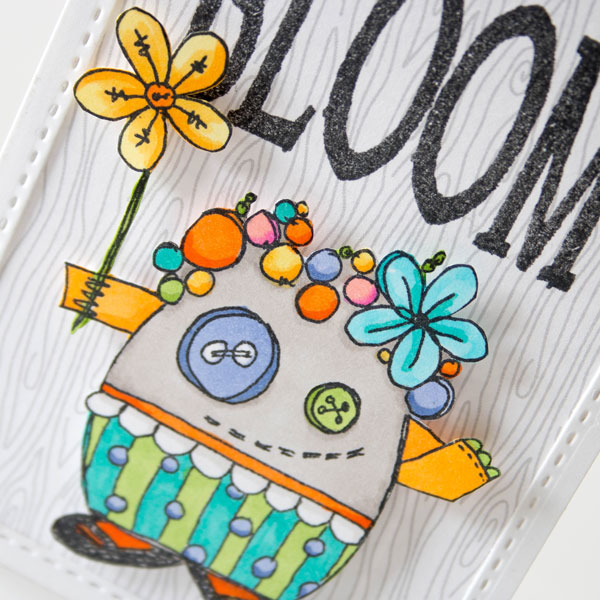
This next little one cracks me up… I call it a flower monster. I colored it with bright colors using darker tones to create shadows.
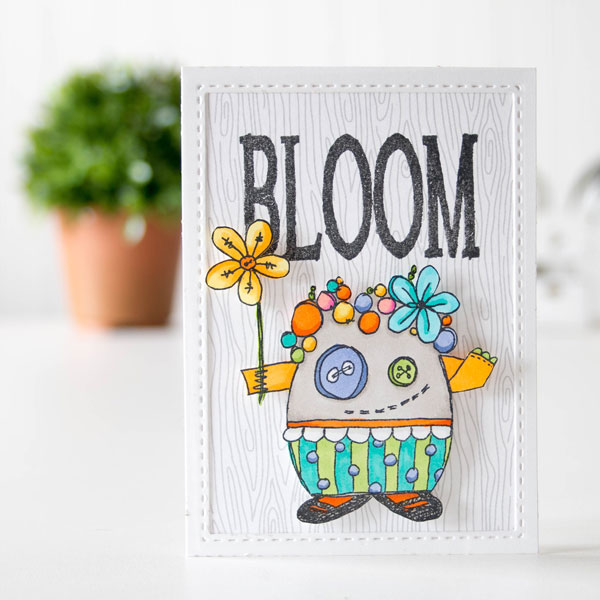
I mounted my monster onto a piece of white woodgrain paper from Doodlebug so the colors would pop! I stamped the large BLOOM in black for contrast.
I’ve created a video of how these came together, You can view it below or on our YouTube channel.
Blog Candy Alert!! Follow our blog via email and comment on this post for a chance to win a special blog candy!
Thanks for coming by today, I hope these silly little cards brighten your day!
 |
 |
 |
 |
 |
 |
 |
 |
 |
 |
 |
 |
 |
 |
 |
 |
 |
 |
 |
 |
 |
 |
 |
 |
 |
 |
 |
 |
 |
 |
 |
 |
 |
 |
Plush Petal Pouches
Hi readers! Happy Thursday! Please join me in a big Simon welcome back to our pal Debby Hughes with her always amazing monthly creative uses post! This time around she’s using some of our new Spring Plush to make cute candy pouches. Read on to get more information, and be sure to watch the video too! Enjoy!

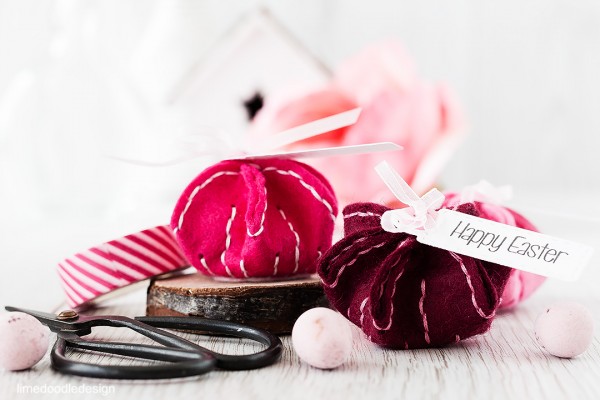
Hello, it’s Debby here with plush petal pouches – try saying that fast three times! Are you as taken with the new plush dies as I am? Fabulous aren’t they but I did want to make sure I made the most of their uses so you’ll see in the video below I took the Plush Flower die pictured and turned it into these cute pouches to hold some chocolate Easter treats. They would work well as party or wedding favors too and when they have served their purpose as packaging the felt can be smoothed out and you have a lovely decoration or I think they would make great drinks coasters too.
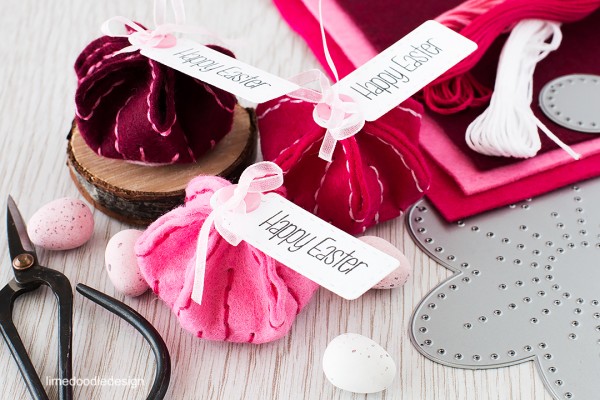
I used some of the new wool felt in the Lipstick Party colorway – three toning pinks in good-sized sheets of quality felt. I cut the Plush Flower die from each color and the flower centre from white felt and then chose DMC embroidery floss colors to tone – 600, 603 and white.
I used a simple running stitch to decorate the flowers, doubling back on my stitching to create a continuous line of stitches for some areas. Choosing this stitch and not a traditional back-stitch means both sides of the project are nice to look at which I think is important – you don’t want messy stitching showing when the recipient opens their pouch.
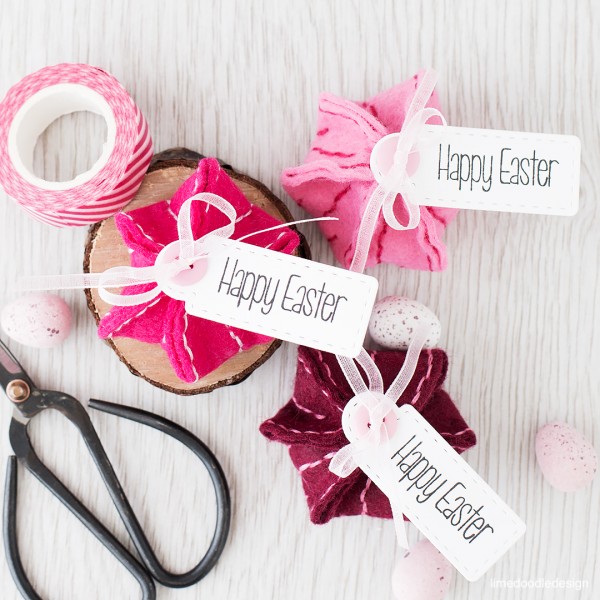
Having finished the stitching I used more of the embroidery floss to pick up the tip of each petal and gather them together like a drawstring bag. In the end I replaced the floss with thin organza ribbon as I thought it had a little more substance.
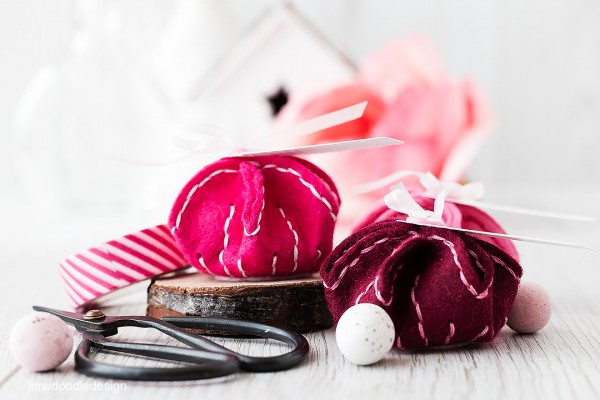
The bags are filled with Cadbury’s mini eggs (small sugar-coated chocolate eggs) – I put five in each pouch and they fitted comfortably with a little space around them too.
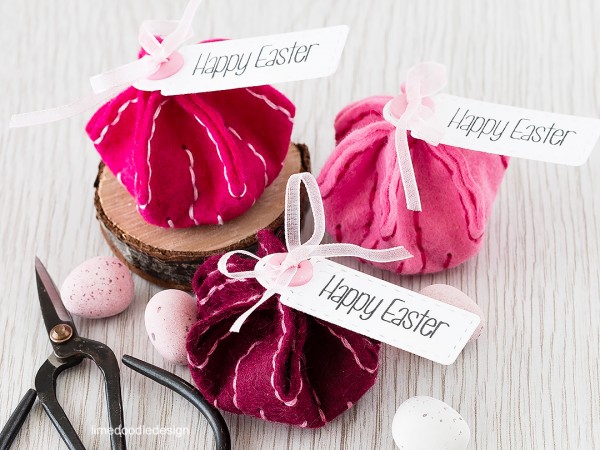
I didn’t think the pouches needed much decorating but I did add a Stitched Tag stamped in Intense Black ink with a greeting from the Springtime Critters set. I threaded the ribbon through the tag and added a button to each pouch before tying the ribbon.
I think these pouches are a cute way to present a small gift or a few sweet treats and it’s great to get more use from our dies :D
Watch the video:
SUPPLIES:
 |
 |
 |
|
 |
 |
 |
|
|
|
 |
 |
 |
Thanks for reading today, and thanks again to Debby for being our guest today!

Blog Candy Alert!! Follow our blog via email and comment on this post for a chance to win a special blog candy!


