Studio Monday: Felt Plush Magnets
Hi friends! Happy Monday! We’re starting a new weekly feature this week called, Studio Monday with Nina-Marie where the fabulous Nina-Marie Trapani will whip up a new design each week featuring a wide variety of products and techniques to inspire you! We hope you love it!
Let’s dive in:
Well hello there everyone, it’s Nina-Marie here welcoming you to Studio Monday! This is the first of our brand new weekly feature here on the Simon Says Stamp blog and each Monday I will be sharing fresh ideas to spark your creativity!
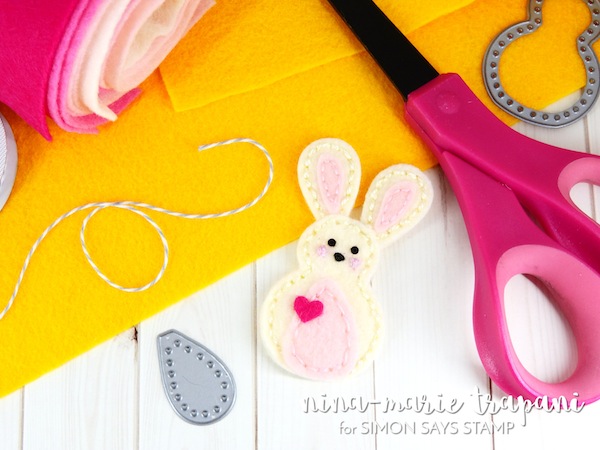
Today I am sharing a great way to use the popular Spring Plush dies and felt to create your own refrigerator magnets! This little cutie would make great gifts to friends and family for them to decorate their own refrigerators with colorful magnets of their own.
I created this magnet felt bunny (or “felties” as I like to call them), by gluing small pieces of magnet onto the backside of the felt bunny. I did not stuff the bunny, since for a refrigerator magnet I felt (no pun intended!) it worked best flat.
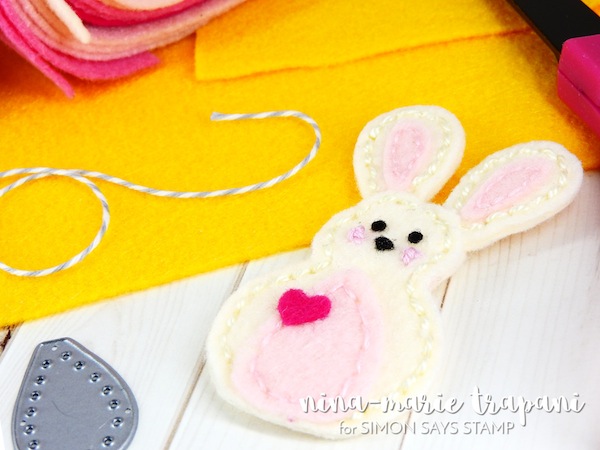
Did you know Simon Says Stamp carries beautiful felt to coordinate perfectly with the Spring Plush dies? The felt is a wool-rayon blend that is of high quality and made in Italy. It truly is fabulous to die cut with and I’ve used some of the felt for today’s project.
WATCH THE VIDEO:

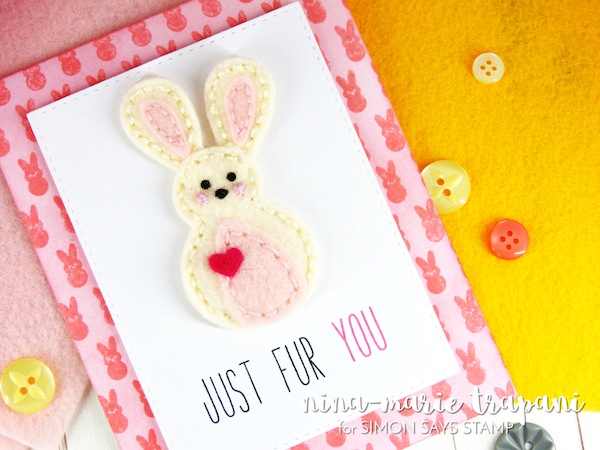
Of course as a card maker, I had to create a card to go with my magnet bunny! I used the adorable Simon Says Stamp Peeps 6×6 background stamp to create a pink stamped background and then blended ink over top to create a tone-on-tone effect (I used Worn Lipstick distress ink for both the stamping and ink blending). For the sentiment, I used the Lawn Fawn Milo’s ABCs stamp set to create a pun greeting that says “just fur you”.
So to see how I created this magnet bunny, be sure to check out the video below or over on the Simon Says Stamp YouTube channel! If you enjoy, be sure to give the video a “thumbs up” and subscribe to our channel for more creative inspiration!
Thanks so much for spending some time with me and I’ll see you next week for another Make it Monday!
xoxo, Nina-Marie

SUPPLIES:
 |
 |
 |
 |
 |
 |
 |
 |
 |
 |
 |
 |
 |
 |
 |
 |
 |
 |

Blog Candy Alert!! Follow our blog via email and comment on this post for a chance to win a special blog candy!
Spotted! April 2016 Edition!

It’s time for another edition of Spotted here on the Simon Says Stamp Blog! Seeing all of the amazing cards and projects featuring the Simon Say Stamp brand that are created by you, our awesome customers, is super fun for us! We love seeing what you are creating. ‘Spotted!’ is a monthly feature on this blog that highlights the talents of all of you! Thank your for bringing our products to life with your creativity and energy! It’s really a treat to share your projects!
Today we are happy to introduce you to 5 designers who shared their work and caught our eye for the April 2016 edition of our ‘Spotted’ post! We send each of them a little something special for being “spotted.” Be sure to use the hashtag #simonsayssstamp on your social media accounts so we can spot YOU! We find cards on Instagram, Facebook, Pinterest, Flickr, in our Simon Galleries, and craft blogs.
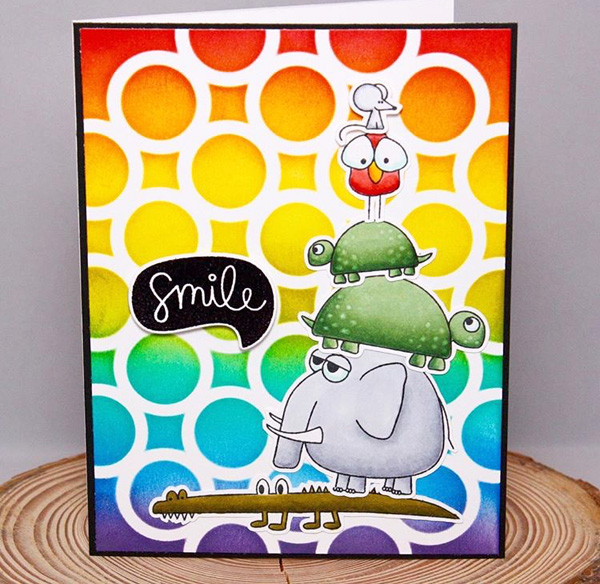
This bright, happy and cheery card made by Misty was spotted on Instagram. We love the pretty rainbow background she created for her card! She used our Simon Says Stamp Exclusive Stacking Animals Stamp Set to create a card sure to make you smile! Please be sure to check out more of Misty’s creations on her Instagram page or on her YouTube Channel.
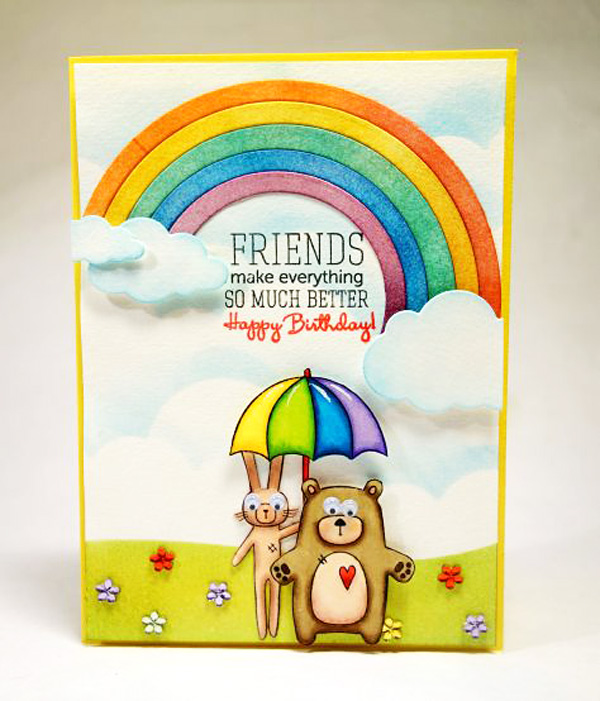
This adorable creation made by Kristina made us grin from ear to ear when we saw the cute googly eyes on the animals! We love how she kept the rainbow theme in the pretty umbrella and then added some glossy accents to make it shiny. What wonderful coloring too! Tina used one of our favorite Simon Says Exclusive Stamp Sets – Abby’s Spring Showers to make her card. To see more of Tina’s cards, visit her on her blog Kristina’s Art Corner!
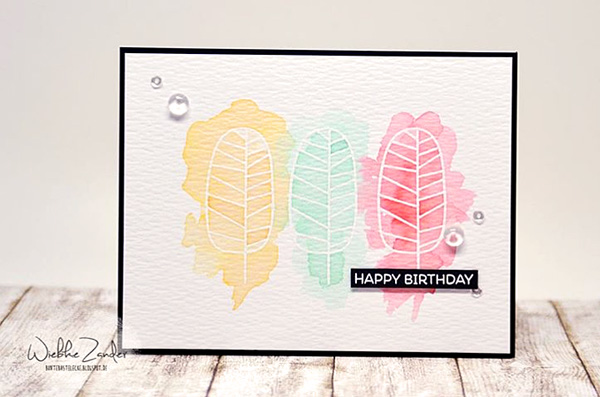
We love this really soft and pretty card by Wiebke, made using our Simon Says Stamp Exclusive One With Nature Stamp Set. The white embossing with the soft watercolor wash is perfection in our book! The rich black accent finishes the card so nicely. To see more of Wiebke’s creations, visit her gorgeous blog or her Instagram page.
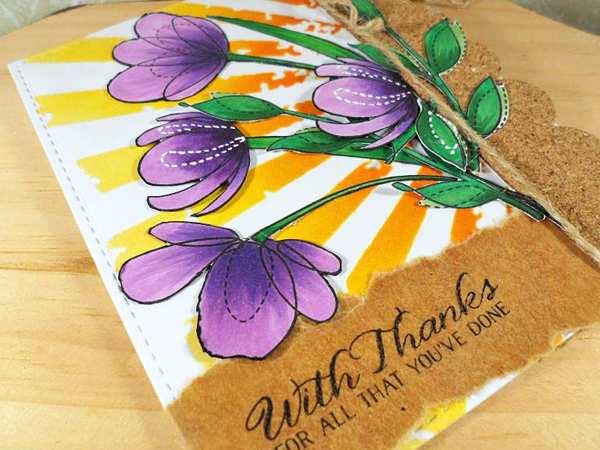
Next up is this bright card creation with awesome purple flowers made by Jenn! Her use of color is awesome! This card has so many layers and textures and we love it! Jenn used our Simon Says Stamp Exclusive Spring Flowers stamp set as her focal point for her card. Please visit Jenn on her Instagram page or her crafting blog!
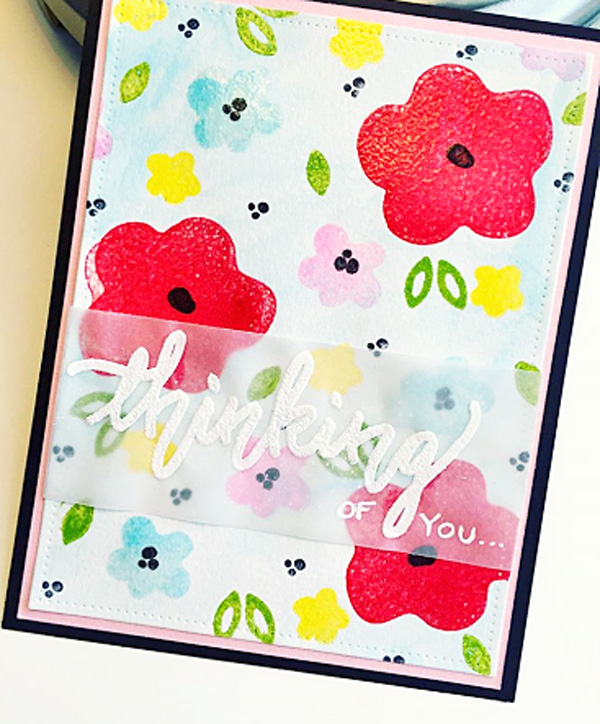
Erin made this fantastic floral card using our Simon Says Stamp April Card Kit! She created a beautiful background of flowers and then accented it with a vellum strip for the sentiment. We love that bright pop of red! So fresh for Springtime. Please see more of Erin’s work on her Instagram page!
Wasn’t that spectacular!? Would you like to be SPOTTED using Simon Says Stamp product? Post your creations to Facebook, Pinterest, Instagram (with hashtag #simonsaysstamp), your blog and/or the Simon Says Stamp online galleries (in the sidebar) and we’ll choose cards or projects to feature each month! We also have a Simon Says Stamp Flickr group here and we would love for you to join us! So many ways for you to play along with us. We can’t wait to see what you are creating!!
SUPPLIES USED IN THESE SPOTTED PROJECTS:
 |
 |
 |
 |
 |
 |
 |
 |
 |
Weekender with Wanda – Tim Holtz Wildflowers!

Happy Saturday! It’s time for the latest edition of “Weekender with Wanda” here on the Simon Says Stamp blog! I’m happy to see you today! Hope you are having a great weekend so far! There is a lot going on here at Simon Says Stamp! We will be announcing a new Release very soon and the stamps and dies are so awesome! The Instagram Contest is going on through April 15th (CLICK HERE for details).
Today is my monthly Tim Holtz feature for sharing all kinds of techniques, products and tools from one of our favorite craft superstars! I’m sharing a tried and true technique that I have used and loved for years – watercolor stamping with markers. It’s a fun and easy way to get awesome watercolor results. The Tim Holtz Wildflowers stamps were my inspiration for today’s card and tag. They are perfect for this technique! (And who doesn’t love Distress Markers?) I took a lot of photos to show you the technique, and also how it looks on different types of papers. Sit back and grab a cuppa joe and read along with me!
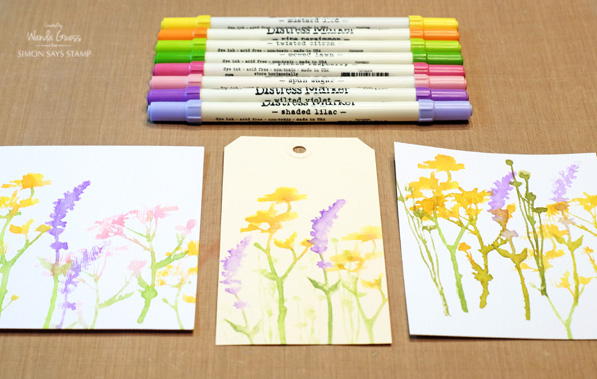
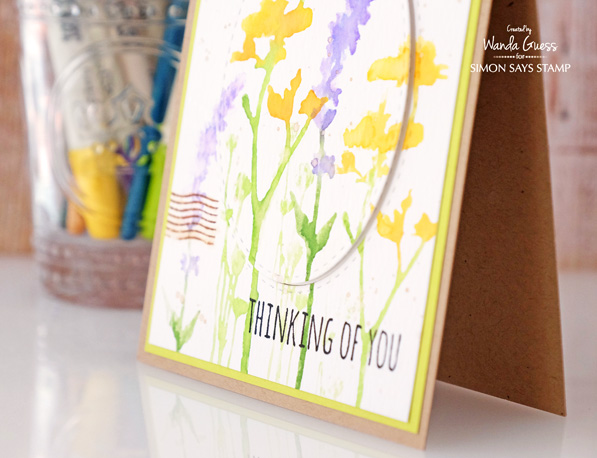
Here is a photo of my card and tag – two different takes on the same technique!
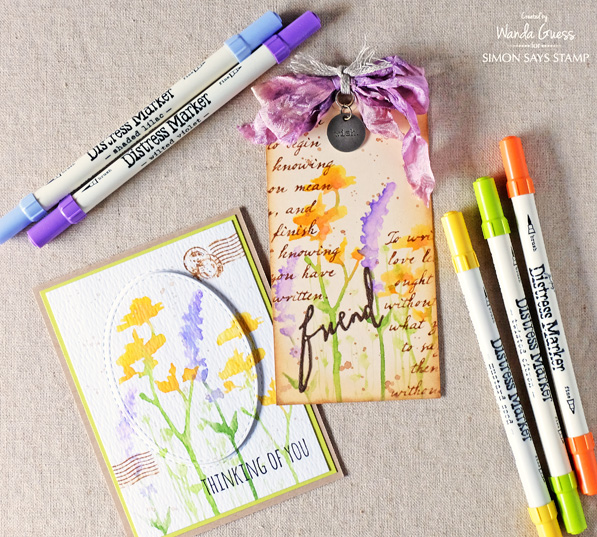
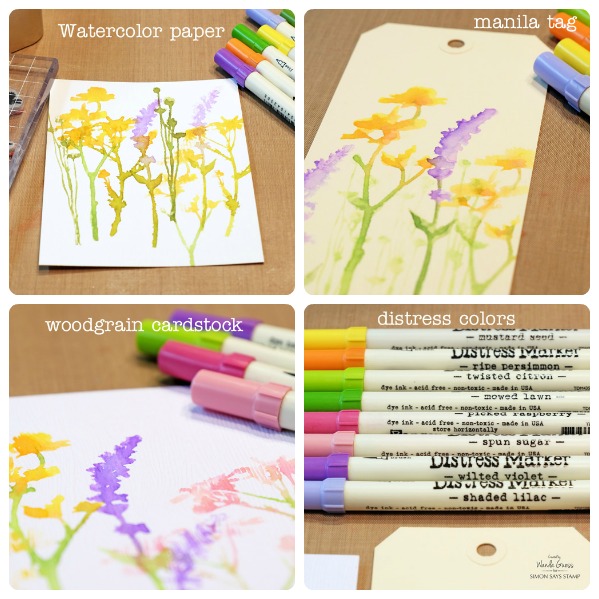
For the card I used Watercolor paper and also combined it with another favorite technique – stacking die cuts! I kept the colors bright and vivid with minimal ‘distressing’ around the edges, etc.
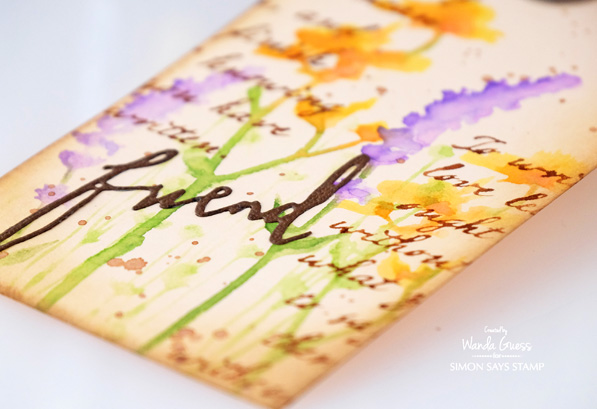
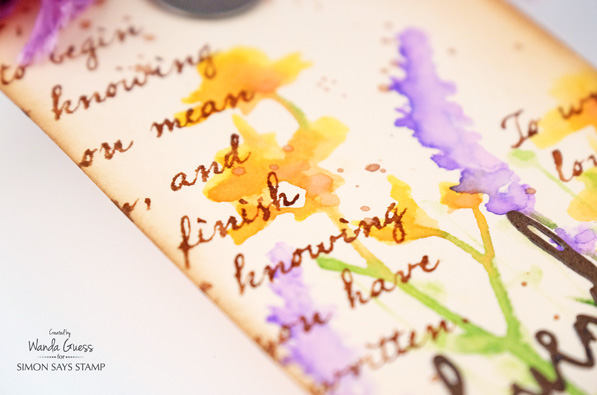
For the tag I used a Ranger Manila Tag – this made the colors more muted and subtle. I also used a lot of ink ‘distressing’ around the tag in rich brown tones. I hand dyed my own Crinkle Ribbon with beautiful Wilted Violet Spray Stain mixed with Antique Linen Spray Stain.
The watercolor with markers technique has just three steps! First, I used my Distress Markers to color (with the brush side), directly onto the stamp. No need to be super careful about it. Mix your colors together so you will get a nice blend. I usually put my lighter color down first. Second, I used my Sprayer to mist the stamp. I hold the sprayer about 10 inches away from the stamp and give it about six pumps of a fine mist of water. You want it pretty wet, and you will see the water start to mix the colors together. The third step is to stamp! I stamped directly down onto the paper. You need to let it dry to see the final results. You can get at least three stampings out of one inking!! That’s it! And, it looks like you painted the images.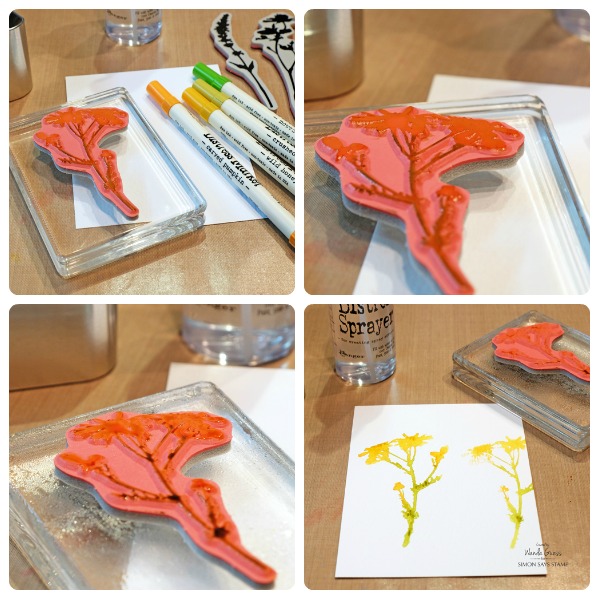
I got all excited about it, so I wanted to see the results on different papers. Watercolor paper gives the most ‘painted’ effect since the paper allows the inks to spread. I think this is my favorite. The Manila Tag gives a more solid image and the color of the tag mutes the ink colors. The Woodgrain paper is really pretty, since it is white and allows the bright color to show through. However, you can see that the lines from the wood grain changes how the images appear. I like them all – which on do you like the best?
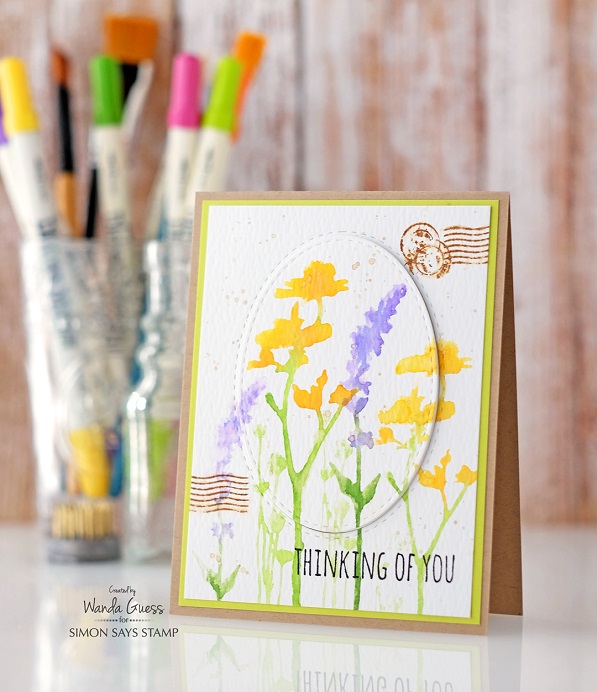
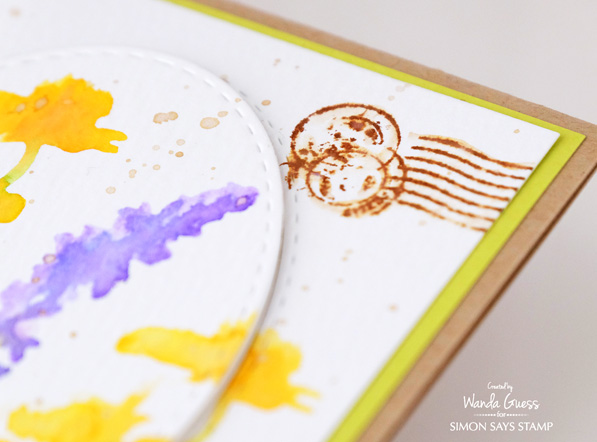
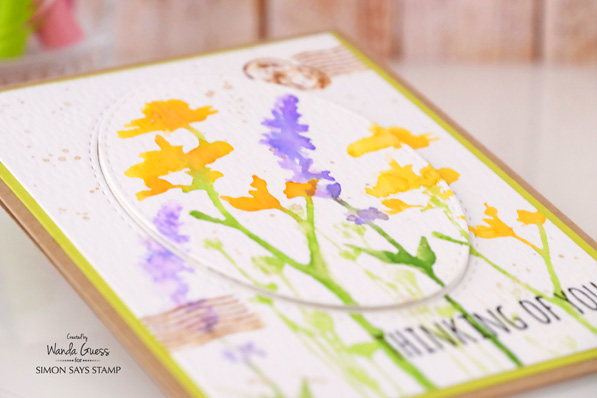
Here is a close up of the card. After my watercolor flowers were dry, I went back with some Antique Linen Ink, water, and my Splatter Brush and added flecks of brown paint to the card. I die cut a Stitched Oval from the center to use as my raised focal point. This technique is very fun! I cut the oval out and then replaced it in my original paper with another oval of paper. Then I put foam squares all over the back of the top oval piece and mounted it directly in place to match up with the bottoms of the stems. I love how this looks.
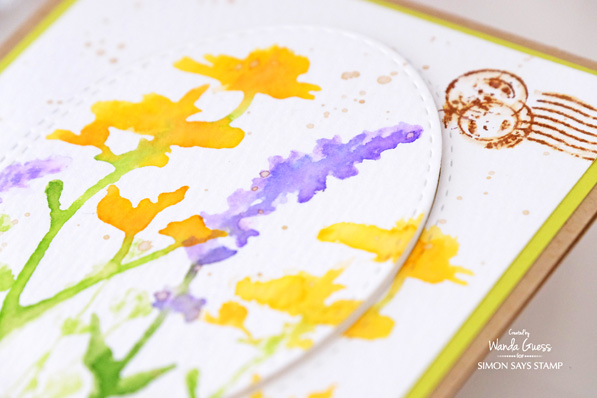

I stamped my sentiment, from the Crazy Talk Stamp Set, in Simon Says Stamp Intense Black Ink. Here is a side view of my card. I mounted some pretty Juicy Pear Cardstock onto a Kraft card base.
I stamped the post marks in Vintage Photo Distress Ink. Then I went back with my Water Brush and put a touch of water over the images to soften the look, and to make them look watercolored too.
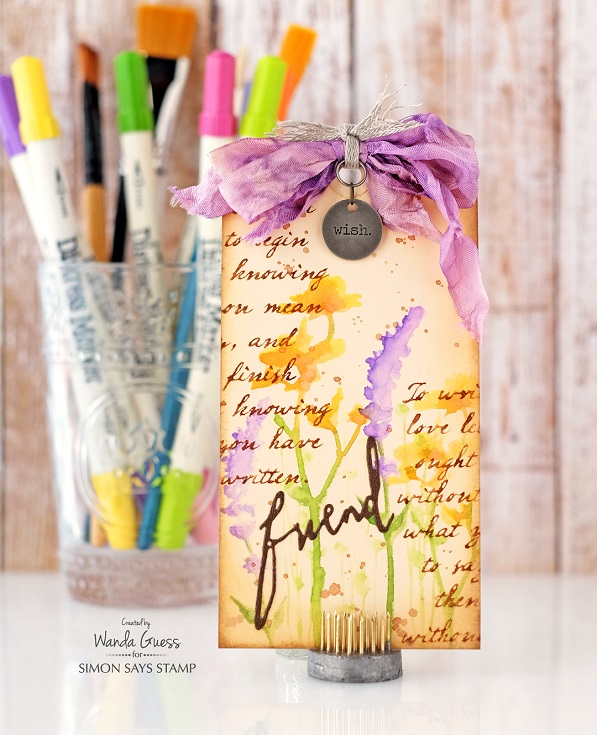
Here is a close up of my tag. I used the beautiful script stamp and the same technique as the wildflowers! I inked the stamp with Vintage Photo Distress ink and then spritzed it with water and stamped it over my flower images. I also added some ink speckles to this the tag.
Be still my heart…. Wilted Violet Ribbon!
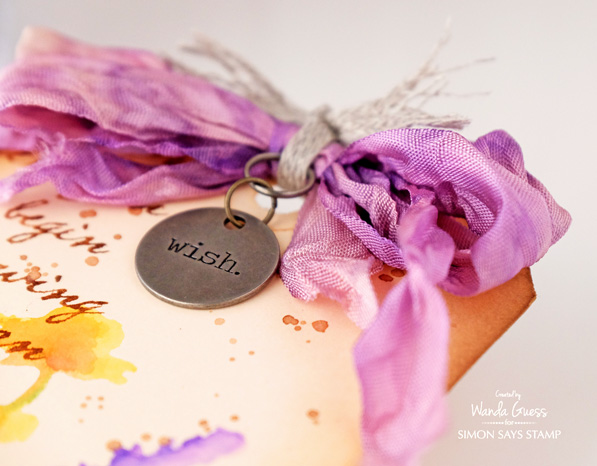
To finish the tag, I edged all around it with Antique Linen Distress Ink and Vintage Photo Distress ink and a sponge dauber. I added some Linen Ribbon and a Typed Token on the top.

As always, thank you, my friends, for coming by to see what I’m up to on the weekends! I hope that you will try this technique and hope you have some time for creative play this weekend! See you soon!
SUPPLIES:
 |
 |
 |
 |
 |
 |
 |
 |
 |
 |
 |
 |
 |
 |
 |
 |
 |
 |
 |
 |
 |
 |
 |
 |
|
 |
 |
 |
 |
 |
 |
 |
|
 |
 |
 |
 |
 |
 |
 |
 |


