Creative Uses: Custom Dimensional Background
Hi readers! Happy Tuesday, and WELCOME to the latest Creative Uses installment by the fabulous Debby Hughes! Be sure to watch the video, and enjoy!
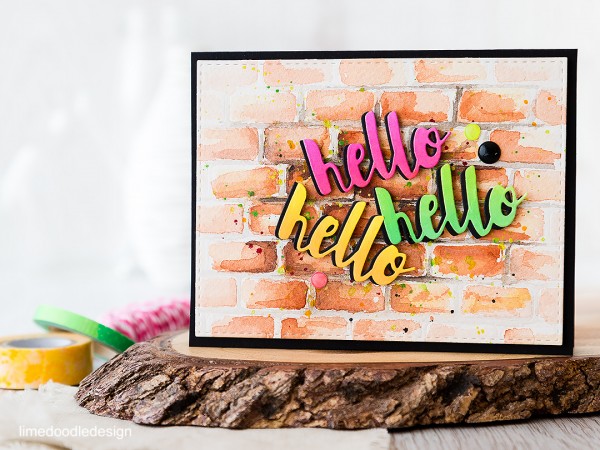
Hello, Debby here today with a video below looking at how you can take one of your smallest dies to create a dimensional background. I used a rounded rectangle die from the Cuddly Critters Accessories set for the graffitied brick wall of this card by running it through my die cutting machine with some Arches cold pressed watercolor card and an embossing mat. The mat enables the die to be pressed in to the thick card without cutting all the way through and instead leaves a brick shaped impression. I ran the die backwards and forwards through the die cutter until I had a whole panel of bricks.
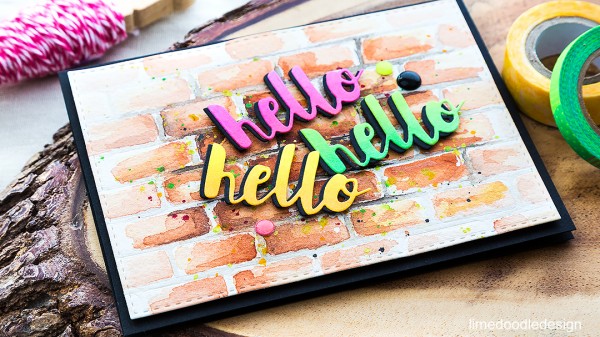
I then used this dimensional pattern as a guide to add watercolors. As I watercolor a lot I have collected a mishmash of my favorite tube watercolors in a palette, however, excellent alternatives would be the Gansai Tambi watercolors or Distress Inks. I cut the watercolored piece with the largest of the Stitched Rectangles to give a finished edge to the panel and splattered it with a combination of mists and paints.
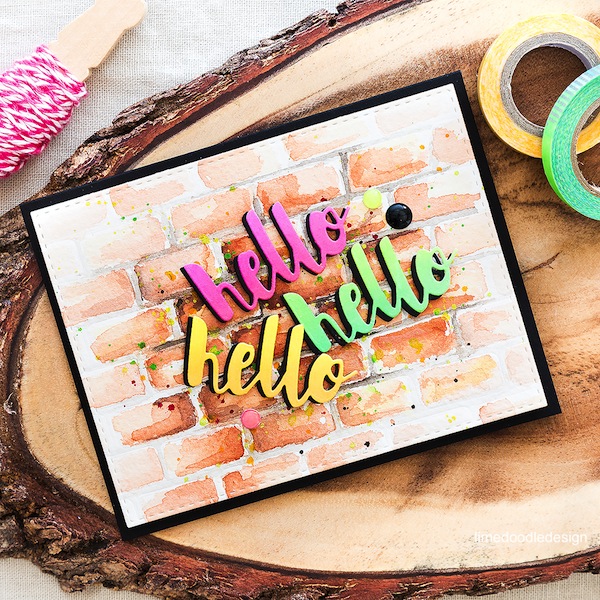
I used the Painted Hello die to create the graffiti words; blending in Hero Arts Neon inks in to white card and then die cutting. I also cut some more of the hellos from black card and used these to back the neon ones so they popped off the brick wall nicely. The finished panel is then mounted on a Black card base.
I think this graffiti style would suit one of the categories I struggle with most – those tricky teens! And the wording can be switched out to fit the occasion with the wonderful array of painted style word dies available. Thanks for joining me today and I will see you next time for another look at how to stretch your supplies :D
Watch the video:
Supplies:
 |
 |
 |
 |
 |
 |
 |
 |
 |
 |
 |
 |
 |
 |
 |
 |
 |
 |
 |

Blog Candy Alert!! Follow our blog via email and comment on this post for a chance to win a special blog candy!
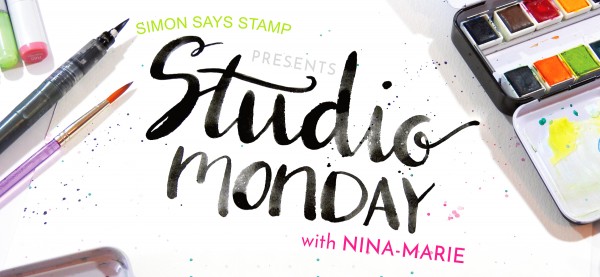
Studio Monday with Nina-Marie: MISTI May-nia
Good morning and happy Monday everyone! It’s Nina-Marie back again for a brand new Studio Monday and today I’ll be featuring some of our newest Simon stamps and dies in these cute, graduation gift card holders!
 With graduations for college and high school students right around the corner, I thought this would be a perfect theme for this week; these gift card holders are super easy to make and do not require any special supplies or techniques. All you will need is a piece of 8″ by 4 1/4” cardstock, and a scoring board and bone folder (or other scoring tool); easy peasy right??
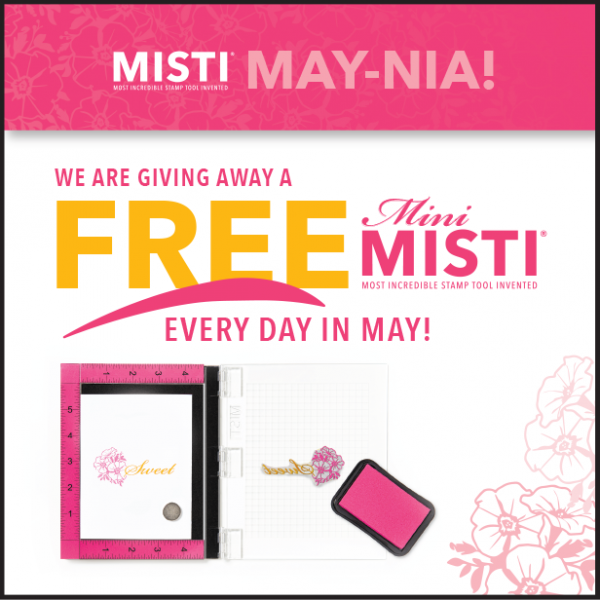 Also, did you know that this month is MISTI-Maynia???? Every single day during the month of May, My Sweet Petunia (the creators of MISTI), are giving away a free Mini MISTI and the Simon blog is today’s giveaway host! I mean like, how cool is that??? To be eligible to win a Mini MISTI, make sure you leave a comment on this blog post!
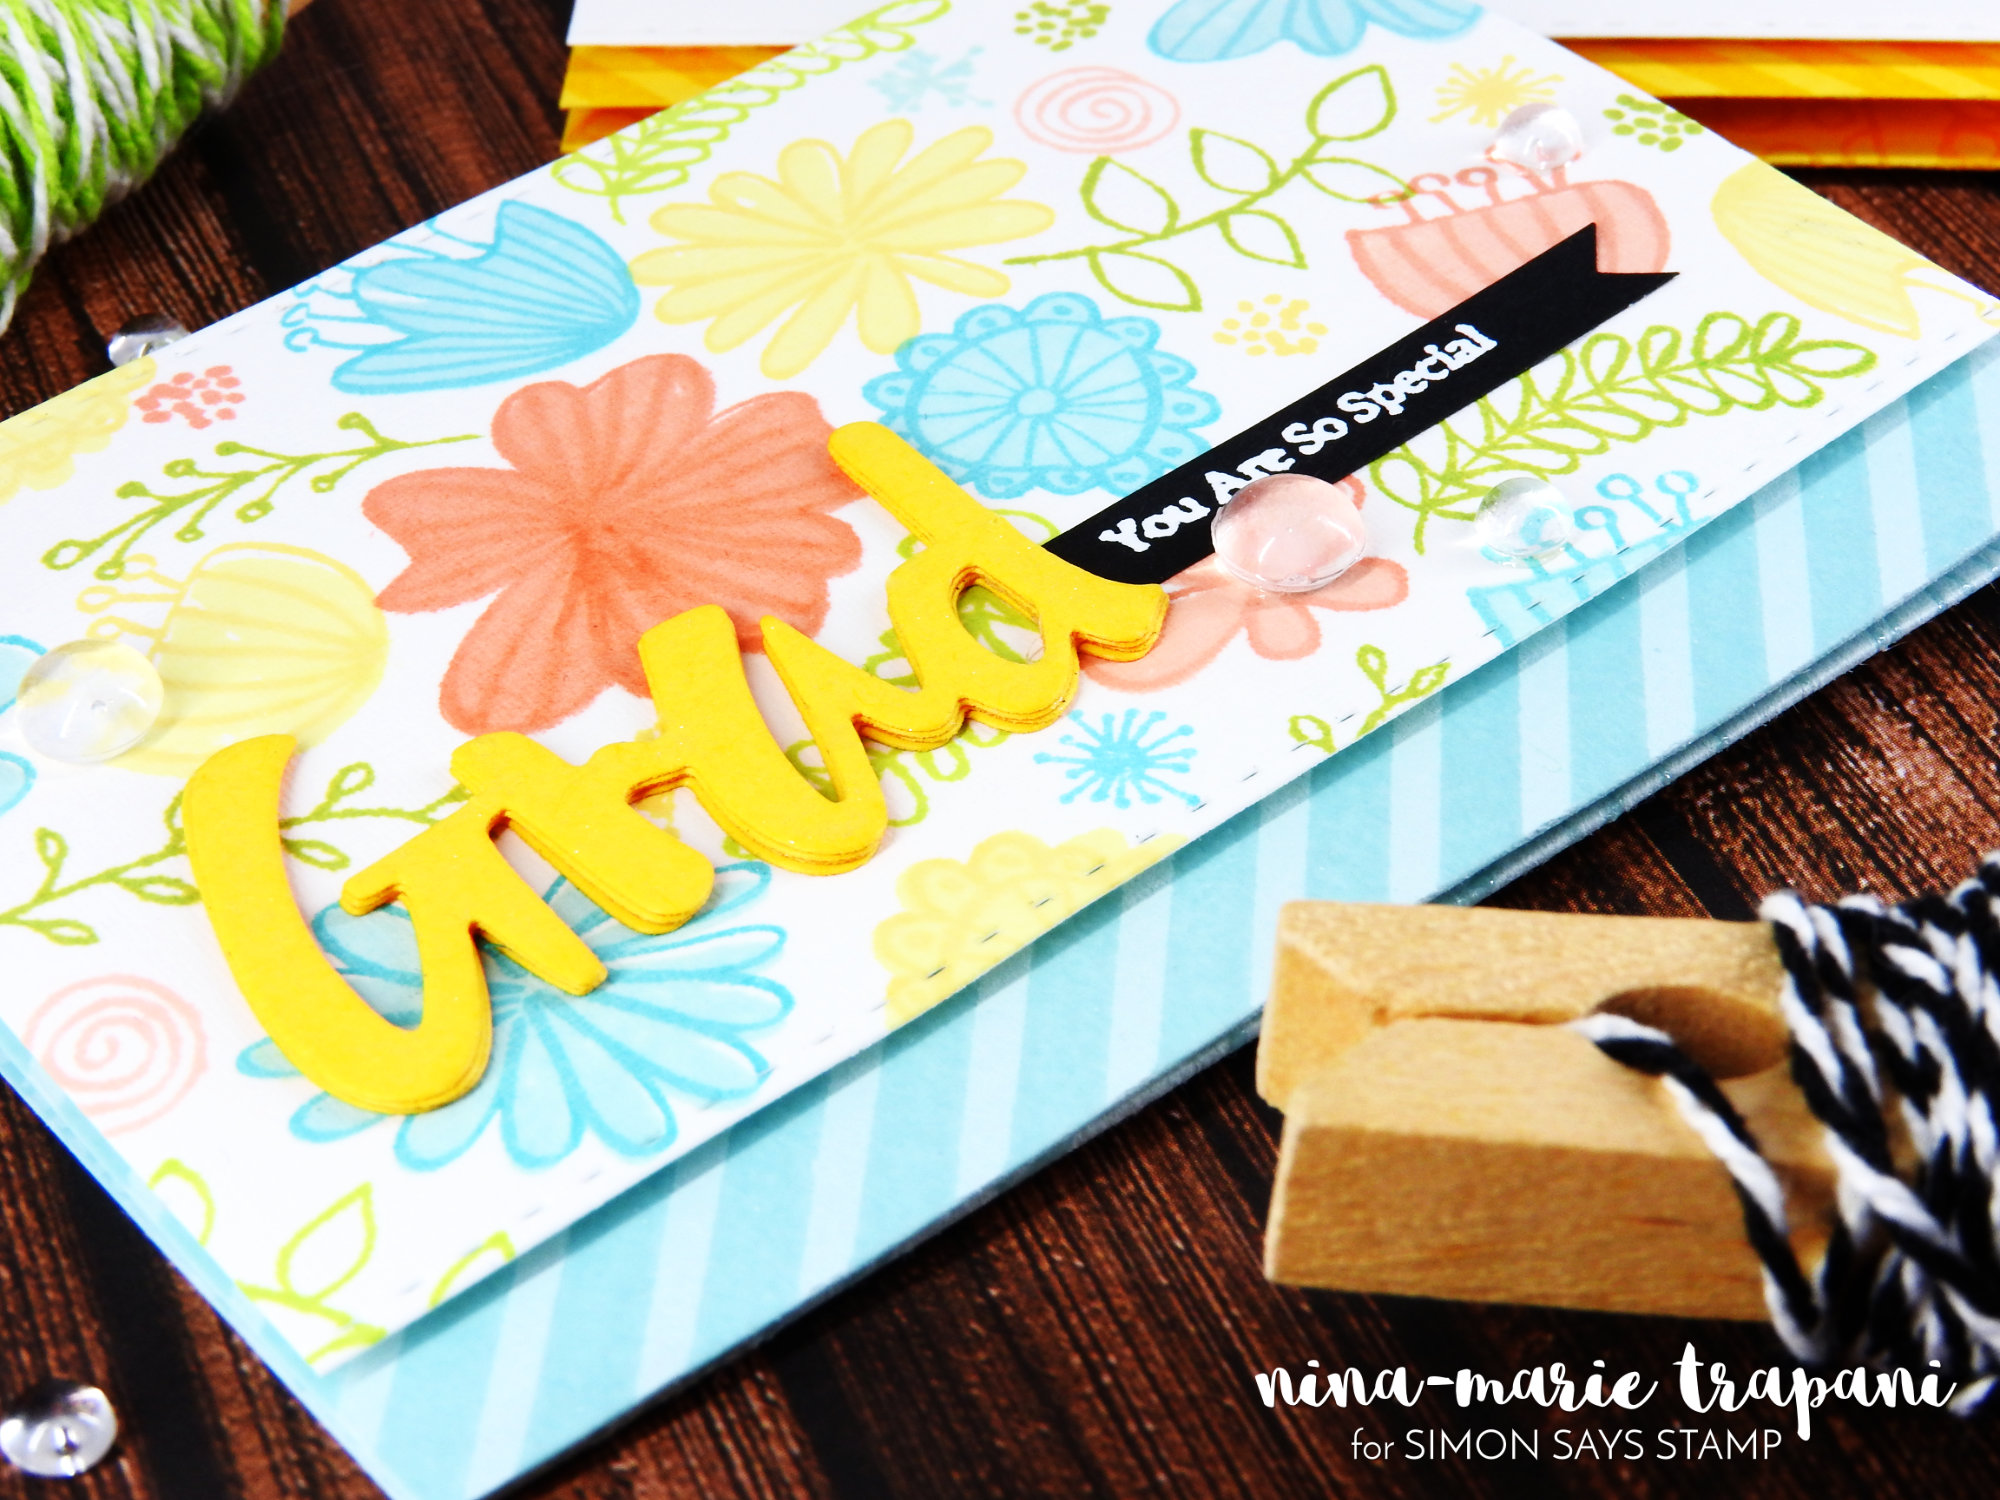
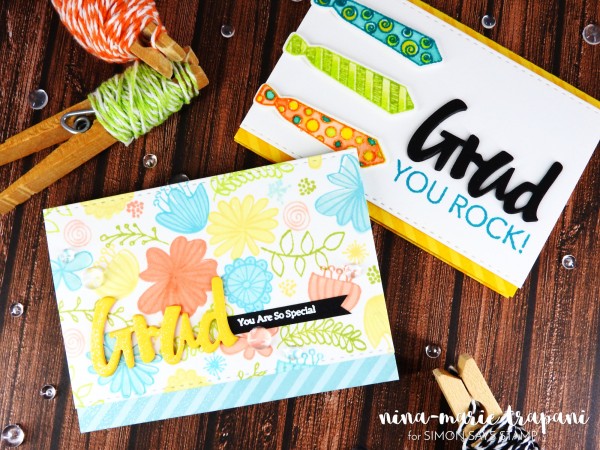
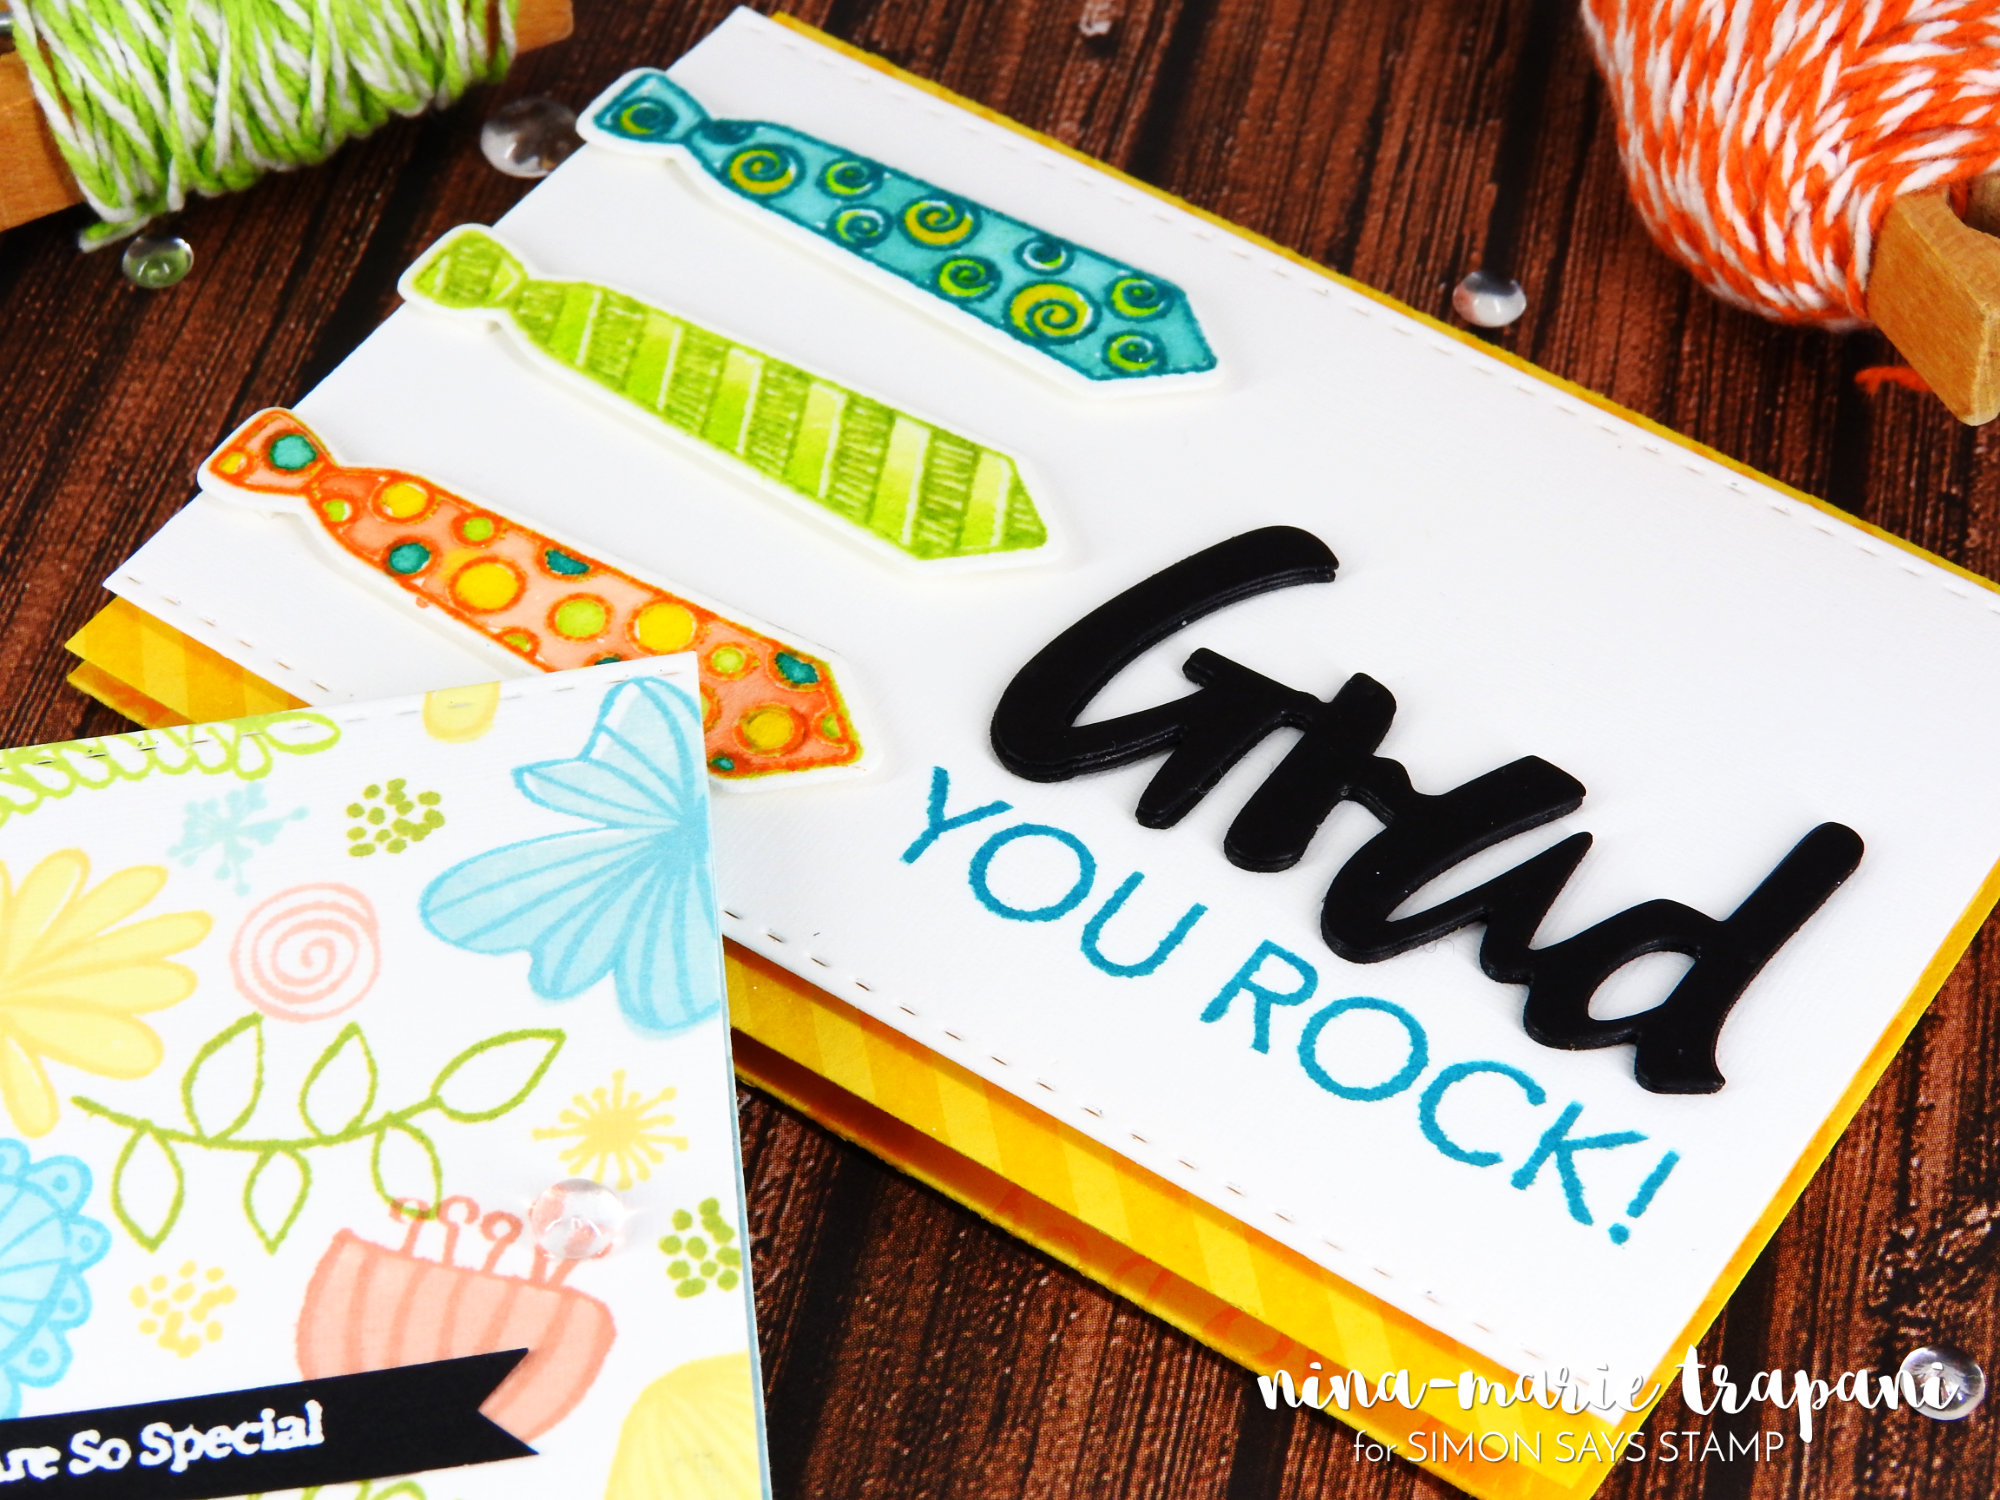
Okay, so back to our cards for today! I created both a masculine and a feminine version of these gift cards to inspire you with a couple of ideas at how you can decorate your gift cards for the graduates in your life. For the masculine version, I used the brand new Painted Grad die and Father’s Day Finds stamps and dies. Don’t those swanky-looking tags look so trendy???
 For the feminine card, I used the Wild Beauty stamp set and the Painted Grad die; I love how the simplistic and doodled look of the Wild Beauty stamps matched so well with the Painted Grad die.
To see how I created these cards – with the help of my MISTI – be sure to check out the video below! If you enjoy, please give the video a big “thumbs up” and subscribe to our Youtube channel for more weekly inspiration and creativity!
WATCH THE VIDEO:
SUPPLIES
 |
 |
 |
 |
 |
 |
 |
 |
 |
 |
 |
 |
 |
 |
 |
 |
 |
 |
 |
 |
 |
Blog Candy Alert!! Follow our blog via email and comment on this post for a chance to win a special blog candy!

Congrats! Blog Candy WINNERS!
From: Weekender with Wanda – Tim Holtz Mini Clipboard: Nicole Douthit!
From: Celebratory Ink Blending and Masking: Helen Gullet!
From: New Art Journaling Inspiration from Vicky Papaioannou!: Francis Arhipoff!
From: Be an embossing BOSS!: Cynthia Johnson!
From: Studio Monday with Nina-Marie: Mini Honeybee Tag Set: Dee Earnshaw!
From: Weekender with Wanda – Happy Mother’s Day!: Linda Duensing!
From: It’s National Scrapbook Day!: Taunya Butler!
From: Fun with 3D Embossing Folders!: Barbara Green!
From: Tim Holtz Linen: Painted Resist with Shari Carroll: Linnea Sundstrom!
From: Stencil It on Wednesday!: Larissa Heskett!
From: Wet on Wet Watercoloring Technique: Wahnita Hammond!
Please email [email protected] with your mailing address (if applicable), the name of the blog you won from, and the prize you won to claim your prize!
See below for a list of other Misti MAY-nia participants and winners so far:
May 01 – My Sweet Petunia Winner- Kathy Nalisnik
May 01 – Ilina Crouse Winner- Mary Morris
May 02 – Lydia Fiedler
May 02 – Virginia Lu Winner- Sue Nagata
May 03 – Jana Millen Winner- Jennifer Partridge
May 04 – Carissa Wiley
May 05 – Maureen Wong Winner- Karen Dunbrook
May 05 – Simon Hurley
May 06 – Laurel Beard
May 06 – Catherine Pooler
May 07 – Laura Sterckx
May 07- My Favorite Things
May 08- Laura Bassen
May 09 – Jeanne Streiff
May 10 – Lawn Lawn
May 11 – Darlene DeVries
May 12- Crafters’ Corner
May 13- Pat Huntoon
May 14 – Sally Lynn MacDonald
May 15 – Avery Elle
Weekender with Wanda – Tim Holtz Mini Clipboard!

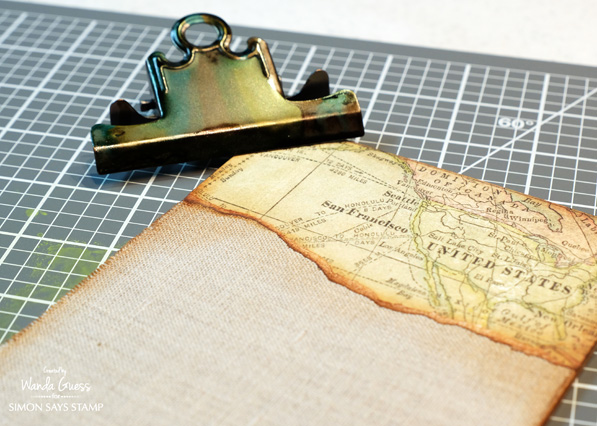
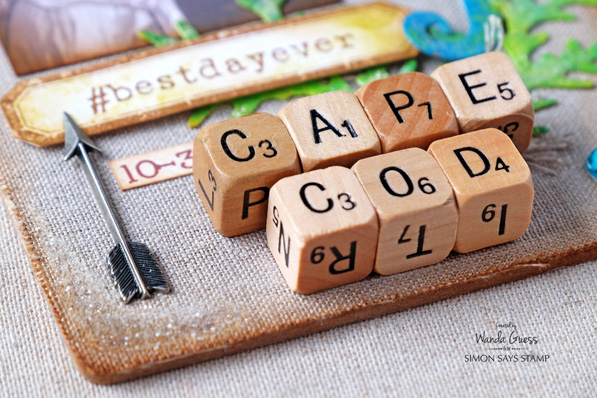
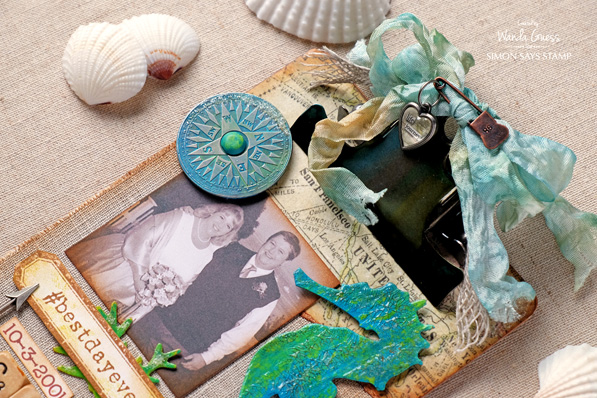
Hi everyone! Welcome back to the latest edition of Weekender with Wanda here on the Simon Says Stamp Blog! I’m happy to see you here today. Hope you had a great weekend so far. It’s that time of year for graduations, weddings, and dads. The Summer will be here before we know it. Today is my monthly post using awesome Tim Holtz products! I look forward to this post every month – trying to think up something fun and unique to show you. Today’s project has a lot going on – some dies, some paints, ribbon, metal, stains, wood, fabric…. Should I go on? This project is also very personal to me and I made it to hang in my home. I used the Tim Holtz Mini Clipboard and designed a special beach-themed wall hanging for our bedroom. I adore anything sea/ocean related and my favorite colors are blues and greens like the ocean. My husband and I were married in Cape Cod (Chatham) and I have such wonderful seaside memories of that time and place!
I started the project by printing out one of our wedding photos in black and white with a vintage feeling. If you know Tim Holtz products, you know he sells “found relatives” and they are awesome! So, I turned my husband and I into found relatives! Then I scurried around my studio finding all kinds of crafty things I thought would work for this project. That’s usually my design process. I gather everything and put it on my table and then edit out as I go along. Here is the final result….
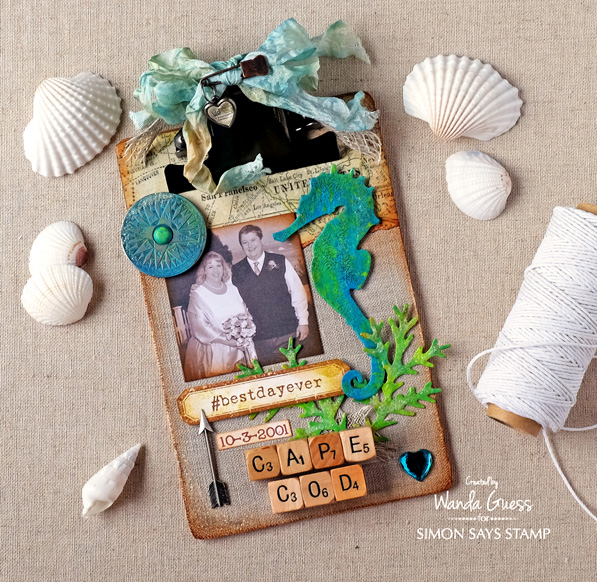
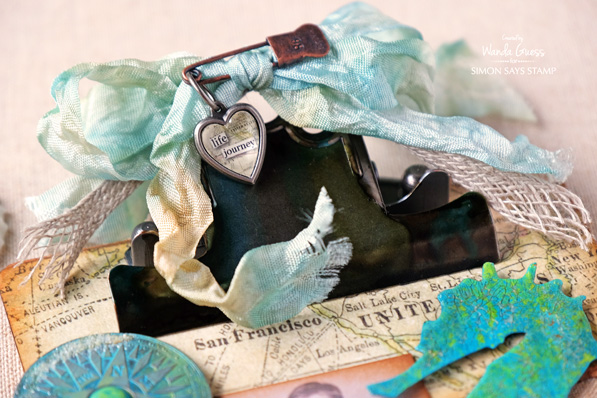
The clipboard comes apart (The clip comes off!) so that you can cover the board easily. Here I used Tim Holtz Patterned Paper (a map) along with the linen “Surfaces” product to cover the board. The linen is backed with adhesive making it super easy to put down. Then I edged the board with a sponge dauber and Vintage Photo Distress Ink.
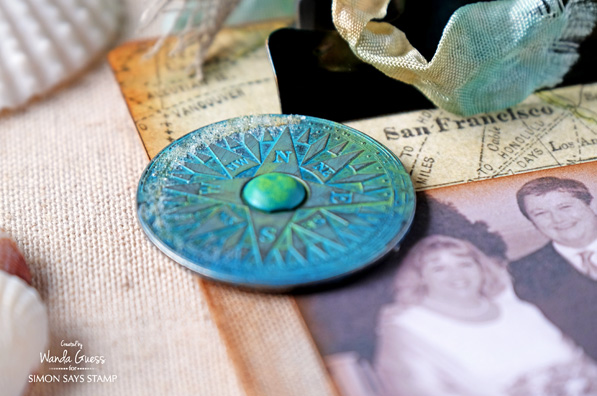
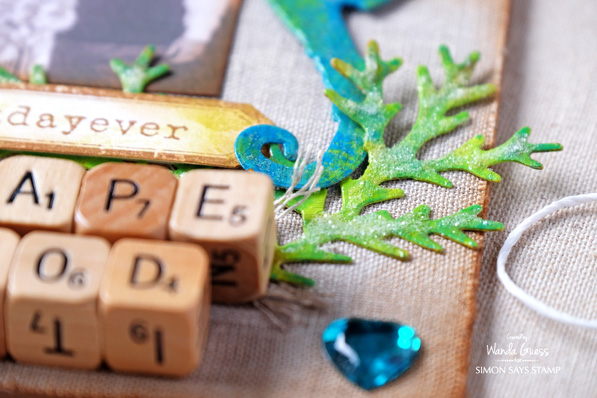
The alphabet dice let you spell out any word or words to customize a project! They also add a great pop of dimension. The compass started off as silver metal and I painted it with a couple of different distress paints using my fingers. Then I rubbed off a little of the paint and added a bit of Rock Candy Distress Glitter.
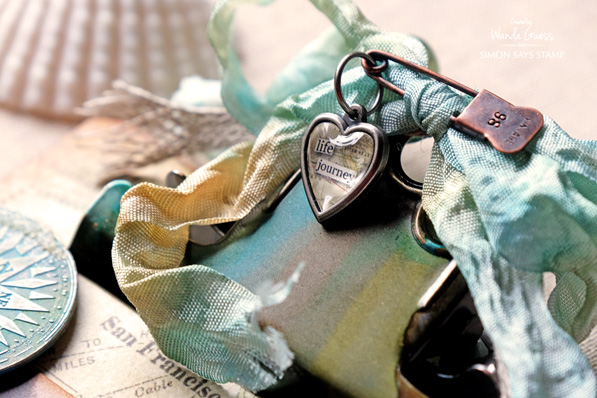
I dyed my own crinkle ribbon by using different colors of Distress Spray Stain (Colors in the supply links). I love how the blues and greens all go together with the brown. I added a bit of linen ribbon to mimic ropes as you would see at the beach.
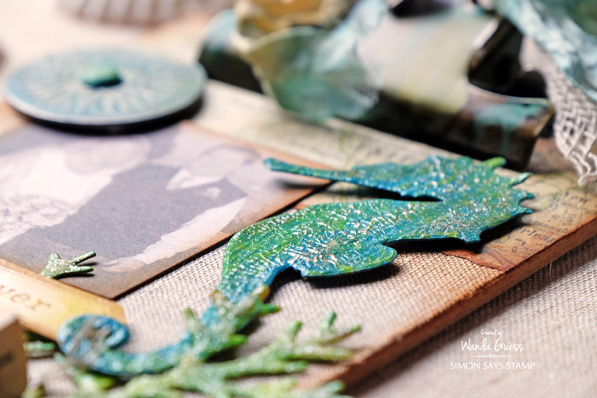
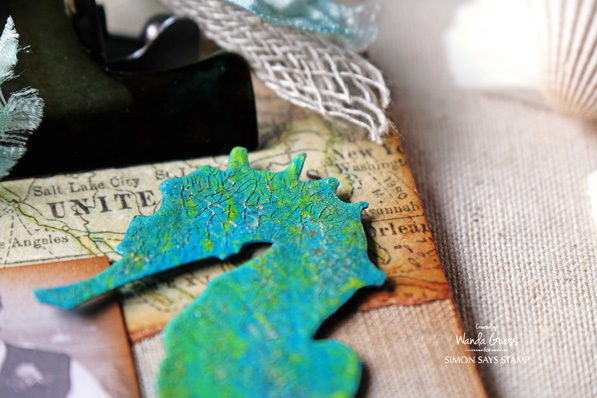
Here is a close up of the seahorse. I die cut the Seahorse from watercolor paper using the Sizzix/Tim Holtz Sand & Sea Dies. (These come in BIGZ and Mini size and I used the BIGZ) Then I painted the seahorse with Twisted Citron, Peacock Feathers and Mermaid Lagoon Distress Paints. After that was dry, I applied a liberal amount of Crackle medium and let it dry overnight. When the crackle was dry, I used Vintage Photo Spray Stain and applied it over the crackle – you can see where it seeped into the cracks. I love how this came out!
Here are the supplies I initially gathered. I didn’t end up using everything because I ran out of room! You can see the screws and bolts for the clipboard in this photo.

This is what the clipboard looked like before I reattached the clip. The clip was stained using Ranger Alcohol Inks! Super easy! I chose three colors of alcohol ink – Pool, Lettuce, and Mushroom. I laid down some paper towels and just dripped the inks onto the clip. You can sort of see how they all ran together. It came out really cool. You could also paint the clip if you choose. I think that would look great too.
To make the seaweed I repeated the same process as with the seahorse. Then as my last step I added some Rock Candy Glitter. Can you believe the seaweed is actually part of the Tattered Pinecone die set?!
Here is another close up of the crackle effect.
I attached a pretty heart charm to my ribbon at the top of the clipboard. These heart charms are one of my most favorite Tim Holtz products and I use them all the time. They come with different images and words to put inside, or you can make your own image to go inside.
I got out some stamps to make the hashtag and the banner. For the date, I printed that out on my computer. I added bits of glitter here and there… The alphabet dice were glued on using Glossy Accents.
Thank you so much for sharing part of your day with me and for letting me share this personal project with you! I hope you will try one of these mini clipboards because it’s really just too much fun! This is such a great project to personalize – for yourself or as a gift…. Could be for a baby, or a graduation, anything really! The next two weekends, my Weekender with Wanda posts are on Sunday! See you soon friends.
SUPPLIES:
 |
 |
 |
 |
 |
 |
 |
 |
 |
 |
 |
 |
 |
 |
 |
 |
 |
 |
 |
 |
 |
 |
 |
 |
 |
 |
 |
 |
 |
 |
 |
 |
 |
 |
 |
 |
 |
 |


