Weekender with Wanda – Go where your heart takes you!

Hello crafty friends! Welcome back to the latest edition of Weekender with Wanda here on the Simon Says Stamp Blog! I’m so lucky that I get to see you every weekend. I really look forward to thinking up a new project to share with you, and I love hearing from you! I read every single comment you leave on my posts, and your kind words uplift me and inspire me! Thank you! Today is my post of the month in which I feature Tim Holtz and Ranger supplies. I try to challenge myself to do something new, or bold, or different. Well, for today’s card I went way out of my color comfort zone! I went big and super bright with lovely primary colors! I used some of my favorite dies from Tim Holtz and lots of ink pads. Let’s get started!
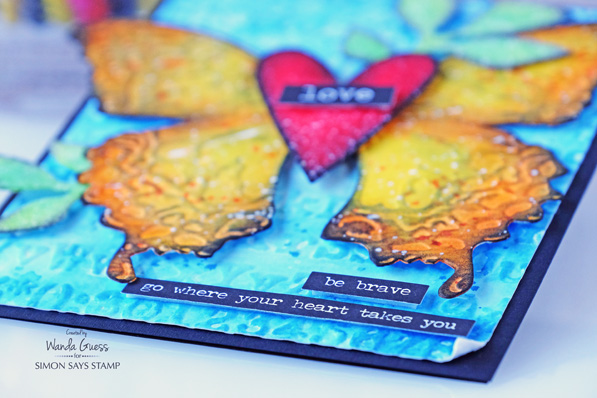
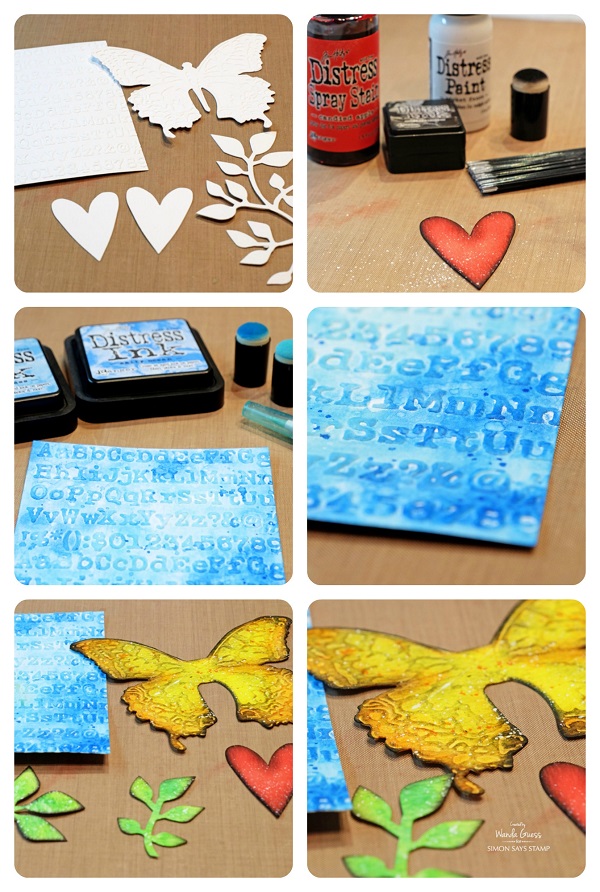
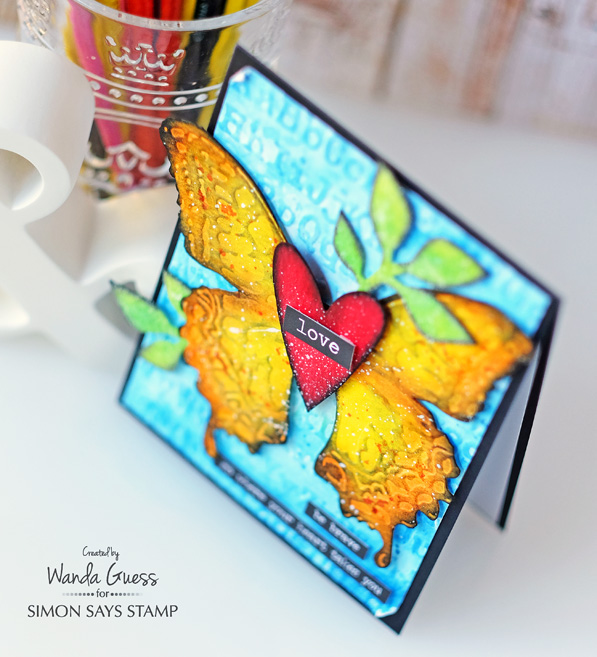
The focal point of my card is the beautiful Layered Butterfly Die from Sizzix by Tim Holtz. In the package with the die, you get a matching embossing folder that perfectly embosses the butterfly. To do this, you first cut out the butterfly. Then you put the cut out piece of paper into the embossing folder and run it back through your die cutting machine. Lovely! There is also a Bee and a Dragonfly version. My card base for today is deep black cardstock – a nice contrast to all that color.
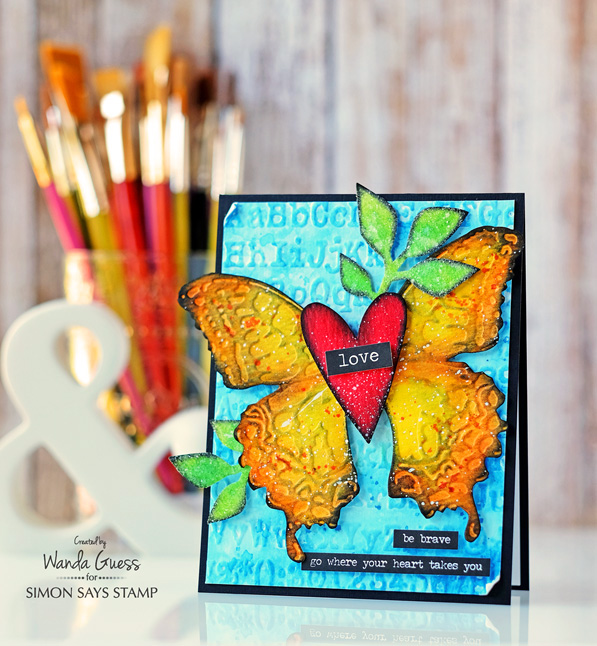
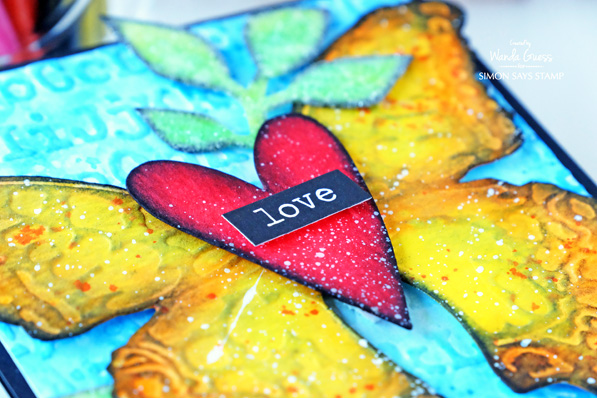
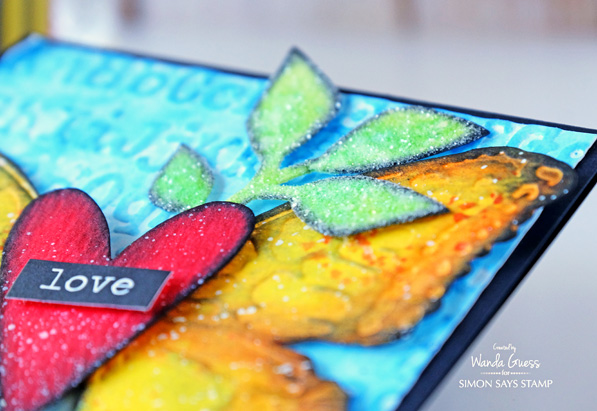
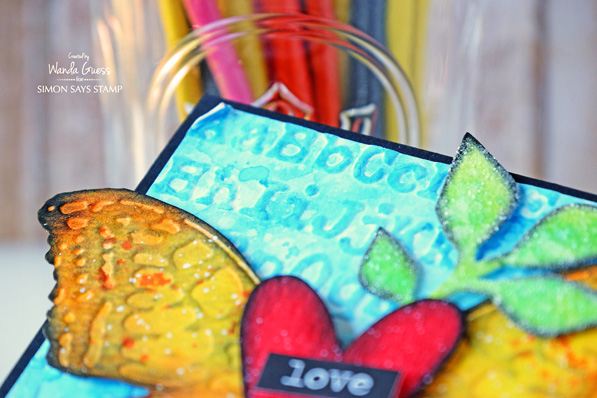
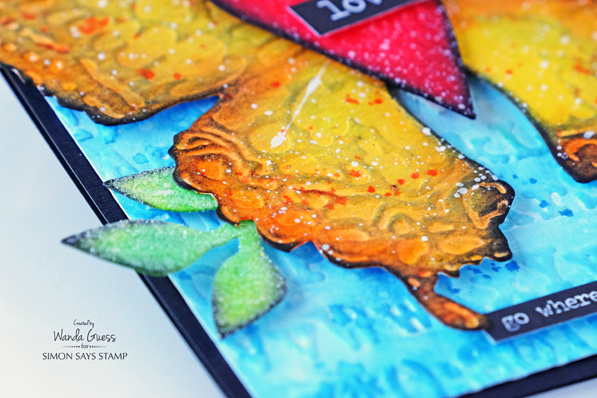
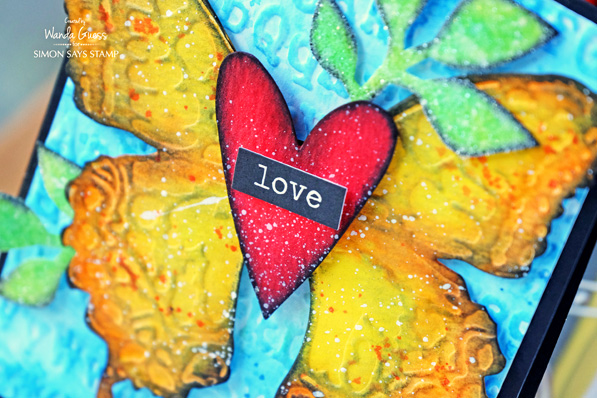
Even though the butterfly is my focal point, I really LOVE how this heart came out. It just pops off the page. There is a lot of texture going on in this card. I decided to add more by covering my leaves with Rock Candy Distress Glitter too! (more is more)! In this close up you can see all the different mediums I used. I started by die cutting all of the pieces out of Tim Holtz Watercolor Paper. For the heart, I sprayed it with three layers of Candied Apple Distress Stain and let it dry. For the butterfly I used Squeezed Lemonade, Carved Pumpkin and Ripe Persimmon Ink pads and a sponge dauber to put the color down. The leaves were inked with Twisted Citron and Cracked Pistachio. YUM! (Ink color links at the bottom of the page!)
Once all the pieces were dry I used a small sponge dauber and Black Soot Distress Ink and edged all of the parts. Then I used Picket Fence Distress Paint and the Tim Holtz Splatter Brush to add white flecks. This was a really fun project!
In this photo, you can better see the glitter. The embossing on the blue layer was made using the Tim Holtz Typewriter Embossing Folder. Then I layered two colors of blue ink over it. Since these are all primary colors they just pop all together!! This is not my normal color palette but it’s so rich and happy. I might have to do more of this!
At first the background was created with embossed watercolor paper. Then, I added Tumbled Glass and Salty Ocean Distress Inks to the paper and wet it all with my water brush. When it was dry, I splattered clean water over it to remove some of the ink. This is a great technique! Then I splattered Salty Ocean ink on it a second time – to build up the layers of color. This sounds harder than it is, truly! The trick is to let your paper dry in between the different ink layers.
My accents are from the Tim Holtz Stickers lines – Big Chat and Small Talk. I love those stickers! They are perfect for any project – and they come in white or black.
Here are some in-process photos. In the first photo you can see all my pieces ready to ink. I used the Tim Holtz Movers and Shapers Hearts, and the Garden Greens Dies. These are a couple of my go to items in my Tim Holtz stash. In the middle two photos you will see some close up shots of the background layer. The bottom two photos show the finished pieces ready to assemble. I trimmed the center of the butterfly since I was going to layer the heart over that part.
One of my tips is to assemble your card on your craft sheet or table first until you get it the way you want it. In this next photo all the pieces are loose. So, when I get it the way I want it I snap a quick picture with my iPhone before I take it apart again. That makes it easy to reference when I am gluing everything together! This works especially well when I am doing cards with flower clusters or leaves.

I like how some of the paint made a big splotch across the butterfly wing. This part always makes me nervous!! It’s the very last step after I’ve worked really hard on something… One bad speckle or splatter can mess up the whole thing!
Thank you for spending part of your weekend with me! Hope you have found something to inspire you to get crafty! Have a great weekend, and I’ll see you soon!
SUPPLIES:
 |
 |
 |
 |
 |
 |
 |
 |
 |
 |
 |
 |
 |
 |
 |
 |
 |
 |
 |
 |
 |
 |
 |
 |
 |
 |
 |
 |
 |
 |

Spotted! June 2016 Edition!

It’s time for another edition of Spotted here on the Simon Says Stamp Blog! Seeing all of the amazing cards and projects featuring the Simon Say Stamp brand that are created by you, our awesome customers, is super fun for us! We love seeing what you are creating. ‘Spotted!’ is a monthly feature on this blog that highlights the talents of all of you! Thank your for bringing our products to life with your creativity and energy! It’s really a treat to share your projects!
Today we are happy to introduce you to 5 designers who shared their work and caught our eye for the June 2016 edition of our ‘Spotted’ post! We send each of them a little something special for being “spotted.” Be sure to use the hashtag #simonsayssstamp on your social media accounts so we can spot YOU! We find cards on Instagram, Facebook, Pinterest, Flickr, in our Simon Galleries, and craft blogs.
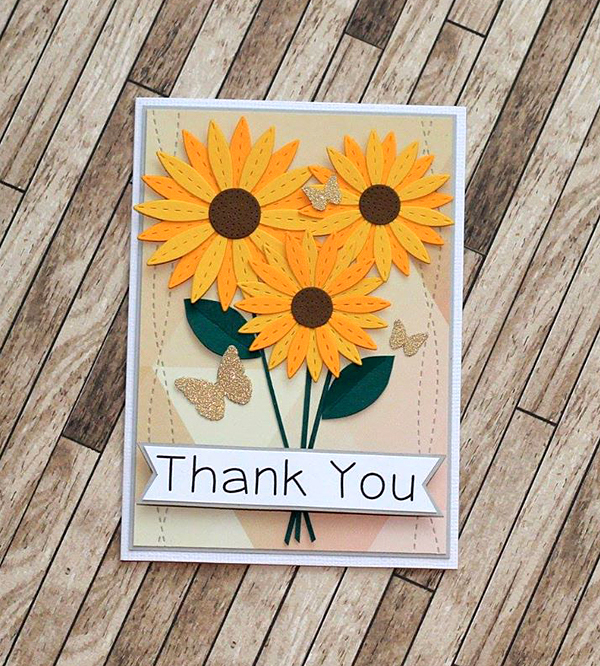
This beautiful and sunny card by Nikki was spotted on her lovely Instagram feed. We loved the cheerful color combination and the fantastic overall card design. Nikki used our Exclusive Simon Says Stamp Stitched Daisies Dies to create this pretty greeting. We all need ideas for thank you cards! Please be sure to visit Nikki on her Instagram page or her Cards by Nikki Facebook Page that shows her cards.
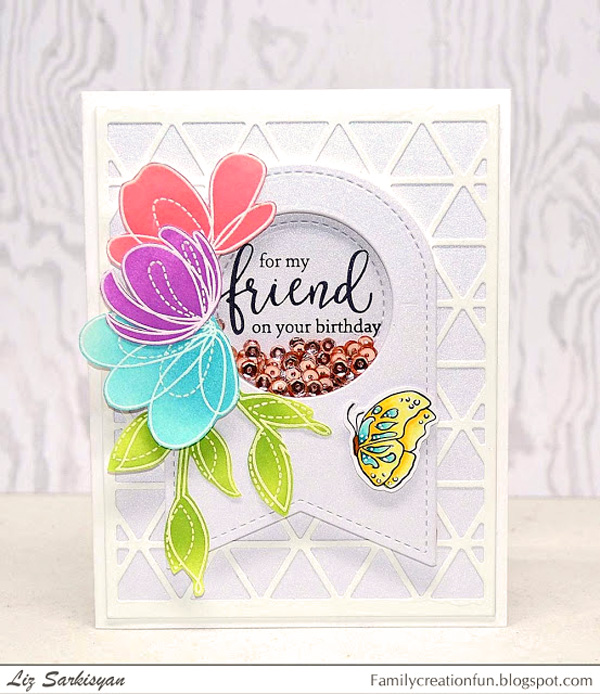
Next up is this light, airy, and very pretty birthday card made by Liz! We love her choice of interesting backgrounds and her use of all that color! Perfect for a Summer occasion. Liz used our Simon Says Stamp Exclusive Stamp Sets Spring Flowers, and Friendship Blooms to create a card sure to brighten anyone’s birthday! Visit Liz on her awesome Blog, or on her Instagram page.
This teacher appreciation project created by Vanessa caught our eye on Instagram right away! We love her fabulous idea for making a label with the wreath. Succulents are so hot right now so she is right on trend. Vanessa used our Happy For You Stamp Set and Matching dies to create her project. You will definitely want to visit Vanessa’s blog and her Instagram page for more inspiration.

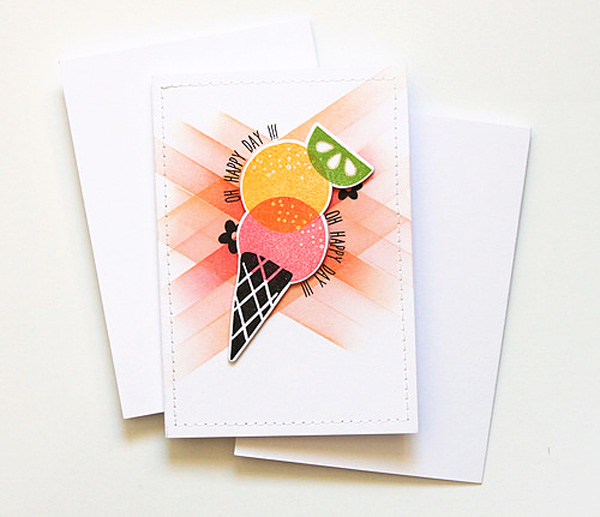
Next up is this fantastic and unique ice cream card made by Pamela. Just wow! What a cool background technique made with inks… We love it, and her perfect stamping and color choices. Pamela used our Simon Says Stamp Exclusive Cone Building stamp set to make her greeting. This card makes us smile big time. Be sure to check out Pamela’s blog and Instagram page for more ideas.
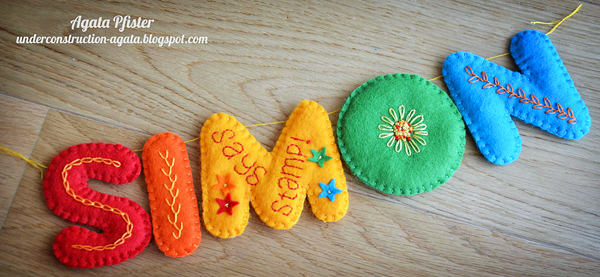
And, of course, we had to feature this beautiful felt project made by Agata! You know that we are crazy about felt here at Simon Says Stamp. Agata used our Simon Says Stamp Felt Pack and created a pretty sign just for us! This one went straight to the heart. Thank you Agata! Be sure to pop over to Agata’s blog to see more of her work.
Wasn’t that spectacular!? Would you like to be SPOTTED using Simon Says Stamp product? Post your creations to Facebook, Pinterest, Instagram (with hashtag #simonsaysstamp), your blog and/or the Simon Says Stamp online galleries (in the sidebar) and we’ll choose cards or projects to feature each month! We also have a Simon Says Stamp Flickr group here and we would love for you to join us! So many ways for you to play along with us. We can’t wait to see what you are creating!!
SUPPLIES USED IN THESE SPOTTED PROJECTS:
 |
 |
 |
 |
 |
 |
 |
 |
 |
 |
 |
See-Through Window Shaker
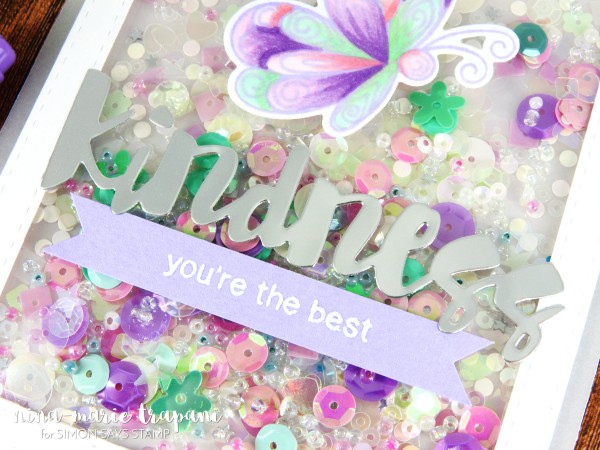
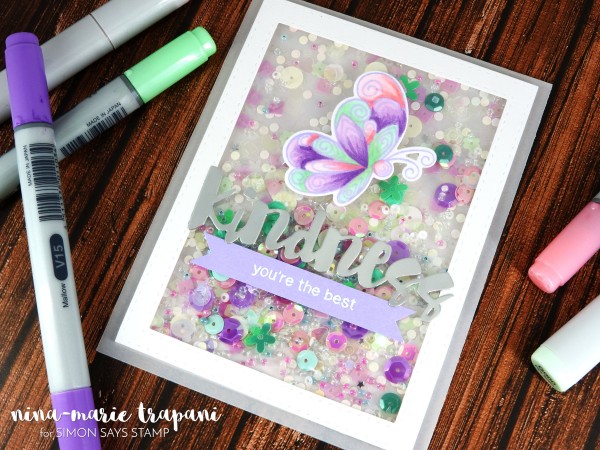
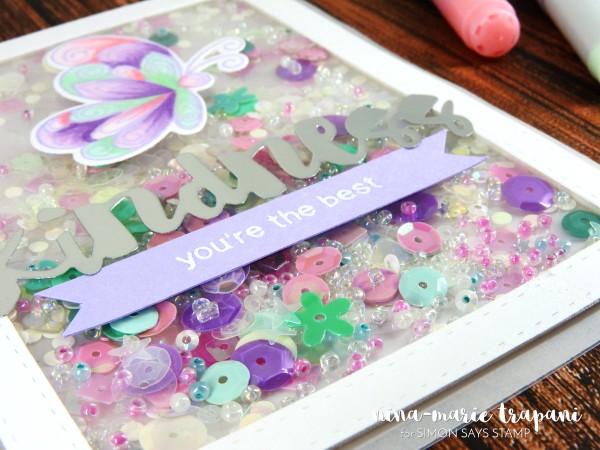
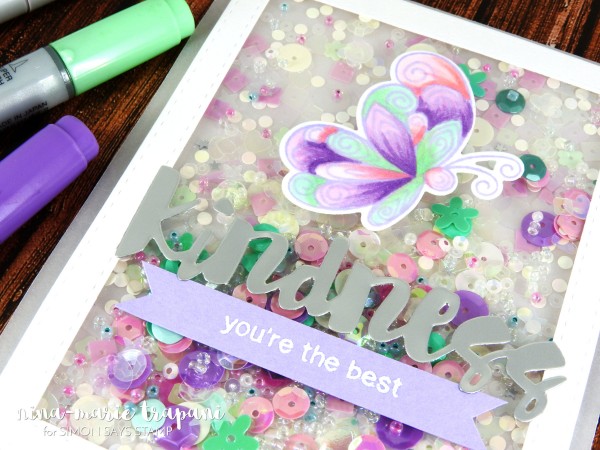
Hello there friends! It’s Nina-Marie back again to share a see-through shaker card with you featuring stamps from Newton’s Nook Designs!
I love shaker cards; they are not only fun to play with after creating, but the process of building it is so much fun too! For me there is always something so rewarding after getting the shaker pieces put inside their little well and hearing that awesome “shake, shake, shake” – even if the card isn’t finished yet – that shaking sound is enough to make me smile!
When I first started off this card design, I knew right away I wanted to make a see-through shaker so that the sequins would look as if they are floating in the background. Originally I was going to make this see-through shaker with the Fuse Tool but… I ended up breaking the sequin-filled pocket I had put together and after spending a long time picking up all the sequins and beads that got sent flying across my desk (and floor), I didn’t want to repeat that same process again! LOL. I’m sure we’ve ALL had plenty of things like that happen to us while we are crafting!
But no matter how you make it, to me there is something magical feeling about a see-through shaker; the light, airy feel makes me think of woodland fairies and pixie dust! While I didn’t use fairies on this card, I think the whimsical appearance of this pretty butterfly from Newton’s Nook Designs’ Beautiful Wings stamp set looks absolutely stunning against the shaker. I also used the coordinating die set.
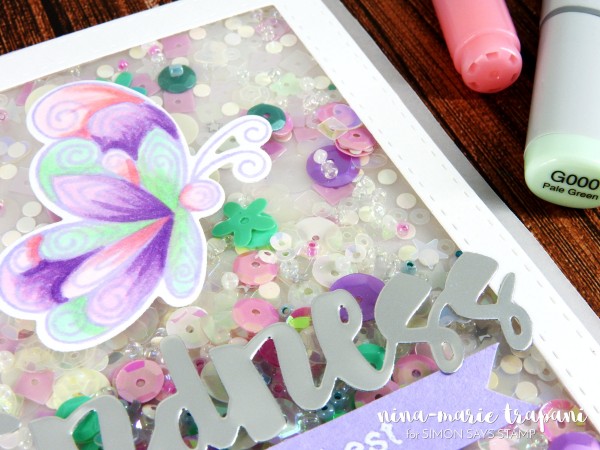
I used Copics to color this butterfly; the colors I used are listed below for reference:
- purples: RV00, V12, V15
- pinks: RV0000, RV23
- mints: G000, YG41
The sequins are all from Lucy’s Cards. I used Iridescent White, Phosphorescence, Cherry Blossom and a bit of Passion Flower.
In the video I have put together for this post, I will be walking you through how I created this entire card from start to finish. It was a lot of fun to put this shaker together (even if I ended up spilling all the sequins across my desk!), and I hope you enjoy watching my process!
If you enjoy the video, be sure to give it a “thumbs up” and subscribe to our YouTube channel for more weekly inspiration!
WATCH THE VIDEO:
SUPPLIES:
 |
 |
 |
 |
 |
 |
 |
 |
 |
 |
 |
 |
 |
 |
 |
 |
 |
 |
 |
 |
 |
 |
 |

Blog Candy Alert!! Follow our blog via email and comment on this post for a chance to win a special blog candy!


