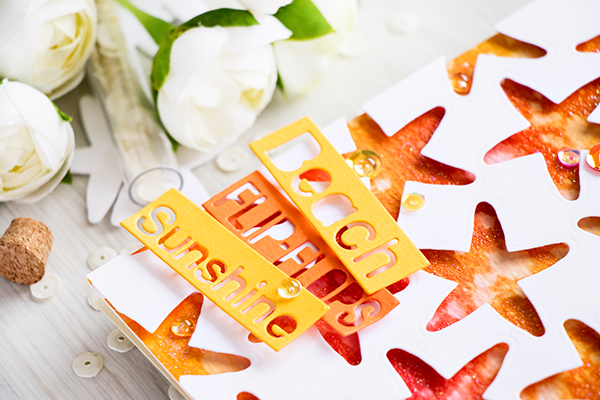
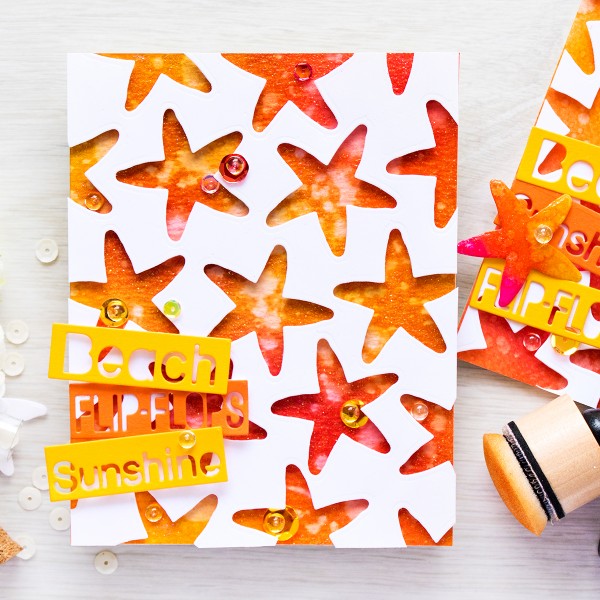
Negative Die Cut Star Fish
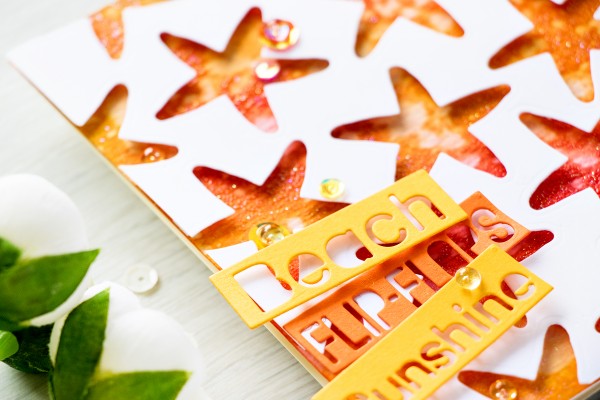
Hi friends! Happy Thursday! As always, I’m happy to welcome back very special guest Yana Smakula to our blog today! She’s thinking outside the box by using a die from the coordinating die set, Set Sail, to make a custom background!! She used some of her favorite Tim Holtz distress ink colors and a blending tool to get that nice sunset color combo. Love the shimmer you see? Yana used Sparkle embossing powder to get the look! She finished the card off with a die cut sentiment from Summer Greetings using Orange Peel and Sunshine cardstock! Be sure to watch the video to learn more! Enjoy!
Watch the video:
SUPPLIES:
 |
 |
 |
 |
 |
 |
 |
 |
 |
 |
 |
 |
 |
 |
 |
 |
 |
 |
 |
 |
 |
 |
 |
 |
 |

Blog Candy Alert!! Follow our blog via email and comment on this post for a chance to win a special blog candy!
Congrats! Blog Candy Winners!
From: Dreamy Mixed Media Canvas: Mary Holshouser!
From: Red White And/Or Blue!: Shona Chambers!
From: Studio Monday with Nina-Maire: Copic Birthday Scene Featuring Avery Elle!: Teresa Doyle!
From: Weekender with Wanda – Coffee Talk!: Brenda Lubrant!
From: Die Cut Bows of Beauty: Megan Harp!
From: Whatever Takes Your Fancy!: Wahnita Hammond!
From: July 2016 Card Kit: Sponge Inked Die Cut Shapes: Susan Pezza!
From: Sun Ray Ink Blending with Laura Bassen: Cynthia Johnson!
Please email [email protected] with your mailing address (if applicable), the name of the blog you won from, and the prize you won to claim your prize!
Dreamy Mixed Media Canvas
Hi readers! Thanks for stopping by our blog today! We’re hoping it gives you good inspiration! We’re thrilled to welcome back special guest designer Emma Williams to our blog! Did you know? She’s also one of our design team members on our Monday Challenge blog? Be sure to give her blog a good peruse for lots more inspiration! (Once you’re done reading this, that is. ;))
Enjoy!
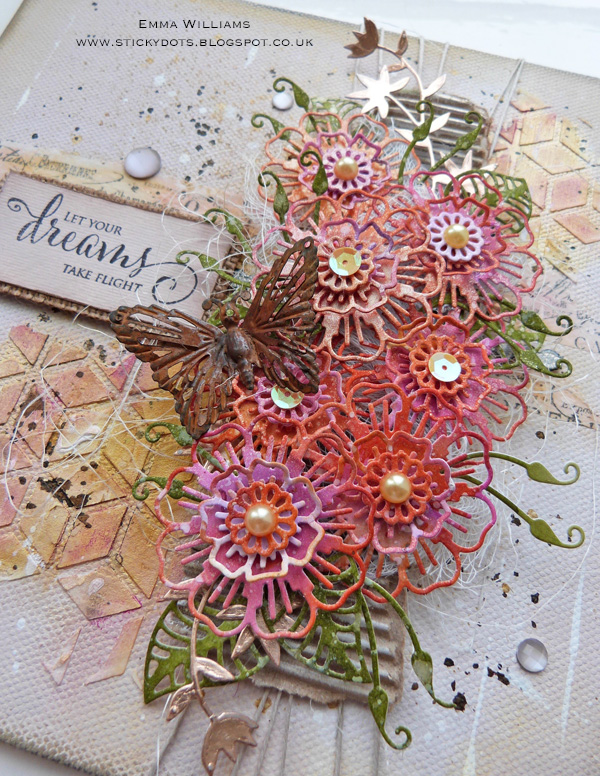
Hello everyone, it’s Emma here!
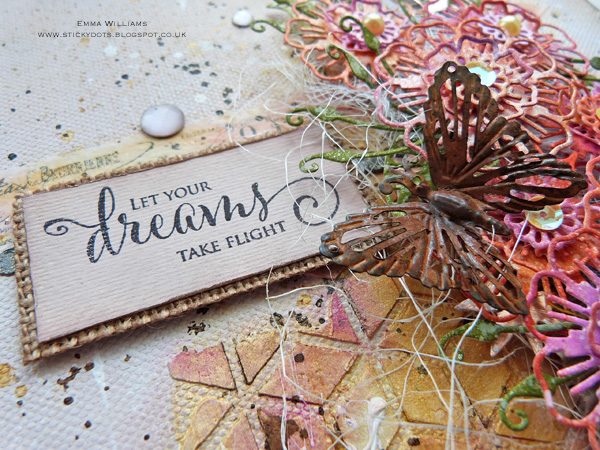
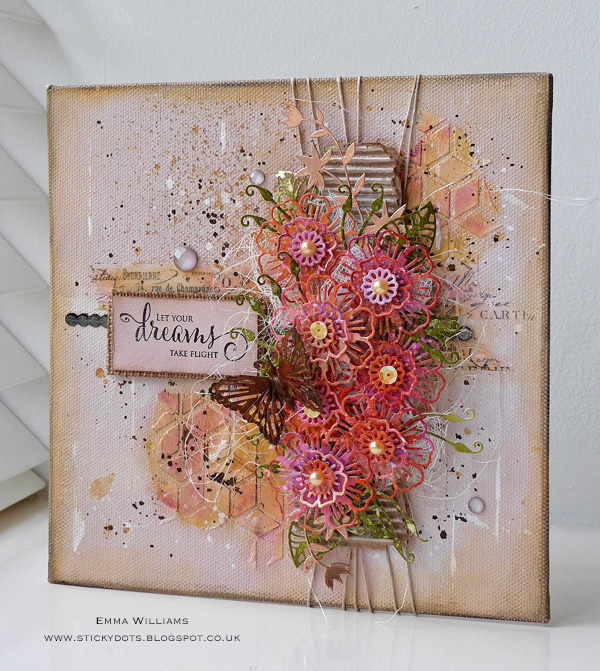
Today, I’m thrilled to have been invited back to the Simon Says Stamp blog to share a summery home decor project that showcases some wonderful Penny Black dies and stamps. This canvas panel that I’ve created for you, is packed full of ideas that can also be used to make special cards to send to loved ones or even a matching gift tag, if you choose…
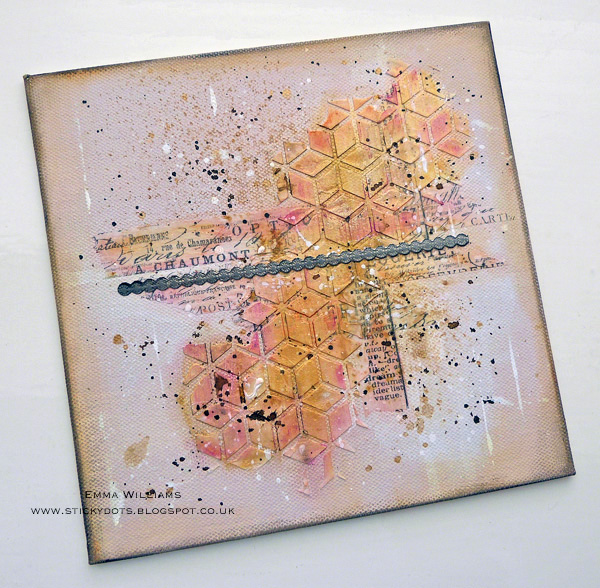
1. I started by cutting a mixed media board to measure 8” square. The boards from this pack are already pre-gessoed so you can start applying your paints to these straightaway.
2. To create the background on the canvas, I began by using a paint brush to apply Spun Sugar Distress Paint to the background and once dry, I then added a small amount of Picket Fence Distress Paint to the centre, spritzed it with water and allowed the paint to run and form drips across the canvas. Heat dry the paint thoroughly before moving onto the next stage.
3. Tear off strips of Tim Holtz tissue tape, (I used Symphony and Sketchbook) and using a small amount of collage medium, attach these across the centre of the painted surface.
4. Lay down the Tim Holtz Blocks Layering Stencil, placing it over the top of the tape and apply Ranger Texture Paste through the stencil using a palette knife.
5. Once the paste is dry, use a dry paintbrush to apply some Prima Metallique Gold Rush Alchemy Paint over the top of the stencilled area, highlighting the gorgeous detail of the raised surface. Once again, thoroughly dry the paint before applying the next layer, otherwise you’ll end up with a muddy mess of colour.
6. Next, I used Picked Raspberry and Spiced Marmalade Distress Crayons and added a small amount of color to random areas of the pasted area, I then used a semi-dry baby wipe to gently blend the colors over the top of the gold paint and I also used my fingertip to take the color from the crayons and extend it over the areas of tissue tape that were still showing.

7. Once I was happy with my background, I then added flicks of the Gold Rush Alchemy Paint, Picket Fence and Ground Espresso Distress Paint over the entire surface. After heat drying the background thoroughly, I then attached a border strip across the centre and added a small amount of Black Soot and Spiced Marmalade Distress crayon around the edge of the canvas, smudging and blending the colours to create a framed border.
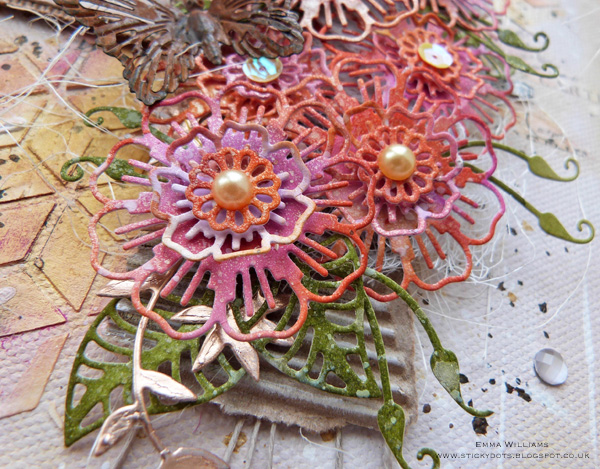
8. Now you have your background, it’s time to move onto creating that burst of flowers and for this I began by applying a small amount of each of the following Distress Stains to a craft sheet: Spiced Marmalade, Picked Raspberry and Wilted Violet. Spritz the stains with water and swipe your watercolor card through the stains, picking up all the color of the ink. Heat dry the card.
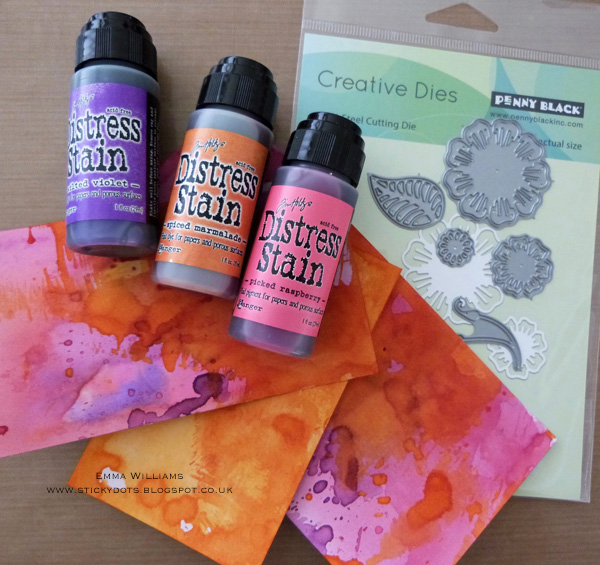
9. Using all three sizes of flowers from the Layered Flower Penny Black Flower Die, die cut the stained card ~ you will need 7 of each size, 21 pieces in total. I spritzed the individual die cuts with Wendy Vecchi’s Pearl Mica Spray for an added shimmer and dried these thoroughly before layering the flowers to create 7 dimensional blooms, attaching each section with a foam pad for added dimension.
10. Add sequins and pearls from the Sunshine 28 Lilac Lane Embellishment Kit to the center of each flower, attaching them with a small dot of Glossy Accents.
11. Tear a strip of corrugated card taken from the Textured Surfaces Pack and apply a light covering of Picket Fence Distress Paint over the top. Once dry, I arranged and stuck the flowers onto the card using foam pads and a hot glue gun to secure.
12. Die cut some leaves and stems from watercolour card, using the Layered Flower die. I then lightly spritzed the die cuts with water before spraying Peeled Paint Distress Spray Stain over the top. Dry the foliage pieces thoroughly and then place them into your flower arrangement, tucking them underneath the flowers. At this stage, I also tucked small pieces of cheesecloth into the arrangement.
13. To complete the arrangement, I used the Flower Frolic die to die cut Gold Metallic Kraft Core Card Stock and placed these die cuts, at the top and bottom my cluster of flowers.
14. I wrapped some twine vertically around my painted canvas and secured the ends with a knot at the back before attaching the flower arrangement over the top of the twine, using foam pads on the back of the corrugated card.
15. Cut a small piece of white card and ink the card with Spun Sugar and Victorian Velvet Distress Ink.
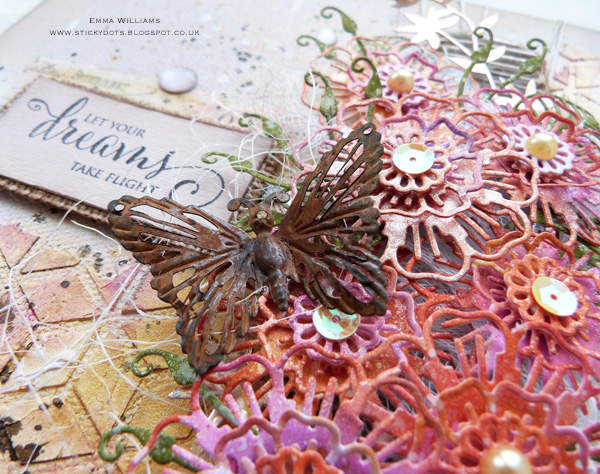
16. I inked up the “Let Your Dreams Take Flight” quote from the Snippets Stamp Set using Jet Black Archival Ink and stamp the message onto the card, before matting and layering the message onto a piece of burlap from the Textured Surfaces pack and attaching this with foam pads to the left hand side of my flower arrangement.
17. As a finishing touch, I shaped the wings of a Finnabair Grungy Butterfly and added this to the flower arrangement, attaching it with hot glue and placing it over the top of the flowers and also three small Prima crystals, which I placed onto the background. I really hope you’ve enjoyed the creative process for this project and that some of the techniques I’ve used will inspire you to create projects of your own using these gorgeous products from Penny Black!
Thank you so much for stopping by today…
Happy Crafting!
Emma
Supplies:
 |
 |
 |
 |
 |
 |
 |
 |
 |
 |
 |
 |
 |
 |
 |
 |
 |
 |
 |
 |
 |
 |
 |
 |
 |
 |
 |
 |
 |
 |
 |
 |
 |
 |
 |
 |
 |
 |
 |
|
 |
Blog Candy Alert!! Follow our blog via email and comment on this post for a chance to win a special blog candy!
Red White And/Or Blue!
This week on the Monday Challenge we are celebrating the 4th of July with a Red/White and/or Blue theme! We hope everyone had a very safe and happy holiday! You can choose any one, two or all three colours for your creation, the main thing is to have fun creating whatever you like!
This week we are showcasing Indigoblu and the Design Team are all using their products. CLICK HERE to see the whole range!
As always, we’re offering a chance to win a $50 Gift Voucher to Simon Says Stamp! All YOU need to do is join in with the challenge!

Below are three projects created by the design team, that showcase this weeks theme! You can visit the challenge blog to get all the details and see the amazing cards and projects that the design team has created this week. If you click on each designers name, you’ll be taken directly to their blog where you’ll get more details about their project! Be sure to give these talented ladies some comments!
The lovely Barbara Schiassi has made this lovely graphic for our inspiration!
Once you have made your creation just go ahead and upload it into the linky on the Simon Says Stamp Monday Challenge blog! We can’t wait to see what you make!
Aida Haron, our Designer In The Spotlight made this lovely canvas:
Aida used:
 |
|
 |
 |
 |
 |
 |
 |
 |
 |
 |
 |
Barbara Schiassi loves this color combination and and used Indigoblu Stamp Crackleglaze for the star:
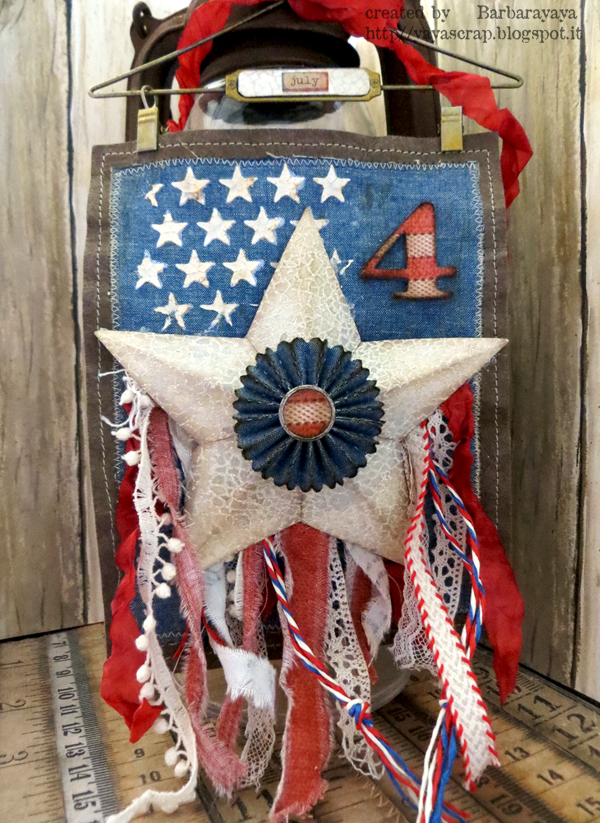
Barbara used:
 |
|
 |
 |
 |
|
 |
 |
 |
 |
 |
|
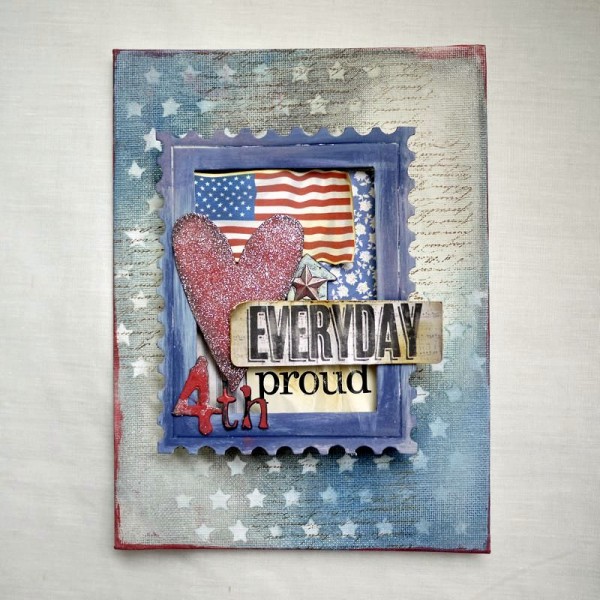
Emma Williams created a celebration of the 4th of July using IndigoBlu’s Limor Circles stamp set to create the background.
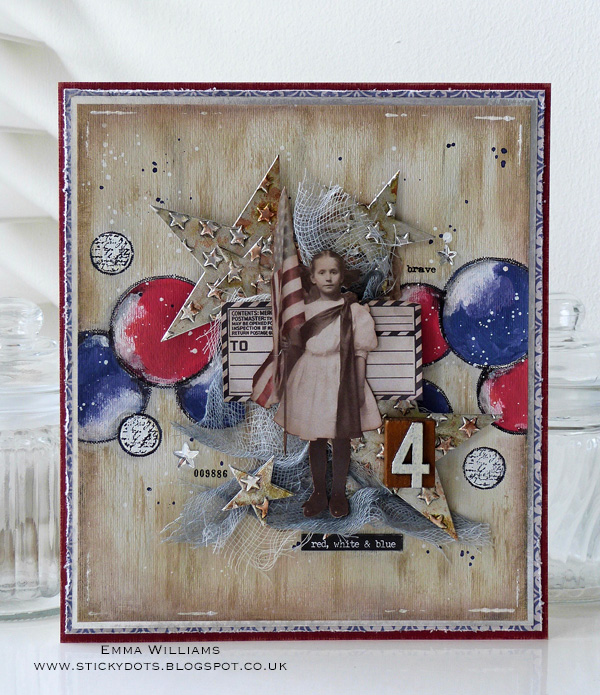
Emma used:
 |
 |
 |
 |
 |
 |
 |
 |
|
 |
 |
 |
 |
So now it’s YOUR turn to get out your inks, paints and crayons and get crafting!

Do you use Instagram? If so please add #sssmchallenge to your challenge entry uploads so we can see them on there too!
Blog Candy Alert!! Follow our blog via email and comment on this post for a chance to win a special blog candy!


