Studio Monday with Nina-Marie: Trifold Card + No Line Coloring
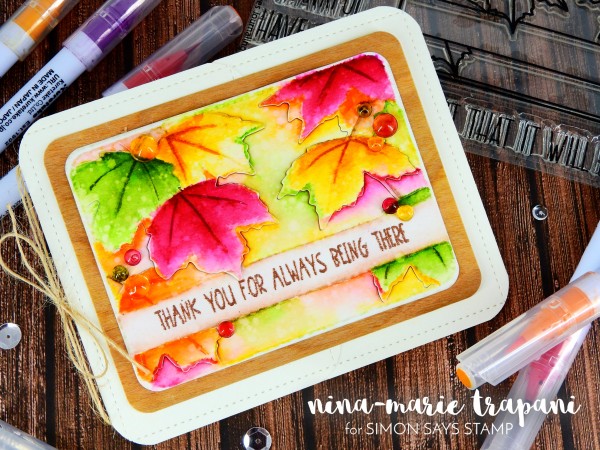
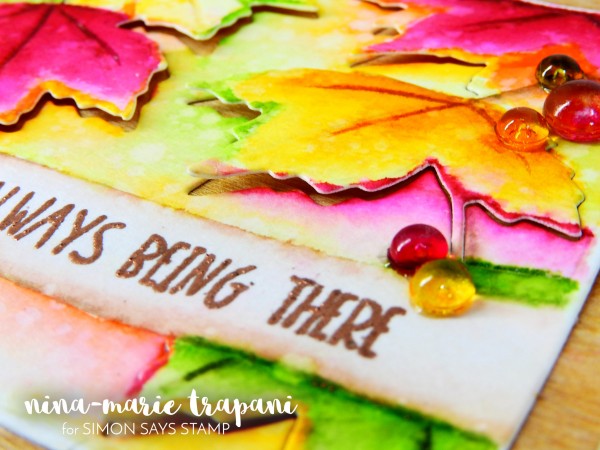
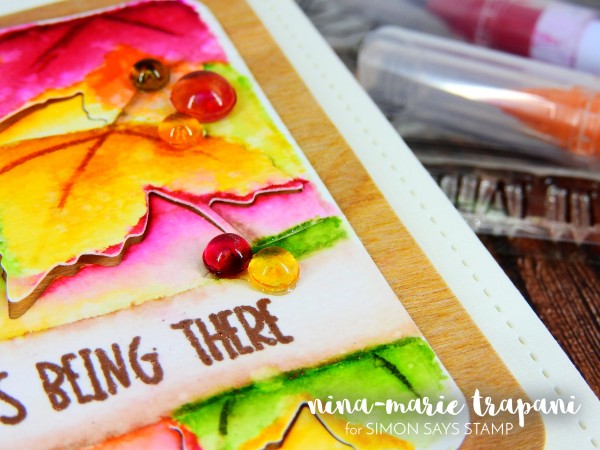
Hello crafters, it’s Nina-Marie here with you today with a brand new Studio Monday feature for you! This week we are showcasing Neat & Tangled products and I will show you how I used their Maple Leaves stamp and die set to create this beautiful fall-inspired card that has LOTS of techniques incorporated into it!
The first technique I’ll cover in today’s video is no line watercoloring. For this card I used Zig Clean Color markers to do my watercoloring, but keep in mind that you can use any watercoloring medium you have on hand to create this card. I love the look of no line coloring because it gives your card a hand-painted artwork feel. When doing no line coloring, you want to make sure you choose a light ink color; for today’s card I used Altenew’s Morning Frost dye ink, but you could use any type of light colored ink for this.
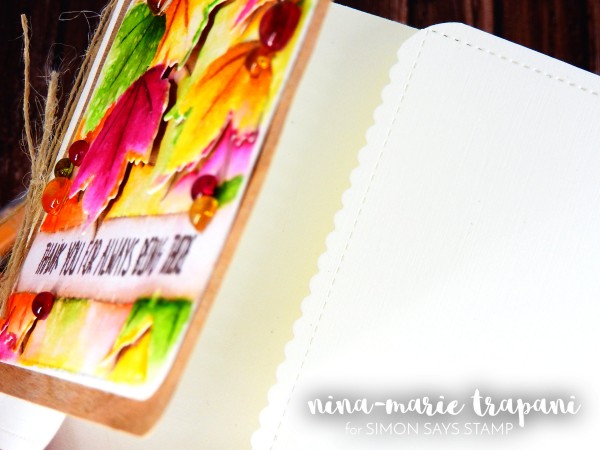
Another technique I’ll be sharing with you is creating a trifold; this could also be classified as a variation to a gatefold card because it’s kind of a blend between the two fold types. In the video, I will walk you through the steps I took to create my version. I love incorporating different card folds into my designs; I don’t always think of it as I am creating, but I love it when I do! :)
Finally, the last technique I will be sharing with you today is coloring Pretty Pink Posh clear droplet embellishments to match the colors on your card. This technique is SO much fun… although I will warn you that it can be a bit messy sometimes! I used Copic markers to do this, but I’ll also share with you some tips on how you can color your droplets a bit faster.
So I hope you’ll be checking out the video to see how this card came together! Be sure to give the video a thumbs up and subscribe to our channel for more weekly inspiration!
WATCH THE VIDEO:
SUPPLIES:
 |
 |
 |
 |
 |
 |
 |
 |
 |
 |
 |
 |
 |
 |
 |
 |
 |
 |
 |
 |
 |
 |
 |
 |
 |
 |
 |
 |
 |
 |

Birthday Surprise: Simon Says Stamp Card Kit Reveal and Inspiration
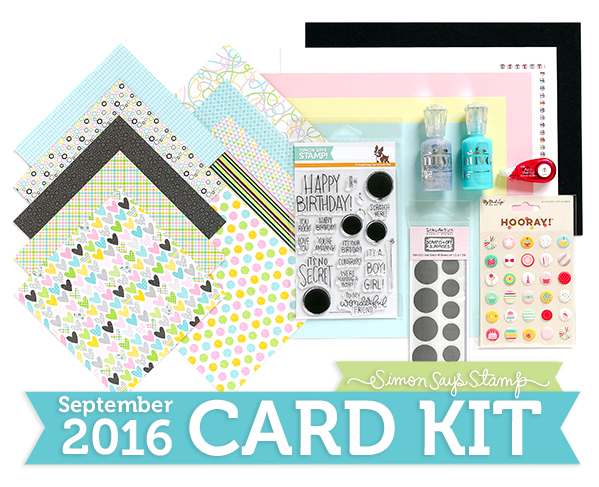
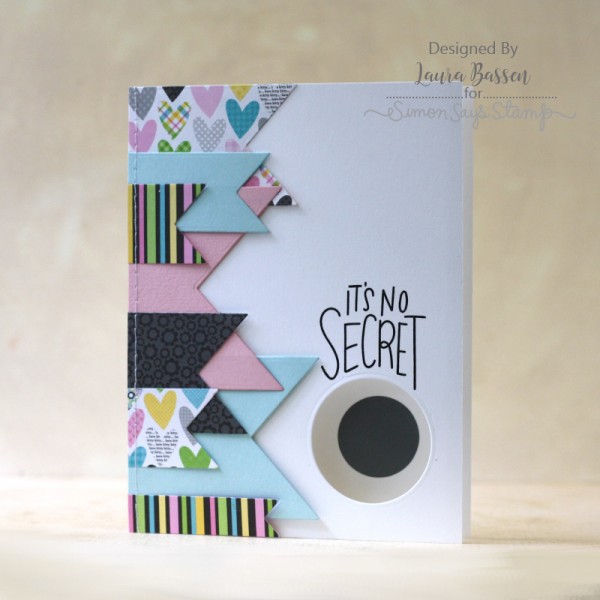
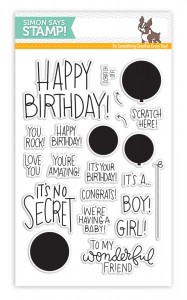
It’s here!!! The September Card Kit Birthday Surprise has some super fun items that you won’t want to miss! The stamp set “It’s No Secret” by Kristina Werner was designed to go specifically with the Inky Antics Scratch Off stickers… how cool is that? Stamp, add a sticker and it’s ready to go! The papers this month are a custom pack from Doodlebug from their “Smitten Kitten Collection”. We’ve included one bottle each of the Nuvo Drops in Caribbean Ocean and Silver Moondust. The My Mind’s Eye Puffy stickers compliment the Simon Says Stamp cardstocks Lemon Chiffon, Cotton Candy, Surf Blue, Black and White. If that isn’t enough, we’ve also included the PLUS strip clear decorative gift tape. Let the card making begin!!
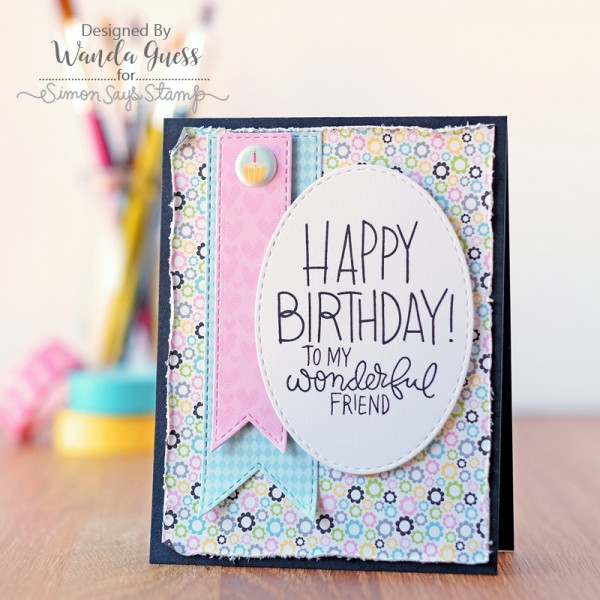
Wanda created a card using the messages from the stamp set stack together on an oval surrounded by die cut papers.
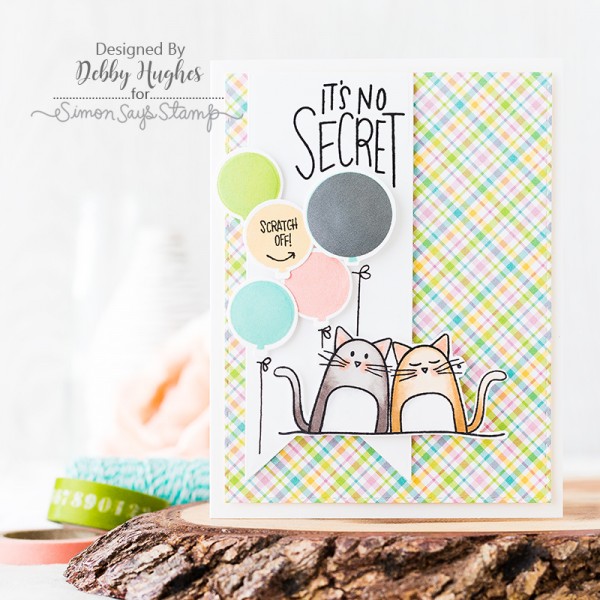
Debby Hughes created an adorable card using the scratch off stickers as a secret announcement for a baby!
And finally, Laura created a peek through window on her card for the scratch off message on the inside.
There are so many ways to use these stamps and stickers.
I have a walkthrough video for you that can be viewed below or on our YouTube channel.
The It’s No Secret stamp set is also available for individual purchase in our store.
Remember, you can SUBSCRIBE to our no obligation kits and receive them monthly for $ 24.95, or purchase them each month for $ 29.95 (while supplies last).
If you are a subscriber who used Paypal to purchase your subscription, please be sure to pay the invoice that we send you within 3 business days. We have a limited number of this card kit in stock and don’t want you to miss out. For easier and quicker monthly processing, please contact us via email or telephone and we will put your credit card on file as a courtesy for you. Card kits bill and ship between the 17th and 27th days of every month.
Thanks for coming by today, Enjoy!!!
Weekender with Wanda – No Line Watercoloring with Altenew!

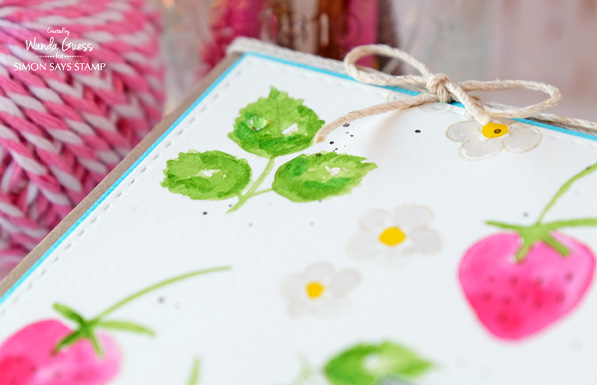
Happy Saturday! It’s the middle of August…which means it’s almost time for one of my favorite things – STAMPTEMBER! Yeah! Just a couple more weeks until we roll out the biggest release of the year here at Simon Says Stamp! I love it – and I’m ready for Autumn! The light is changing in the mornings – have you noticed it too? Today I’m sharing the latest edition of Weekender with Wanda, and I have a cool technique to share with you. I truly do hope that you try this because it is so nice to sit and color/paint and the results are so rewarding. I’m talking about No Line Watercoloring! Today’s post features beautiful stamps from one of our favorite member companies – Altenew. I used the gorgeous “Beautiful You” Stamp set for my card.
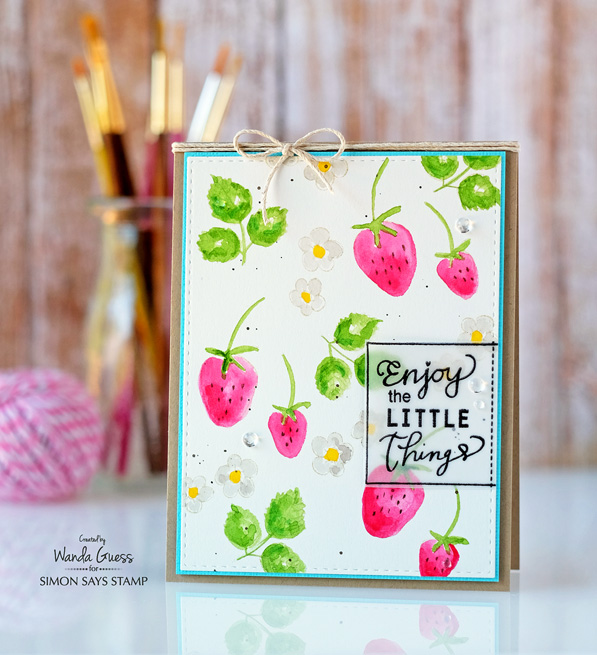
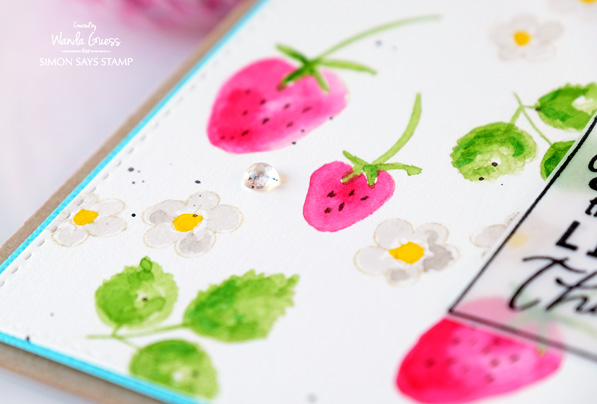
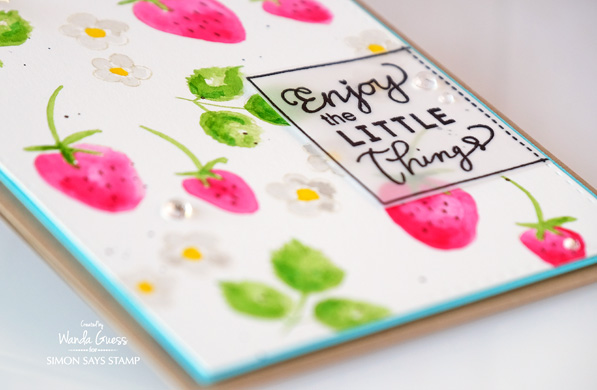
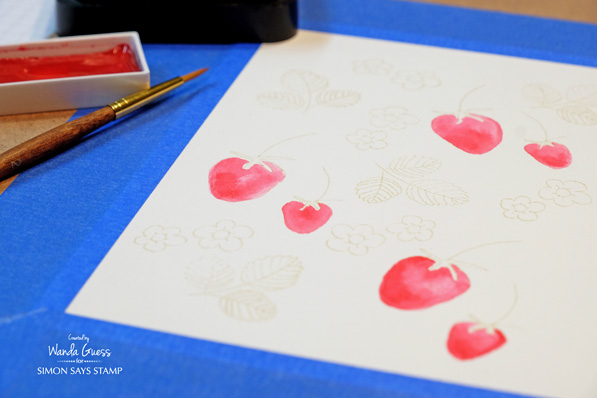
Doesn’t it look like I painted this? I actually fooled my husband when I showed it to him! Hee hee. I started with a sheet of watercolor paper and taped it to my hardboard to keep it nice and flat. (See photos and supplies below) No Line Watercoloring is simple! I took my Antique Linen Distress Ink pad and randomly stamped the strawberries, leaves and flowers onto the paper. This ink color is so light that you can barely see it. And, that’s the trick. After stamping in light ink, you color over it with watercolor paints! If you look closely you can barely make out the stamped images.
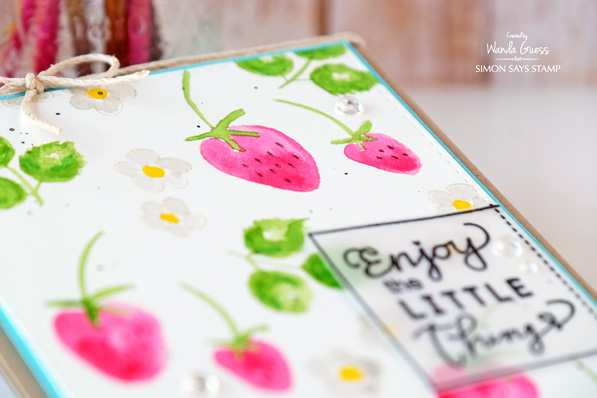
The pretty sentiment is stamped onto vellum paper because I wanted the color to show through it!
Here is what the center panel looked like when I started. Later, I die cut out my card layer by using the Simon Says Stamp Stitched Rectangles Dies.

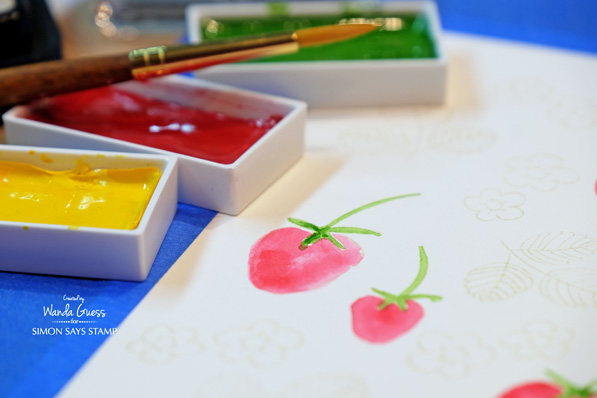
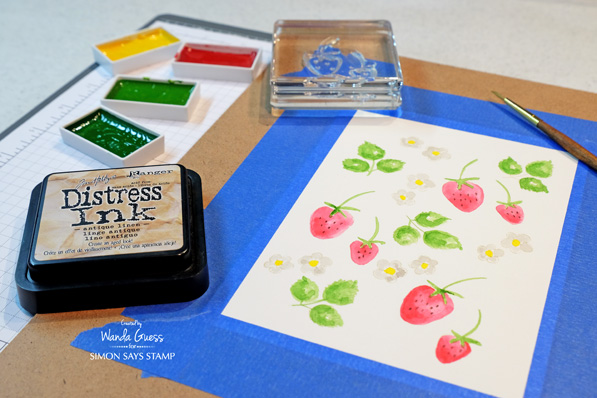
I used Kuretake Gansai Tambi Watercolor paints. These are the most beautiful paints! I use mine all the time. The colors are very rich and creamy and they paint like a dream. In this photo you can see that I started with the strawberries and colored them in. I let each color dry before using a new color. This kept the paint colors from running together.
Next I used green watercolor paint and did the leaves and stems.
Here is the whole panel before I cut it out with the Stitched Rectangles Die. One tip for coloring white items – use a soft grey. Strawberry flowers are white with yellow centers and I wanted my project to have those colors too. The grey tricks your eye into seeing this as a white object.
I ended up splattering a bit of brown paint over my finished panel. I always like paint splatters! I wanted a tiny pop of a bright color, so I layered a thin layer of aqua around my center panel before mounting it onto a kraft card base. The finishing touch was a twine bow.

Thank you for spending part of your weekend with me! I hope this technique will inspire you – and hope you try it yourself! See you soon!
SUPPLIES:
 |
 |
 |
 |
 |
 |
 |
 |
 |
|
 |
 |
 |
 |
 |
 |
 |
 |
 |
 |
 |
 |
 |


