Weekender with Wanda – Happy Mail Letters!

Happy Saturday! Welcome back to the latest edition of Weekender with Wanda here on the Simon Says Stamp Blog! And, happy first weekend of August! Are you getting your kiddos ready for school yet? I have a lot of friends who are in full on back to school mode already! Seems early to me, but I am ready for Fall to come! Because I’m always ready for Fall! Should be any day when we will see Halloween candy at Target! That always shocks me. I have been cleaning, organizing and purging in my studio for a couple of weeks and I feel like I can think again! It’s so nice to have a clean and tidy space. Hope you are having a great weekend so far.
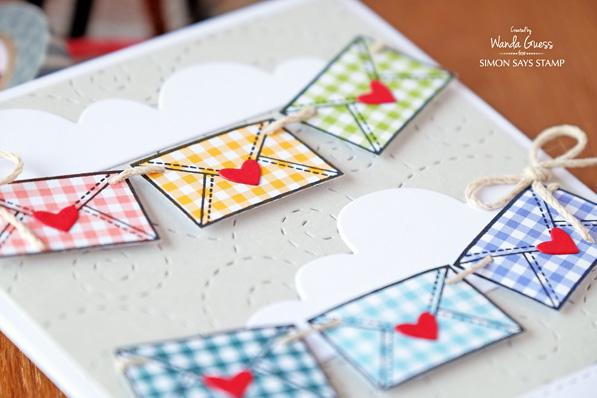
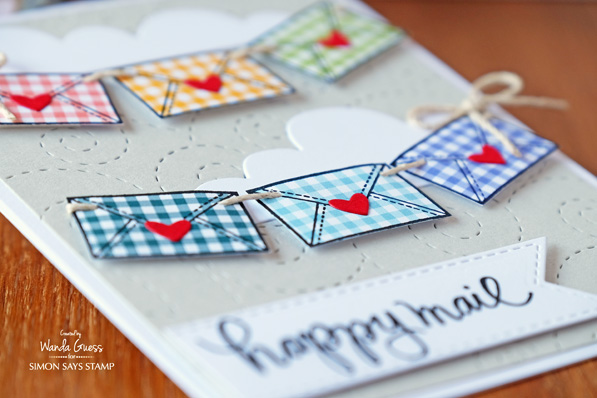
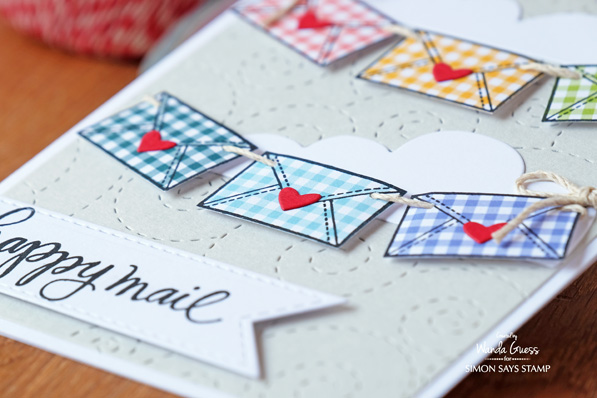
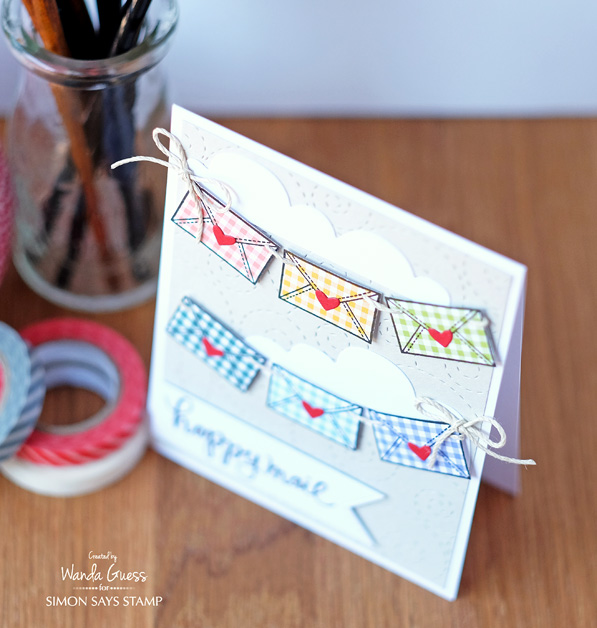
Today I’m featuring some gorgeous and happy exclusive products from our very own Simon Says Stamp line of stamps, dies and inks. I used the Sending Happy Thoughts stamp set to create a sweet banner of happy love letters! Who doesn’t love happy mail? This card was really fun to create and I used the new Tiny Check paper pad from My Favorite Things to make my letters. The pattern is the perfect size and scale – and the colors are so fresh.
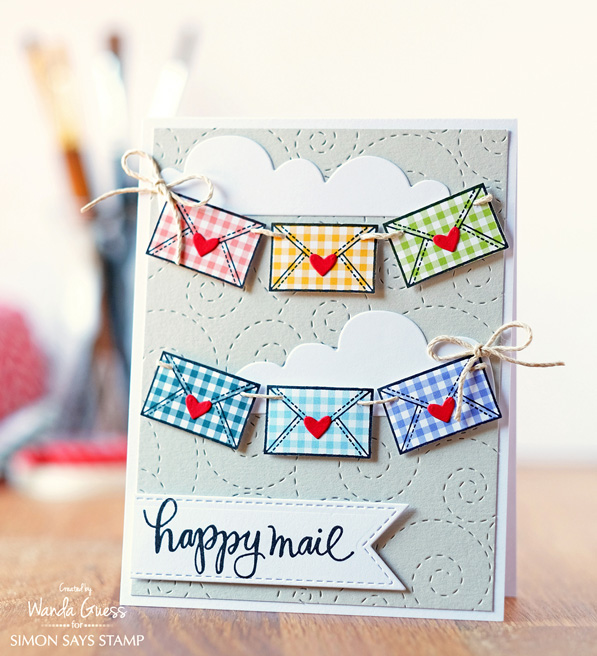
I started the card with a crisp white A2 card base. Then I layered a piece of Simon Says Stamp Fog Cardstock embossed with the beautiful Stitched Whirl Background Die. This die cuts into, but not through, the paper – giving this gorgeous pattern! I thought it looked like wind for this card! Then I die cut some fluffy Flat Bottom Clouds dies and adhered them to the Fog cardstock. I used Simon Says Stamp Intense Black Ink and stamped the little envelopes onto the patterned paper. Then I cut them out by hand. I used the Stitched Heart Collage die to make some adorable little red hearts and glued them on the letters.
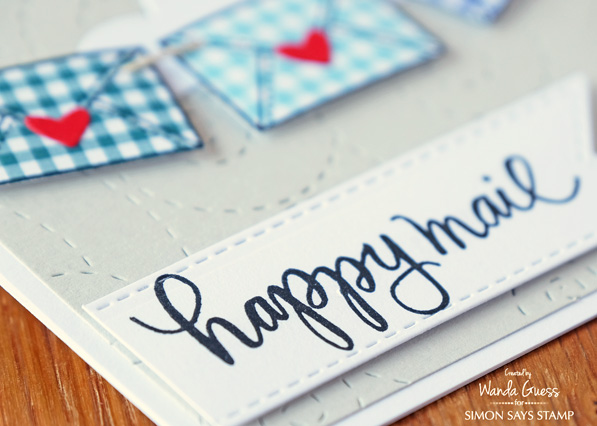
I stamped the sentiment onto a Stitched Banner Die and attached it to the card using foam squares.
For the letter banner, I first punched holes in the corners of all the letters. Then I wove the twine behind each letter to hook them together. I tied a bow at each end. The letters are attached to the card using foam squares so they pop off the paper!
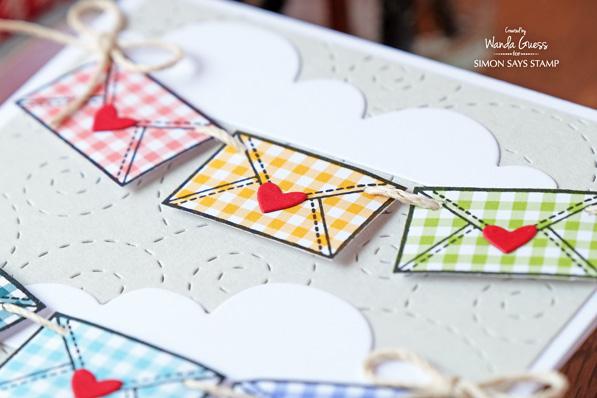
I attached the bows with a touch of glue under each one. This let me get them in just the right place. One of my funny tips is that I use my clear stamping blocks to hold things down when waiting for glue to dry! You will often see a card on my desk buried under a little stack of clear blocks!
Hope you get some happy mail in your mailbox soon! Enjoy your weekend!
SUPPLIES:
 |
 |
 |
 |
 |
 |
 |
 |
 |
 |
 |
 |
 |
 |
 |
 |
 |
 |
 |

Tim Holtz Surf Shack with Shari Carroll
Happy Friday everyone!! It’s Shari here with a fun project. I’ve worked with the Tim Holtz Surf Shack and Village Dwelling dies to create the cutest little beach house!!!! It’s so gnarly!!
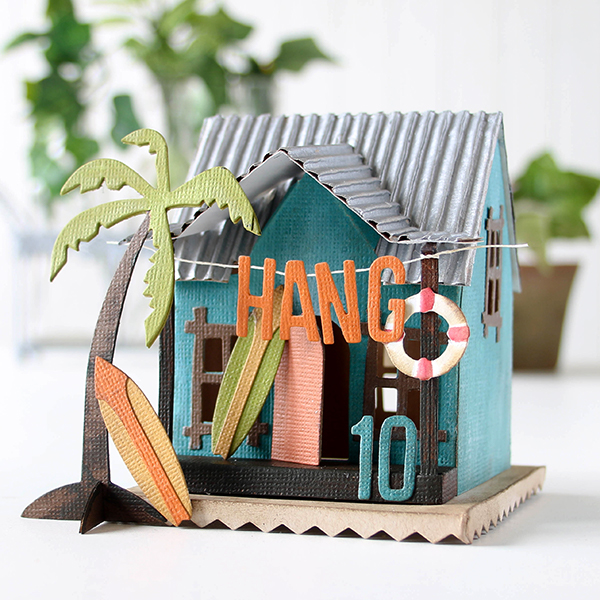
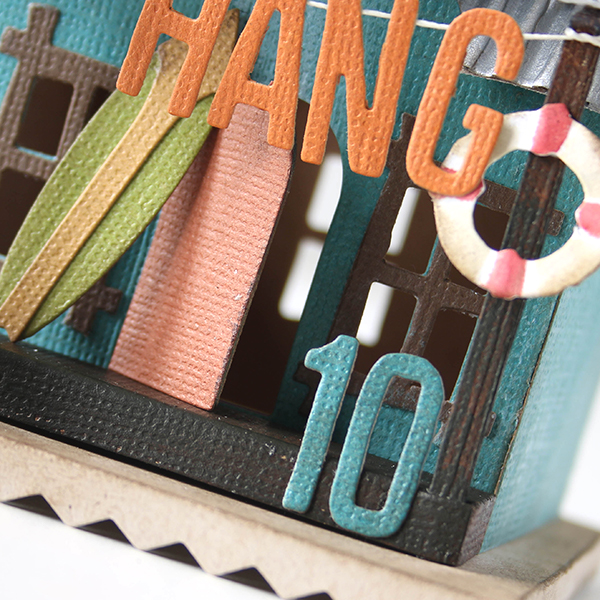
I started out with the Nostalgic Kraft-Core cardstock and cut out several of the elements in different colors. I tried to stick with colors that would look retro. I also used the Texture Surfaces to cut out the roof pieces. Once I painted them with Brushed Pewter Distress paint it really looks like corrugated steal!

I used a little bit of Fired Brick and Antique Linen Distress ink to color the life preserver, and some Distress paints to give the house a weathered look.
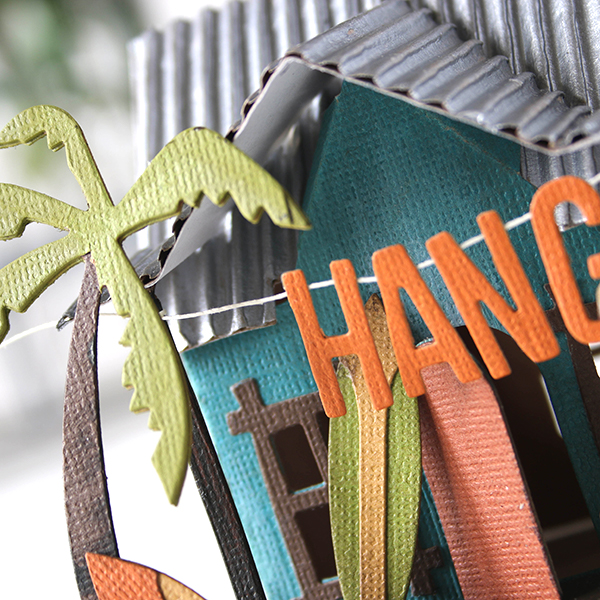
I decided it would be cute to put “Hang 10” on my shack, so I used the Tim Holtz Alphanumeric Thinlits Dies in fun colors and strung the “Hang” up by attaching string to the porch posts. I placed the “10” to the front of the porch.
I have a full process video for you that you can see below or on our YouTube channel.

Blog Candy Alert!! Follow our blog via email and comment on this post for a chance to win a special blog candy!
Thanks for coming by today and have a great weekend! Surf’s up!!
 |
 |
 |
 |
 |
 |
 |
 |
 |
 |
 |
 |
 |
 |
 |
 |
 |
 |
 |
 |
 |
 |
Happy Birthday Concord & 9th!
Hi friends! Happy Thursday! This is a very happy day as we’re celebrating the fantastic Concord & 9th on their first Birthday! Please give a big Simon welcome back to Angie, who is our special guest today! Big kudos to Angie the entire team at Concord & 9th for their consistent gorgeous designs and inspiration! We are HUGE fans, and wish them lots and lots of continued success and accolades! Please be sure to wish them a Happy Birthday in social media with the hashtag #C9BirthdayBash. Read on and enjoy!
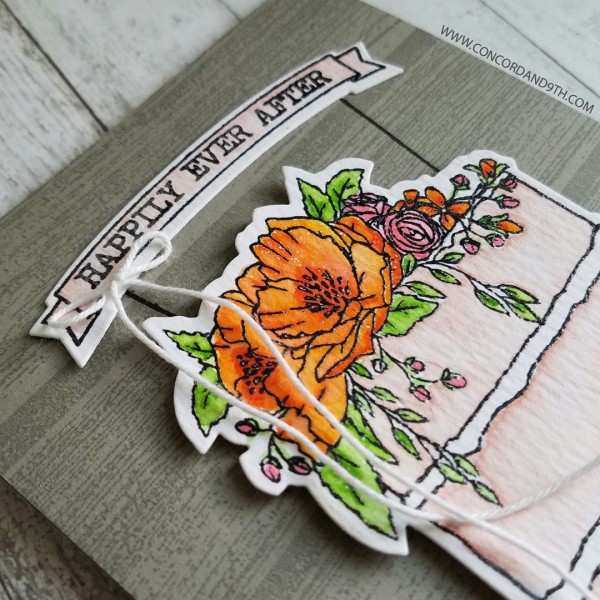
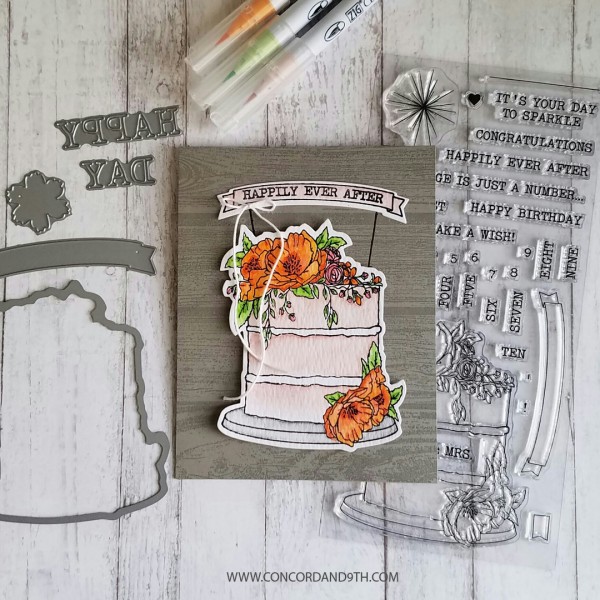
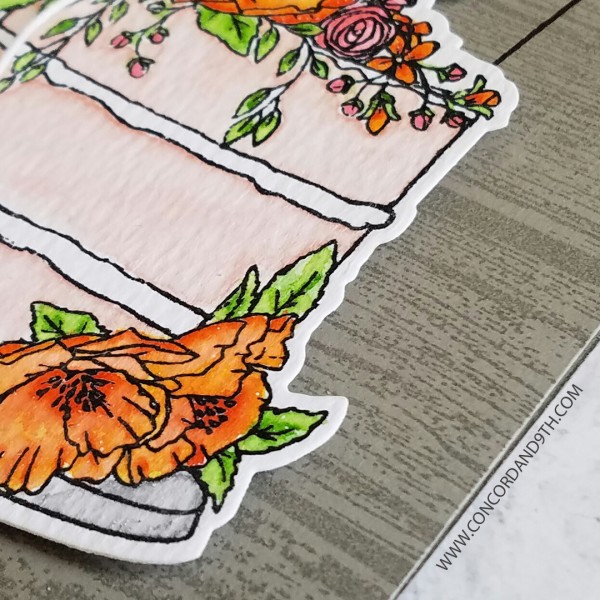
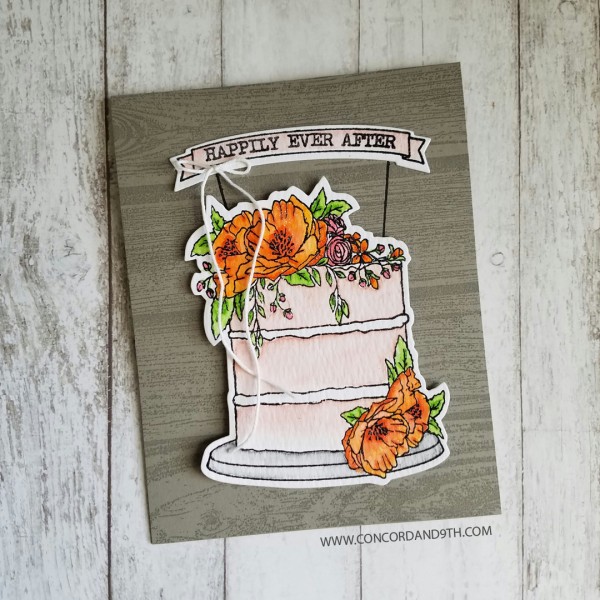
August is Concord & 9th’s birthday month, with August 9th being one year since our very first product launch, so of course we had to create a birthday stamp set. We love the current trend of layered cakes (frosted or not) with large floral toppers. The cake in the Happy Days stamp set is about 3 3/4″ tall by 3 1/8″ wide after it’s stamped and die cut – that does not include the banner. It fills up a standard card size perfectly! This set is definitely intended for those with a passion for coloring! There are fun sentiments like MAKE A WISH and HAPPY BIRTHDAY. You can use the little numbers or even stamp out THE BIG FIVE-OH, and so on.
We didn’t want this to be a birthday set only, so we included sentiments such as MR & MRS and HAPPILY EVER AFTER for weddings, CONGRATULATIONS for a bridal/baby shower, and even IT’S YOUR DAY TO SPARKLE for special events like graduation. The banner piece is also versatile. You can stamp greetings inside of it by bending them slightly. It works as a topper, or flip it over and it runs under the cake plate with the same angles. There is a stick (or straight line) in the stamp set that acts as the banner poles, a candlestick, poles for the little individual flag or the stick to a fun sparkler! The coordinating die, Happy Day dies, has a large cake piece, banner, the words HAPPY and DAY that can be used on their own or together. The words are separate so you can use the negative piece stacked or in a straight line. There is also a flower die shape. This doesn’t cut anything specific in the stamp set, but it works well to die cut, curl the petals, and add to the top/bottom of the cake for dimension.
Did you notice the background of this card? It’s our new Barnwood Background stamp set. This set is photopolymer and sized at 5×6. Perfect for card sizes. It looks great stamped portrait or landscape too! We love the rustic feel this background provides. It’s a perfect backdrop for this beautiful cake!
Now on to how we made the card…
Step 1: Using the Concord & 9th Happy Days stamp set, stamp the large cake on to watercolor paper with black ink. Sprinkle with clear embossing powder and heat set. This will ensure no bleeding while watercoloring the image. Plus, it gives is a nice sheen. Line up the cake die from Happy Days dies and run through your Big Shot.
Step 2: Die cut the banner out of watercolor paper using your Big Shot. Stamp the long banner piece from Happy Days stamp set with black ink. Slightly bend HAPPILY EVER AFTER to fit inside the banner, and stamp in black ink. Sprinkle with clear embossing powder and heat set.
Step 3: Use Zig markers and an aqua/water brush to color in the banner and cake. Have fun with this part! Coloring is therapy after all!
Step 4: Use the MISTI to stamp the Barnwood Background on to your card base. The beauty of the MISTI is you can stamp it again if the first image doesn’t pop enough. Stamp the straight line image, or banner poles on to the card base using black ink. Adhere the cake using foam tape for dimension, and glue dots for the banner.
We hope you’ll like these new products as much as we do! We cannot wait to see what you create with them! We also want to publicly thank Simon Says Stamp for supporting Concord & 9th, and being amazing people to work with!
SUPPLIES:*
 |
 |
 |
 |
 |
 |
 |
 |
 |
 |
 |
|
 |
 |
 |
 |
 |
 |
 |
*Stay tuned! New release available on Aug. 9th!


