Spotted – December 2016 Edition!

It’s time for another edition of Spotted here on the Simon Says Stamp Blog! Seeing all of the amazing cards and projects featuring the Simon Say Stamp brand that are created by you, our awesome customers, is super fun for us! We love seeing what you are creating. ‘Spotted!’ is a monthly feature on this blog that highlights the talents of all of you! Thank your for bringing our products to life with your creativity and energy! It’s really a treat to share your projects!
Today we are happy to introduce you to five awesome designers who shared their work and caught our eye for the December 2016 edition of our ‘Spotted’ post! We send each of them a little something special for being “spotted.” Be sure to use the hashtag #simonsayssstamp on your social media accounts so we can spot YOU! We find cards on Instagram, Facebook, Pinterest, Flickr, in our Simon Galleries, and craft blogs.
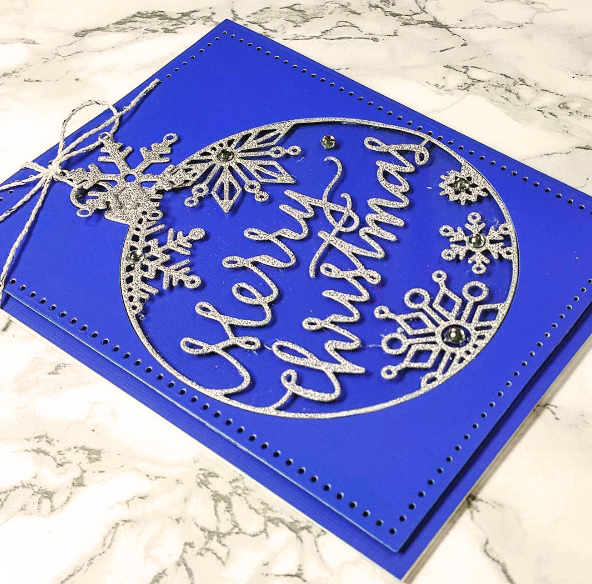
The first card for today’s post is this gorgeous icy blue ornament card by Annie! This card was spotted on Annie’s Instagram. We love all that bright bold color for a holiday card! That silver and blue is just wonderful! A clean, simple and perfect creation! Annie used our Simon Says Stamp Exclusive Merry Christmas Ornament to make the focal point of her card. Please visit Annie at her Instagram Page or her blog to see more of her beautiful work.
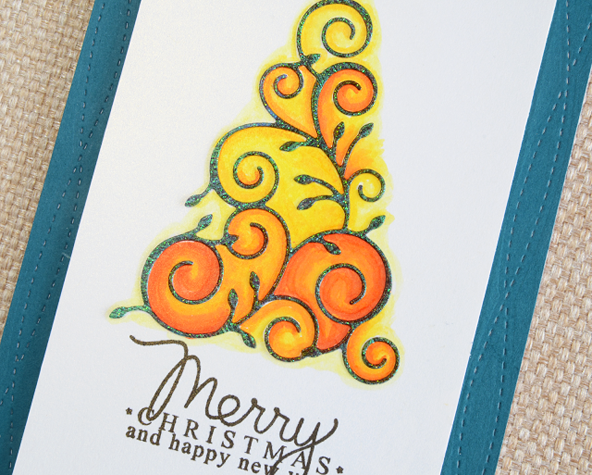
Next we have this beautiful Christmas Tree card made by Glorious! She used her Copic Markers to perfection to create the pretty yellow and orange shading underneath the die cut. So creative! Glorious used our Simon Says Stamp Exclusive Christmas Tree Wafer Die to make her card. Please visit Glorious on her Instagram page or on her crafting blog!
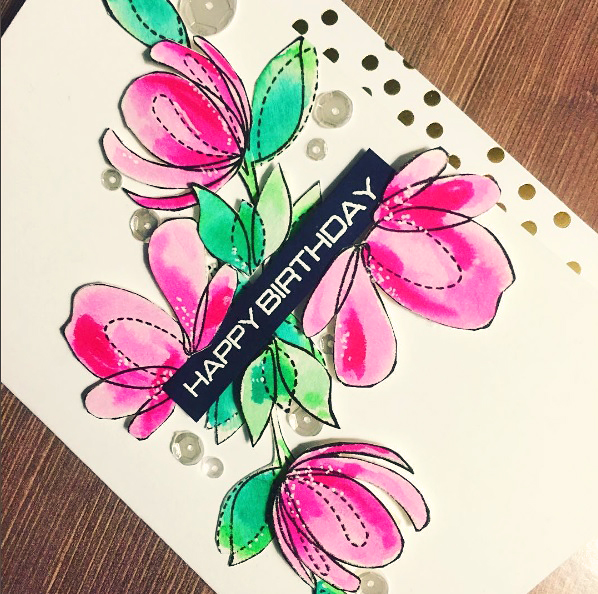
The next card for today is an amazingly beautiful floral birthday card made by Kimberly! She used one of our most popular Simon Says Stamp Exclusive stamp sets called Spring Flowers. The way she colored the blooms is so pretty, and the touch of polka dots finished the card off just right. What a happy card! To see more of Kimberly’s creations, please see her Instagram page or her blog.
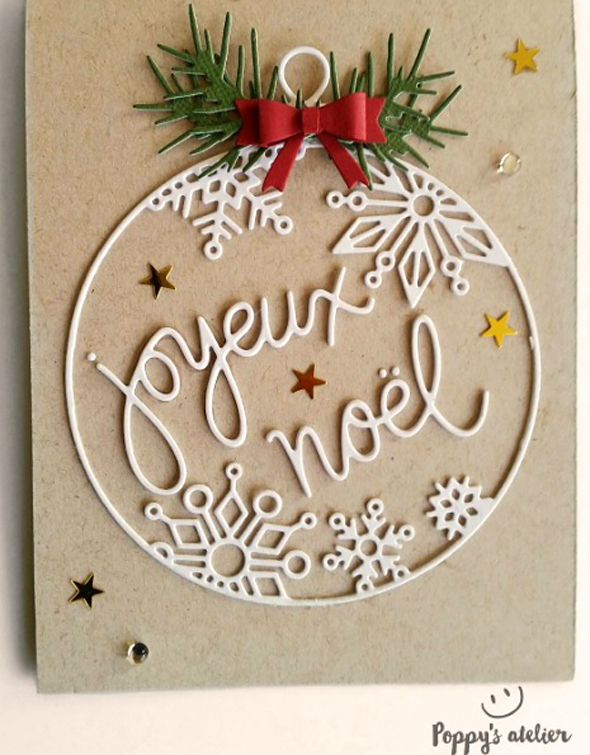
This next card was spotted on Poppy’s Instagram account! What a beautiful homey, cozy, country Christmas Card! We love the look of the white ornament against the kraft paper. And, she used just the right embellishments to create a certain look and feel to this card. Poppy used our Simon Says Stamp Exclusive Merry Christmas Ornament Die and then swapped out the words by using the Simon Says Stamp Exclusive Joyeux Noel word die. To see more of Poppy’s cards please check out her blog or her Instagram account.
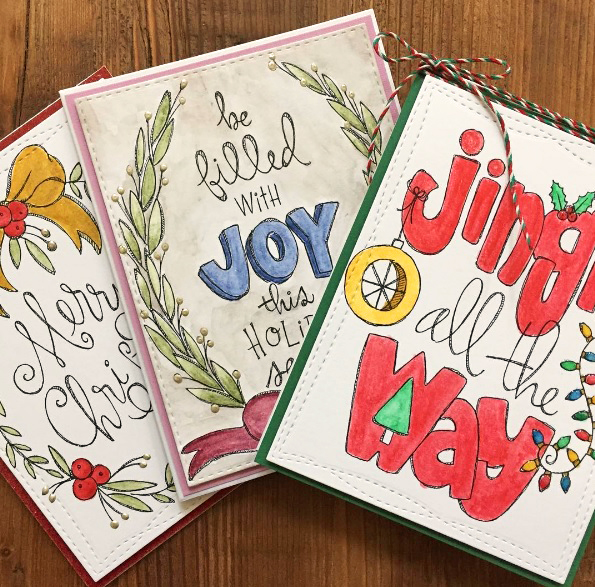
And for our last project for today, we spotted these perfectly colored cards made by Sarah. She used Inktense pencils to make these images pop right off the page, and then used just the right amount of layers and embellishments. She used our Simon Says Stamp Exclusive Believe in the Season Paintable Prints to make several festive cards ready to mail out! Please see more of Sarah’s work on her blog or at her Instagram account page.
Wasn’t that spectacular!? Would you like to be SPOTTED using Simon Says Stamp product? Post your creations to Facebook, Pinterest, Instagram (with hashtag #simonsaysstamp), your blog and/or the Simon Says Stamp online galleries (in the sidebar) and we’ll choose cards or projects to feature each month! We also have a Simon Says Stamp Flickr group here and we would love for you to join us! So many ways for you to play along with us. We can’t wait to see what you are creating!
SUPPLIES:
 |
 |
 |
 |
 |
 |
 |
 |
 |
 |
Studio Monday with Nina-Marie: Dimensional In Lay Die Cutting
Hello everyone, it’s Nina-Marie here wishing you a very Happy National Poinsettia Day! Today’s Studio Monday post features a twist to the in lay die cutting technique that I think you’ll enjoy. I’ll show you how to create a dimensional effect (and a stunning background too)!

Because it is National Poinsettia Day, I wanted to use the Poinsettia stamp and die set from Simon Says Stamp in this project; but keep in mind that this technique will work with ANY coordinating stamp and die set.
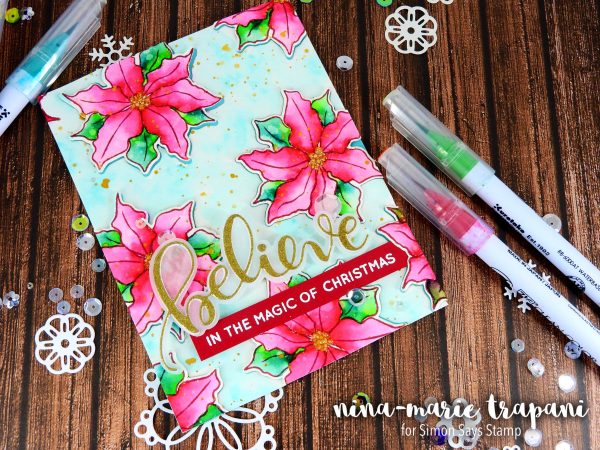
I stamped the outline flowers onto watercolor paper with Simon’s Schoolhouse Red ink; if you don’t want to do any coloring, you could definitely stamp the solid poinsettia image from this set instead. I love to color though, so I used the outline and did some watercoloring with Zig Clean Color markers. The colors I used are as follows: Geranium Red 029, May Green 047, Marine Green 400, Turquoise Green 042. All the gold accents are made using Finetec’s gold metallic watercolors.
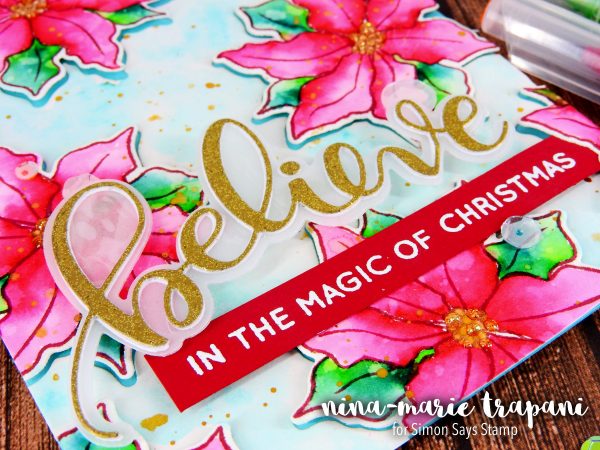
I am a huge fan of the gorgeous Believe script stamp and die set… I paired the two together with the Poinsettia stamp and die set by die cutting the Believe script from DIY glitter paper and vellum. The supporting sentiment underneath the word believe was heat embossed onto a piece of Schoolhouse Red cardstock.

WATCH THE VIDEO
To see how this card came together, I hope you’ll check out the video below! If you enjoy, be sure to give it a thumbs up and subscribe to our channel!
SUPPLIES
 |
 |
 |
 |
 |
 |
 |
 |
 |
 |
 |
 |
 |
 |
 |
 |
 |
 |
 |
 |
 |
 |
Thanks so much for visiting me today and I hope you get to create something in celebration of National Poinsettia Day too!
Did you know?? Simon Says Stamp has galleries that YOU can upload your creations to! You can find them all HERE.
Blog Candy Alert!! Follow our blog via email and comment on this post for a chance to win grab bags and blog candy! Remember to tag your awesome projects with #simonsaysstamp on social media so we can see what you are creating!

Weekender with Wanda – Holiday Cheer with Hero Arts!

Hello and happy Weekend! I’m always happy to see you here and it’s time for the latest edition of Weekender with Wanda here on the Simon Says Stamp blog! I’m so grateful to be able to share with you every week, and I appreciate your kindness and love shown in the comments. I read all of them, and they cheer me and lift me up! So, thank you! It’s definitely holiday time and I’m ready to get the party started!
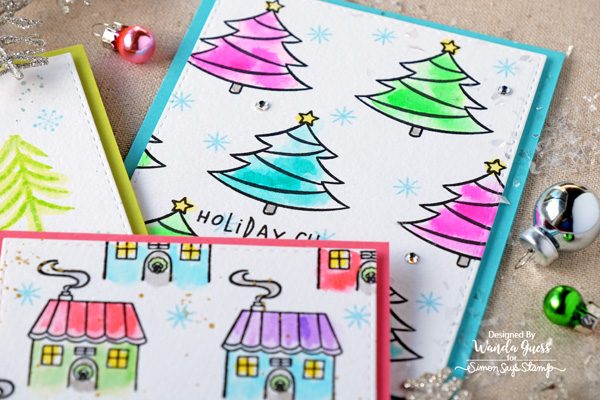
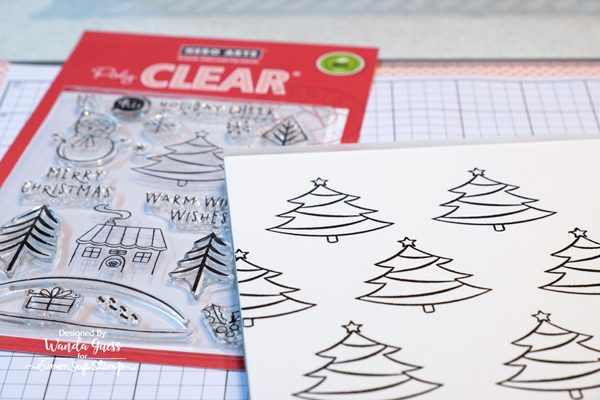
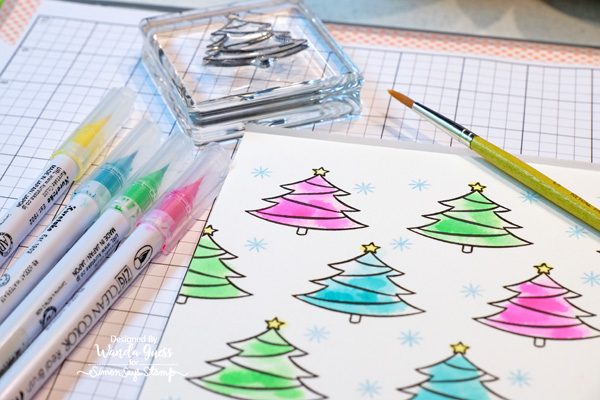
This week I thought I would make some one layer, clean and simple cards in vivid, bright colors! Today my cards are featuring stamps from one of our very favorite companies, Hero Arts! The Hero Arts Holiday 2016 release is amazing. A really varied and beautiful assortment of products for every style and holiday. Today I chose one of the happy clear stamp sets called, appropriately, Holiday Cheer! I used my Zig Clean Color Markers to watercolor the images in non-traditional brights. I made three cards out of the one stamp set. I adore the font of the sentiments so much.
Here are all three cards together. I like to use colored cardstock as my card base when I do one layer cards since it adds just the right punch of color. Then, inside, I will layer a piece of white cardstock to write on. These colors remind me of retro 60’s Christmas decorations!
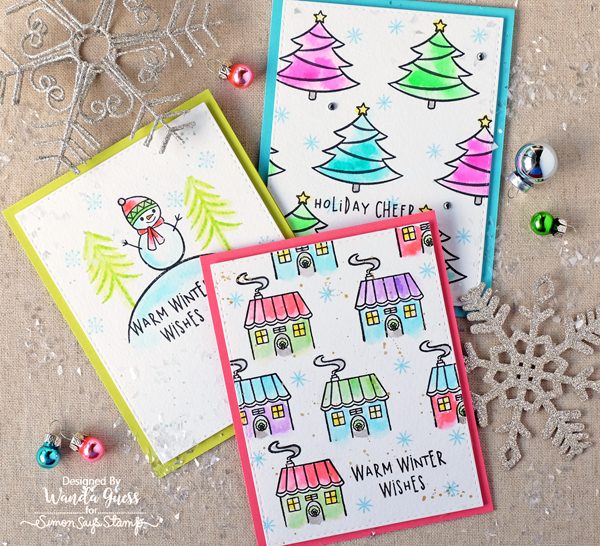
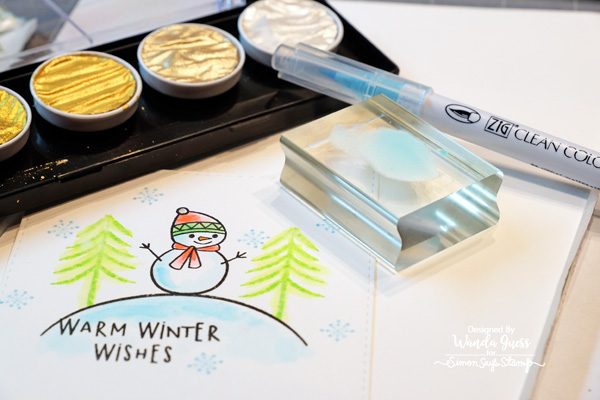
This little snowman is just the sweetest thing with his hat and scarf! I stamped the hill, the sentiment and the snowman in waterproof ink. I stamped the snowflakes and trees in Distress Inks. The coloring was done with Kuretake Zig Clean Color Brush Markers. I chose them for this project because of the pretty colors they come in!

I made this tree card first, and that’s what started my creative juices flowing for today’s post. I lined up the trees in then put the sentiment in the center. The snowflakes are stamped in Tumbled Glass Distress Ink. I added a few clear Hero Arts gems as a finishing touch.

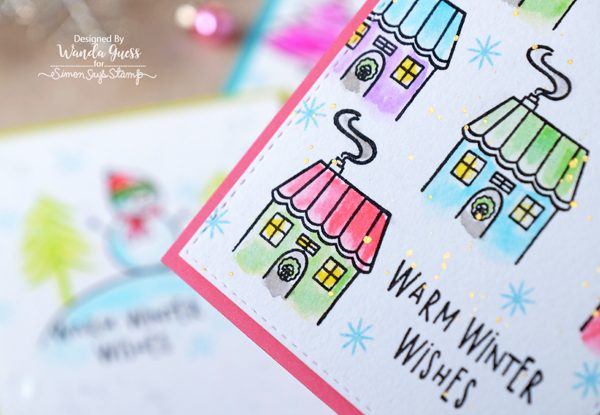
Now, this house card I think is my favorite one! Probably because there is so much color! Each watercolor panel was die cut with the Simon Says Stamp Stitched Rectangles die to give a polished look. I also mounted each panel onto the card base using foam tape. These are just a couple of quick ways to make your CAS cards pop!

I started each card with watercolor paper, and stamped my images in rich black ink.
There are a couple of ways to color with your Zig Markers. I chose to paint onto the images with the markers and then go back over the color with clean water and a paint brush. This gives a darker color wash. If you want the color to look lighter, I recommend painting on your image with clean water first and then adding the color to the water. Just a matter of personal preference! I like both ways.
On the House card and the Snowman card I splattered gold and silver paint over the final images. I LOOOOOVE my Finetec Gold palette. I highly recommend that this paint palette be part of your crafty stash. I’ve been using these paints for a long time and the color hasn’t even started to go down yet. I simply mix some paint and water together on a stamping block and use a paint brush to flick the paint onto the card. This is one of my favorite looks.
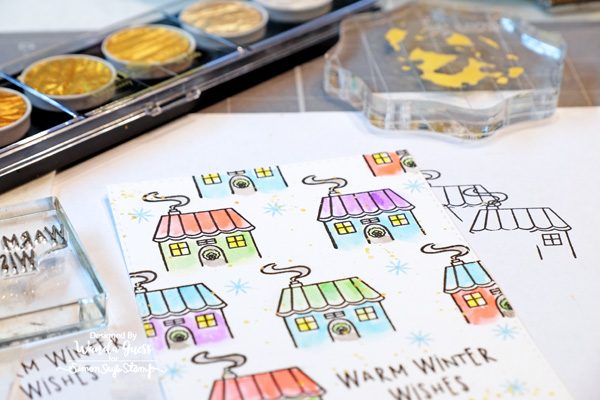
After I did the gold on the card above, I started thinking… I wonder if I can make the white metallic into blue!? So I put down some Zig marker onto a block, added water, and then added the white pearl paint. Voila – icy blue shimmery paint speckles. How fun is that? We can make any color now!
Thank you for joining us here on the Simon Says Stamp Blog! Holiday Cheer and Winter Wishes to you!
SUPPLIES:
 |
 |
|
 |
 |
 |
 |
 |
 |
 |
 |
 |
 |
 |
 |
 |
 |
 |
 |
 |
 |


