Recycling Wrapping Paper For Cards + Merry Christmas From Simon Says Stamp!
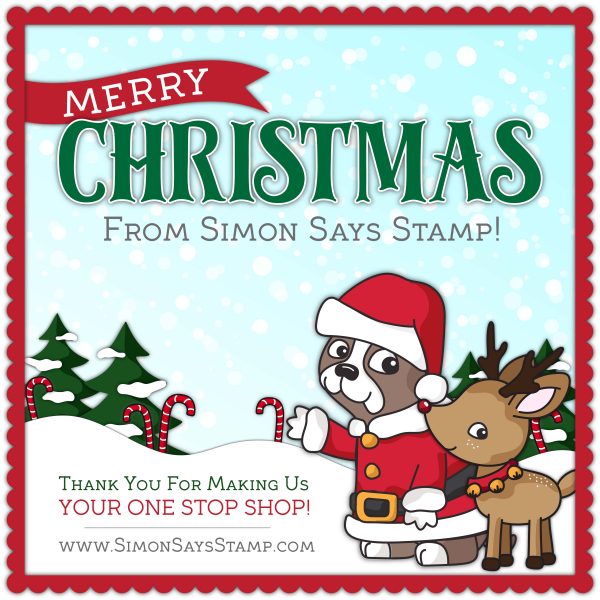
MERRY CHRISTMAS crafty friends!! For those that celebrate, both myself and Simon Says Stamp hope you have a very blessed and happy holiday today!
I know many of you probably have an over-abundance of wrapping paper in your house right now…! Those pretty prints and festive patterns shouldn’t all have to be dumped in the trash can or recycle bin after being torn off of the gifts you exchanged with your friends and family… Today I want to share a tutorial on how to make use of those gorgeous wrapping papers and incorporate them into cute card and envelope sets!
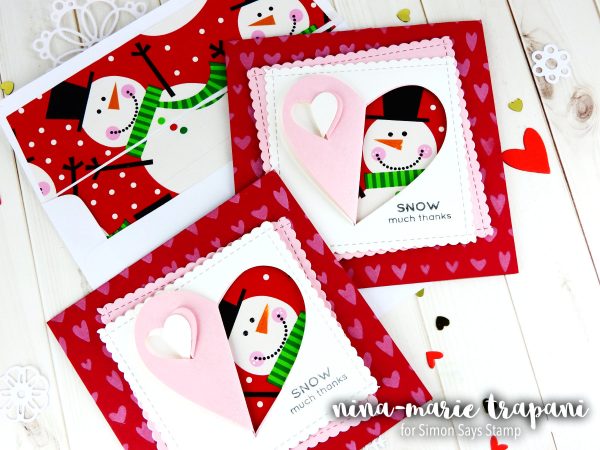
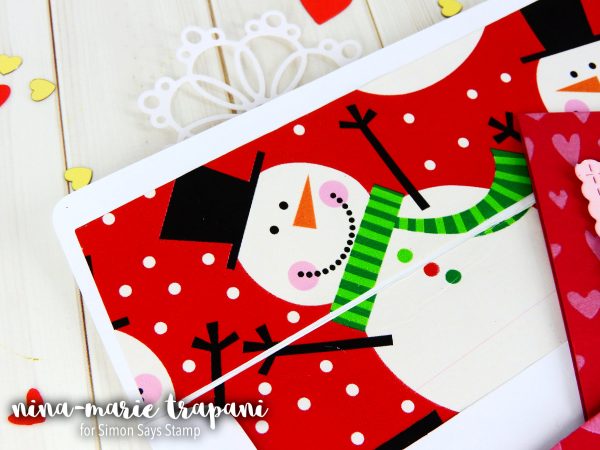
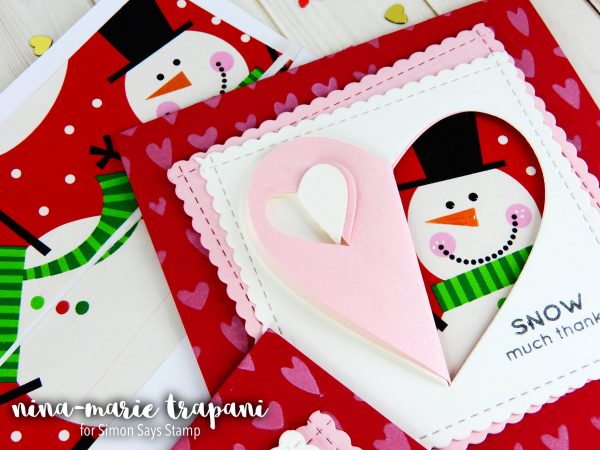
Thank you cards are probably something everyone will be making use of over the next couple weeks, so I thought this would be an appropriate theme for the cards I am making today. I had some super cute snowman wrapping paper scraps left over from wrapping gifts and I thought I’d use the paper with some of the new Hey Love and DieCember™ die sets from Simon Says Stamp. The awesome Heart Fold die is really great for making windows in a card; in the video I will show you how I created the layered appearance!
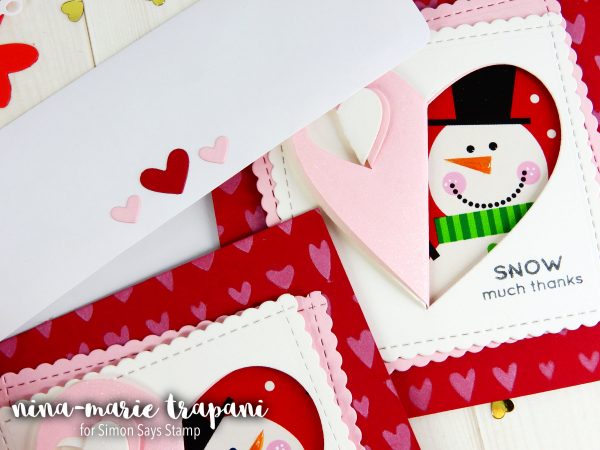
I also used the new Envelope Liner die set to create coordinating envelopes for my cards; because wrapping paper is so thin, it works very well for using inside an envelope because it adds literally no extra bulk! I think it is so fun for the recipient to open up the envelope and find a really cute pattern on the inside that matches the card perfectly. It takes very little time to do this and adds that extra handmade touch to the card that is priceless.
I hope you will check out the video below to see how easy these cards were to put together! I also hope that it inspires you to save some of those beautiful gift wrap scraps from the trash pile and reuse them for making pretty cards (and envelope liners!) for friends and family! Many of the holiday patterns can be used all winter long, not just for Christmas, so I challenge you to see what fun cards you can create using this idea!
WATCH THE VIDEO
SUPPLIES
 |
 |
 |
 |
 |
 |
 |
 |
 |
 |
 |
 |
 |
 |
 |
 |
 |
 |

Weekender with Wanda – Welcome 2017 with Simon Says Stamp!

Happy Weekend! And a very merry and happy Christmas Eve to you! All of us at Simon Says Stamp wish you a wonderful holiday tomorrow as you celebrate with your family and friends! Thank you for another great crafting season full of fun and inspiration. Hard to believe it’s over! Today I want to welcome you back to the latest edition of Weekender with Wanda here on the Simon Says Stamp Blog. I’m delighted to see you on this special day. I had a hard time thinking of what to share today…. Should I share one last Christmas project? Or a Valentine project? Something else? Hmmmm. So I decided to go in the middle – and make a festive New Year card! I used lots of Simon Says Stamp Exclusive products on this one! I combined winter stamps, and baby stamps, and some birthday dies…. And it came together in a cheery greeting to welcome 2017! I’m ready to kick off a new year! This coming week is a good time of calm and reflection of the year that has passed and the new year to come.
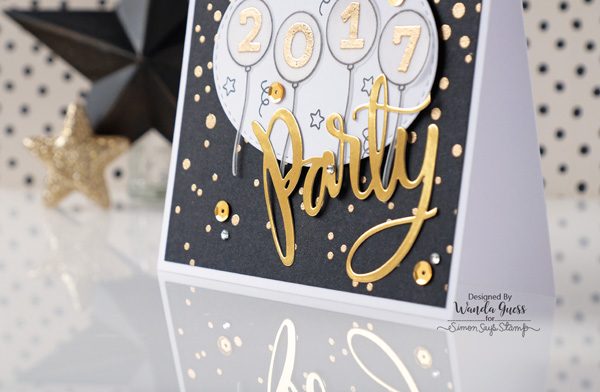
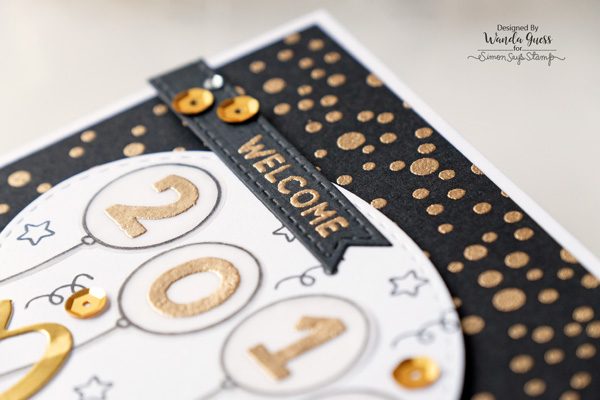
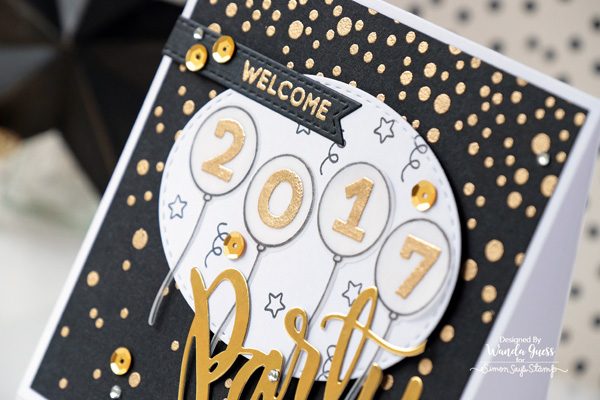
My finished card is a 5×5 inch square. I made my card base out of crisp white cardstock. Next I used rich black SSS cardstock and the SSS Exclusive Falling Snow Background Stamp and heat embossed gold snow! (Or in this case, gold confetti!) This gave me the foundation for the rest of the card. I love how this came out!
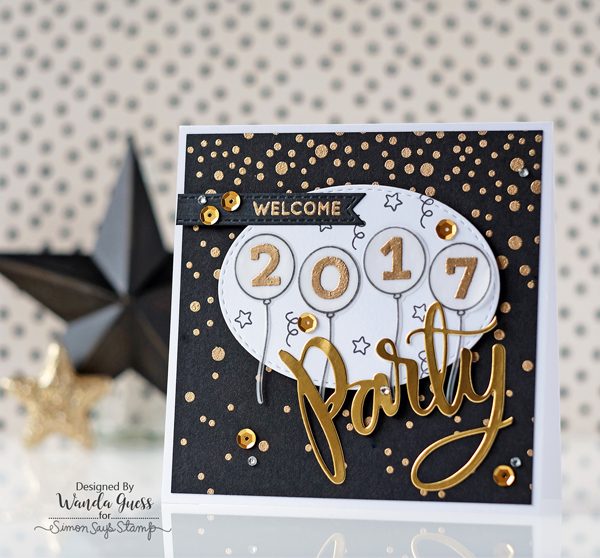
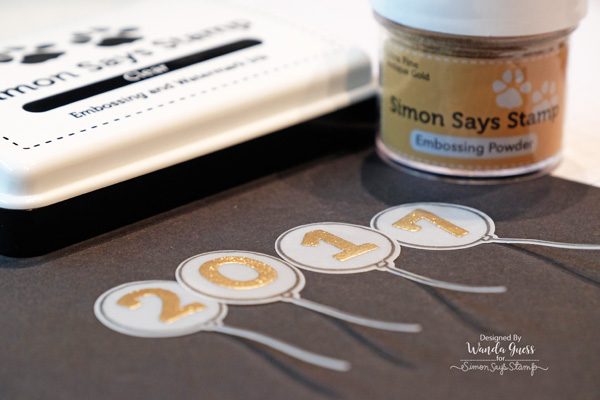
I needed a focal point for the balloons, so I die cut a Stitched Oval in white cardstock. Then I stamped confetti and stars on it using SSS Intense Black Ink, and set that aside. Next up was to stamp and emboss the balloons. I stamped the balloon stamps on vellum and heat set the black ink. The balloons, welcome stamp, and stars/confetti stamps are from the SSS Exclusive stamp set called Cuddly Critters Accessories. After the ink was dry on the vellum, I used the matching dies to die cut the balloons out. Then I used the SSS Advent Numbers stamps and heat embossed 2-0-1-7 in SSS Gold embossing powder. The numbers are the perfect size for the balloons!
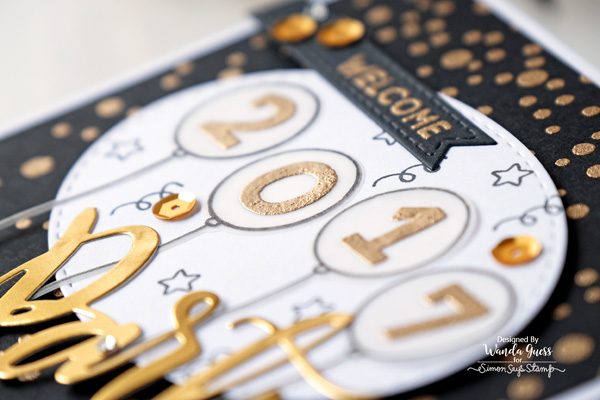
I die cut the SSS Party Circle Die out of bright gold cardstock. This die has a circle around the word party – so I just trimmed the word out with some small scissors. I attached the balloons to the white oval by using a Quickie Glue Pen and putting the glue behind the numbers. That way it doesn’t show. I mounted the oval to the card using foam tape.
I used the Quickie Glue Pen again to attach the party die onto the card. I finished up by sprinkling a few gold sequins and clear gems for a bit more sparkle. Because, well, sparkle! LOL.
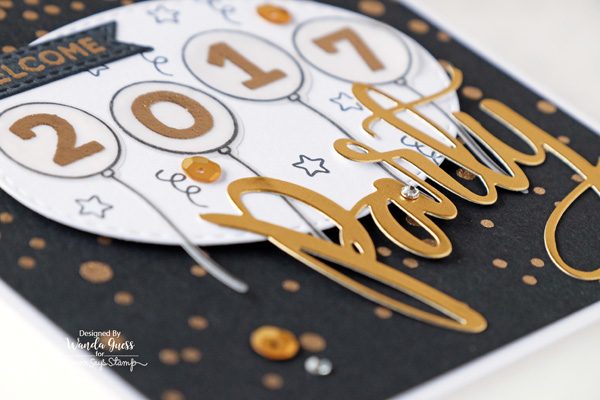
This little welcome stamp actually says Welcome Little One! I used a piece of washi tape over the Little One part of the stamp to mask off just the part I wanted. I heat embossed this sentiment onto black cardstock and then die cut it out with a SSS Stitched Banners Die.
Again, wishing you a delightful Christmas Eve! I’m looking forward to stamping with you in the new year, as we welcome 2017! I’ll see you next weekend right here! Thank you for spending part of your weekend with Simon Says Stamp!
SUPPLIES:
 |
 |
 |
 |
 |
 |
 |
 |
 |
 |
 |
 |
 |
 |
 |
 |
 |
 |
 |
 |
 |
 |
 |
 |
 |
 |
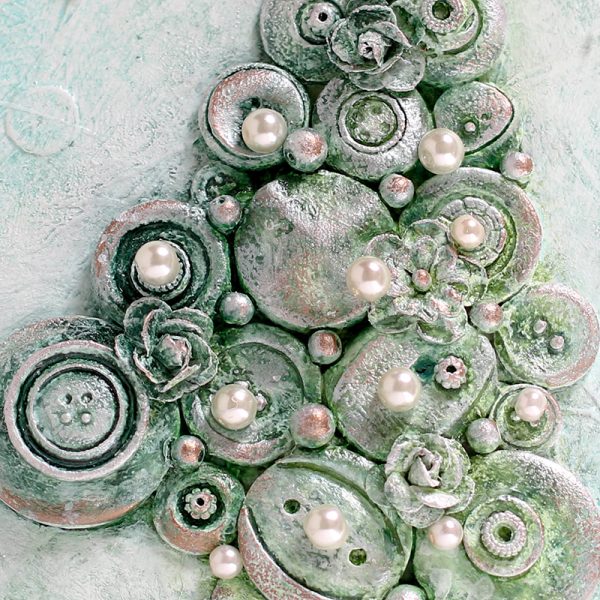
Mixed Medium: Christmas Tree with Shari Carroll
Happy Friday everyone and welcome to the blog.
I’ve had a play in the studio… and created a fun mixed medium project! The process is so soothing and rewarding to me, something I can do over and over again. I’ve always been very inspired by Anna Dabrowska (Finnabair) and decided to finally give her collage techniques a try.
So… I made a Christmas tree.
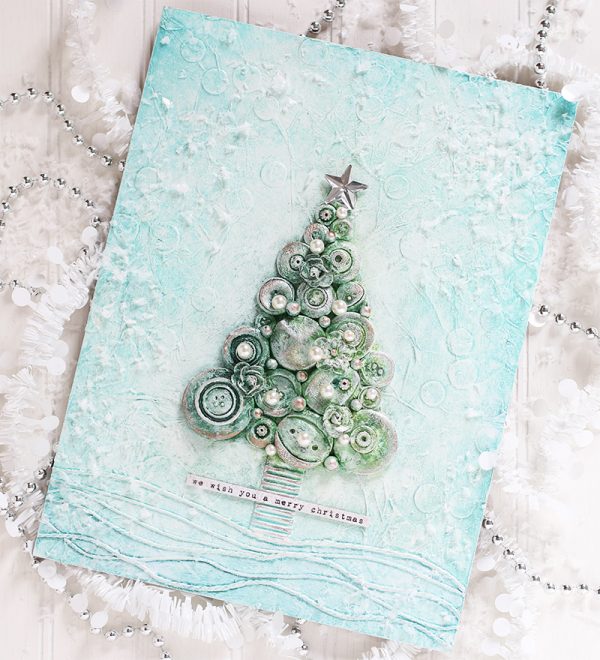
I started out with tissue papers and stencil with modeling paste. Then I added buttons (from a large collection that I need to use) and pearls which I’ve glued in the shape of a tree.
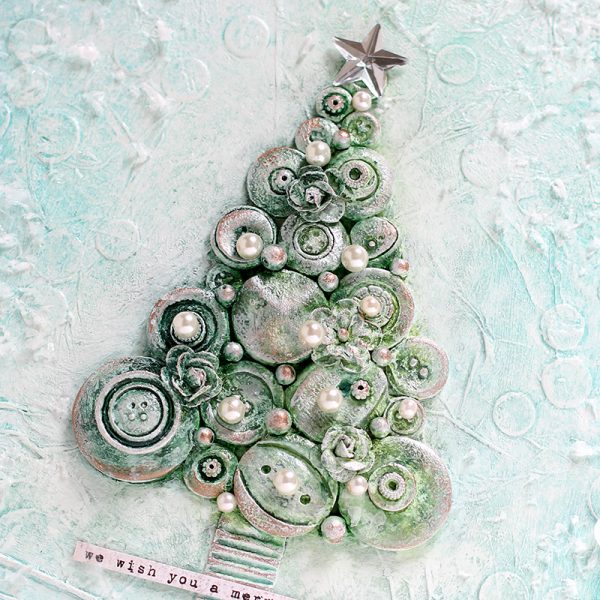
From there I used gesso, sprays, and metallic mousse to create a frosty look.
Do you see a smiley face like I do? lol.. it’s funny how those things happen.
There are so many layers of mediums going on here, quite hard to explain in writing so I’ve created a full process video. You can view below or on our YouTube channel HERE.
You’ll be surprised to see how this started out!
Blog Candy Alert!! Follow our blog via email and comment on this post for a chance to win a special blog candy!
I’d like to wish you well this winter and if you celebrate, have a very Merry Christmas!
 |
 |
 |
 |
 |
 |
 |
 |
 |
 |
 |
 |
 |
 |
 |
 |
 |
 |
 |
 |
 |
 |
 |
 |
 |
 |


