Weekender with Wanda – Fun with Simon Says Stamp Dies!

Hello and happy weekend to you my creative friends! Welcome back to the latest edition of Weekender with Wanda here on the Simon Says Stamp blog! Thanks for spending part of your weekend with me! Hope you have Happy Valentine’s Day coming up this week. The hubs and I don’t have any plans – maybe just a low key dinner together and some nice valentine cards exchanged at home. I wouldn’t mind getting some chocolates though! LOL. Chocolate is always a good idea in my book. When I was little my dad used to always leave a giant heart shaped box of candy on my dresser at night – kind of like the Valentine Fairy came!
Today I’m featuring lots of pretty dies and stamps that are from our Simon Says Stamp brand. Often, I make cards that have only dies and no stamping! Do you do that? There are so many pretty dies available for us to use nowadays. Well, today, my card is about 90% die cuts…and one stamp set used as an accent. I happen to really love working with patterned papers and die cut cards are perfect for using your nice paper pads.
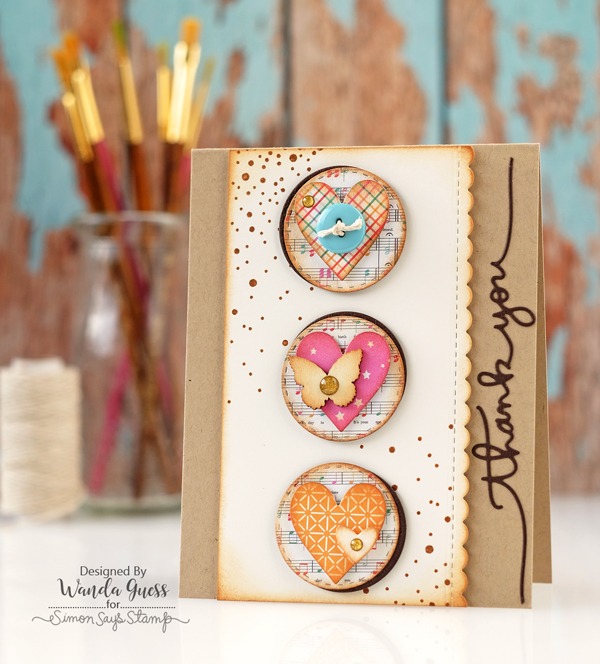
This card started with an A2 card base made from Neenah Desert Cardstock. Next I trimmed a panel of cream cardstock and die cut the long edge using the Simon Says Stamp Exclusive Scallop Stitches Die. I inked the edges with Vintage Photo Distress Ink and a sponge for a bit of a vintage feeling. Now, here’s where I used the awesome Simon Says Stamp Falling Backgrounds stamp set! I used the circles stamp to add accents at the top and bottom corners of the cream panel. It gives just the right amount of interest to all that white space.
Next I had fun using the Simon Says Stamp Stitched Circles Dies and Simon Says Stamp Stitched Heart Collage Dies to cut out pieces from the Party Time 6×6 paper pad. I also die cut brown circles in the same size to layer on the bottom. This gives a nice shadow effect. After all my pieces were die cut out, I used the same Vintage Photo Distress Ink to ink all the edges.

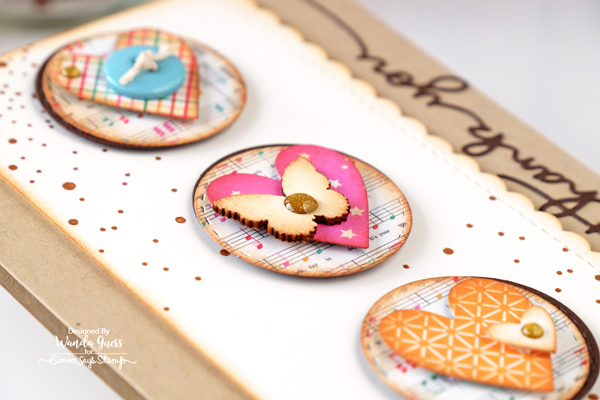
I had fun choosing enamel dots, wood veneer pieces and buttons to add interest to the hearts. I die cut the beautiful Simon Says Stamp Handlettered Greetings Die from brown paper.

Here is a close up of the pretty scallop edge and the thank you die. So pretty!

Here are my pieces before I inked them. I think it makes a big difference to just add a bit of ink!


These wood veneer pieces from Kaiser Craft come in all kinds of shapes and sizes. They are so pretty to add a little something to a card or other mixed media project.


Thanks for joining me today for this die cut card! How do you like to use your patterned papers? I have so many paper pads in my studio I could make cards for 50 years! (But I’m not a craft hoarder! ha). Best wishes for a great weekend and I’ll see you next week!
SUPPLIES:
 |
 |
 |
 |
 |
 |
 |
 |
 |
 |
 |
 |
 |
 |
 |
 |
 |
 |
 |
 |
 |

Color Coordinates: Sweet Pea

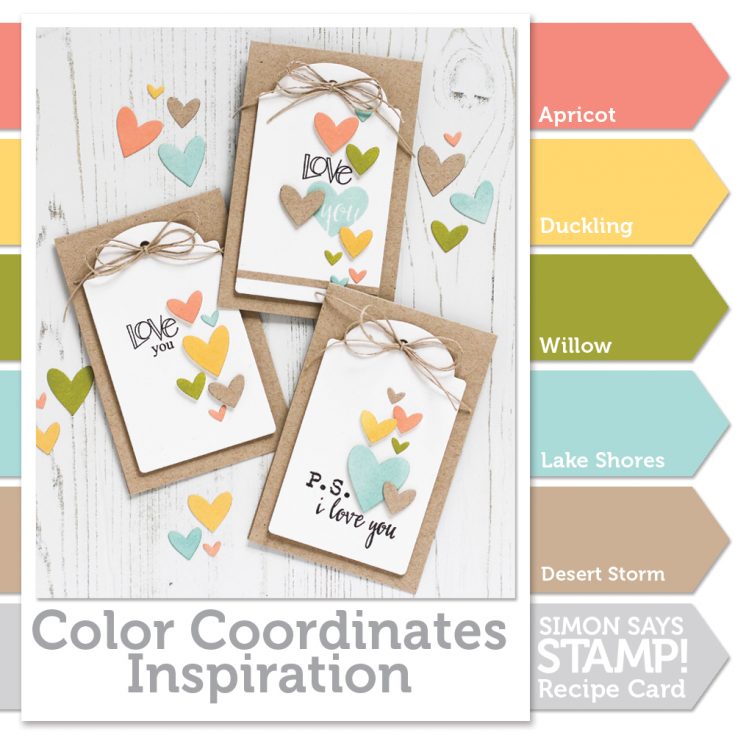
Happy Friday everyone!! It’s Shari here with a Color Coordinates recipe for you that is perfect for Spring, or in my case… my Valentines notes to my manly family.
I’ve chosen muted tones of ink that go well together such as Apricot, Duckling, Willow, and Lake Shores. As my fifth color, I’ve used Desert Storm cardstock.
I’ve created tags by die cutting white cardstock using the Large Tag die to put onto small notecards for my menfolk. To get these started, I colored panels of white cardstock with the inks using an ink blending tool.
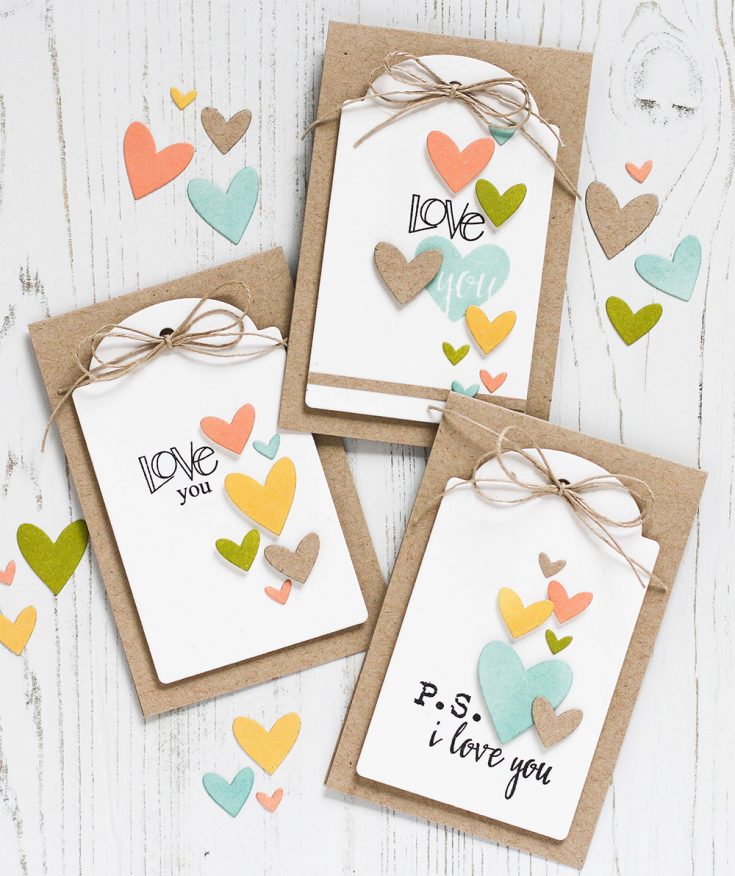
Once I had my panels colored, I use the Clipping Heart Die to cut out my hearts. This die is perfect for these tags because of all the different sizes of hearts in just one die.
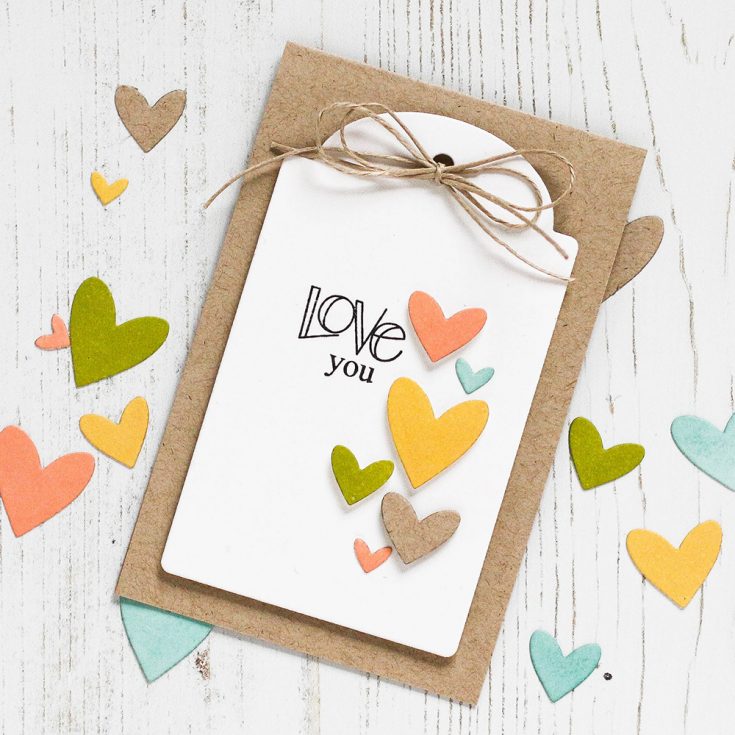
I stamped a greeting from the Love and Quotes stamp set on each tag using Intense Black ink and then assembled the colored hearts around the greeting.
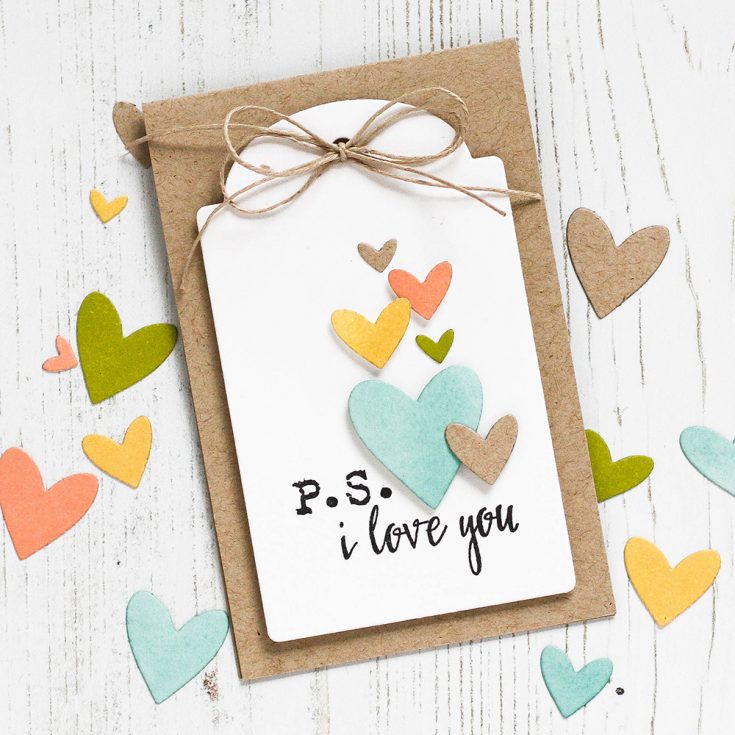
Once my tags were stamped and assembled, I added a twine bow to the tops and mounted them to a 4 1/4″ x 2 3/4″ notecard made from Desert Storm cardstock.

I’ve filmed a video to show you how these came together. You can view it below or on our YouTube channel HERE. I hope you enjoy!!
 Blog Candy Alert!! Follow our blog via email and comment on this post for a chance to win a special blog candy!
 |
 |
 |
 |
 |
 |
 |
 |
 |
 |
 |
 |
 |
 |
 |
 |
 |
We’re celebrating our 14th Anniversary!!!

Hi friends! February is our Anniversary month! As of this year, we’ve been in business for 14 years! We’d like to celebrate with a special discount on our Simon Says Stamp brand! Use code FOURTEENYEARS to take 14% off our Simon Says Stamp Brand products! This discount does not include our card kit or card kit subscription. This code is valid until Sunday, February 12th at 11:59 PM EST. Shop early for the best selection and enjoy!


