Yippee for Yana: Watercolor Galaxy

Hi friends! Thanks for stopping by today! Welcome to Yana Smakula‘s latest edition of “Yippee for Yana“! In this edition Yana is using some new Pretty Pink Posh stamps and combining them with a gorgeous galaxy technique. Please be sure to watch the video, and enjoy!
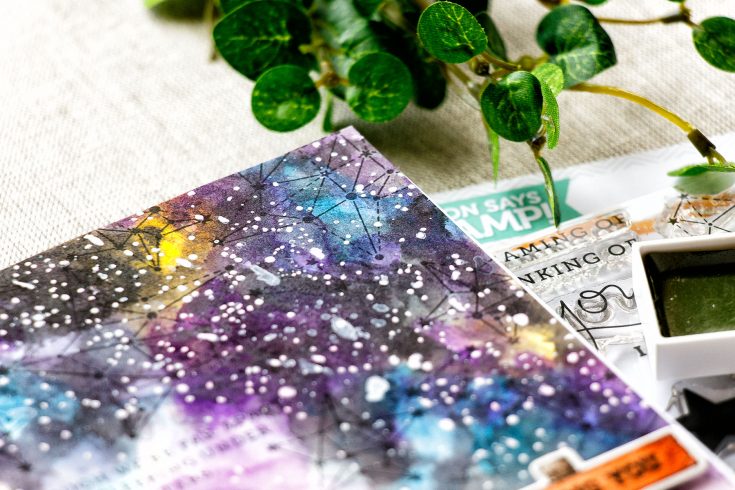
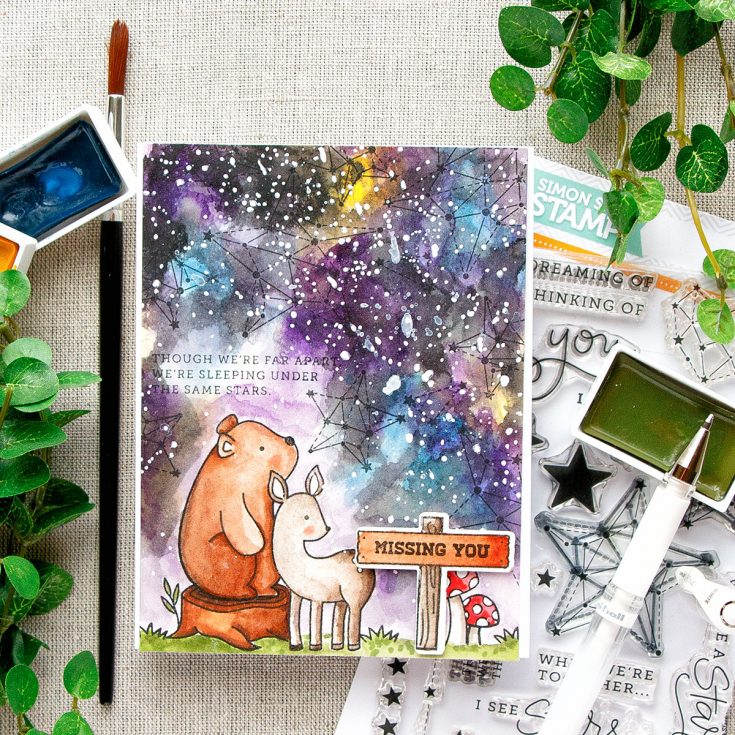
Hi everyone, this is Yana Smakula and I’m excited to bring you another episode from my by-monthly “Yippee For Yana” video series! In today’s video I’m showing you how to create a watercolor galaxy background. This project probably seems intimidating because right now you are thinking “there’s no way I can create that watercolor galaxy background”. Trust me, you can. You just have to give it a try and add some black and white at the end. This really is the main trick.
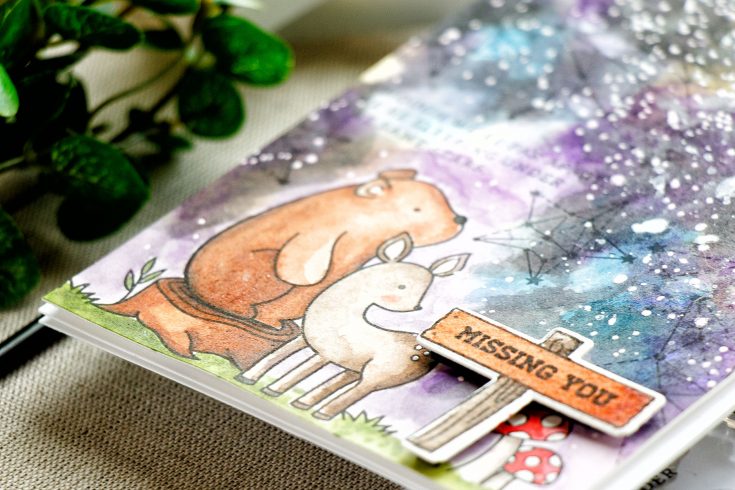
I started working on my project by stamping stars and a sub sentiment from the Seeing Stars stamp set in Versafine Onyx Black ink onto Arches Hot Press watercolor cardstock panel. This particular paper is smooth and perfect for stamping and watercoloring, it has almost no texture at all, so images stamp really nicely. The reason I went with Versafine Onyx Black ink for stamping is this ink is nice and rich and it is waterproof; it was vital to use a waterproof ink for my stamping. I also stamped my critters and I used a bit of masking.
Because I was creating a scene, I need to mask several images for best results. After my stamping was done I moved onto coloring. I taped my panel onto a board (I knew I would be adding quite a bit of water so I wanted the panel to warp as little as possible and I was able to minimize warping by taping my panel down). For my coloring I used Gansai Tambi watercolors and first colored my critters. Later, I used several colors or Copic markers to add details and shading to my images as I didn’t quite like the watercolored result. You can definitely combine different coloring mediums to add details and finishing touches.
Don’t feel like you can’t mix mediums, you most definitely can (and because VersaFine ink is also Copic friendly after it’s been heat set the ink didn’t bleed when it came in contact with markers) To color my background I first wet the paper using a flat waterbrush and next added initial color. I used a heat tool in between each layer of color and dried my paper. My background looked quite bad during the process but as soon as I added black and later white it magically transformed.
I made sure to kept the area around my critters and sentiment light (I added only light shades of blue and purple and just a bit of black) so that the main images still remained prominently visible on my project. I also die cut and stamped a wooden sign from the Camping Friends stamp set by Pretty Pink Posh onto same Arches Hot Press watercolor paper, added a missing you sentiment and watercolored the sign to match the rest of my scene.
I foam mounted my watercolor panel onto an A2 top folding card base – it was trimmed to 4 by 5 ½” and foam mounted stamped and die cut sign on top. I used black foam tape to make sure it wouldn’t be visible on the card. This project was inspired by a card I shared several months ago over on my blog I used the same Seeing Stars stamp set to stamp constellations on my background and went with the same watercolor galaxy technique. Have fun stamping!
WATCH THE VIDEO:
SUPPLIES:
Thanks for reading today, and thanks to Yana for being our guest!
 |
 |
 |
 |
 |
 |
 |
 |
 |
 |
 |
 |
 |
 |
 |
 |
 |
 |
 |
 |
 |

Blog Candy Alert!! Follow our blog via email and comment on this post for a chance to win a special blog candy!
Waffle Flower Crafts: BBQ Star
Hi friends! Happy Tuesday! Thanks for stopping by today! Please welcome back the super talented Channin Pelletier as a special guest on our blog! She made this fabulous summer BBQ card and also a video to take you through the process! Be sure to watch the video, read on, and enjoy!

Hello all!! It’s Channin here and I am so very excited to be here at Simon Says Stamp sharing a video featuring just a few of the brand new products from Waffle Flower Crafts’ stupendous summer release!
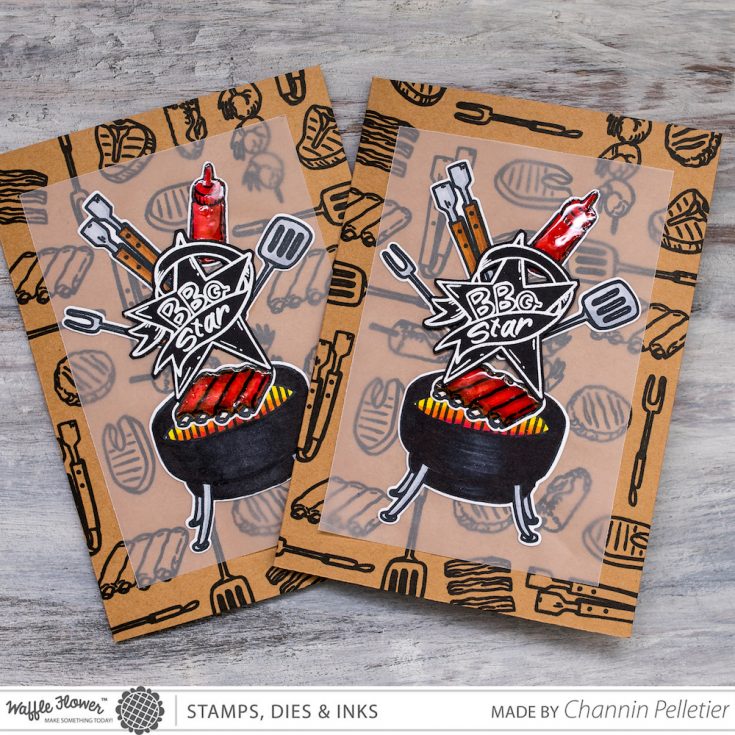
This release is epic! There are 12 new stamp sets and 12 new dies in this summer release! I chose to focus on the more masculine stamp sets, Meat Up and BBQ Sayings, for my card today.
First, I created my A7 card base by trimming a sheet of Neenah Desert Storm to 10”x7” and then I scored and folded it in half to create my 5”x7” card. Next, I repeatedly stamped several images from the Meat Up Stamp Set in Versafine Onyx Black Ink on my card base to create a patterned background. I then stamped some of the images from the Meat Up and the BBQ Stamp Set on a scrap of Neenah Solar White in Memento Tuxedo Black Ink and then used my copics to color the images in.
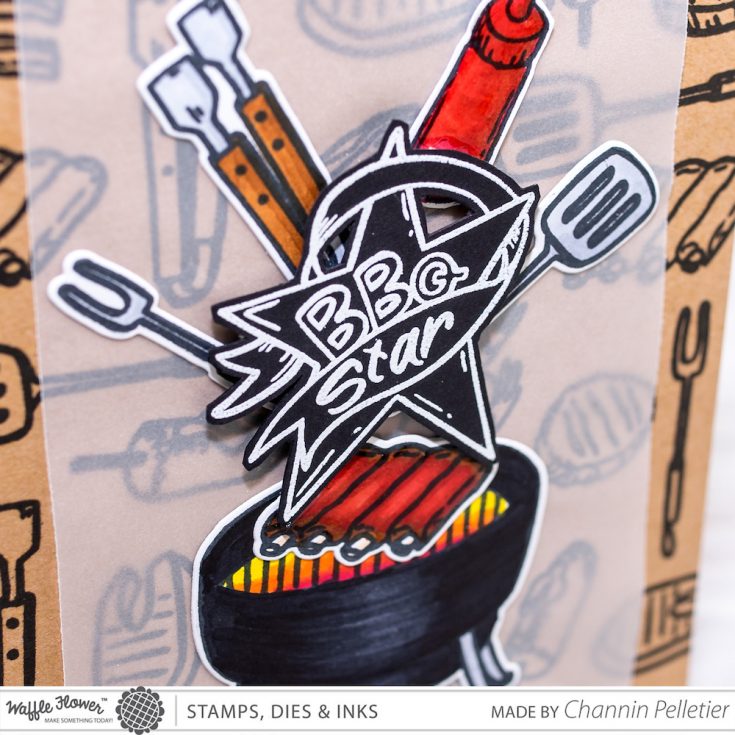
Once I had finished coloring, I die cut out the images from the Meat Up Stamp Set with the matching dies and then fussy cut the ketchup/BBQ sauce bottle. I then stamped and heat embossed a sentiment from the BBQ Sayings Stamp Set in white on black cardstock. I then fussy cut the sentiment out and then used a scalpel to remove the paper in a couple of the negative spaces between the ribbon and the star. I then cut a 5 3/4” x 3 7/8” panel of vellum, then glued the ribs onto the grill with Tombow Mono Multi Liquid Glue, and then arranged all my images and my sentiment over the vellum.
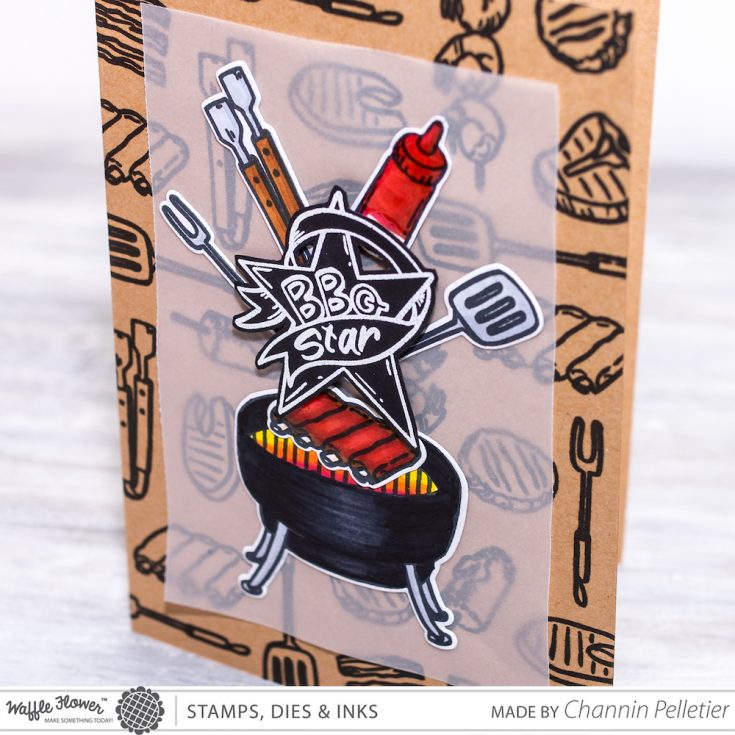
Once I had everything arranged the way I liked it, I used washi tape to hold everything in place, flipped it over, and then applied glue to the backs of all the images and adhered them to the vellum. I then added foam tape to the back of my sentiment and then adhered it to my vellum panel as well. Next, I flipped the vellum over and then added dots of liquid adhesive behind the images and then adhered the vellum to my card base. Lastly, I added glossy accents to the ribs and the BBQ sauce bottle and then called it done! :)
 I hope you enjoyed my card and video! Thanks so much for joining me today!
Watch the video:
Supplies:
 |
 |
 |
 |
 |
|
 |
 |
 |
 |
 |
|
 |
 |
 |
 |
 |
 |
 |
 |
 |
Blog Candy Alert!! Follow our blog via email and comment on this post for a chance to win a special blog candy!
Congrats! Blog Candy Winners!
From: Studio Monday with Nina-Marie: Die Cut Florals + Little Details: Cindylu Miller!
From: Journaling Card Box: Amanda Hayes!
From: Happy National Scrapbook Day!: Melissa Hartman!
From: Amore, Laura Fadora: Tropical Leaves: Cindy Yost!
From: Hi there! New Brand Alert: Flora & Fauna: Monika Reeck!
Studio Monday with Nina-Marie: Die Cut Florals + Little Details
Hello crafty friends! Nina-Marie here with you today and it is Monday once again! Which means, it is time for a new Studio Monday video! I love putting these together for you each week and hope you have as much fun watching as I do creating them!

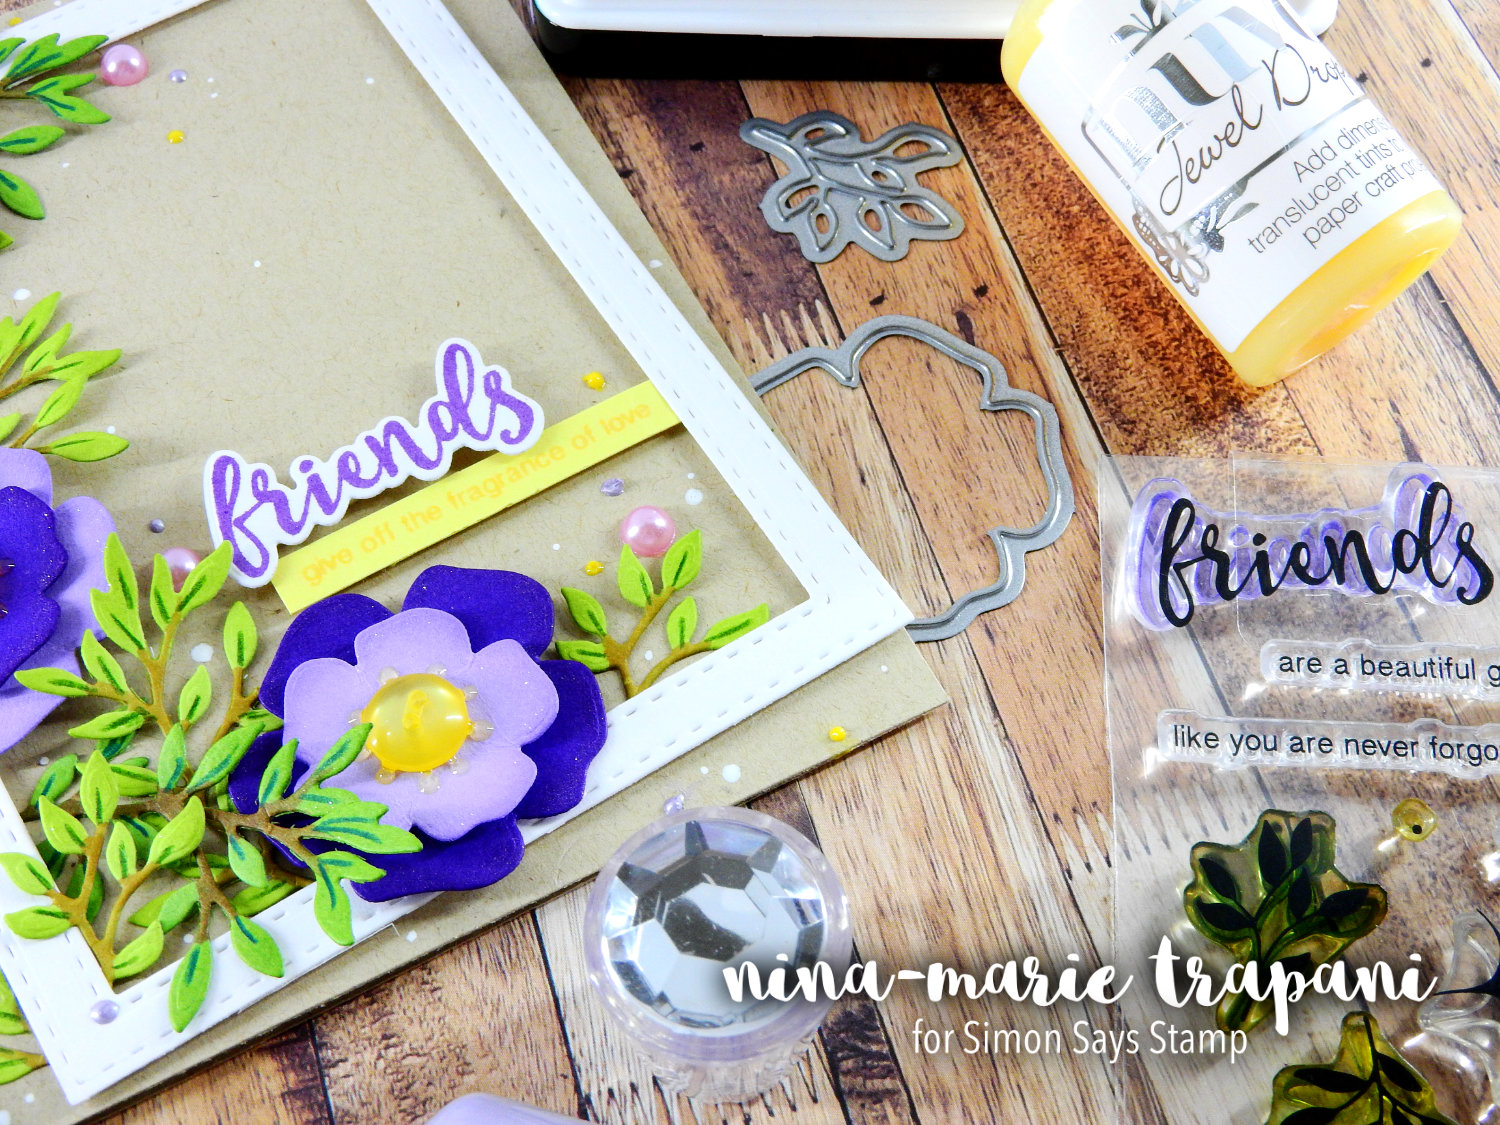
This week I wanted to feature one of our newest stamp and die set combos, the Forget Me Not Trio. I was so excited to design these products, which can be either on their own, or together. No matter how you pair them, there are many different things you can do with these products! In the Forget Me Not Trio collection are the Forget Me Not floral dies, the Friends of Life stamp set and the coordinating Friends of Life dies. I’ll also be touching on adding many small details to your cards; little details go a long way in making a card look truly unique!
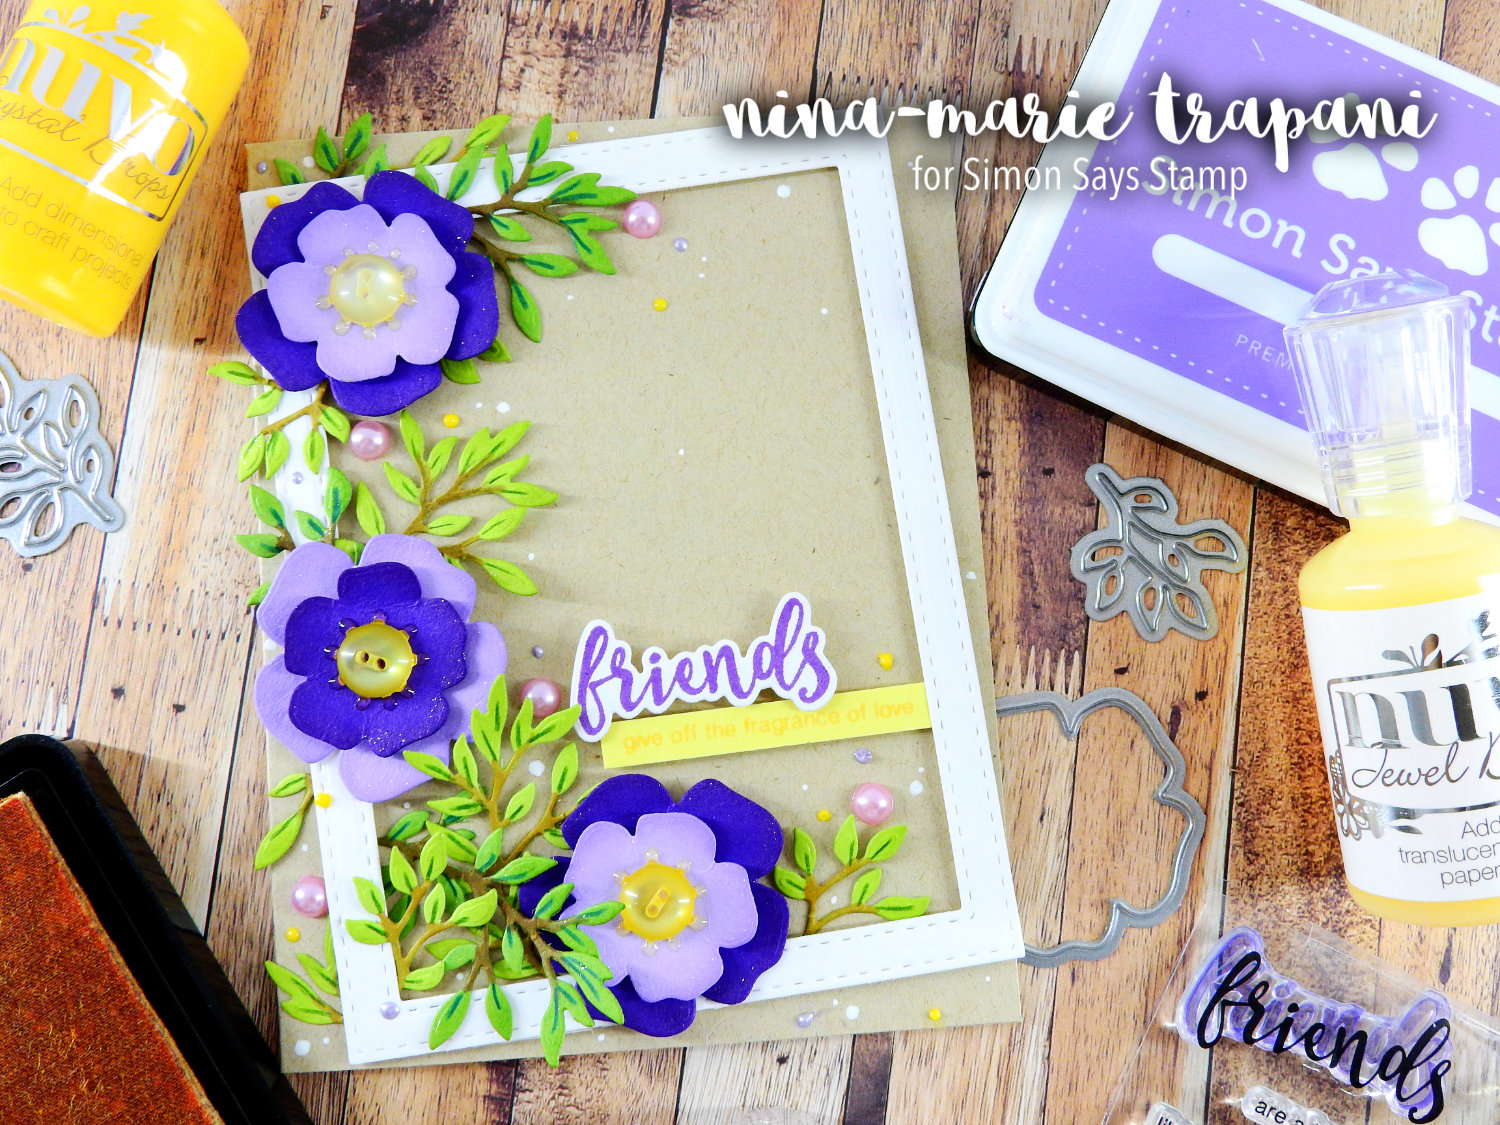
The Forget Me Not floral dies allow you to build die cut flowers and leaves into beautiful arrangements. I cut mine from Simon cardstocks, but you could easily cut them from white cardstock and color the petals and leaves with inks, or cut from watercolor paper and watercolor them in. Or, if stamping is more your style, you can use the flowers from the Friends of Life stamp set and color in the outlines, or do some stamp layering with the solid images. The coordinating dies give you the versatility to cut anything you want from the stamp set.
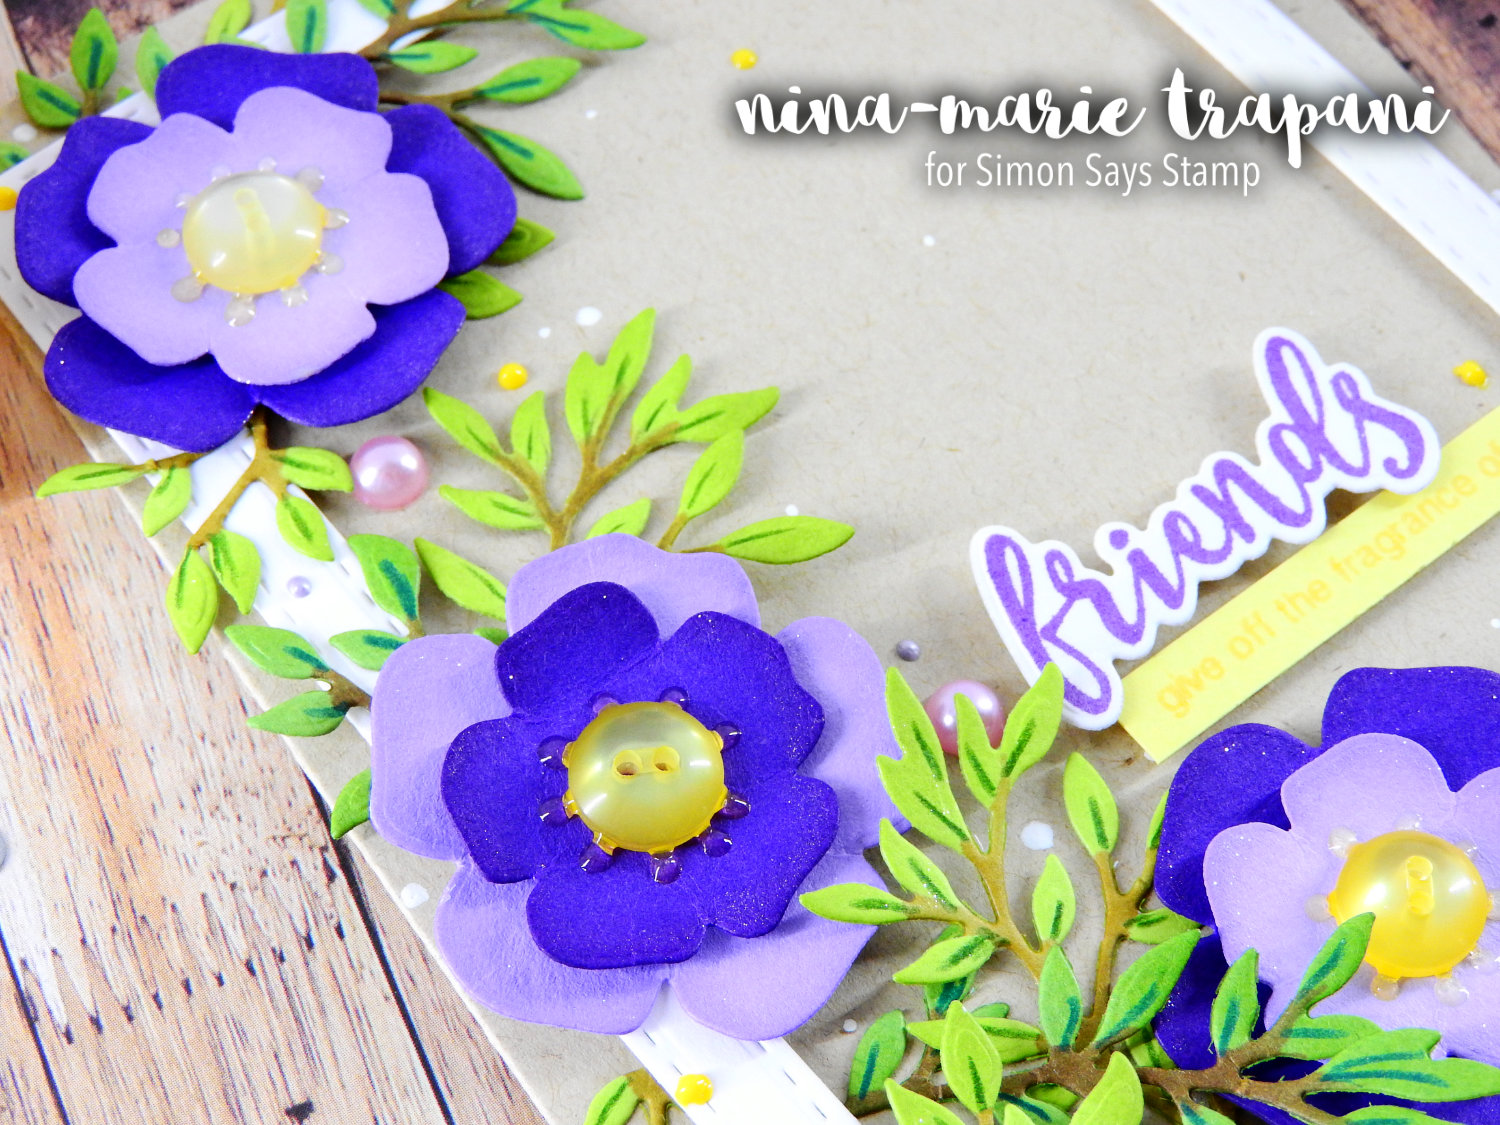
When I die cut the flowers and leaves, I used coordinating ink colors to add just a touch of shading to the edges of each flower and to certain areas of the leaves. This is an optional step and the results are subtle, but I think it adds a nice finishing touch to the final card.
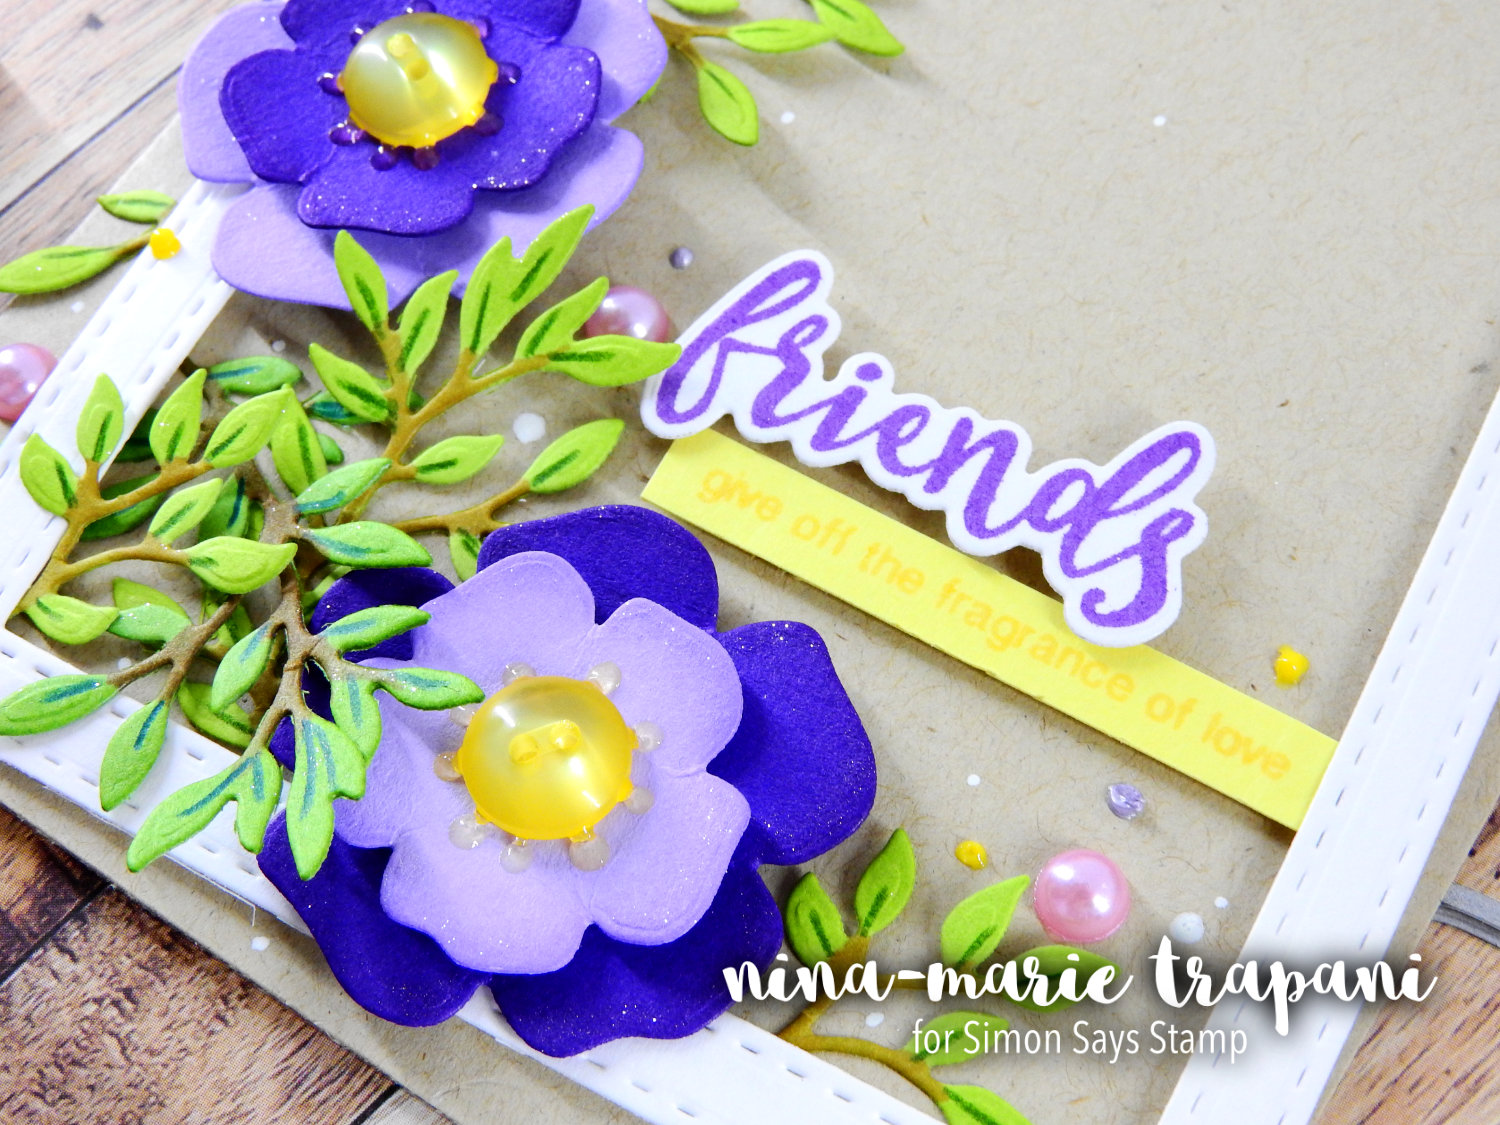
I also swapped out the die cut centers of the flowers for a more embellished look. With a few yellow buttons from 28 Lilac Lane and a bit of Nuvo Jewel Drops, I was able to decorate the inside of the flowers very easily that created a very pretty effect. If you want something a not quite so bulky, you could use the flower center dies that are included in the Forget Me Not floral die set.
For detail on the leaf branches, I added some brown shading to the stems and a bit of green to the “centers” of the leaves. Again, these are small details, but look perfect when combined together with all the other details in the card.

With some Simon inks, I stamped the word “friend” and one of the smaller supporting sentiments (from the Friends of Life stamp set). I also added a few pink half-pearls from 28 Lilac Lane in between my floral arrangement, as well as some more Nuvo Crystal Drops.

After all those embellishments – yes there are quite a few! – I added one more. With a Wink of Stella clear glitter pen, I brushed the edges of each flower and certain areas of the leaves to add a hint of sparkle. There isn’t a ton of sparkle all over, so the little hints actually make you take a second look at the card because you *think* you saw something shimmer! This is a very effective way to make your card just a bit more interesting without being over the top. With all that we have going on in this card, having just the hint of sparkle makes more of a statement.

I hope today’s video not only gave you inspiration for creating beautiful florals with the Forget Me Not Trio collection, but also provided some helpful ideas and tips for adding small details to your card to make the perfect statement. Be sure to stop back next week for my newest Studio Monday video, and subscribe to our YouTube channel to catch all of our weekly videos!
Thanks for visiting me today!
WATCH THE VIDEO
SUPPLIES


Blog Candy Alert!! Follow our blog via email and comment on this post for a chance to win grab bags and blog candy! Remember to tag your awesome projects with #simonsaysstamp on social media so we can see what you are creating!


