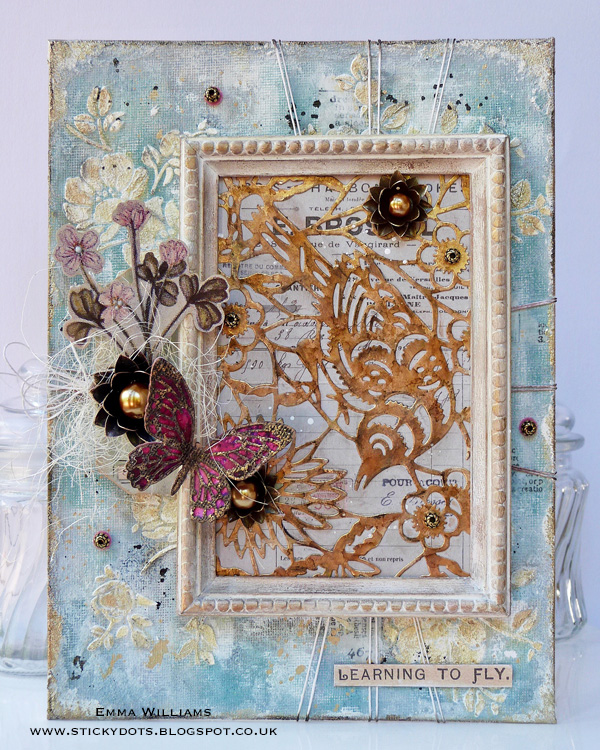
Learning to Fly Home Decor Panel
Hello everyone, it’s Emma here and I hope you’re all having a wonderful weekend! Today, I’m really pleased to be back on the Simon Says Stamp blog and so excited to be sharing this mixed media project that I’ve created. I absolutely love creating my own backgrounds and when I was thinking about a theme for this month’s project, I was inspired by the beautiful new Paper Cut Bird die from Tim Holtz and used this to create an oriental inspired project using a combination of Tim Holtz’s Distress Paints, Layering Stencils and dies to build up the layers. Of course, you don’t have to create a home decor panel like I did, you can also use some of the ideas and techniques to create cards or even scrapbook layouts ~ the choice is yours and there are endless possibilities!
- I began by cutting down the Media Board to measure 7” x 9.5”. The board is pre gessoed and means you can start adding the medium to it straightaway.
- Apply a layer of Weathered Wood over the surface of the board and allow to dry or heat dry using a heat tool. Using a paint brush, lightly dry brush the surface with Antique Linen, allowing the Weathered Wood to still show through but creating a more shabby chic, aged look to the painted surface.
- Once again, dry the paint thoroughly before moving onto the next layer, Peacock Feathers, which again, I applied using a dry paint brush and just gently kissing the surface of the canvas with the paint.
- Place the Floral Layering Stencil in the top right hand corner of the painted canvas and using a palette knife, apply Grit Paste through the stencil directly onto the canvas.
- I continued to add the paste through the stencil, applying the floral pattern to each of the four corners. At this stage, also add a small amount of paste around the edge of the canvas, you only need to smear this on using your finger or a palette knife. Allow the paste to dry thoroughly, and from experience DO NOT be tempted to poke with your finger.
- Once completely dry, take a small amount of the Unicorn’s Hair Sparks Paint and apply to a craft sheet. Add a misting of water and then using a paint brush, brush the paint over the top of the raised stencilled and pasted areas. Gently heat dry the painted surface but don’t leave the heat on any area of the paste too long as it will bubble.
- When the paint is dry, it will leave a very subtle but beautiful shimmer to the stencilled areas.
- Taking the Pumice Stone Distress Crayon, apply a small amount around the outlines of the stencilled areas and then blend the crayon out using your fingers.
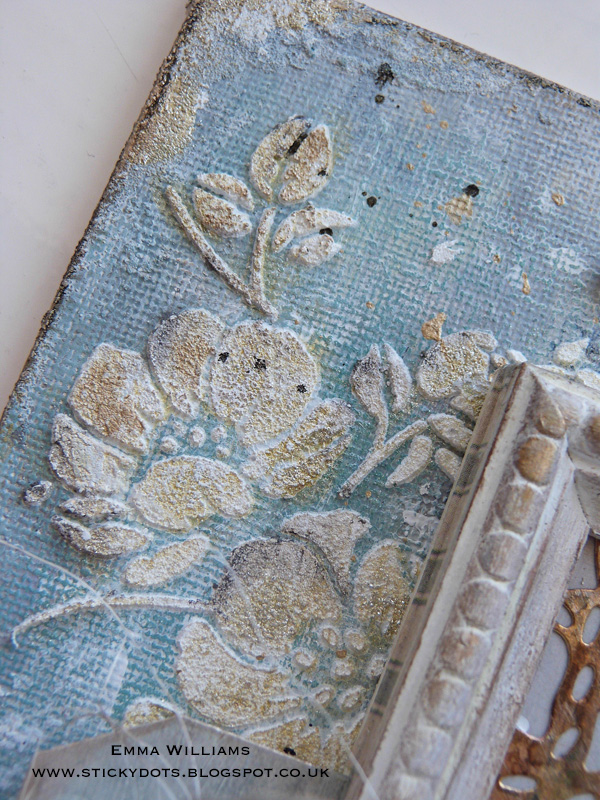
- Splatter the surface with Black Soot Distress Paint and dry the surface completely. Outline the edge of the canvas the Black Soot Distress Crayon.
- Wrap a piece of twine horizontally, three times around the middle of the canvas, creating a fan pattern and securing the ends of the twine at the back. Then wrap a second piece of twine vertically around the canvas creating the same fan out pattern.
- Now, we can move onto the beautiful inlaid style panel and to begin with I gessoed the two sections of the Mini Framed Panel and allowed it to dry. Then add a couple of coats of Antique Linen Distress Paint over the top.
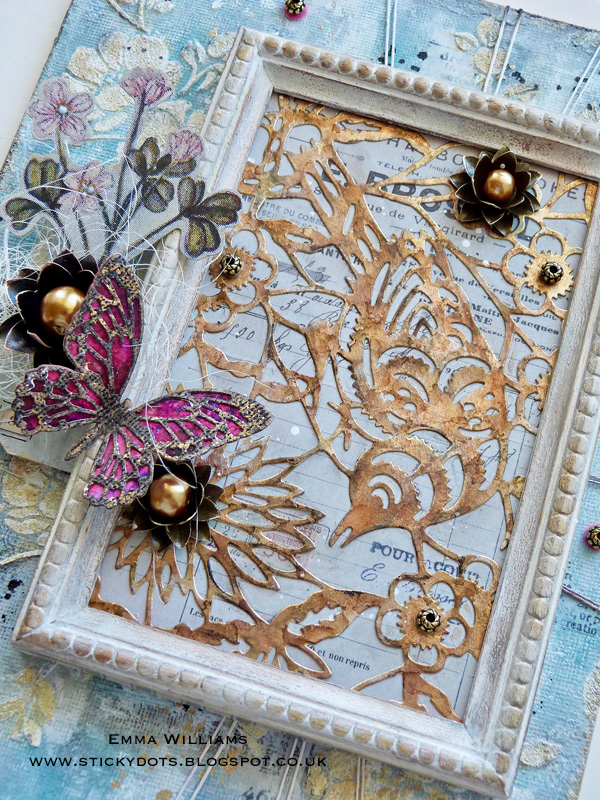
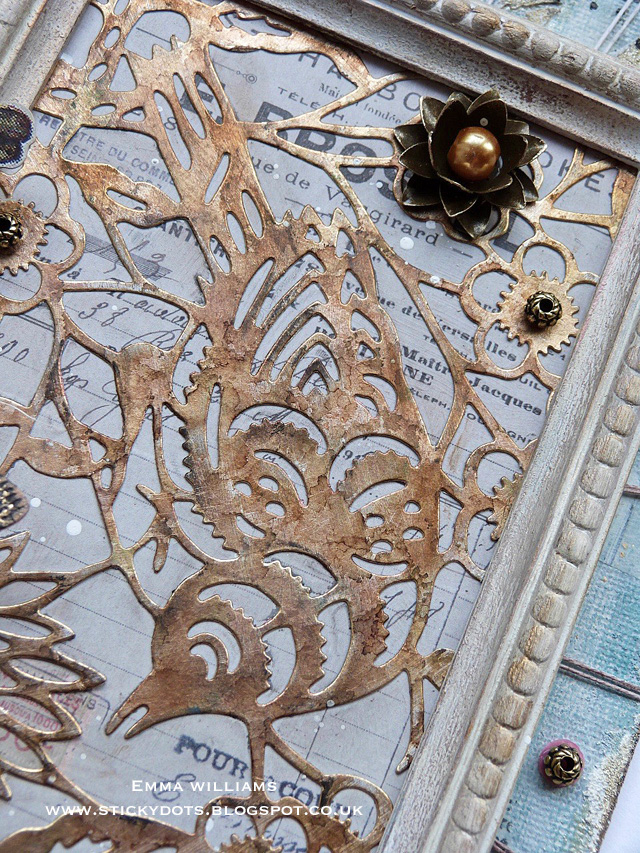
- Once the frame is dry, use your fingertips to apply small amounts of Rose Gold and Bronze Age Waxes over the top to accentuate the beading on the frame. Take the Paper Cut Bird die and die cut the image from Gold Metallic Kraft Paper. For a more aged look, I applied small dots of a combination of Gold Mixative, Mushroom and Hazelnut Alcohol Ink to the ink applicator and pounced the ink over the surface of the die cut.
- Apply a layer of Collage Medium to the back of the die cut and attach to one of the larger pieces of ephemera from the Tim Holtz idea-ology Collector Layer’s pack, before attaching the ephemera piece to the back panel of the frame.
- Place the frame over the top and then apply some of the striped design tape around the frame, to hide the join. Using a hot glue gun, attach the frame to the canvas panel, placing it on the right hand side. Attach Metallic Beads and two of the medium sized lotus flowers to highlight some of the flowers on the inlaid section and place gold glass pearls in the centres.
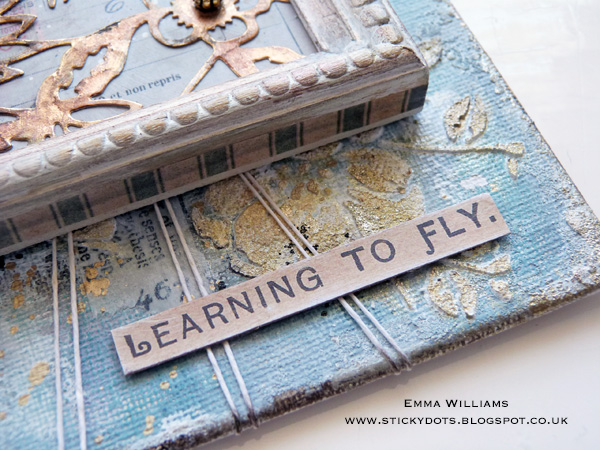
- Cut a 3cm section from the top of a tag and colour with the same paints that were used on the background. Thread some twine thought the hole and then attach the tag to the left hand side of the frame, placing it onto foam pads and attaching it centrally from the top and bottom.
- Using Collage Medium or a hot glue gun, attach a piece of the Botanical Layers and one of the largest Lotus Flowers directly onto the tag, placing it over a bed of sisal fibres. Add a pearl to the centre of the lotus flower.Using a piece of coloured card, I chose pink ~ use one of the Mini Detailed Butterflies die and die cut the solid section. Die cut the filigree section from black kraft stock.
- Layer the black die cut section over the top of the solid piece and attach with collage medium. Gently rub the Collage Glue Stick over the top of the black outlines and then apply the gold vintage foil transfer sheet, shiny side uppermost, directly onto the tacky areas to transfer the foiling. Attach the finished butterfly to the decorative cluster on the left hand side of the frame.
- To complete the panel, I added some more of the metallic beads and attached them around the frame, before adding one of the quotes from the Clippings set and placed this in the bottom right hand corner.
I really hope you’ve loved the creative process behind this project and you’ll be inspired by some of the techniques I’ve used today, it really was a fun piece to create! Thanks so much for stopping by today and I’ll see you again very soon!
Emma
Supplies:
 |
 |
 |
 |
 |
 |
 |
 |
 |
 |
 |
 |
 |
 |
 |
 |
 |
 |
 |
 |
 |
 |
 |
 |
 |
 |
 |
 |
 |
 |
 |
 |
 |
 |
 |
 |
 |
 |
 |
 |
 |
 |
 |
 |

Blog Candy Alert!! Follow our blog via email and comment on this post for a chance to win a special blog candy!
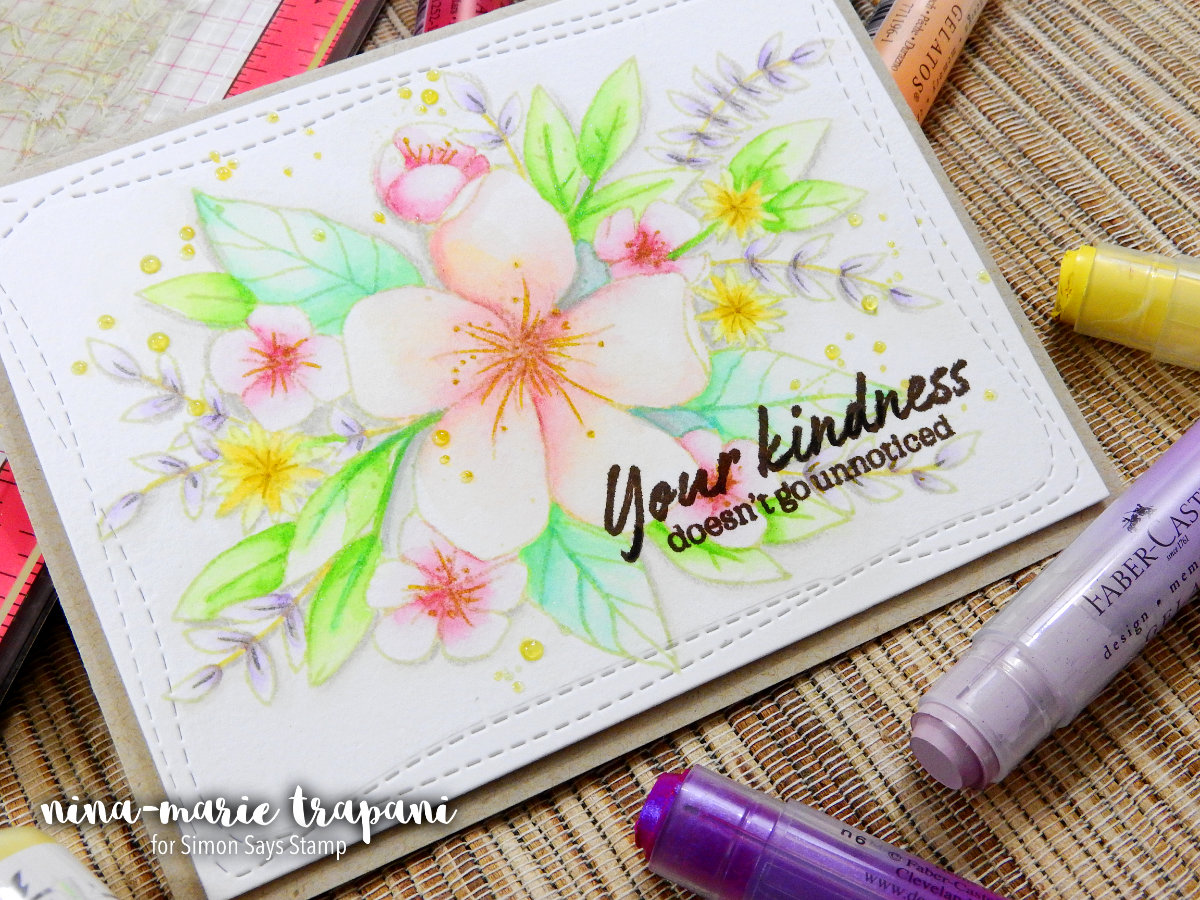
No-Line Watercoloring with Gelatos
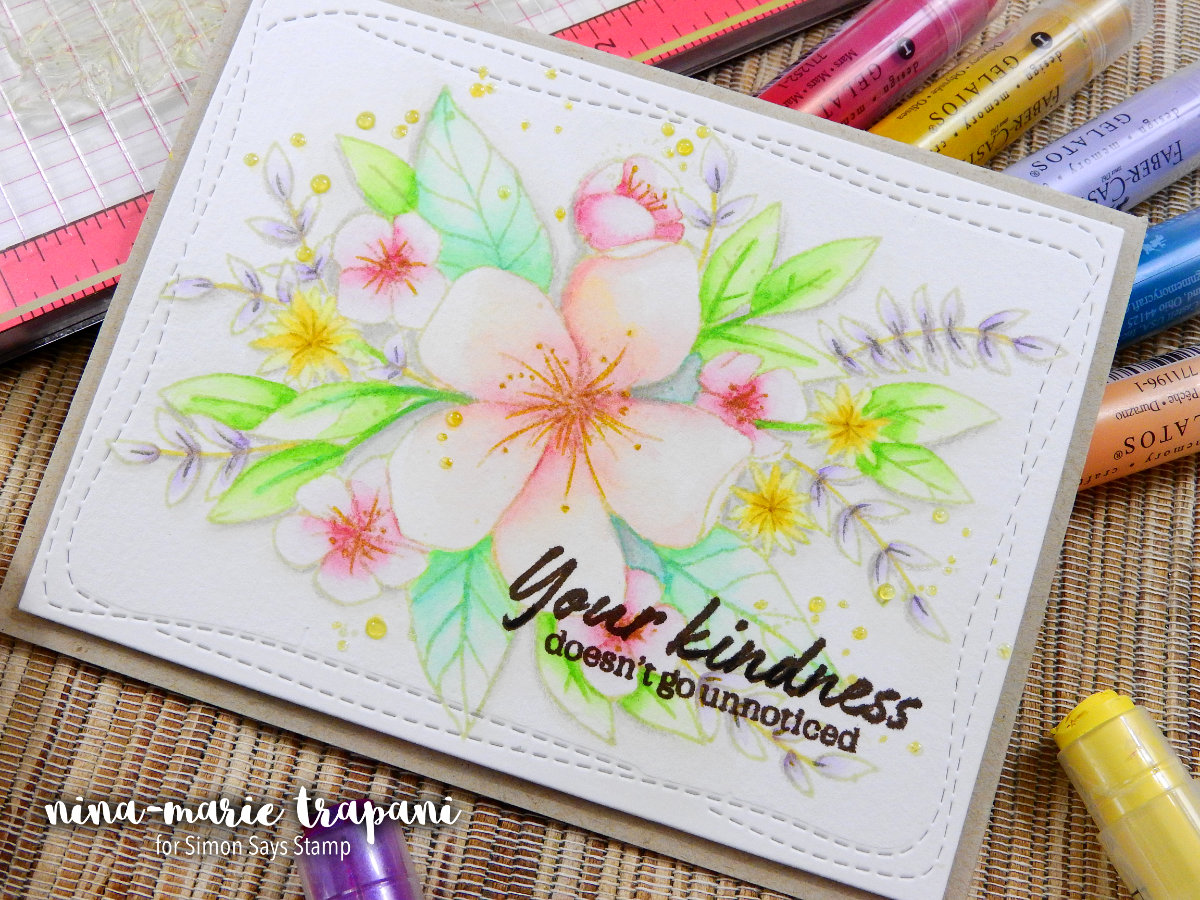
Happy Saturday crafters, it’s Nina-Marie here with you! Today I have a no-line watercolor video to share, featuring products from Faber Castell.
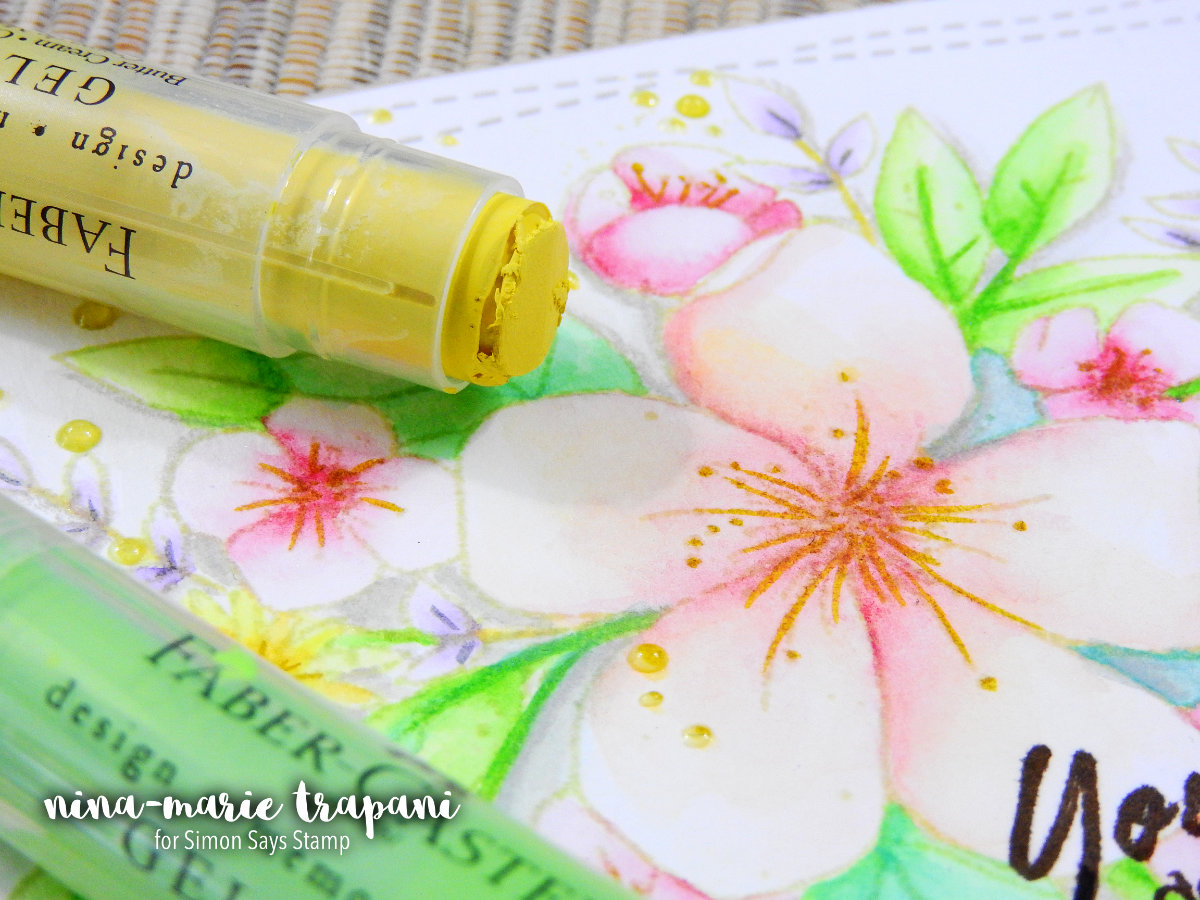
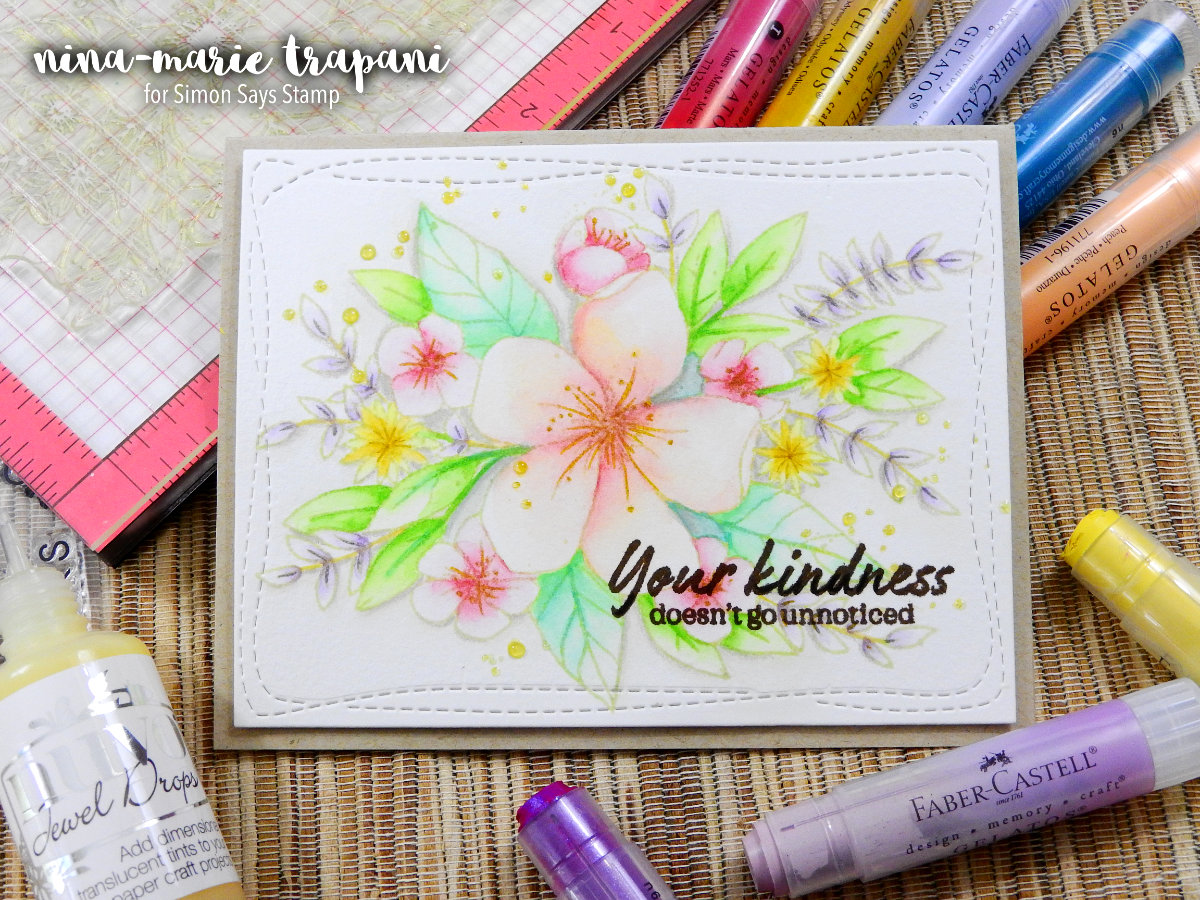
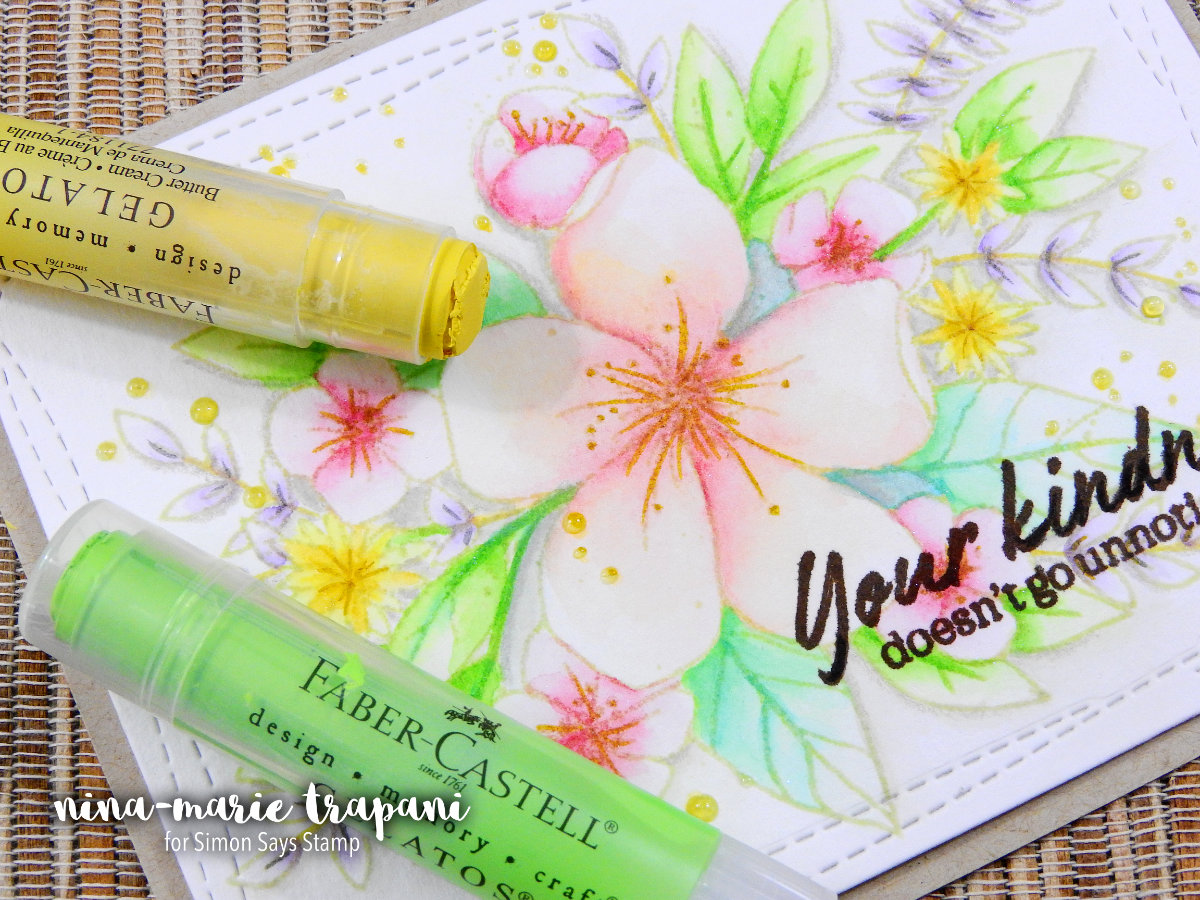
Did you know that Faber Castell is one of the oldest industrial companies in the world? Since 1761 they have been creating art products that we all love and enjoy using. Pretty cool, huh? In the card you see here, I’ve used their gelato pigment sticks to watercolor the floral images from Concord & 9th’s Hello Lovely stamp set.
I did use the no-line coloring technique with this card, but remember that you can always use a darker ink color if you don’t feel comfortable with “no-line”. However, no-line watercoloring is really easy when you use the Barely Beige ink from Simon Says Stamp. This ink was intentionally created for this technique and it is a real game-changer.
The way Simon’s inks are formulated, the lines do not disappear when a pigment is applied over top of them. Instead, the ink becomes a more darker version of the medium that was applied over it. So in the case of the leaves for instance: the lines were originally a light brown. After applying the gelato coloring over top, the lines of the leaves are now a darker tint of the green that was applied.
This same principle will be the same for no matter which type of wet coloring medium you choose to work with (such as markers or watercolors). Here’s a look at the watercoloring in progress; this photo was taken when I was about halfway done. Not all of the watercolor layers have been painted on yet and there is no background coloring.
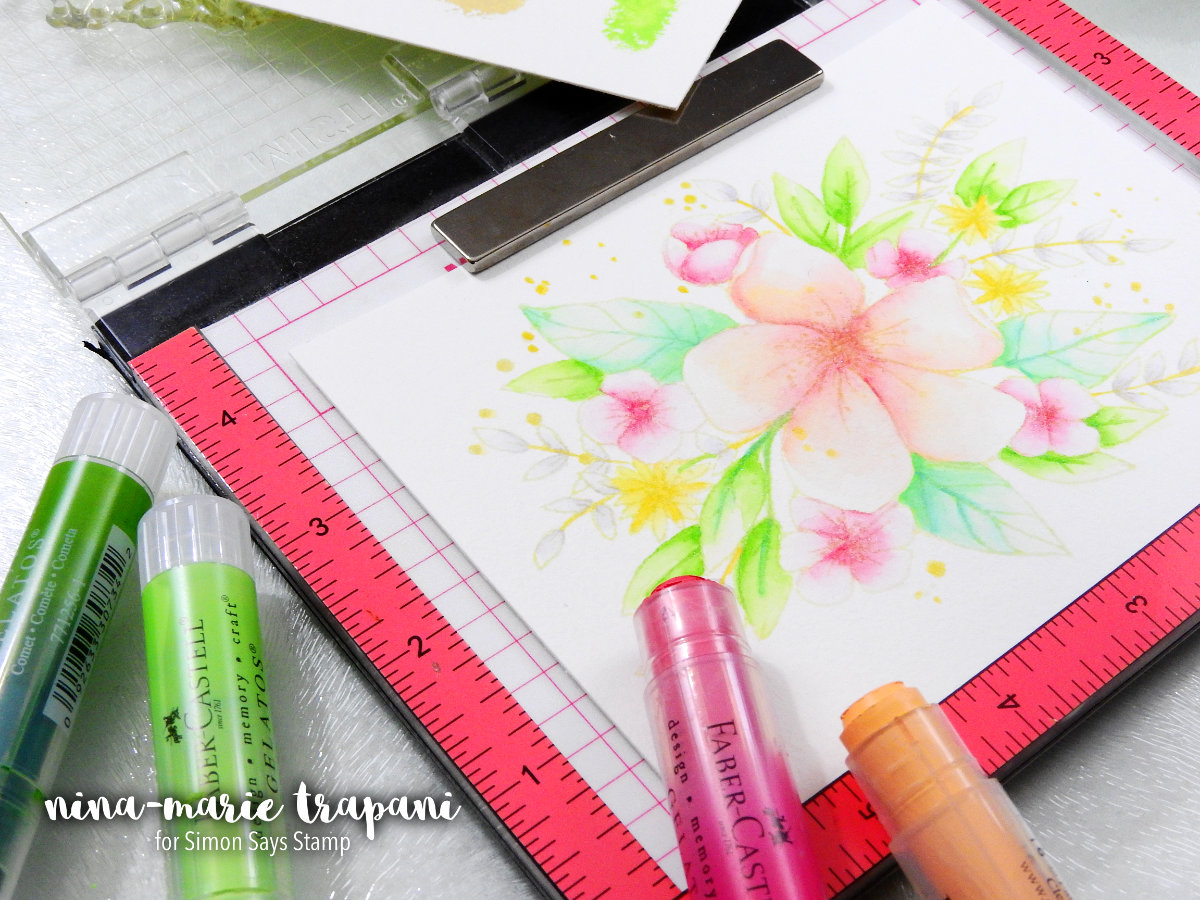
As I watercolored this entire image, I left the paper in my MISTI stamping tool. Normally for a piece like this, I would have taped it to a mini hard board. But because I wanted to be able to stamp back over top of the image later on, I did not remove the paper from the MISTI. The MISTI doubles nicely as a work surface!
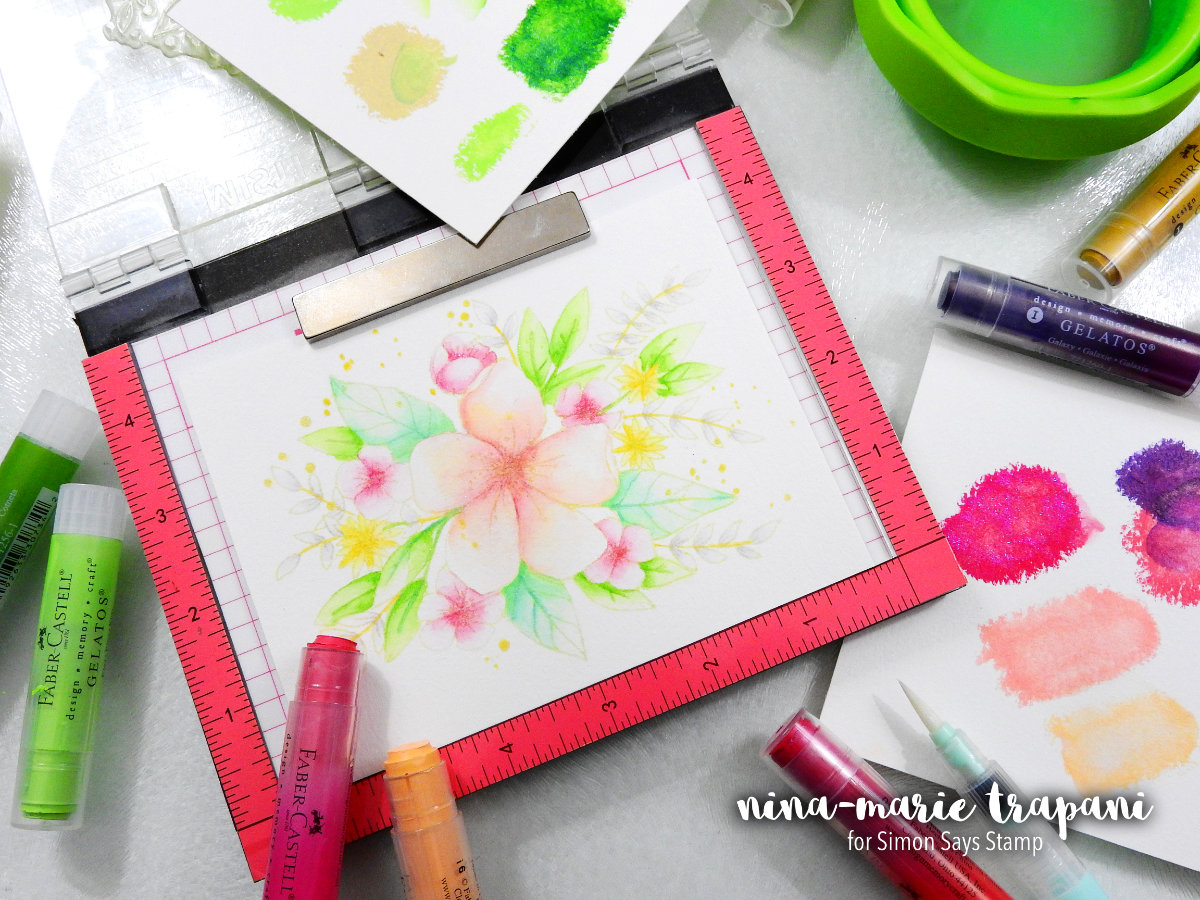
Now you may be thinking, but how can I paint with the gelatos? Don’t let the stick of pigment deter you from giving them a try. There are many different ways you can use these pigment sticks for more than just swiping color across a paper. My favorite way to use them is by making my own little color swatches on paper and picking up the color from these swatches.
By simply scribbling a generous little spot of pigment onto some scraps of watercolor paper, you can take a damp brush and pick up as much or as little pigment as you’d like.
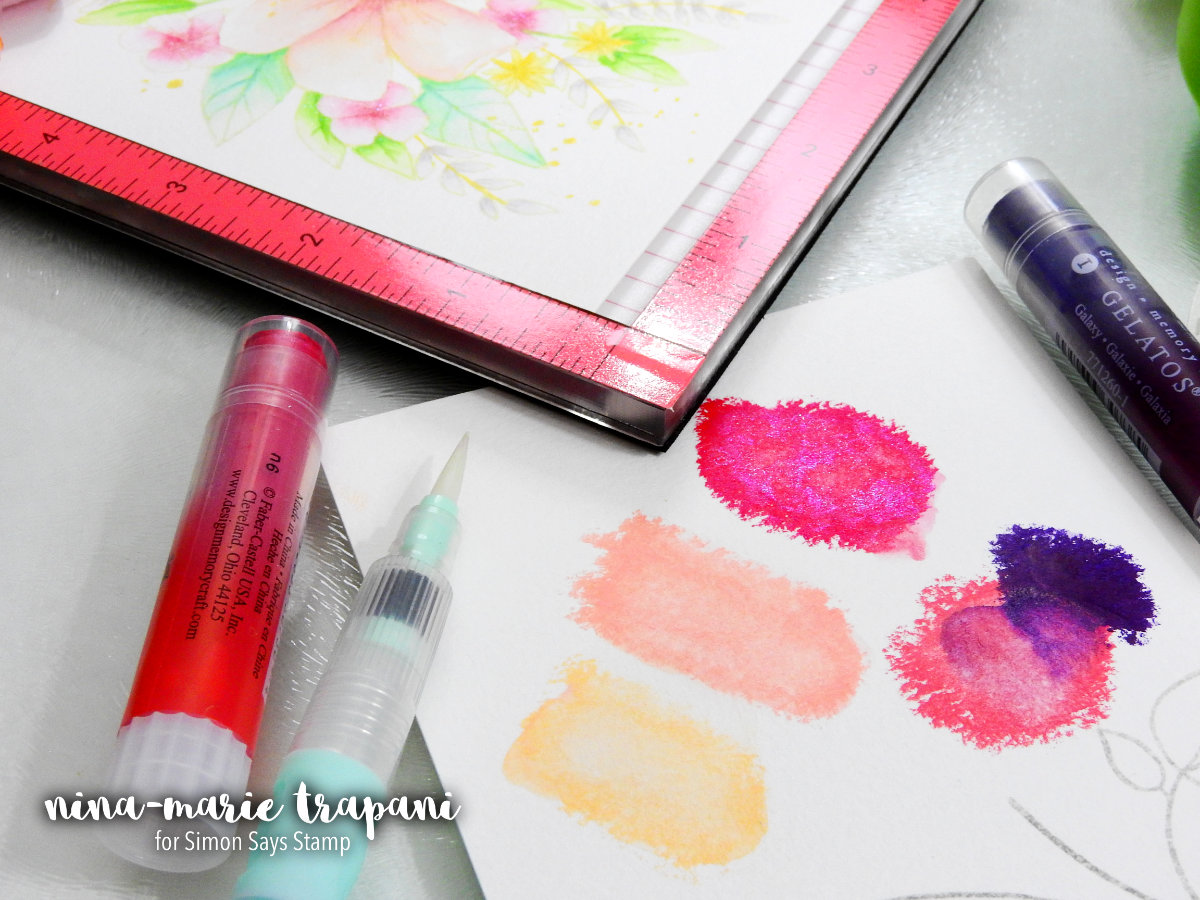
The gelatos reactivate beautifully with water, so you can get quite a bit of use out of these color spots. I was able to paint this entire card with the first scribbles of gelatos that I had put down and still had pigment left on the paper. I saved those to use for future projects.
Another way you could pick up the gelatos is by scribbling them onto a hard painting palette or piece of plastic packaging. But I find I get more concentrated amounts of pigment by scribbling onto watercolor paper.
All in all, I put a few layers of watercolor on each image, simply because I love the layered look. You can add as little or as many layers of gelato watercolor onto your images. Just remember – as with any watercolor paint – let the layers dry between applications. Otherwise you will end up with paper piling.
After the watercoloring was finished, I die cut the panel with one of our new Wonky Stitched Rectangles dies and stamped a sentiment from Hero Art’s You Are Loved stamp set. The sentiment was stamped in our Simon Dark Chocolate ink.
Since I planned on letting the watercoloring have the limelight, I mounted the panel onto a simple Neenah Desert Storm card base and then covered over the yellow splatters (part of the stamped Hello Lovely image) with Tonic Studios’ Limoncello Jewel Drops.
I hope today’s post and video proves helpful to you in doing some watercoloring with gelatos! Bear in mind that you can do many other techniques with this medium and I can’t wait to share more ideas with you using this product!
Thanks so much for visiting with me today, and be sure to stop back on Monday for more inspiration from me!
WATCH THE VIDEO
SUPPLIES


Blog Candy Alert!! Follow our blog via email and comment on this post for a chance to win grab bags and blog candy! Remember to tag your awesome projects with #simonsaysstamp on social media so we can see what you are creating!
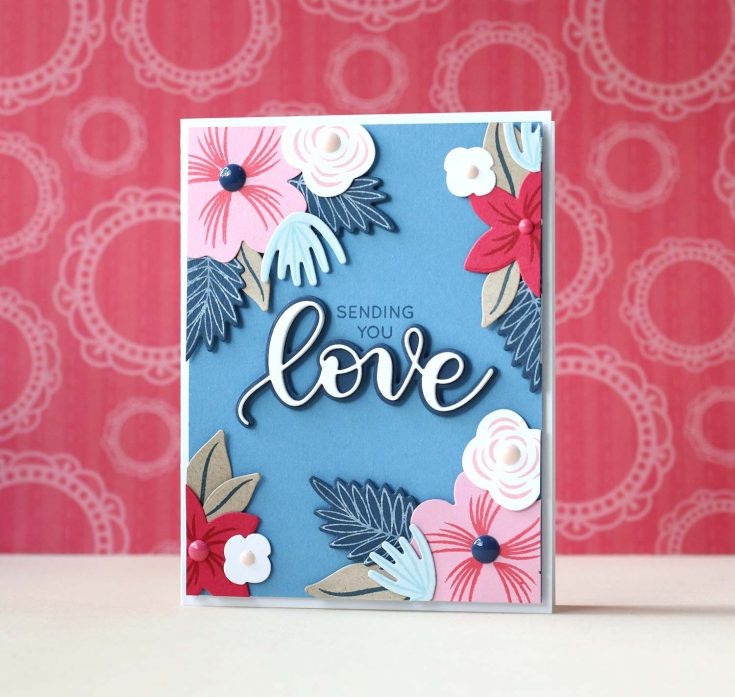
Amore Laura Fadora: Sending You Love
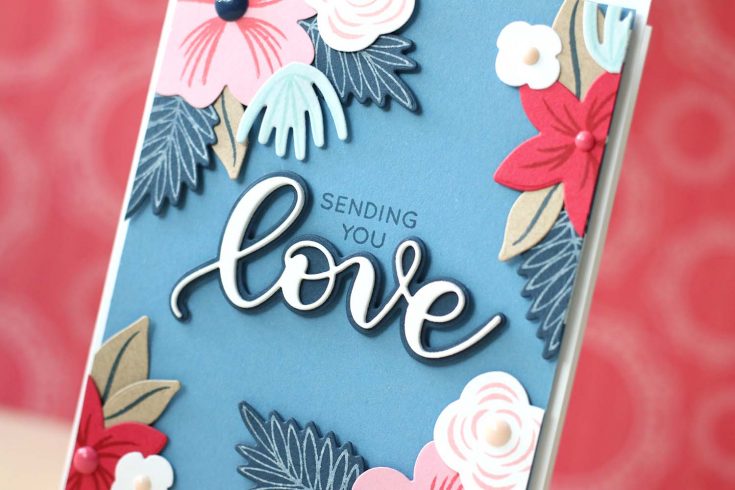
Hi friends! Thanks for stopping by for the latest edition of Amore, Laura Fadora with the fabulous Laura Bassen! Today, Laura has picked a gorgeous palette inspired by Pinterest to make a love card using our Hope Blooms stamp and die set as well as our Kristina’s Love stamp and die set designed by Kristina Werner. Please be sure to watch the video for more information and enjoy!

Watch the video:
Supplies:
 |
 |
 |
 |
 |
 |
 |
 |
 |
 |
 |
 |
 |
 |
|
|
 |
 |
 |
 |
Thanks for reading today, and to Laura for being our guest!
Blog Candy Alert!! Follow our blog via email and comment on this post for a chance to win a special blog candy!


