Work it Wednesday July 2017

Hi readers! Happy Wednesday! Welcome to Work It Wednesday for July 2017!
In case you’re wondering what ‘Work It Wednesday’ is, let me explain: On the second to last Wednesday of every month, we want to see what you’re creating! The Simon Says Stamp community is so very talented, and we want to see more of your cards and projects every month.
We thought this would be a great way for all of you to ‘stretch your creative muscles’ and share what you’ve been working on. So we’ll give you a little challenge each month, and you’ll have until the following month to share what you’ve made. Please limit entries to 3 per month.
Each month we’ll pick a few random participants to win a Simon Says Stamp grab bag!
The projects and cards that were shared for April were so great! We loved what you made, and we look forward to seeing what you make for this challenge.
Do you want to see all of the cards and projects that were shared for June 2017 Work it Wednesday? Check them out!
The following three participants were randomly chosen to win a goody bag from Simon Says Stamp:
Lirpa1972!
Giorgia Rossini!
Maryam!
Please email [email protected] with your mailing address and she’ll get your prize sent out to you.
Now on to this month’s challenge! Add sparkle! Glitter, sequins, glimmery paper, etc. Just add some BLING!
Once you’re done creating, share your project below!
What are you waiting for? WORK IT! ;)
Doodling with Debby: Pencils on Kraft
Hi friends! Happy Tuesday! Welcome to the latest edition of “Doodling with Debby” where Debby Hughes is giving us some cool tips and tricks on coloring on kraft colored paper. Please read on, watch the video, and enjoy!

Hi it’s Debby here today and I’m delighted to be joining you with this month’s Doodling With Debby feature. I have a video below pencil colouring on kraft card using the beautiful Bouquet Of Thanks set.
I’ve only relatively recently discovered the joys of coloured pencils, particularly on neutral card and I’m certainly no expert. However, I’ve had a number or requests to see a video so I thought it was the perfect project to share for my Doodling With Debby feature this month.
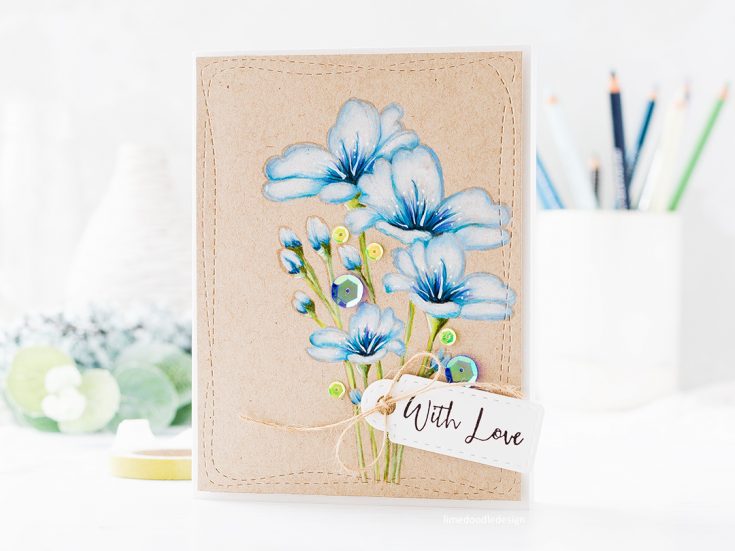
I started the card with a panel of Neenah Desert Storm card. I particularly like how coloured pencils pop off kraft or grey card. The Bouquet Of Thanks stamp set has a lovely large floral image, which I stamped with Simon Says Stamp Clear Embossing Ink. This leaves a tone on tone impression, which gives me an outline to work with, but as I colour the outline fades back leaving just a little definition to the areas not so deeply coloured.
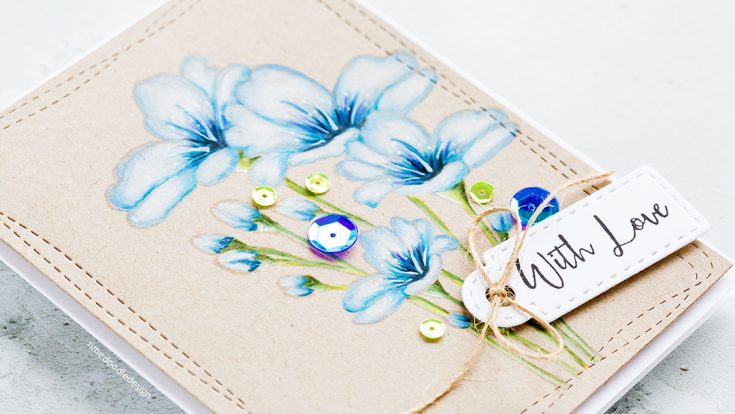
I find the best way to get the most impact when colouring with pencils is to really concentrate on the highlights and shadows. With this in mind I started my colouring by blocking in areas of the petals with a white pencil that I wanted to reserve for highlights. As I continued to colour I’d avoid these areas or use only the lightest of my blue shades. Once I started to get a light base of colour over the petals I then concentrated on getting the deeper colours in place. Using a range of blue pencils and getting progressively deeper in colour I flicked pencil lines from the centre of the flower over the base of the petals. I even used a little black pencil for the deepest shadows.
With the highlights and shadows now in place I finished the colouring by blending the two areas together. I’ve tried using paper stubs and gamsol to blend with but find I prefer simply going over the areas with a pencil and using a little more pressure to build up the colour and blend the areas together.
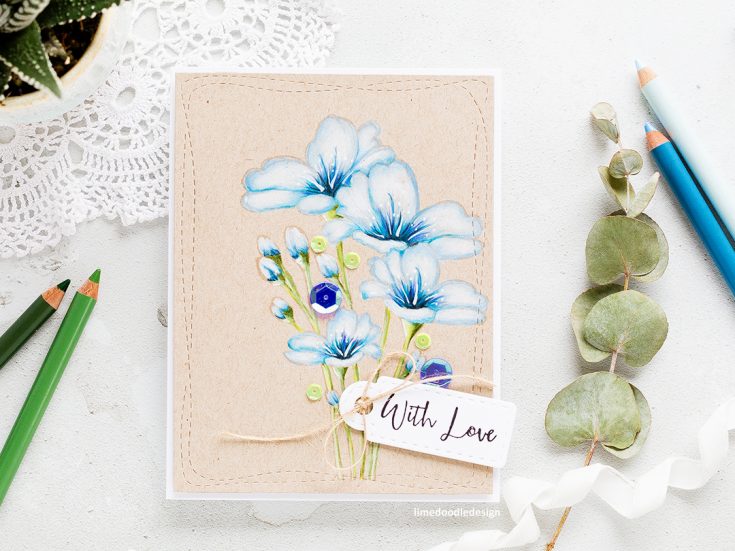
With the colouring now complete I wanted to keep the card nice and simple. I cut the panel with a Wonky Rectangle and added a tag from the Bundle Of Stitched Shapes dies cut from white card and stamped in Versafine Onyx Black with a sentiment from the Bouquet Of Thanks set.
Using foam adhesive I added the kraft panel to a white card base and popped on the sentiment tag. I accented the tag with a twine bow kept in place with a glue dot and then, as a final touch, accented the colouring with Simon Says Stamp Chameleon sequins.
Thanks for joining me today and I’ll see you for next month Doodling With Debby feature.
Watch the VIDEO:
Watch below or in HD at YouTube.
SUPPLIES:
 |
 |
 |
 |
 |
 |
 |
 |
 |
 |
 |
 |
 |
 |
 |
 |
Thanks for reading and thanks to Debby for being our guest!

Blog Candy Alert!! Follow our blog via email and comment on this post for a chance to win a special blog candy!
Congrats! Blog Candy Winners!!
From: Studio Monday with Nina-Marie: Hero Arts Ombre Ink + 2 Cards: Siobhann Bakke!
From: Summer Fruit!!: Chris Edler!
From: August 2017 Together Card Kit Hearts Alive Inlay: Carmela Hubler!
From: Amore Laura Fadora: Live Well Love Much: Fonda Rush!
From: Tiny Terrarium Hello Card with Nina Yang: Sharon Mattingly!
Please email [email protected] with your mailing address (if applicable), the name of the blog you won from, and the prize you won to claim your prize!
Pattern Stamping with August 2017 Card Kit
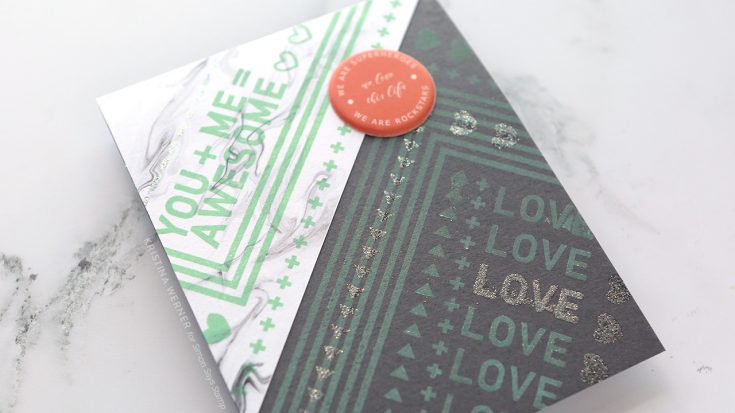
Happy Monday, all! Kristina here with some additional inspiration using the August 2017 Card Kit. I’m keeping it to just contents from the kit to create today’s card, plus a few extra tools and ink. :)
I created the card base out of the Slate cardstock included in the kit, and then adhered a triangle patterned paper to the top left corner of the card. I used this diagonal line as the basis for all of the stamping.
One of the best techniques with Distress Oxide inks is stamping on dark surfaces. Most other inks do not show up on dark surfaces, but the pigment ink qualities of Distress Oxide ink allow it to show up well on darker surfaces. I stamped images from the You + Me stamp set in the kit using Cracked Pistachio Distress Oxide ink.
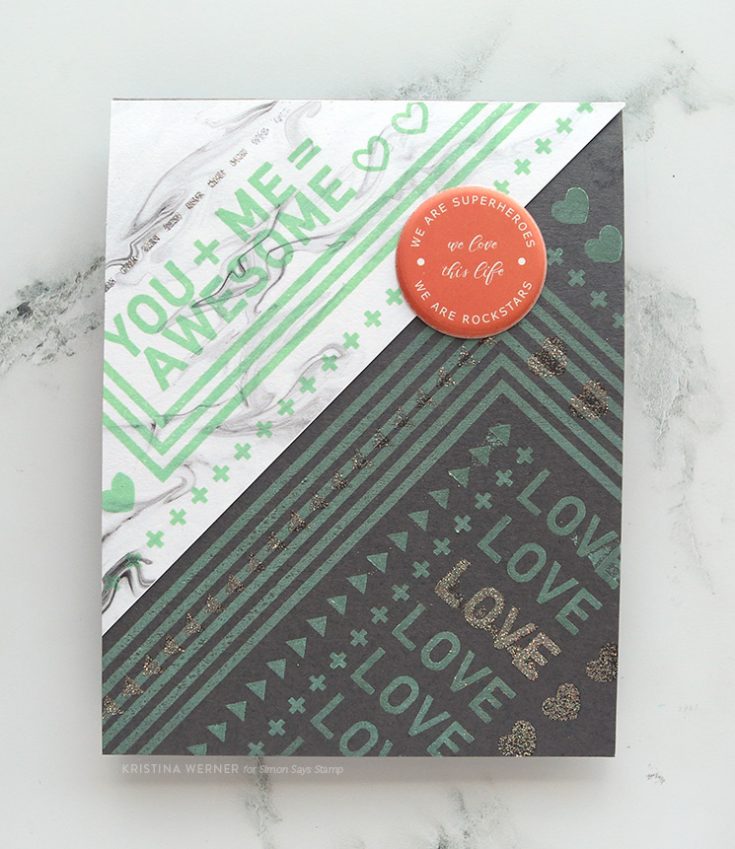
After the Distress Oxide ink was dry, I stamped additional images using Simon Says Stamp Clear embossing ink. This sticky ink gave something for the Wow Cloud 9 embossing glitter to cling to while I heat set it.
To finish off the card, I adhere one of the puff stickers to the top right corner of the card.
I hope you enjoy today’s card and video! You can pick up the August 2017 Card Kit in the Simon store, or subscribe to receive this kit and future kits. :)
Supplies
|
|
 |
 |
 |
 |
 |
 |
 |
 |
 |
 |
 |
 |
|
 |
 |
|


