NEW Fall & Winter Avery Elle Collection!
Hi friends! Happy Tuesday! If you haven’t checked out Avery Elle’s new Fall collection (that includes holiday items) for 2017, be sure to check it out! It’s never too early to start making Christmas cards! I like that special guest Jamie Gracz kept the coloring pretty simple and classic for this cool card! Read on!
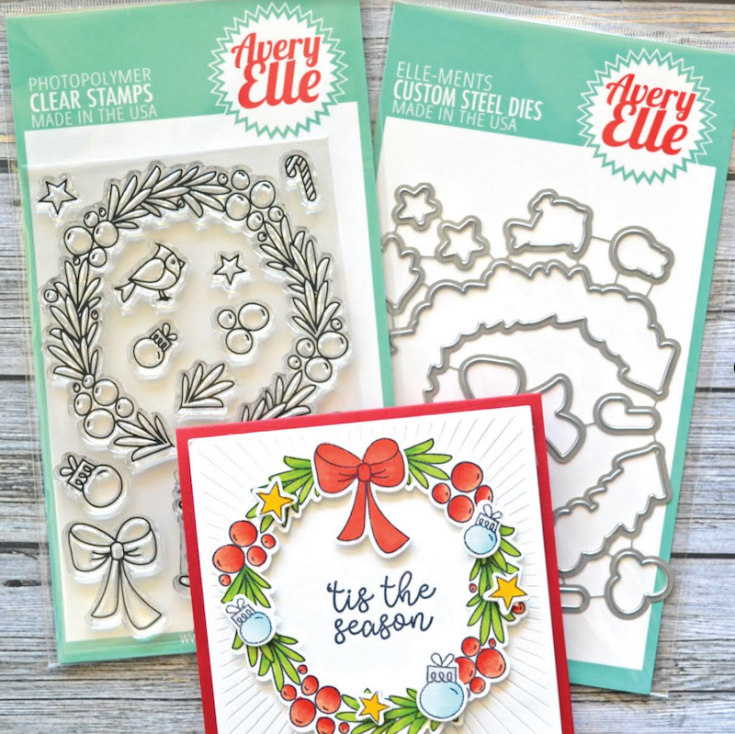
Hi this is Jamie from Avery Elle and I am so excited to show you a card I made with some of our new Fall Release items. We have 13 new stamp sets, 16 new die sets and 7 new embossing powders that just released!! Woo Hoo!
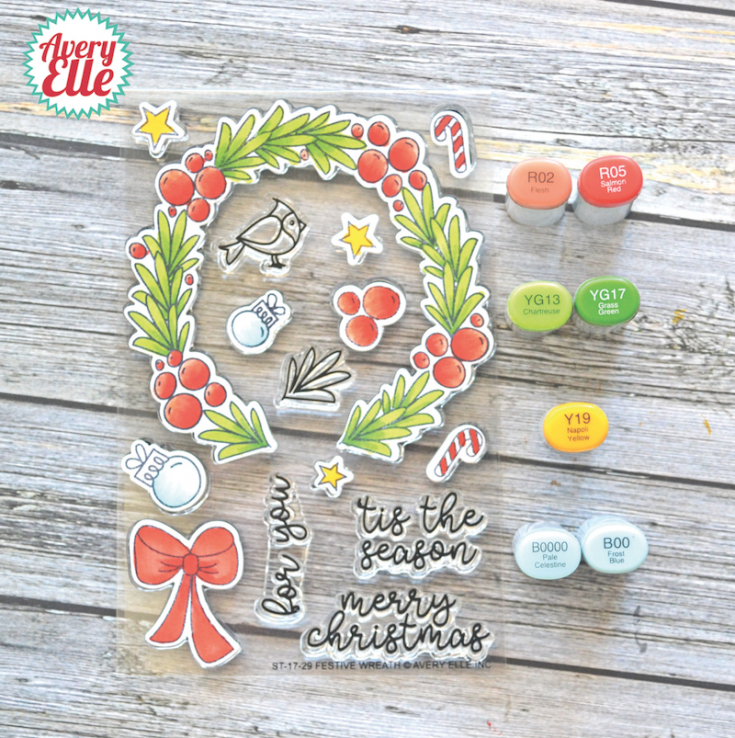
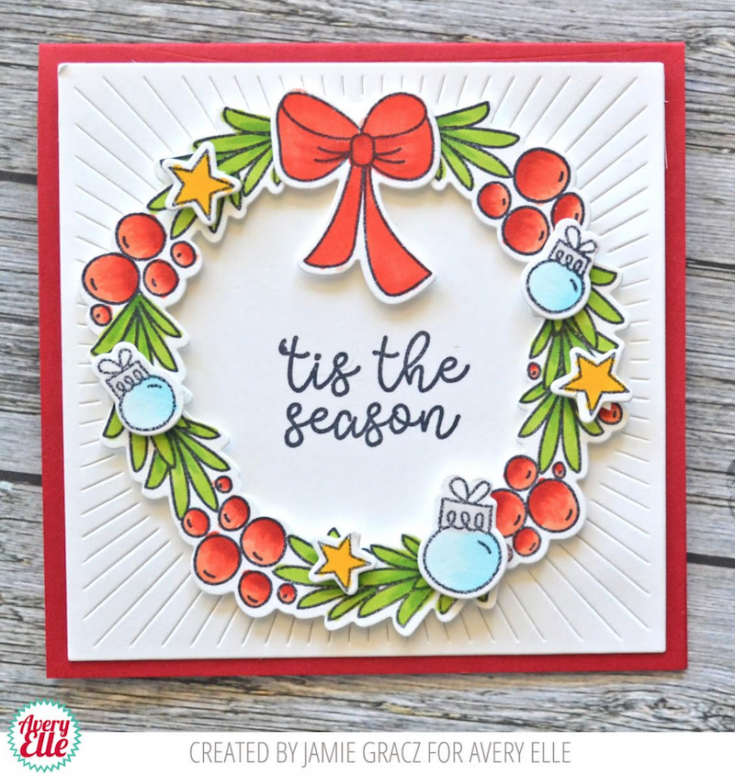
To make this card I stamped and colored images from our new Festive Wreath stamp set using our New Moon Dye Ink Pad and copic markers. I then die cut the images and adhered them onto a die cut from our Burst die set. This was so fun to make!!
I hope that you get a chance to check out our entire Fall 2017 Release! We hope that you love it as much as we do!! Thanks Simon Says Stamp for featuring my card today! You are the best!
SUPPLIES:
 |
 |
 |
 |
 |
 |
 |
 |
 |
 |
 |
 |
 |
 |
 |
 |
 |
 |
Thanks for reading today, and thanks to Jamie for being our guest!

Blog Candy Alert!! Follow our blog via email and comment on this post for a chance to win a special blog candy!
Congrats! Blog Candy Winners!
From: Studio Monday with NIna-Marie: DIY Apple Jar Teacher Gift: Tracey Magner!
From: Doodling with Debby: Embossing with a Stencil: Deborah Wolfington!
From: Stamplistic Sunshine with Shari Carroll: Carol Densmore!
From: Beach Scene Masked Motivation with Kelly Latevola: Rebecca Ramirez Barnes!
From: Yippee for Yana: Outline Letters into Solid with Copic Markers: Susan Pezza!
From: Best Birthday Shaker Card Kit Inspiration: Janet Ingraham!
Please email [email protected] with your mailing address (if applicable), the name of the blog you won from, and the prize you won to claim your prize!
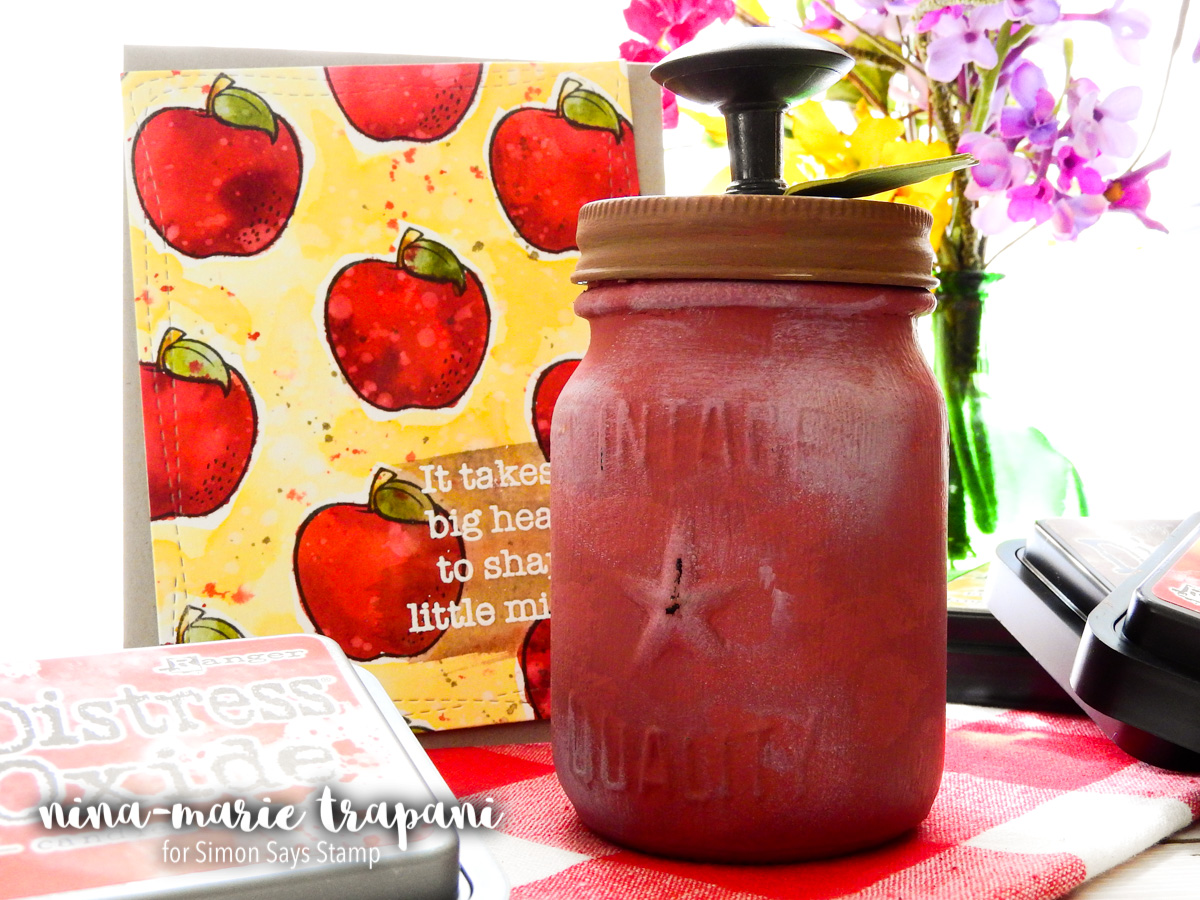
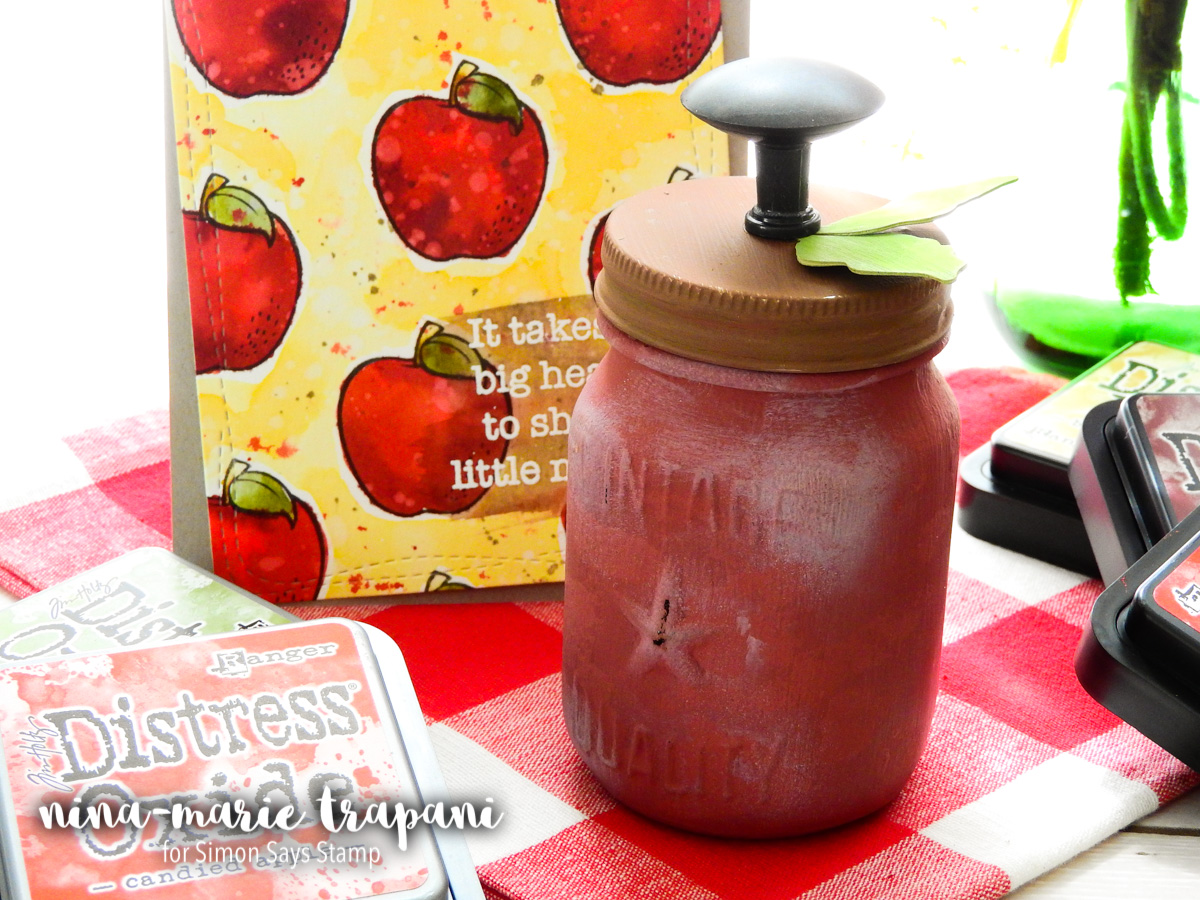
Studio Monday with Nina-Marie: DIY Apple Jar Teacher Gift
Hello crafters! Welcome back to a brand new Studio Monday video! With school starting already for many of you out there, I thought this would be a perfect opportunity to share some teacher-themed inspiration.

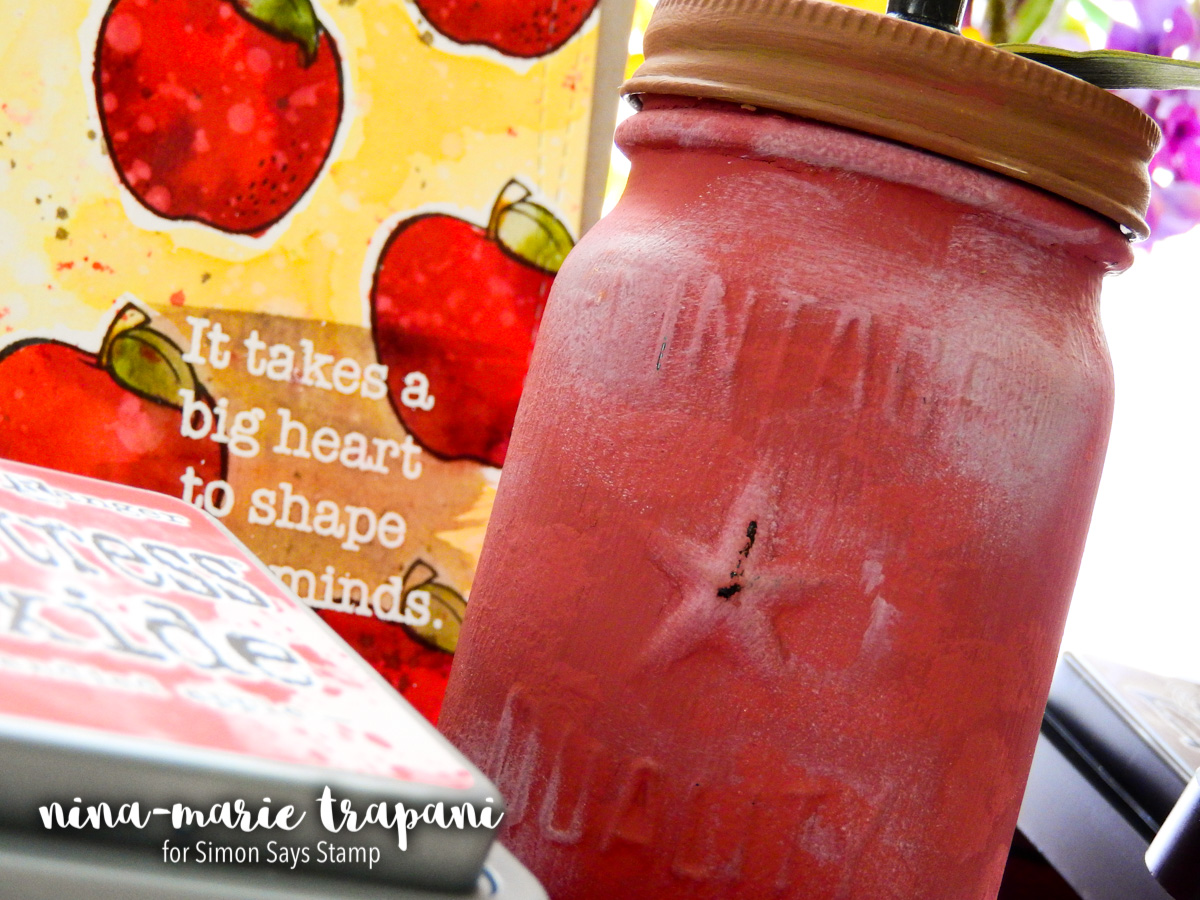
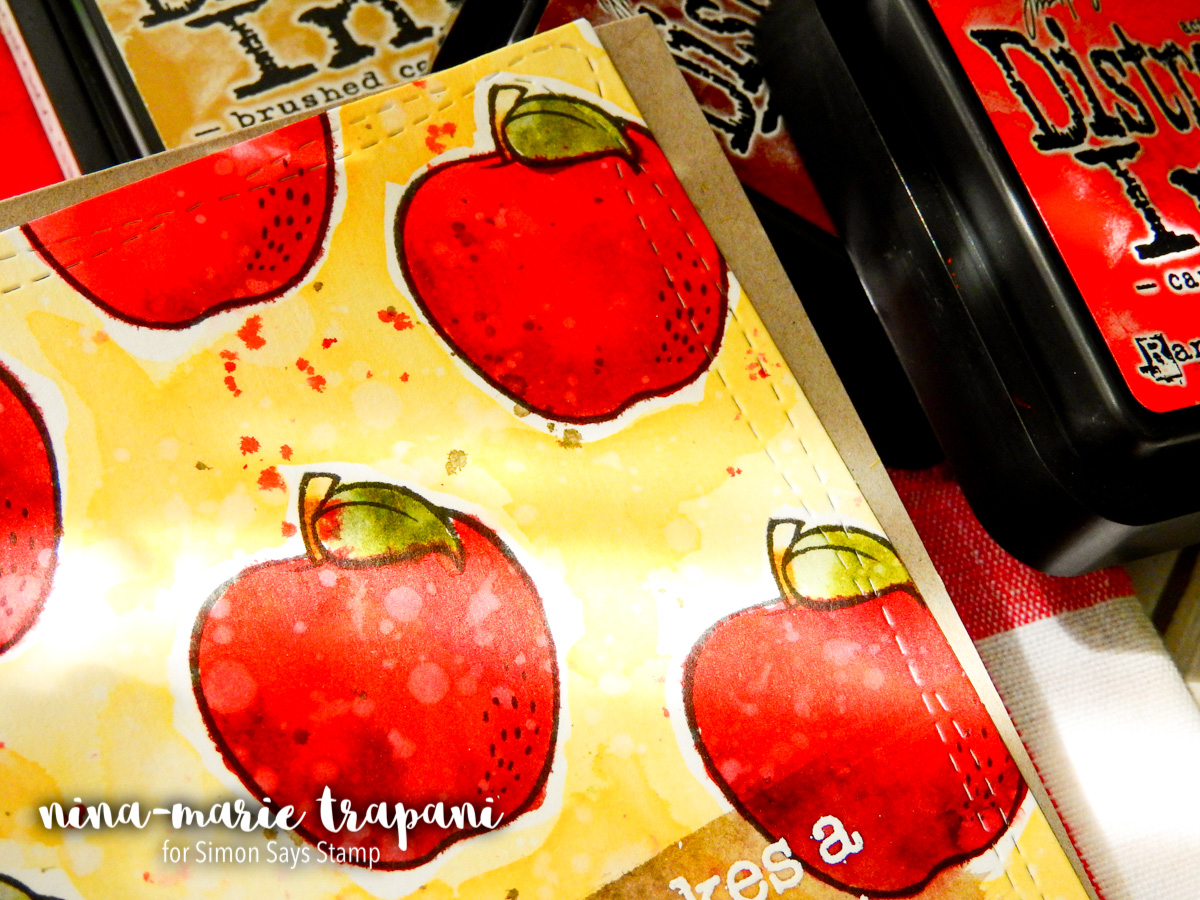
Today I will be using Tim Holtz Distress and Oxide Inks, along with his vintage Mini Mason jar set. On the card, I also used some our newest Simon exclusives, including the Dancing Fruits and Thank You Teacher stamp sets.

The jar you see is made to mimic an apple… yes it doesn’t look like a real apple, but I still think it looks cute! You can fill this jar with candy, small gifts, etc. for a teacher in your life!
I used chalk paint on my jar, as I love the distressed feel of chalk on glass. To distress the jar, I brushed on Fired Brick Oxide inks. In the video I’ll explain why I chose this ink for the distressed effect.
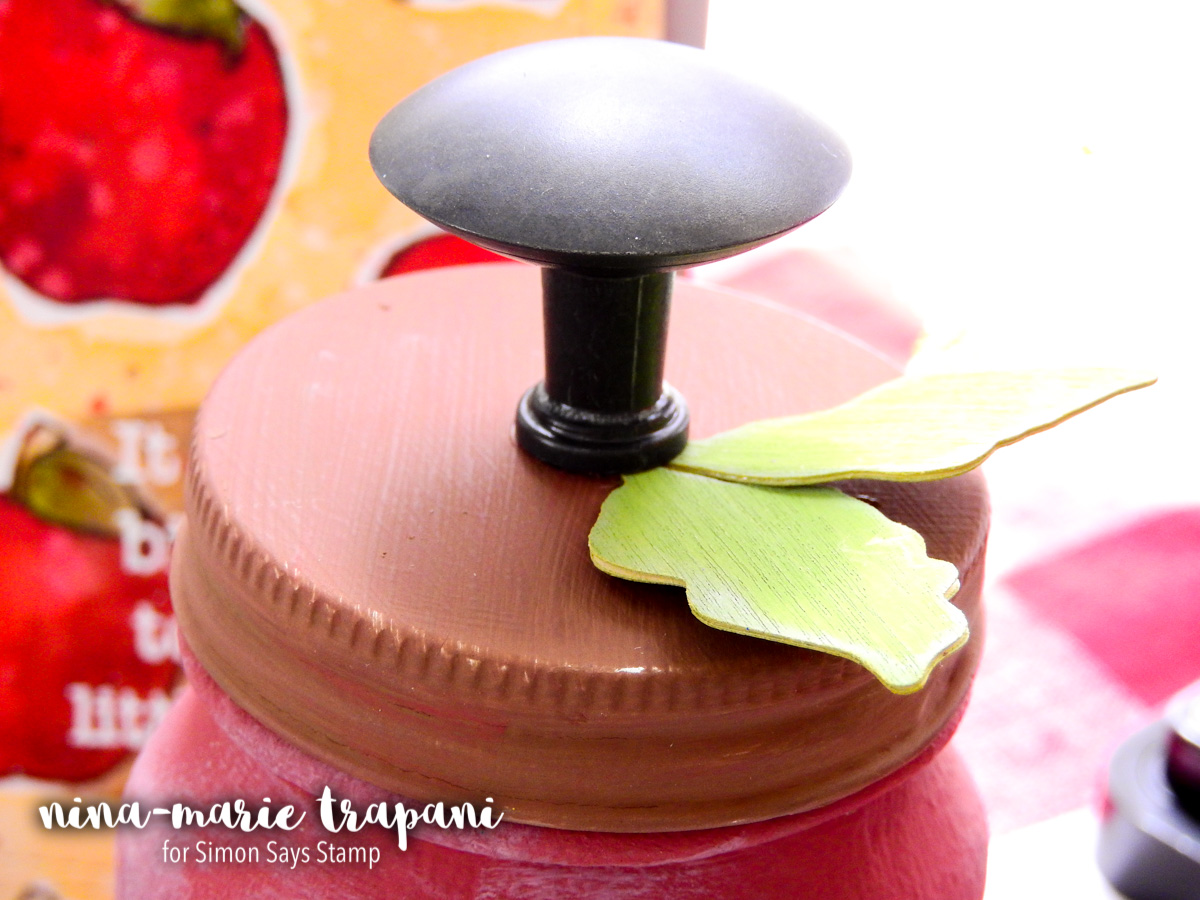
The lid of the jar has a simple handle attached to the top (found in most hardware stores), and I also die cut leaves from our Simon exclusive Poinsettia die set (coordinates with the Poinsettia stamp set). Proof that holiday sets can indeed be used year round!
As with any gift, you usually want to include a card! So I made a coordinating card to go with the jar… in an apple theme of course! :)
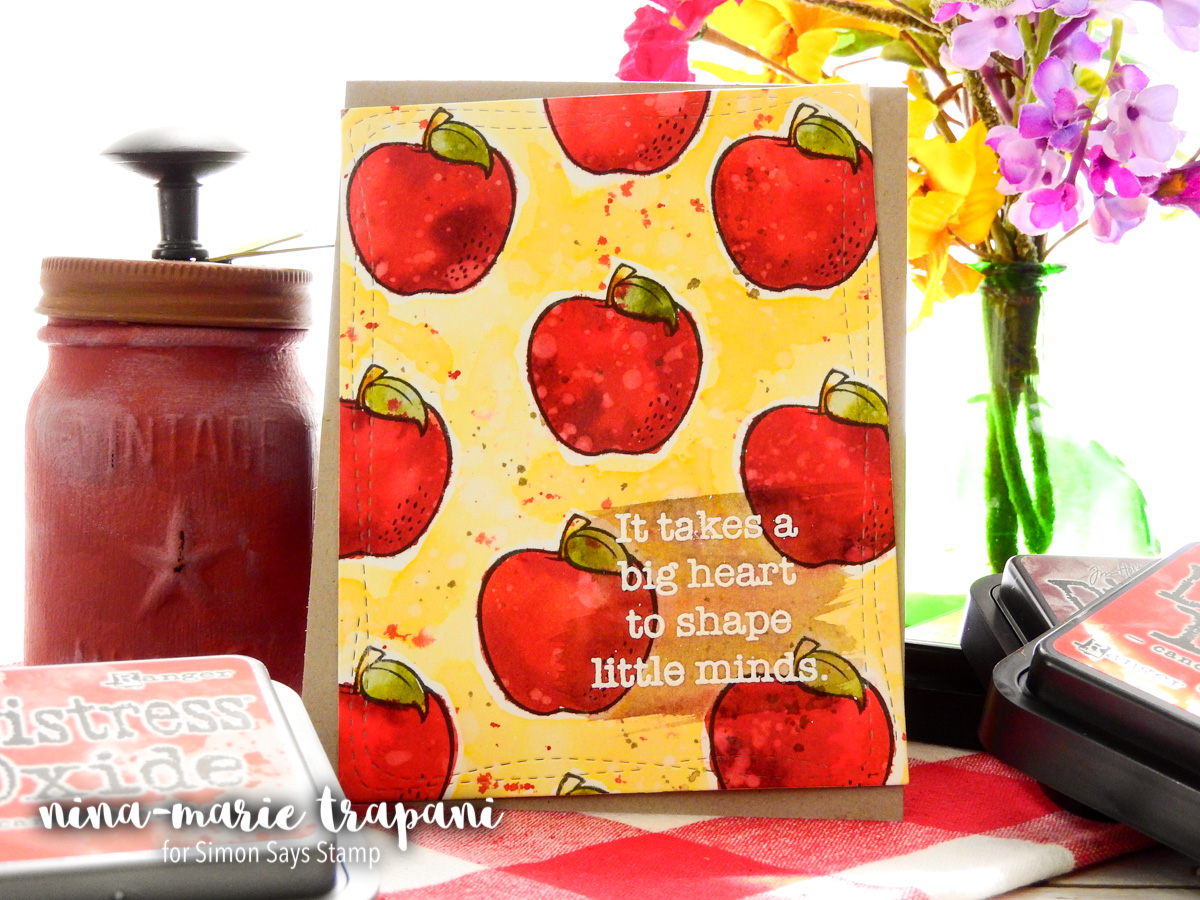
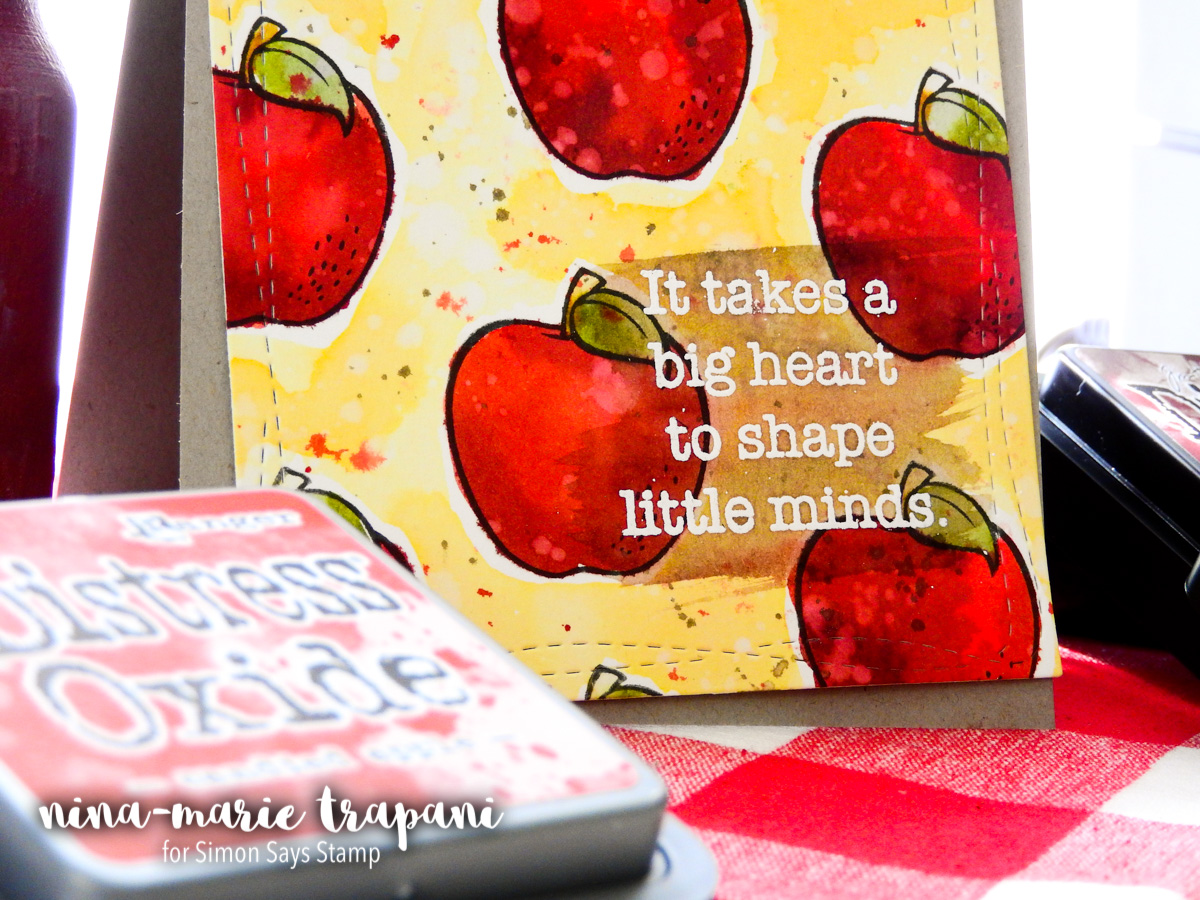
I stamped the apples from the Dancing Fruits stamp set in black ink and then watercolored them in with Distress Inks; you can see the coloring process in the video below! I also included a sentiment from our Thank You Teacher stamp set, heat embossed in white.
With the Simon exclusive Wonky Rectangle die set, I trimmed my watercolored panel down and adhered it to a brown-gray card base.
I really love how this gift set turned out and I hope you will check out the video to see everything come together! Thanks for visiting with me today… I’ll be back next week with more to share with you!
WATCH THE VIDEO
SUPPLIES


Blog Candy Alert!! Follow our blog via email and comment on this post for a chance to win grab bags and blog candy! Remember to tag your awesome projects with #simonsaysstamp on social media so we can see what you are creating!
Doodling with Debby: Embossing with a Stencil
Hi friends! Welcome to the latest edition of Doodling with Debby! This month Debby Hughes has made a gorgeous thank you card using the stencil embossing technique. Be sure to watch the video and enjoy!

Hi this is Debby and for my Doodling With Debby feature this month I have a video below using the lovely Marilyn stencil to create and embossed background, which I then emphasized with Nuvo Embellishment Mousses.
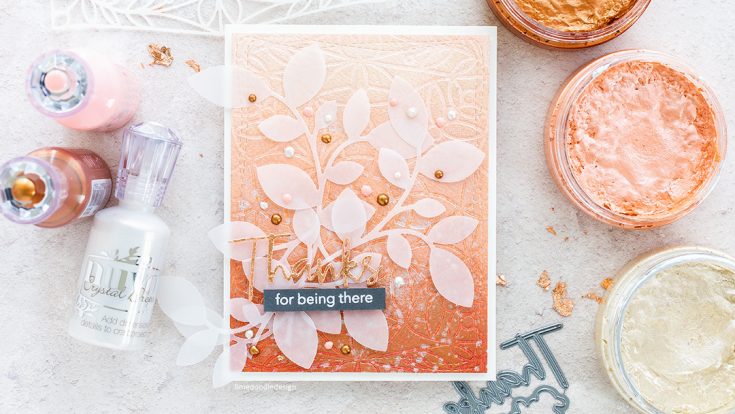
I started this card by ink blending Rosie Cheeks, Melon and Merlot inks in to a panel of Arches Cold Pressed watercolor card. I then sandwiched the ink-blended panel between an embossing mat and the Marilyn stencil. The pressure of running this sandwich through a die cutting machine embosses the stencil pattern into the watercolor card.

I used my finger to rub Nuvo Embellishment Mousses in Fresh Copper, Coral Calypso and Mother Of Pearl over the raised areas of the embossing to emphasize the design. To give more sparkle I splattered the panel with a solution of Perfect Pearls and then when dry die cut with a Wonky Rectangle. I added the die cut panel to an Ivory card base.
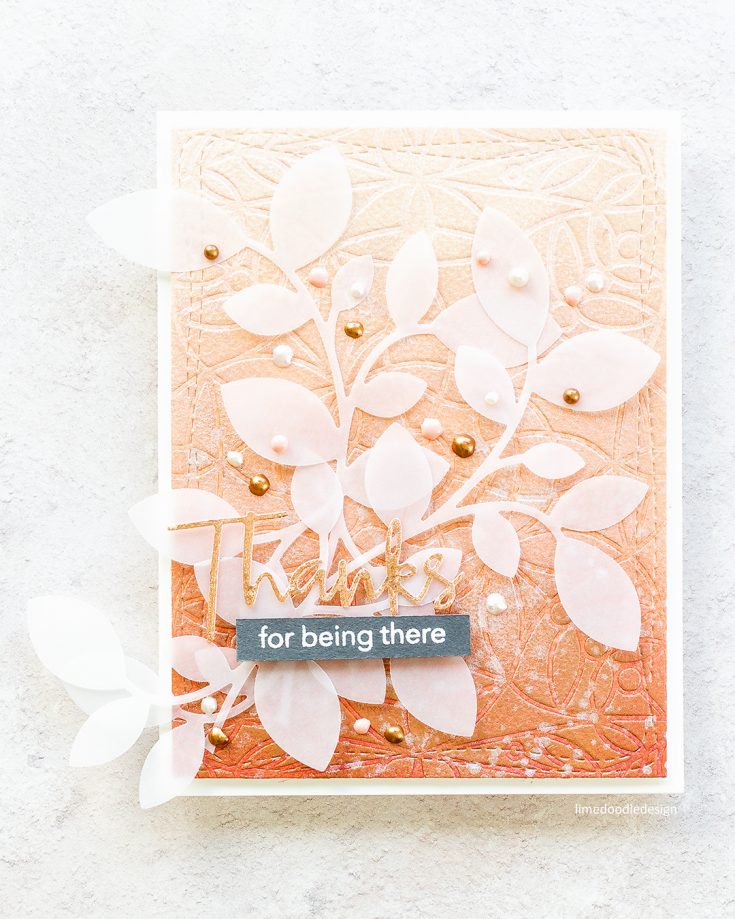
With the background now complete it was time to concentrate on the rest of the card. For the sentiment I added a piece of Be Creative Tape Sheet to a scrap of Ivory card and covered it with Nuvo Sunkissed Copper Gilding Flakes then die cut the Script Thanks die.
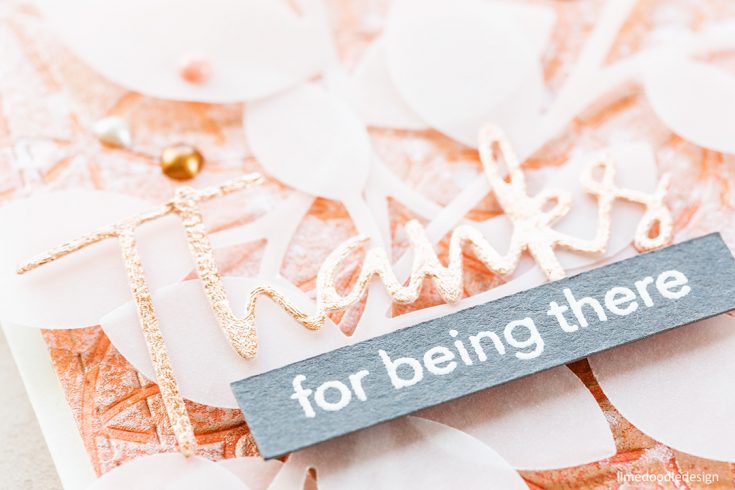
I paired the coppery thanks die cut with a coordinating sentiment from the Thoughtful Messages set which I white heat embossed on Slate card and trimmed to a skinny banner.
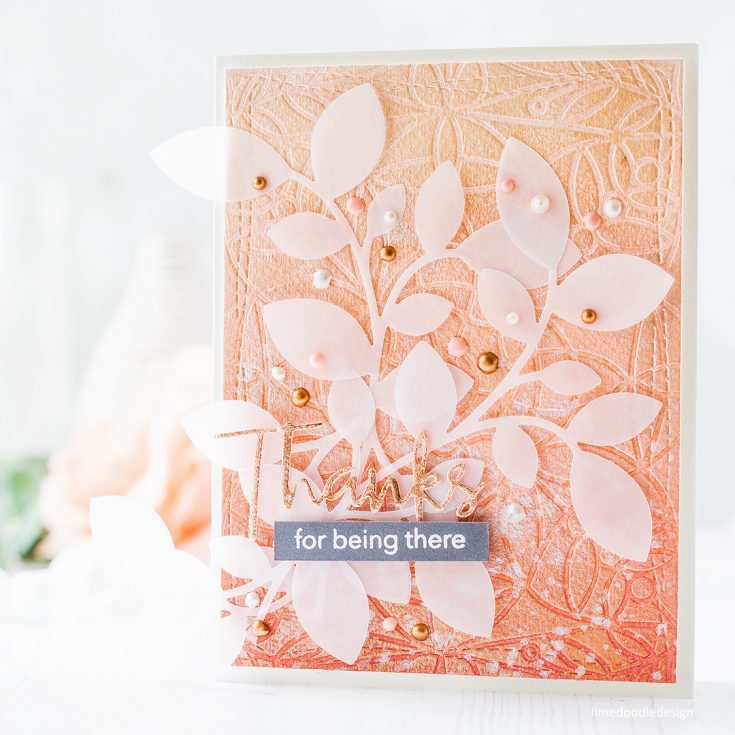
I die cut two sprigs of vellum leaves using my favorite Clustered Leaves die and then adhered all the elements to the embossed panel. As a final touch I added Nuvo Crystal Drops in Copper Penny, Bubblegum Blush and Ivory Seashell.
Thanks for joining me today and I’ll see you next time for Doodling With Debby!
WATCH THE VIDEO:
Watch below or in HD at YouTube.
SUPPLIES:
 |
 |
 |
 |
 |
 |
 |
 |
 |
 |
 |
 |
 |
 |
 |
 |
 |
 |
 |
 |
 |
 |
 |
 |
 |
 |
 |
 |
 |
Thanks for reading today, and thanks to Debby for being our guest!
Blog Candy Alert!! Follow our blog via email and comment on this post for a chance to win a special blog candy!


