Studio Monday with Nina-Marie: Kindness Day Handmade Paper Ornament Gift Idea

Hello everyone! Did you know that today is World Kindness Day? This fun holiday is all about showing kindness to others; as crafters, we can use our love of creating to spread some HANDMADE kindness to those around us.
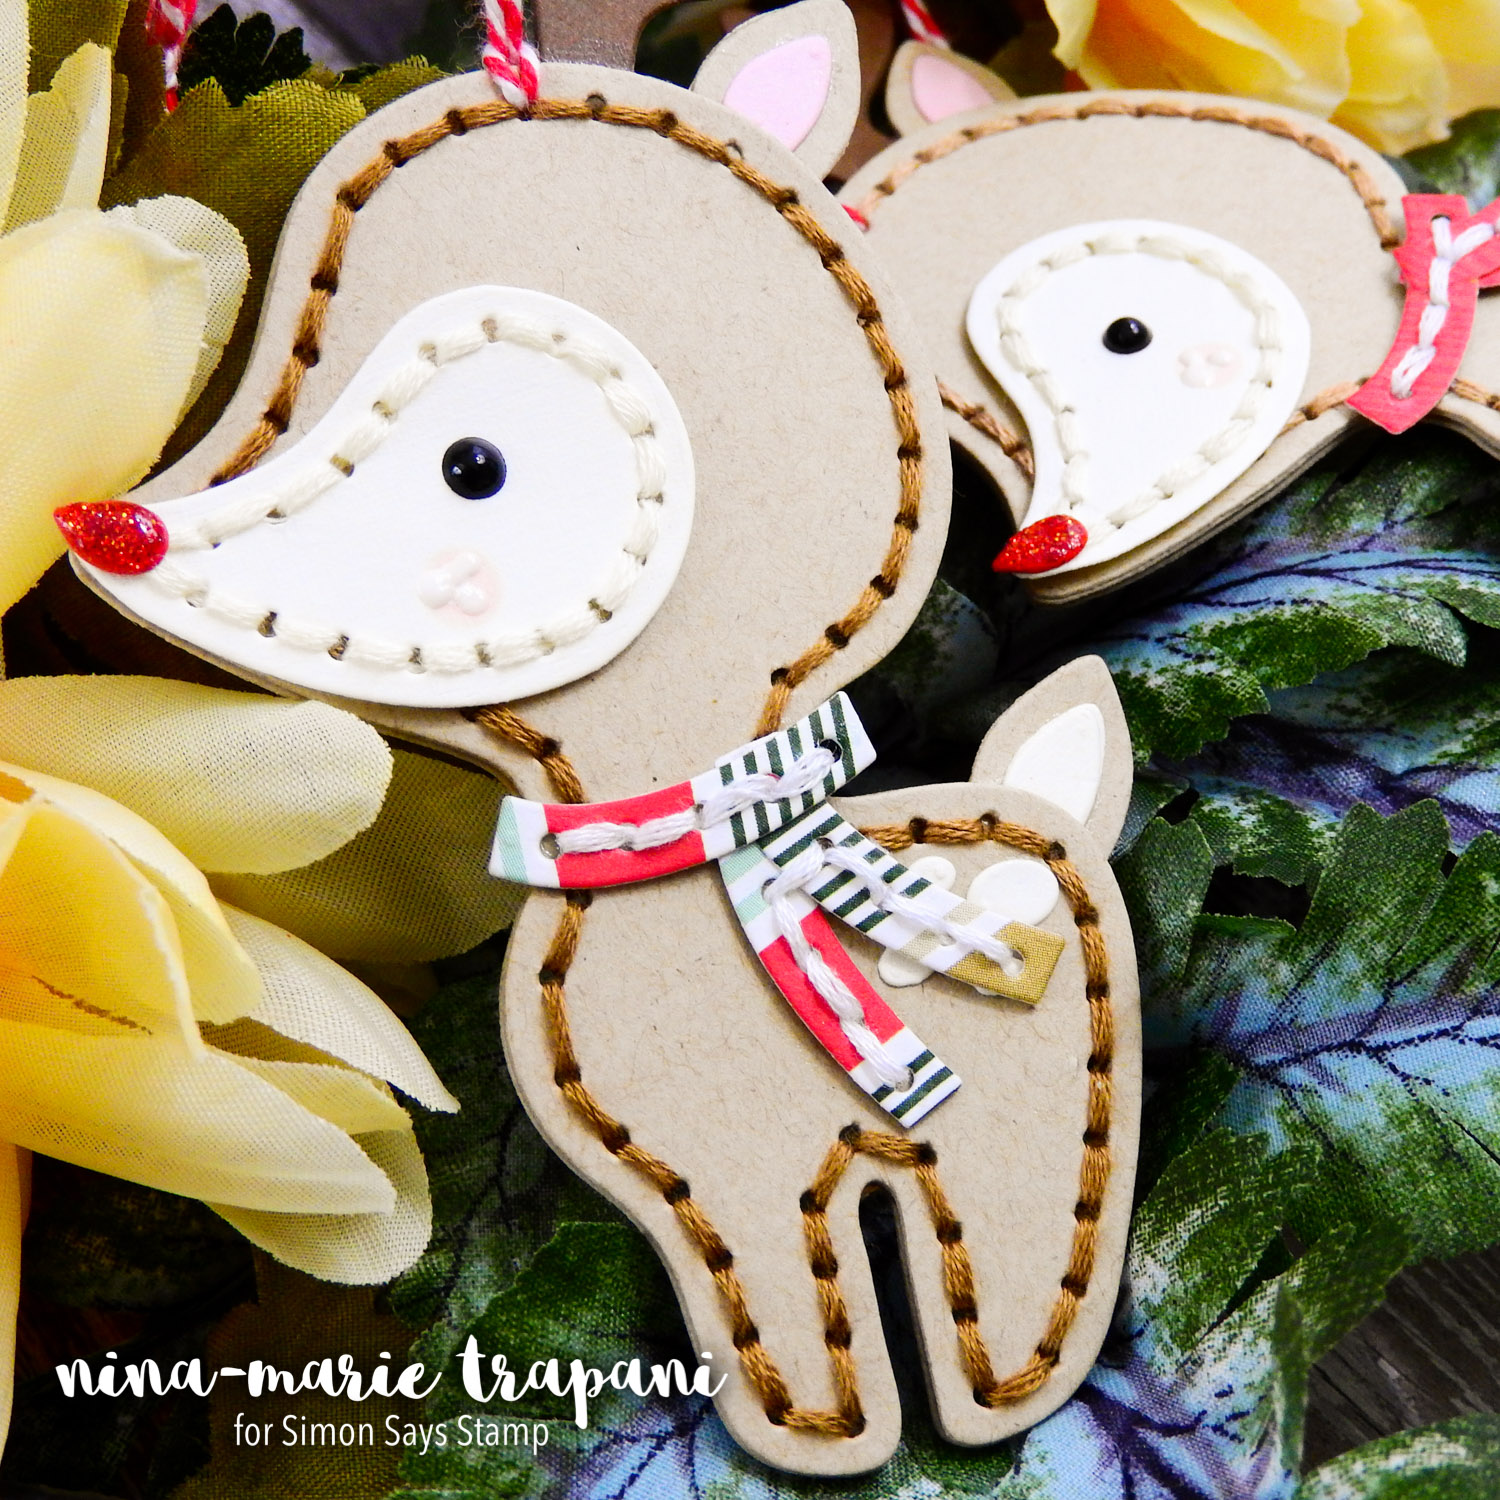
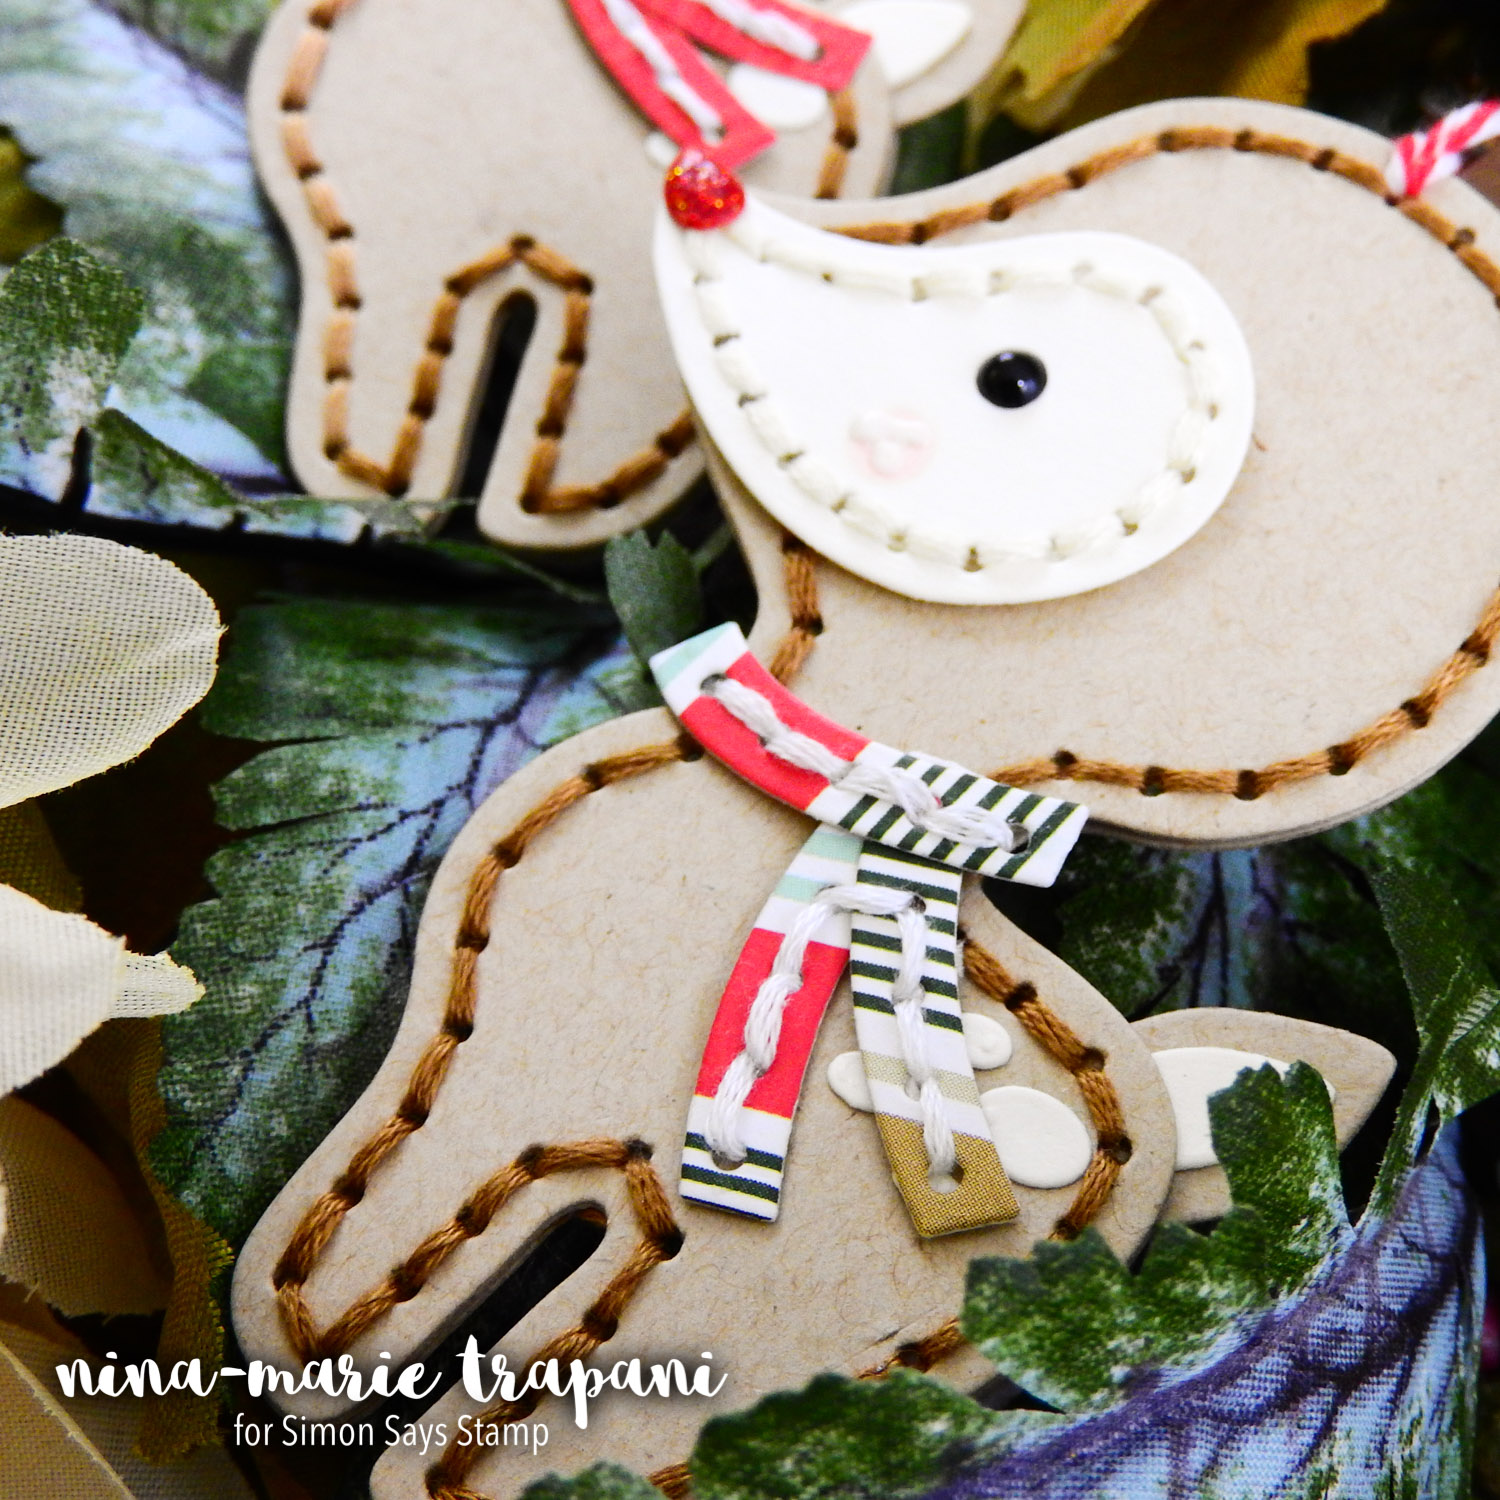
I thought that this would be a perfect opportunity to share an ornament idea with you using an adorable Plush Die from Simon Says Stamp. Today I’ve used the Plush Deer set, but there are many other stitching dies that you could use for today’s project as well if you do not have this one.
Check out all of the fun stitching and plush dies we carry at Simon Says Stamp by clicking HERE. All of these dies could be turned into ornaments in the same way I did on these festive reindeer.
While these plush dies are most often featured with felt, you can also use them with paper and cardstock! These are also great projects to use up scraps with (I know we all have lots of scraps laying around!).
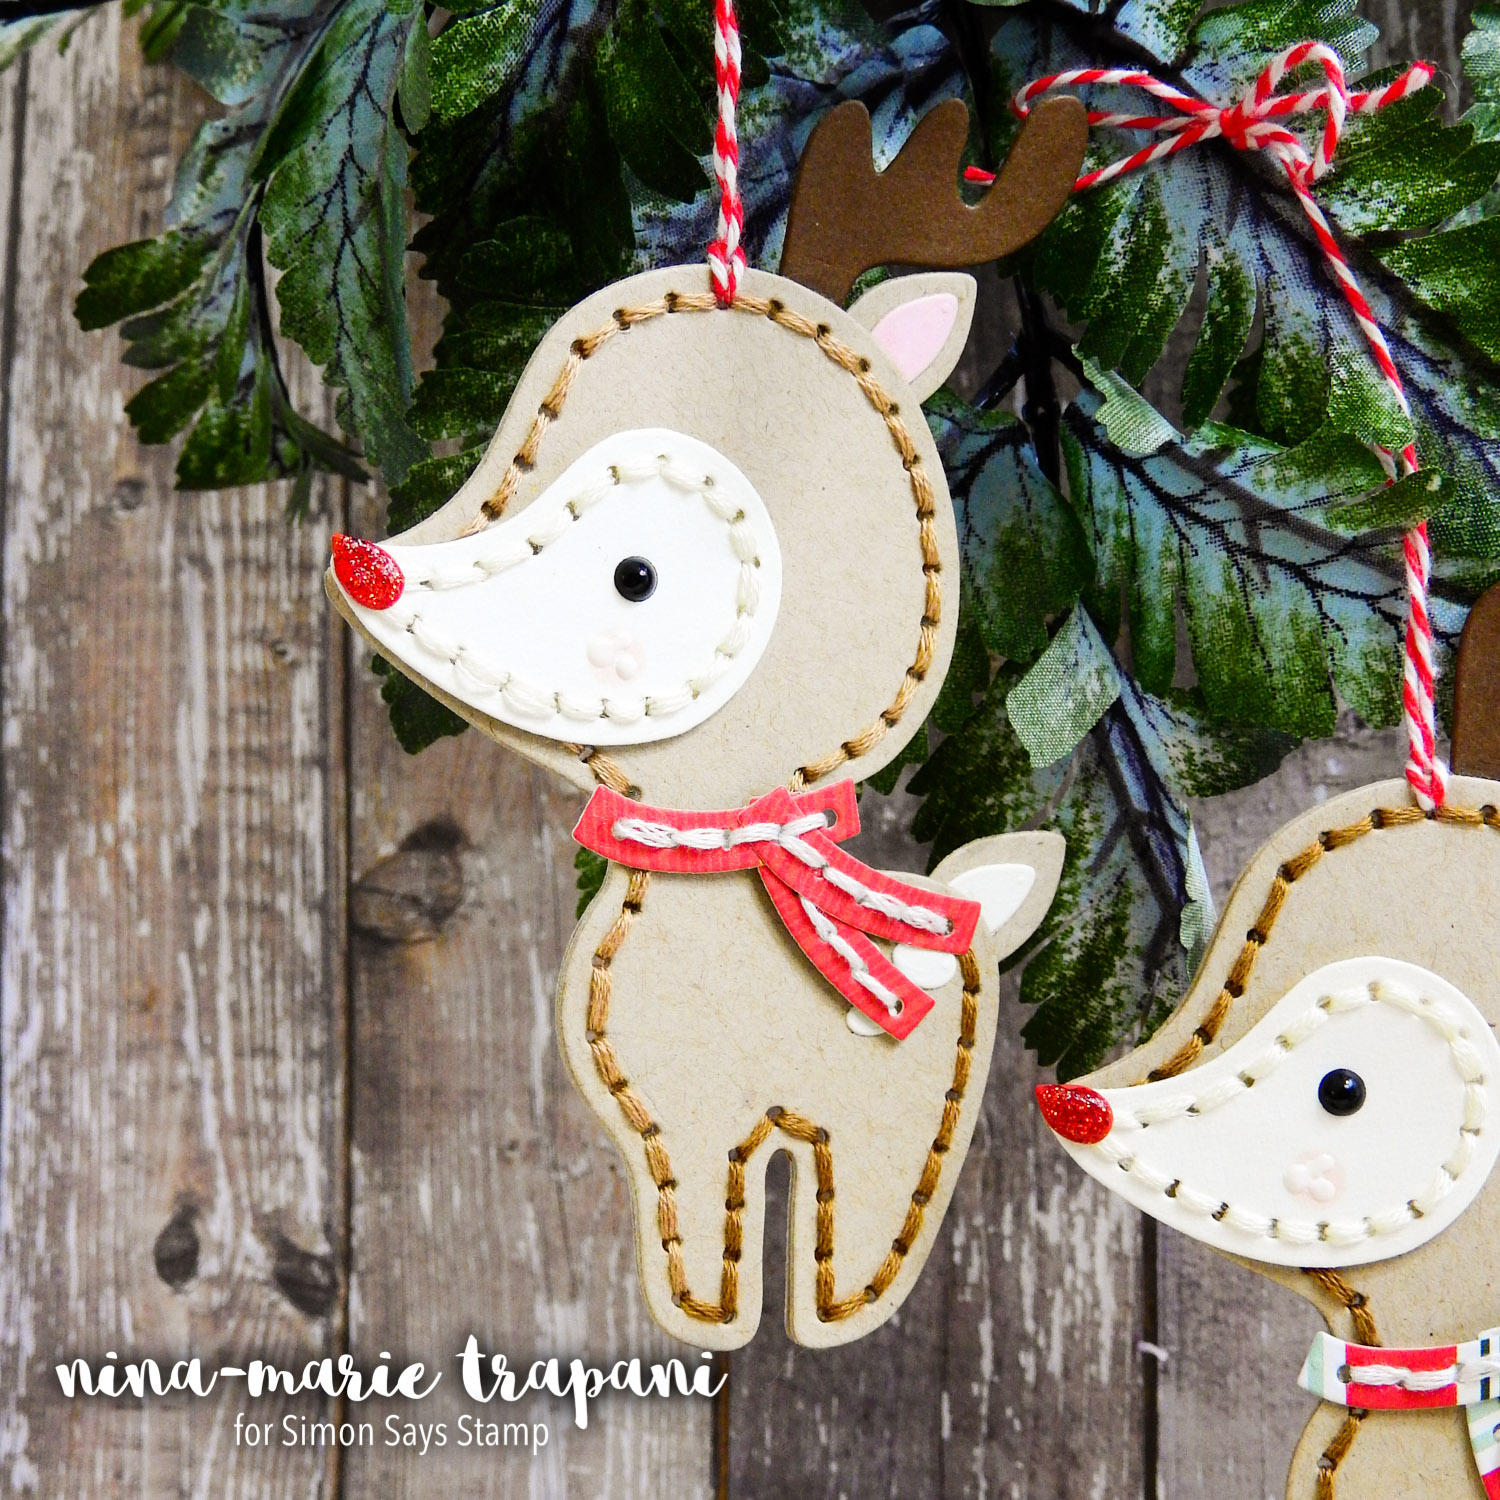
For some pattern and interest, I also enjoy throwing in a bit of patterned paper here and there too. You’ll notice that the scarves on each of my reindeer are created with scraps of paper from one of my favorite Christmas pattern paper collection, Deck the Halls by Echo Park.
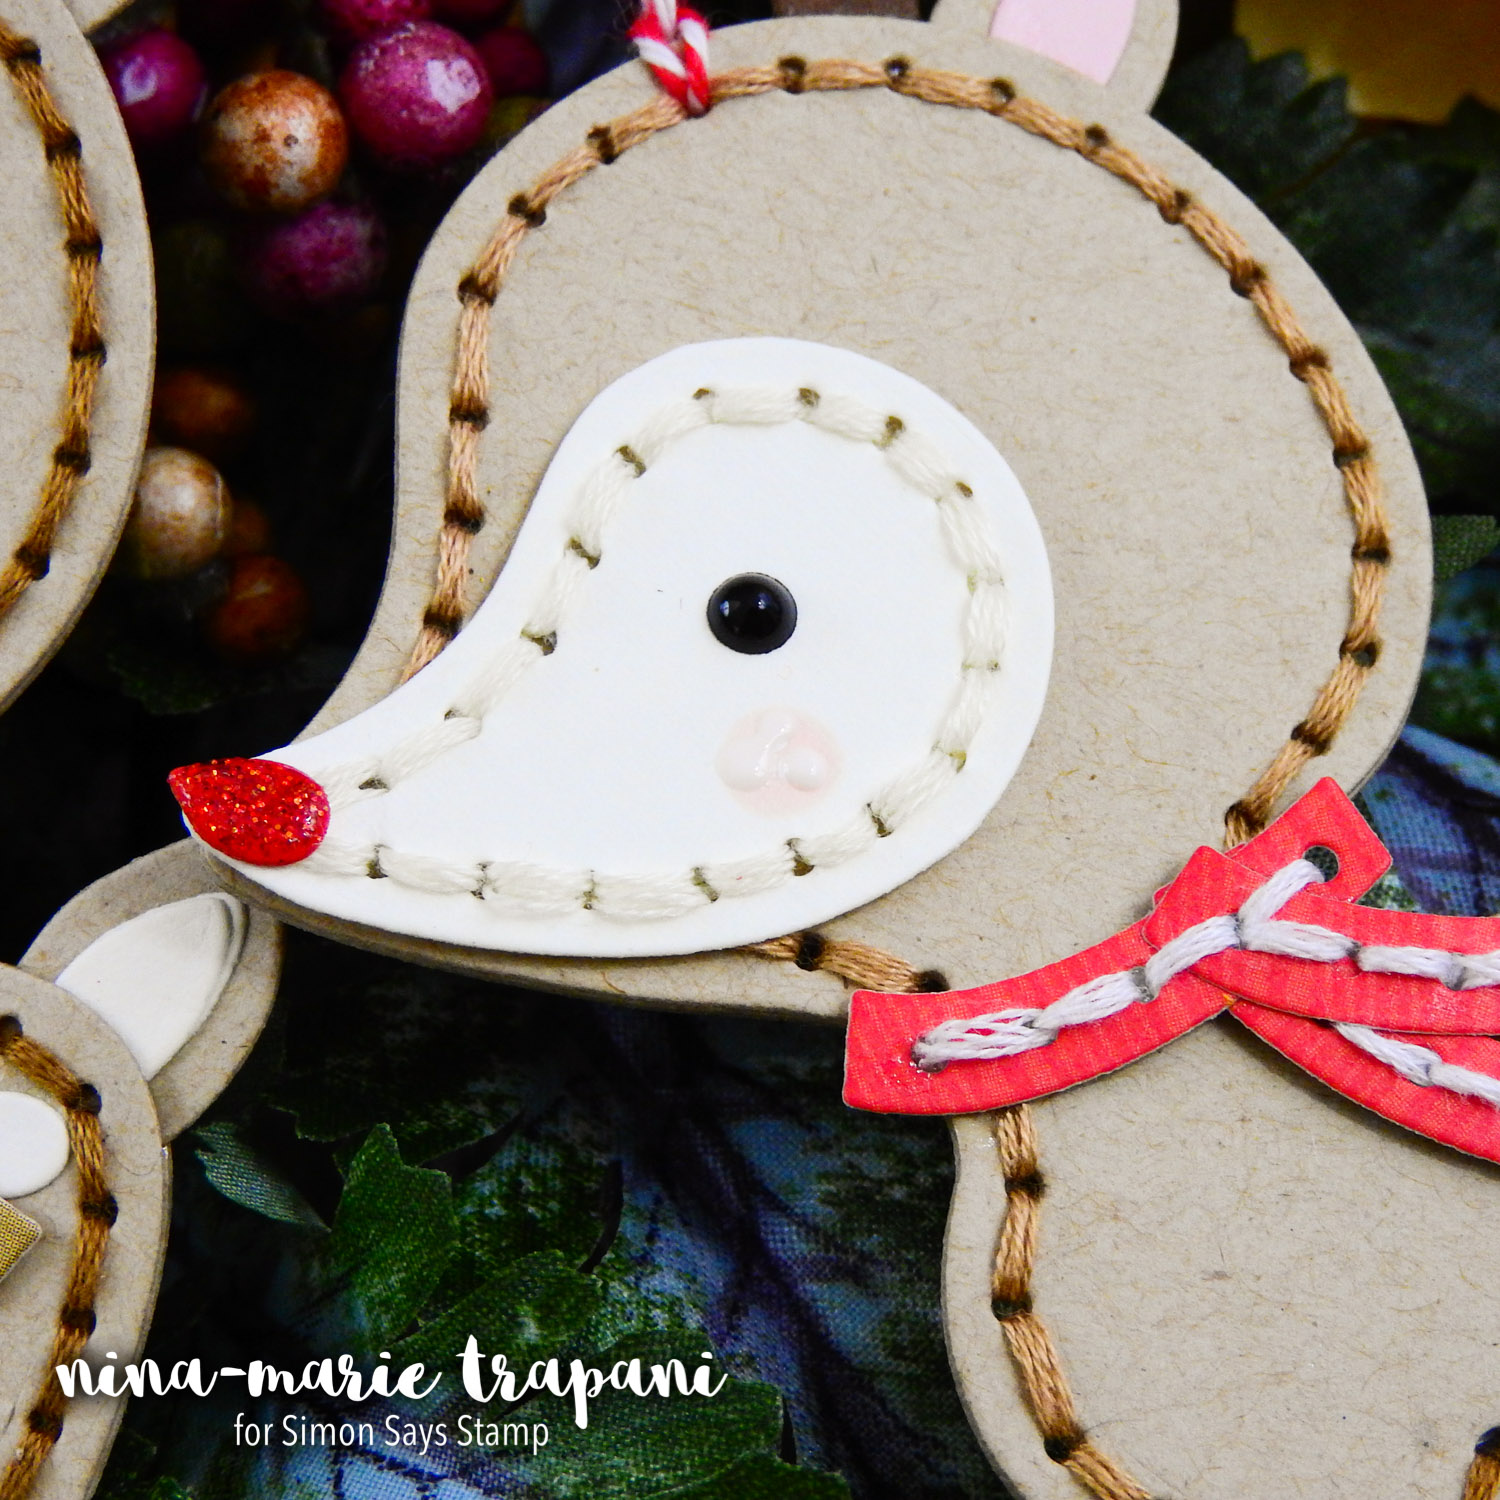
To stitch these ornaments together, I used Iris embroidery floss and a needle. When selecting floss, I picked colors that were slightly darker than the color of paper it would be sewn onto. I like having the contrast of the floss on the paper when using slightly darker shades.
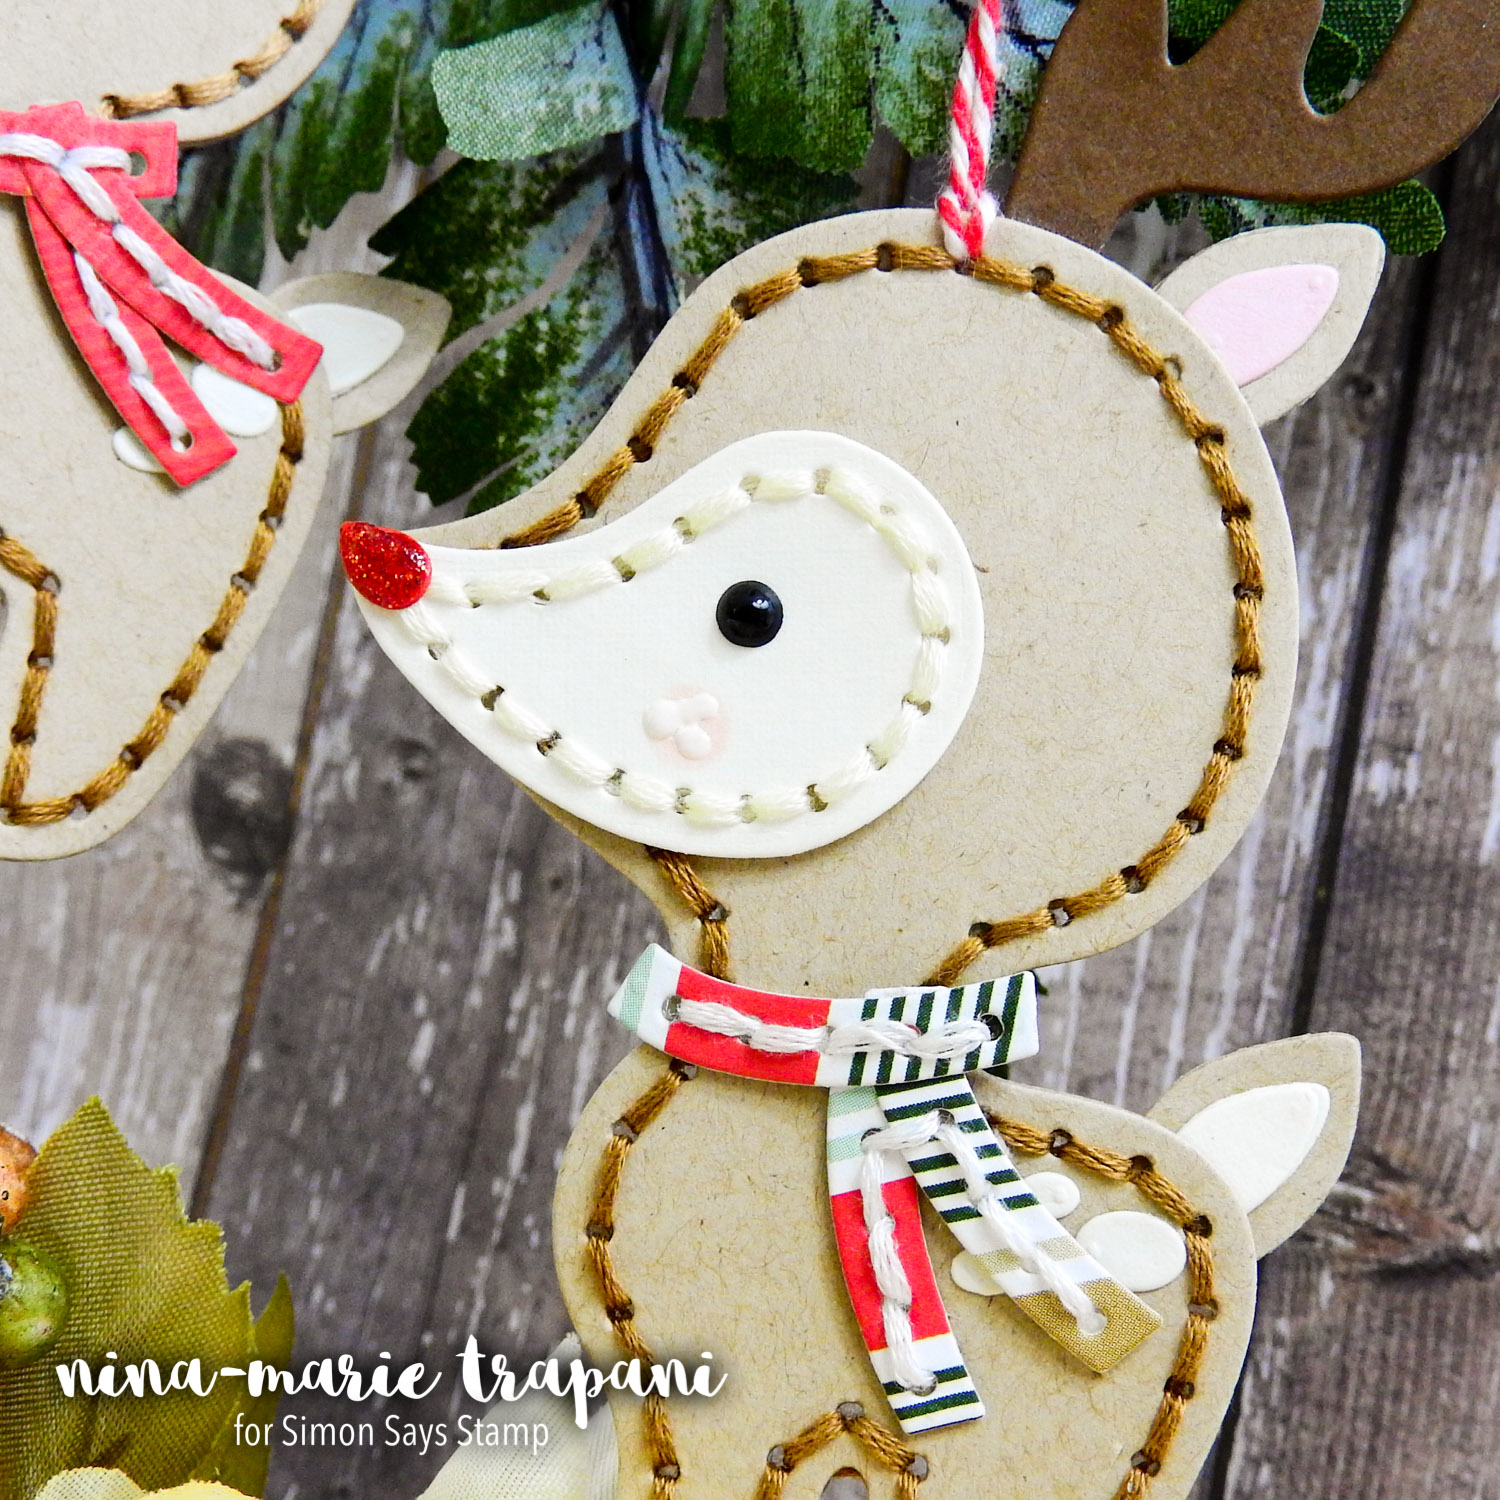
Little details also make a big difference on your projects; on the face of the deer, I added Nuvo Drops on the deer’s nose, as well as his eyes. His cheeks have some rosiness that I used a Copic marker to color.
These ornaments are perfect for giving to friends and family over the holidays! I plan on making a couple more of these reindeer and giving them to all the girls that work at my favorite coffee shop in town! If you make some ornaments like this, who would you give them to?

Be sure to watch the video below to see how I made the ornaments; I hope you will be trying this gift-idea out!
Don’t forget to do something special for someone you know in celebration of World Kindness Day… make a card, bake a treat or do something unexpected! Random acts of kindness help make the world a better place!
WATCH THE VIDEO
SUPPLIES
|


Blog Candy Alert!! Follow our blog via email and comment on this post for a chance to win grab bags and blog candy! Remember to tag your awesome projects with #simonsaysstamp on social media so we can see what you are creating!

A Fantastic Day!!
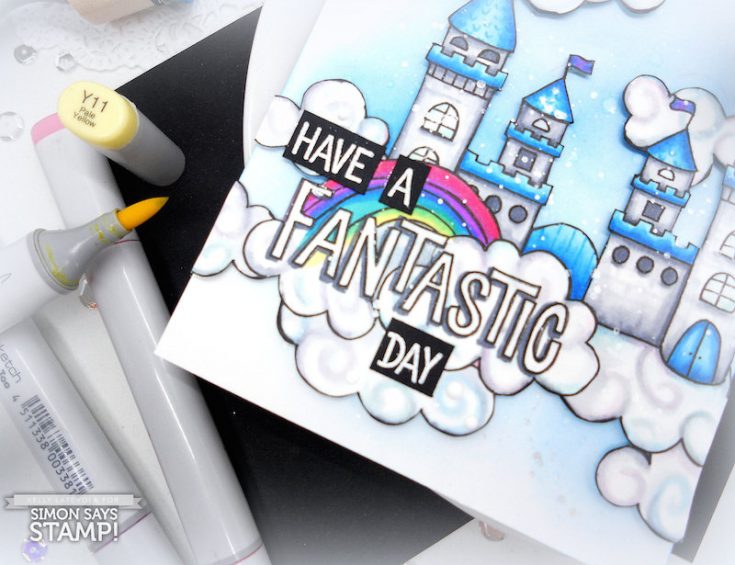
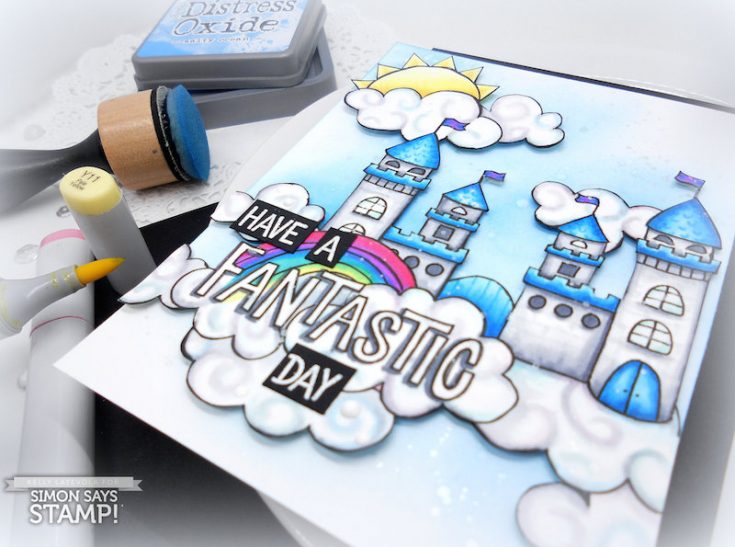
 Hi friends! Happy Sunday! Please welcome the always fabulous Kelly Latevola back to our blog as a guest designer. I hope you love this fairy tale take on an encouragement card! I love how she combines our Dream Come True, Happy Days, and Amazing Messages clear stamps to create this gorgeous design! Do you love the swirly clouds as much as I do? Be sure to watch the video to see how she achieves the look… and enjoy!
WATCH THE VIDEO:
SUPPLIES:
|


Thanks for reading today, and thanks to Kelly for being our guest!

Blog Candy Alert!! Follow our blog via email and comment on this post for a chance to win a special blog candy!
How To: Go Press and Foil Machine
Hello everyone! I am thrilled to have you here with me today for a how-to video on the Couture Creations Go Press and Foil machine! Have you seen this fun, foil transfer tool? We now have them in stock here at Simon Says Stamp, and you can find all of Couture Creations’ products HERE.
The Go Press and Foil machine works by using heat and pressure (via any standard die cutting machine) to transfer heat-activated foil on cardstock. You can also transfer foil onto other materials as well, like chipboard and textiles!
A cool feature about the Go Press and Foil machine that makes it stand apart from other foiling machines is that you can create easy letterpress results! The machine also works with embossing folders, which expands your foiling techniques even further!
Let me show you some samples of the different things you make with this machine.
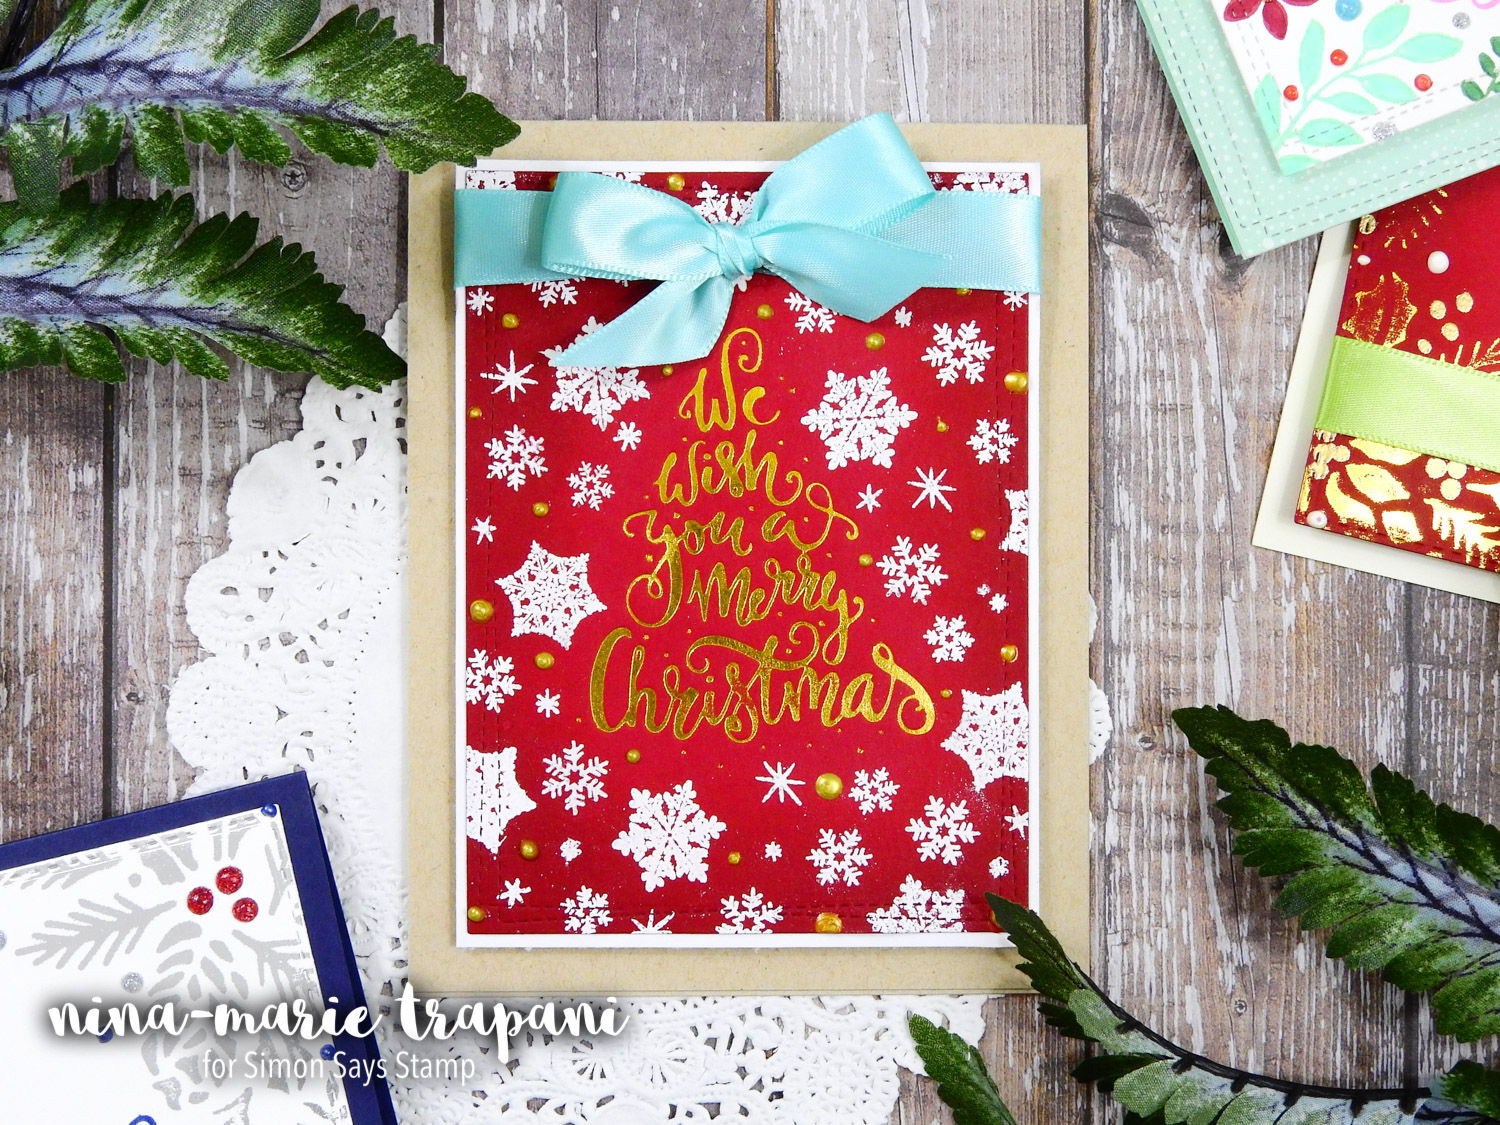
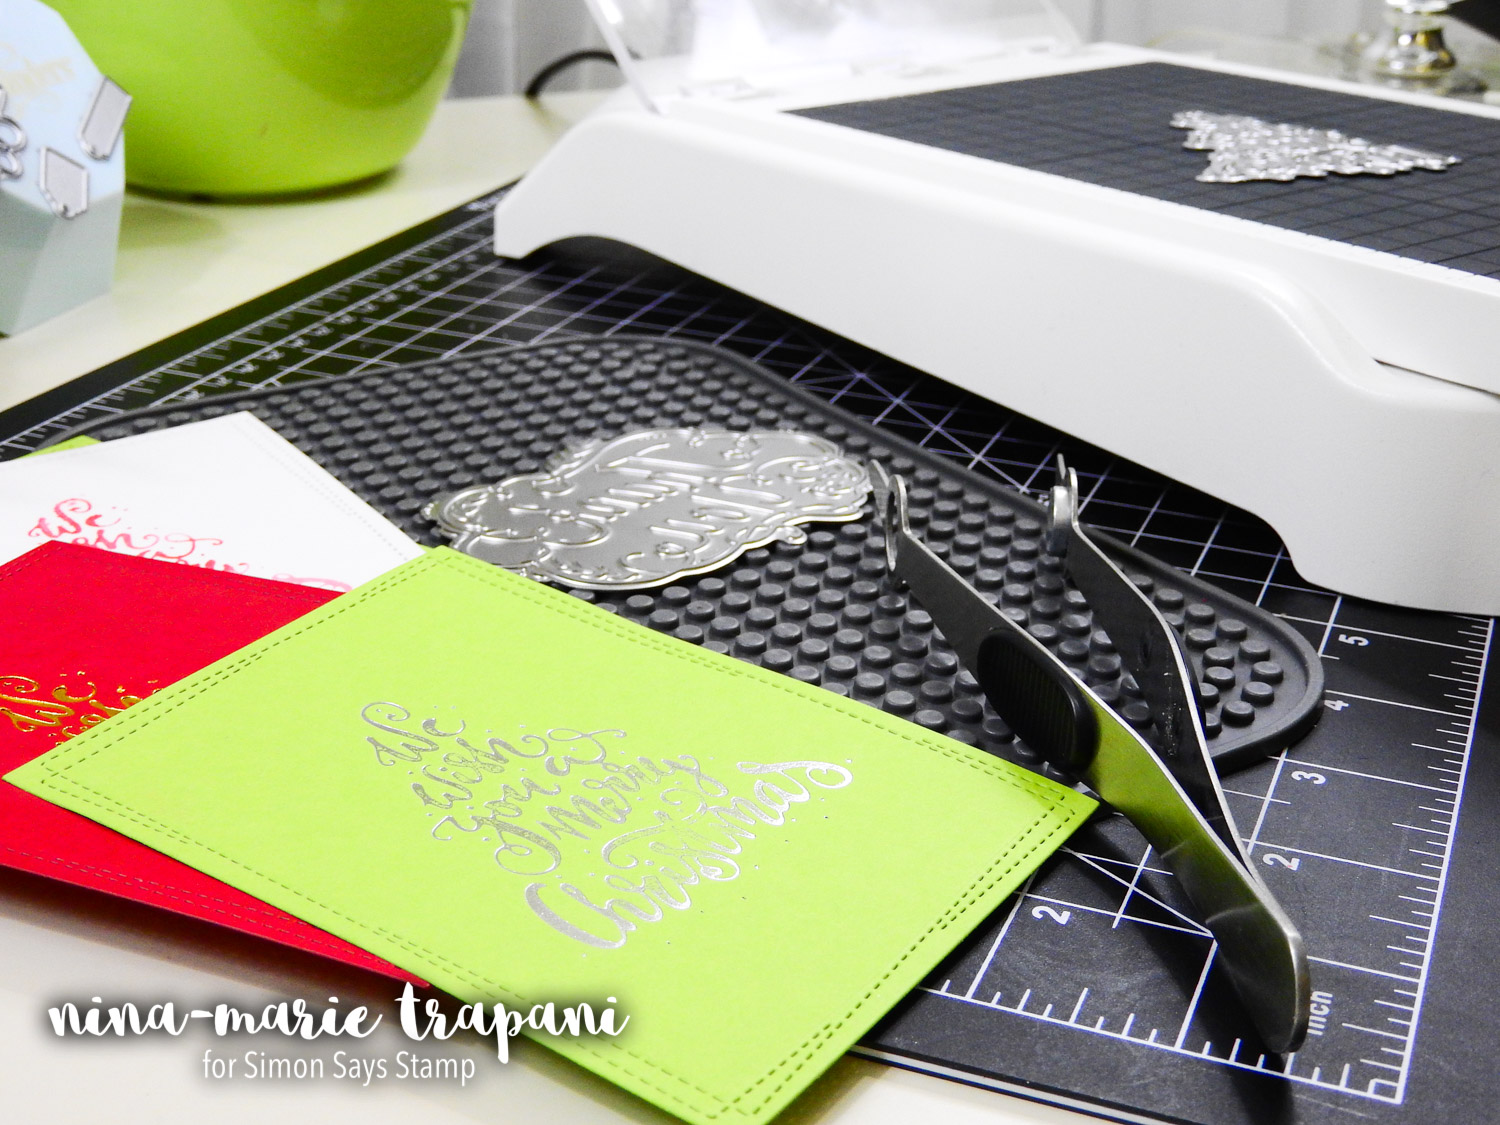
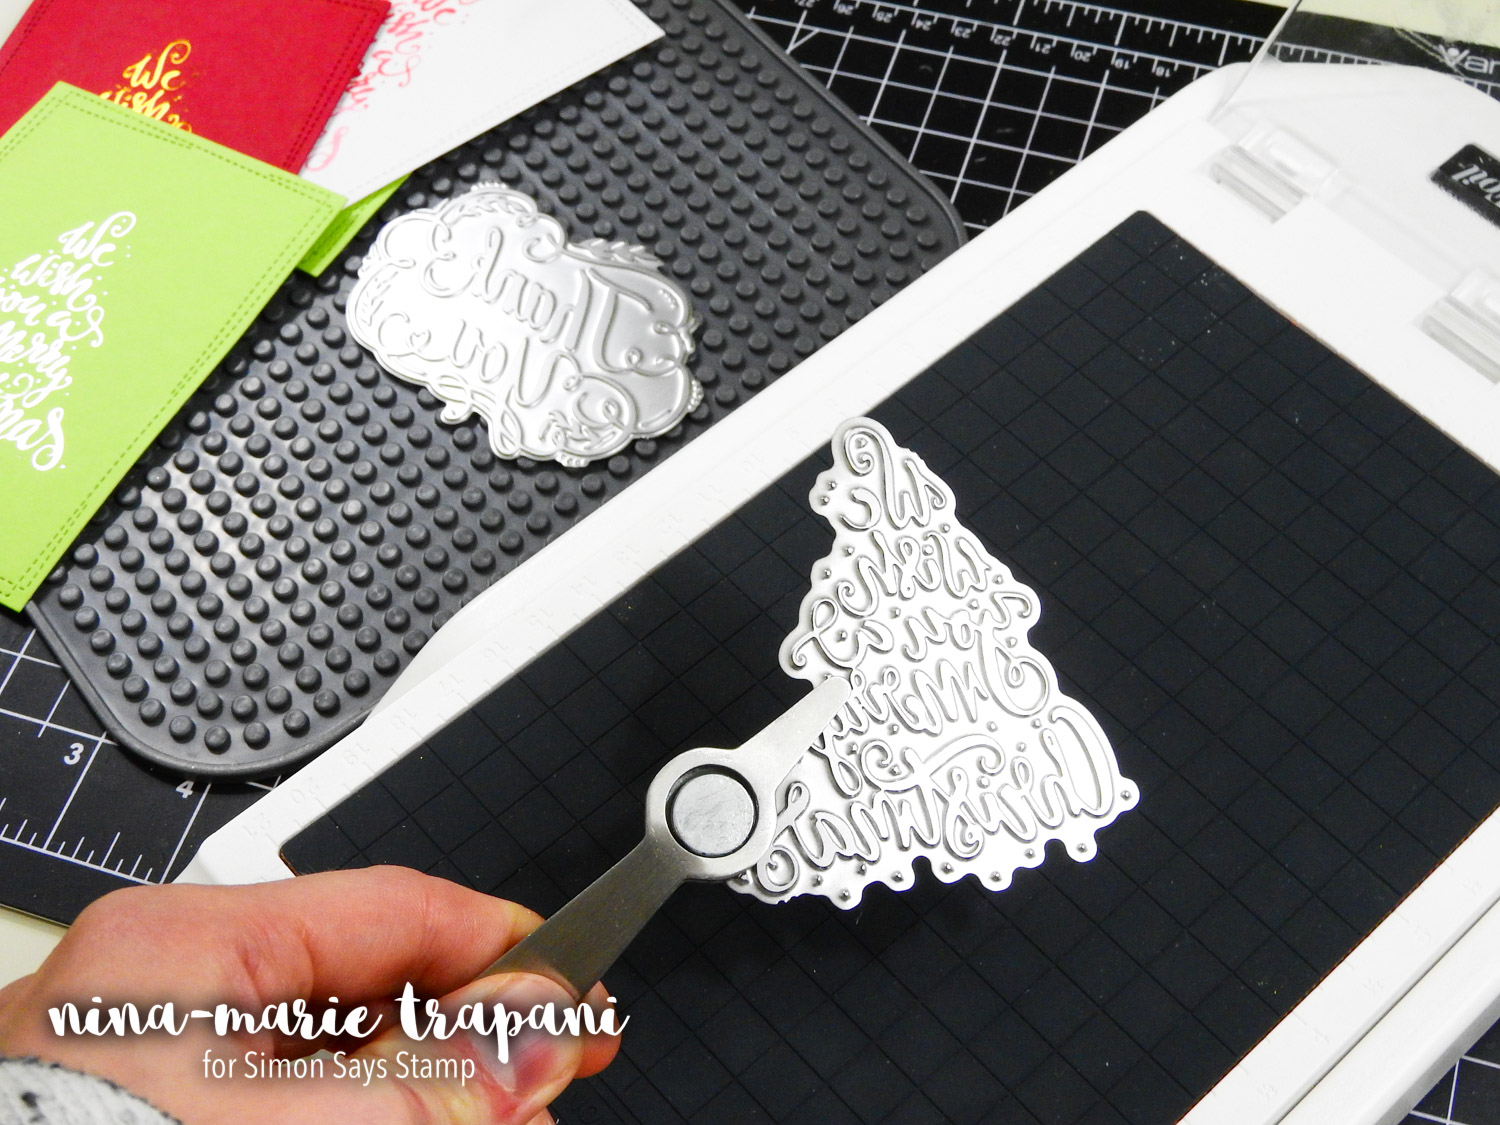
This first card showcases a Hot Foil stamp from Couture Creations; we have quite a few of these “stamps” that can be found HERE. These “stamps” are not a typical rubber or clear stamp that we are used to; they actually remind you more of a die without any cutting edges. Made from steel, these Hot Foil stamps heat up when placed inside your Go Press and Foil machine and help transfer your foil onto paper. I used the foil stamp with some of the Couture Creations gold foil; if you watch the video, I will walk you through the steps in using the foil and stamp together.
After you place your stamp, foil and paper into the machine, you take the entire platform of the machine (with everything still inside) and run it all through your die cutting machine. The Go Press and Foil machine applied the heat needed to transfer your foil, but it did not add the pressure; this is where the die cutting machine comes into play. The pressure and heat combination transfers the foil while the impression of the stamp “embosses” the paper with a letterpress effect. It is truly beautiful!
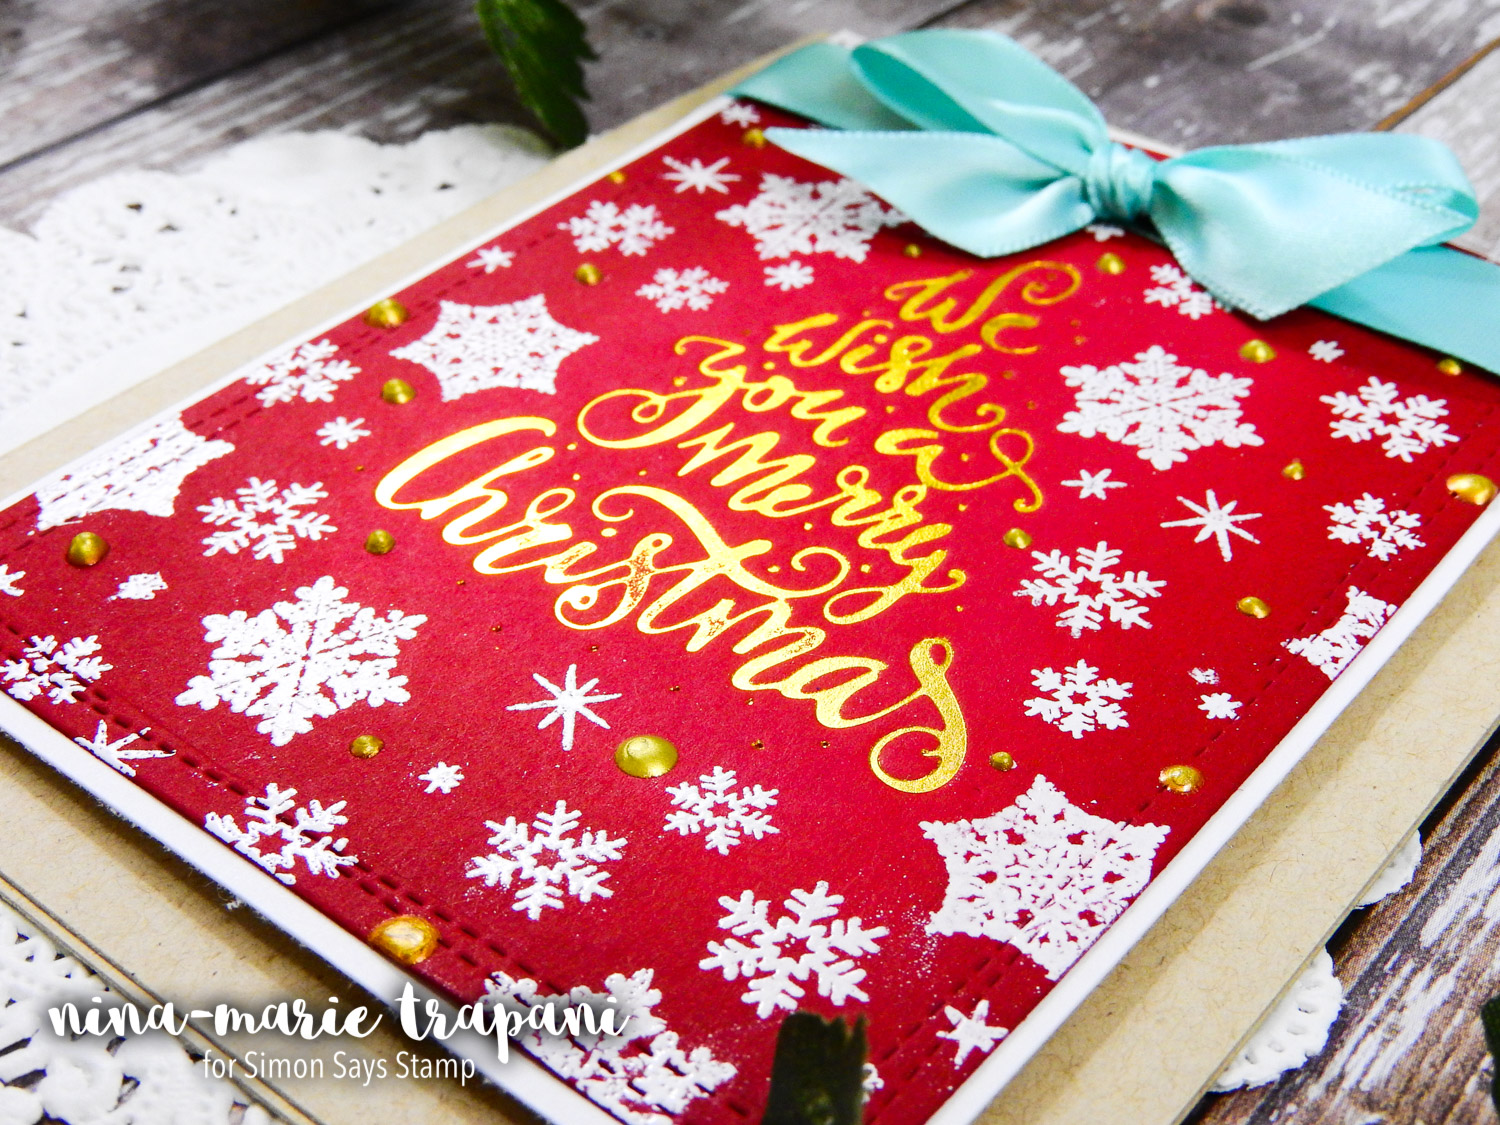
I decorated the card with snowflakes from the To Be Jolly stamp set (from Couture Creations), the Swell Christmas and the On a String stamp sets (from Simon Says Stamp). There are gold metallic Nuvo Drops around the heat embossed snowflakes and the panel is matted with white and kraft cardstocks.
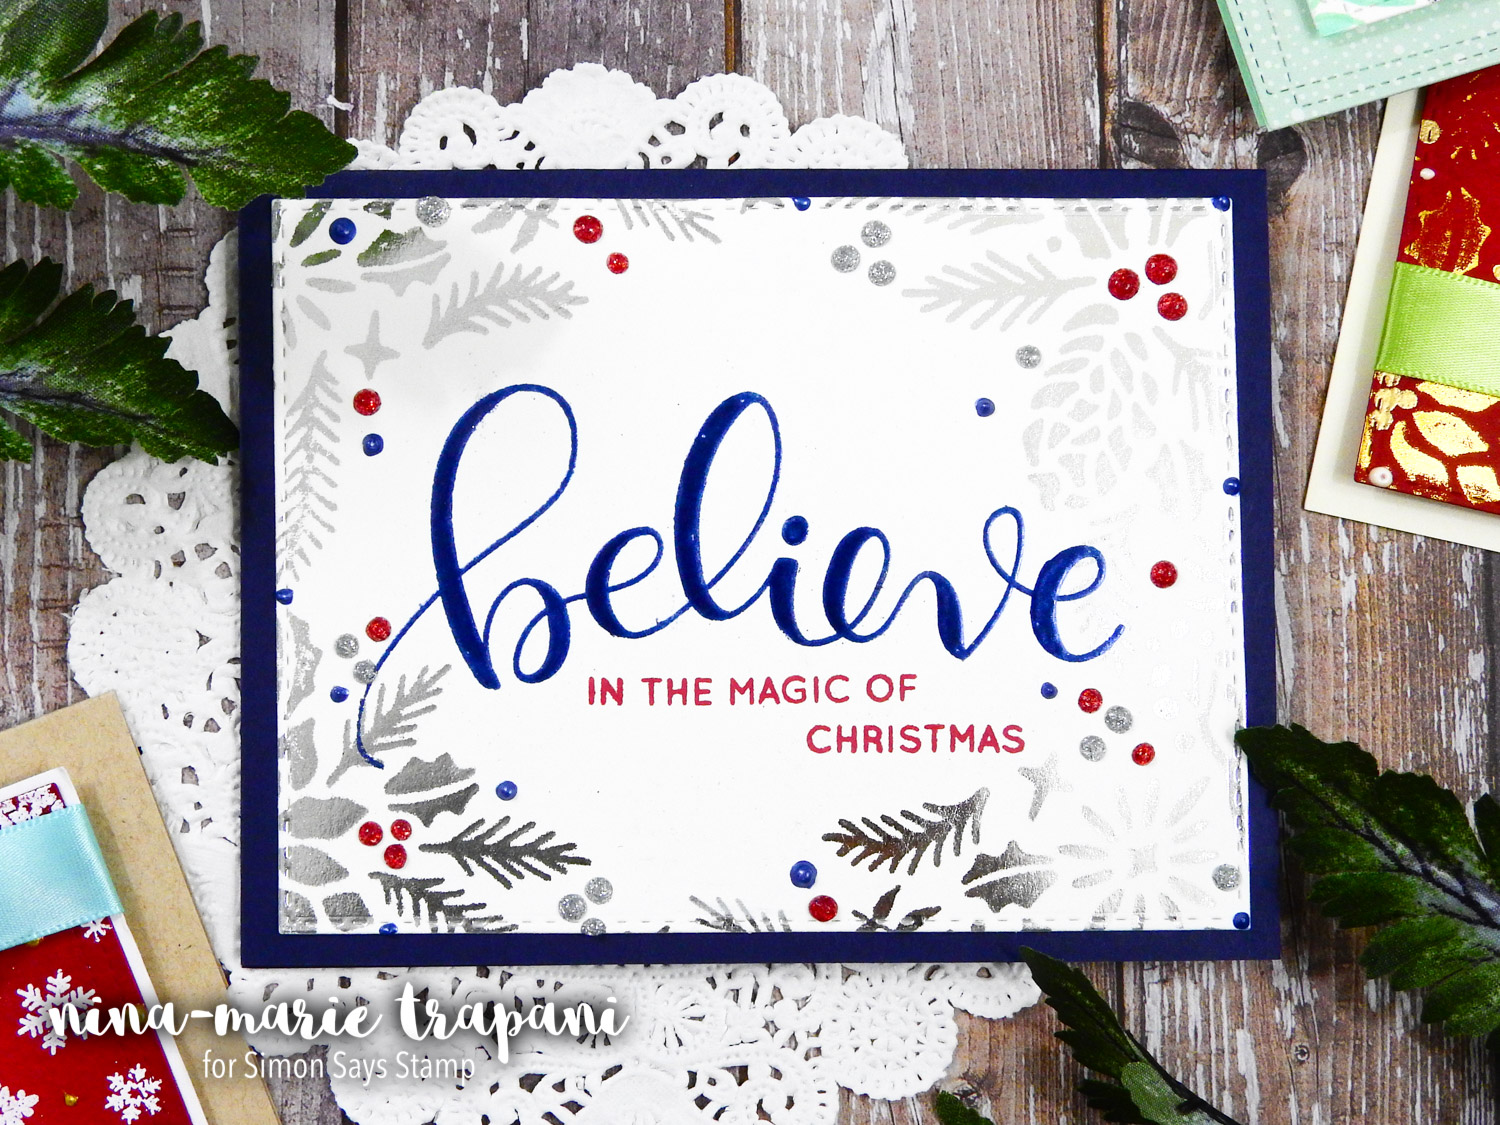
With an embossing folder, you can create similar results as the Hot Foil stamps. This embossing folder is a stamp and folder set from Couture Creations called To Be Jolly and I paired it with some of their silver foil. This technique requires a different sandwich than the Hot Foil stamps, which I demonstrate in the video below.
On this card I had a bit of foil transfer in places it was not supposed to (in the open areas of the folder); this I believe was the result of a bit too much pressure. However, you can fix little mistakes that may happen with this foil by taking a Tombow Sand Eraser and rubbing the excess foil off the paper. The eraser does not harm the foiled pattern; instead it removes only the foil that was not transferred as a result of an embossing folder impression.
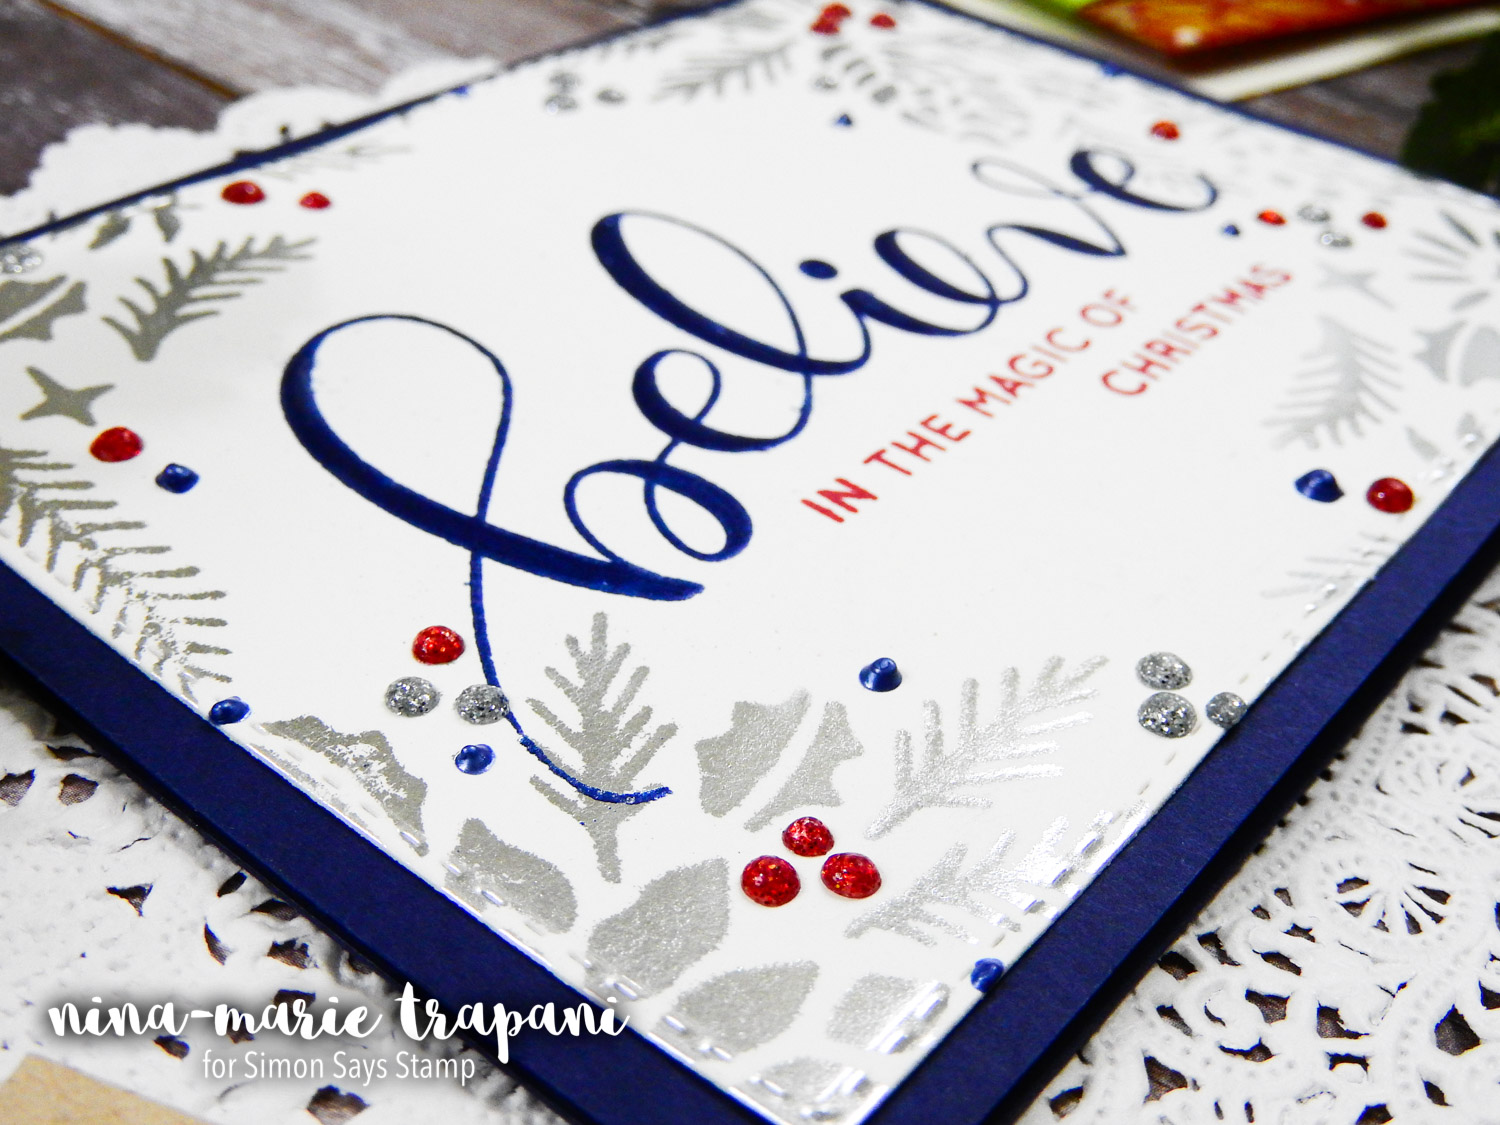
I kept this card simple and elegant. The fonts are from the Believe sentiment stamp set from Simon; “believe” is heat embossed in Steel Navy powder and the rest of the greeting is stamped with red ink. For extra color, there are Ruby Slipper, Navy and Silver Nuvo Drops dotted around the foiled, holiday foliage.
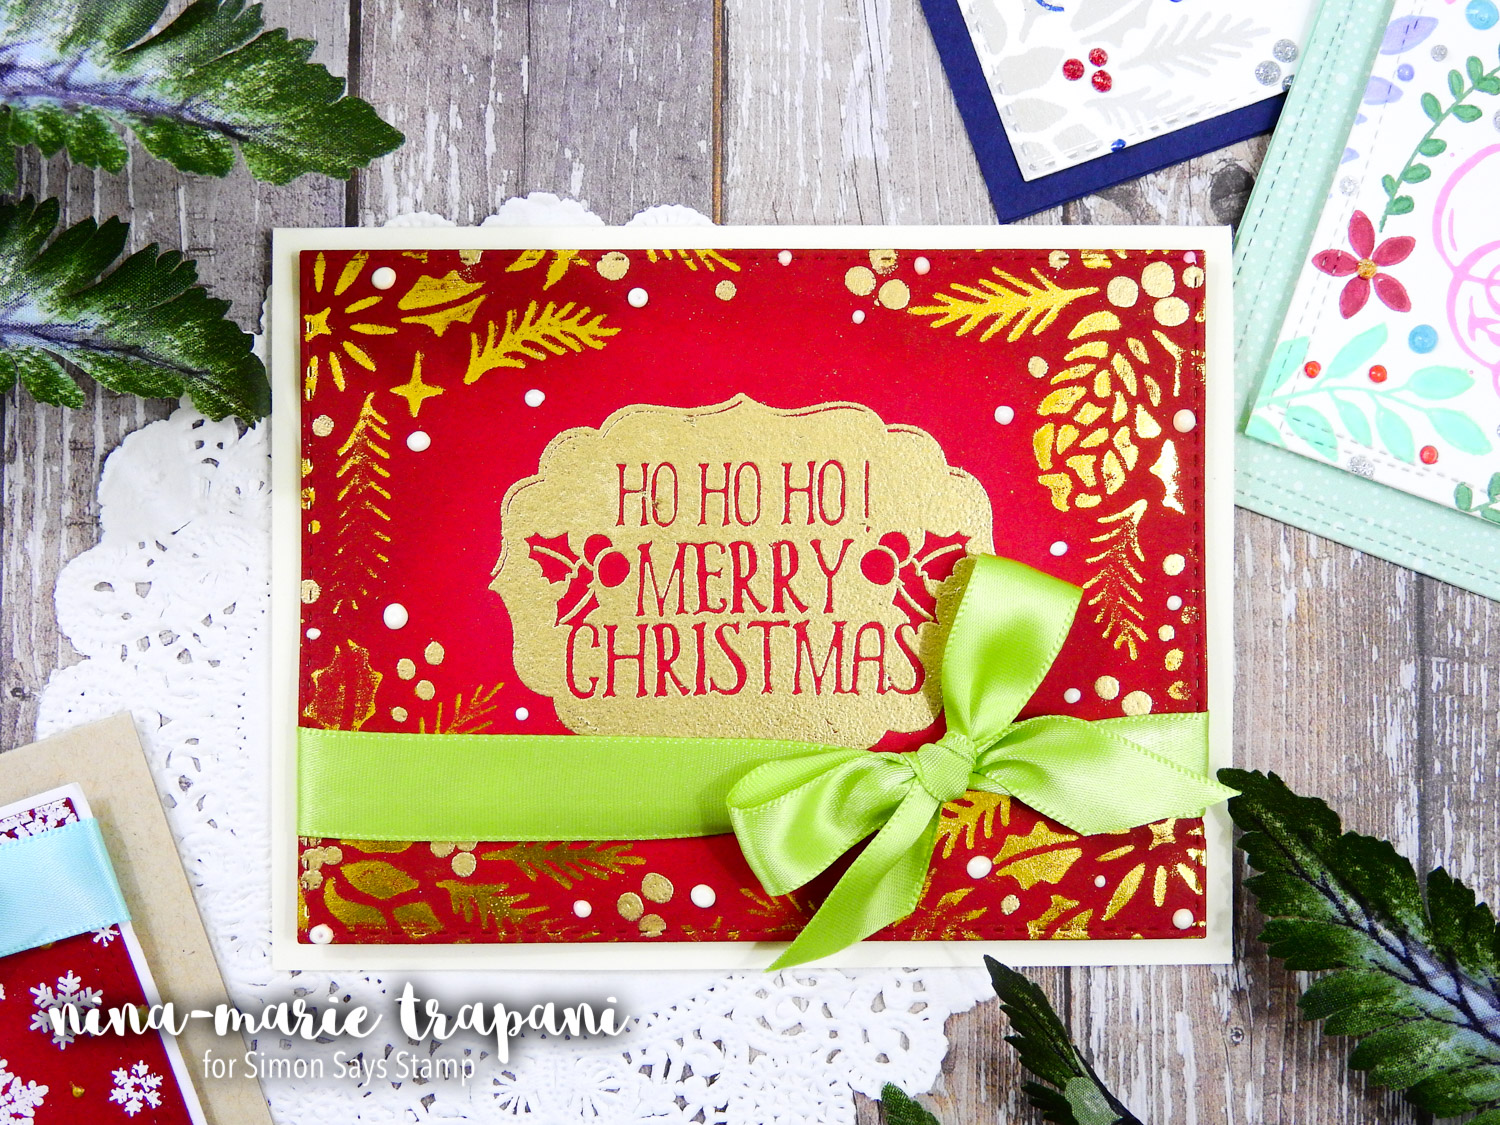
This red and gold beauty is created in the same manner as the previous embossing folder technique. You may notice however that the foil transfer was not “perfect”. I wanted to share this card with you because I think it demonstrates how you can still make use of your “imperfect” foiling (because who wants to throw away a foiled design???).
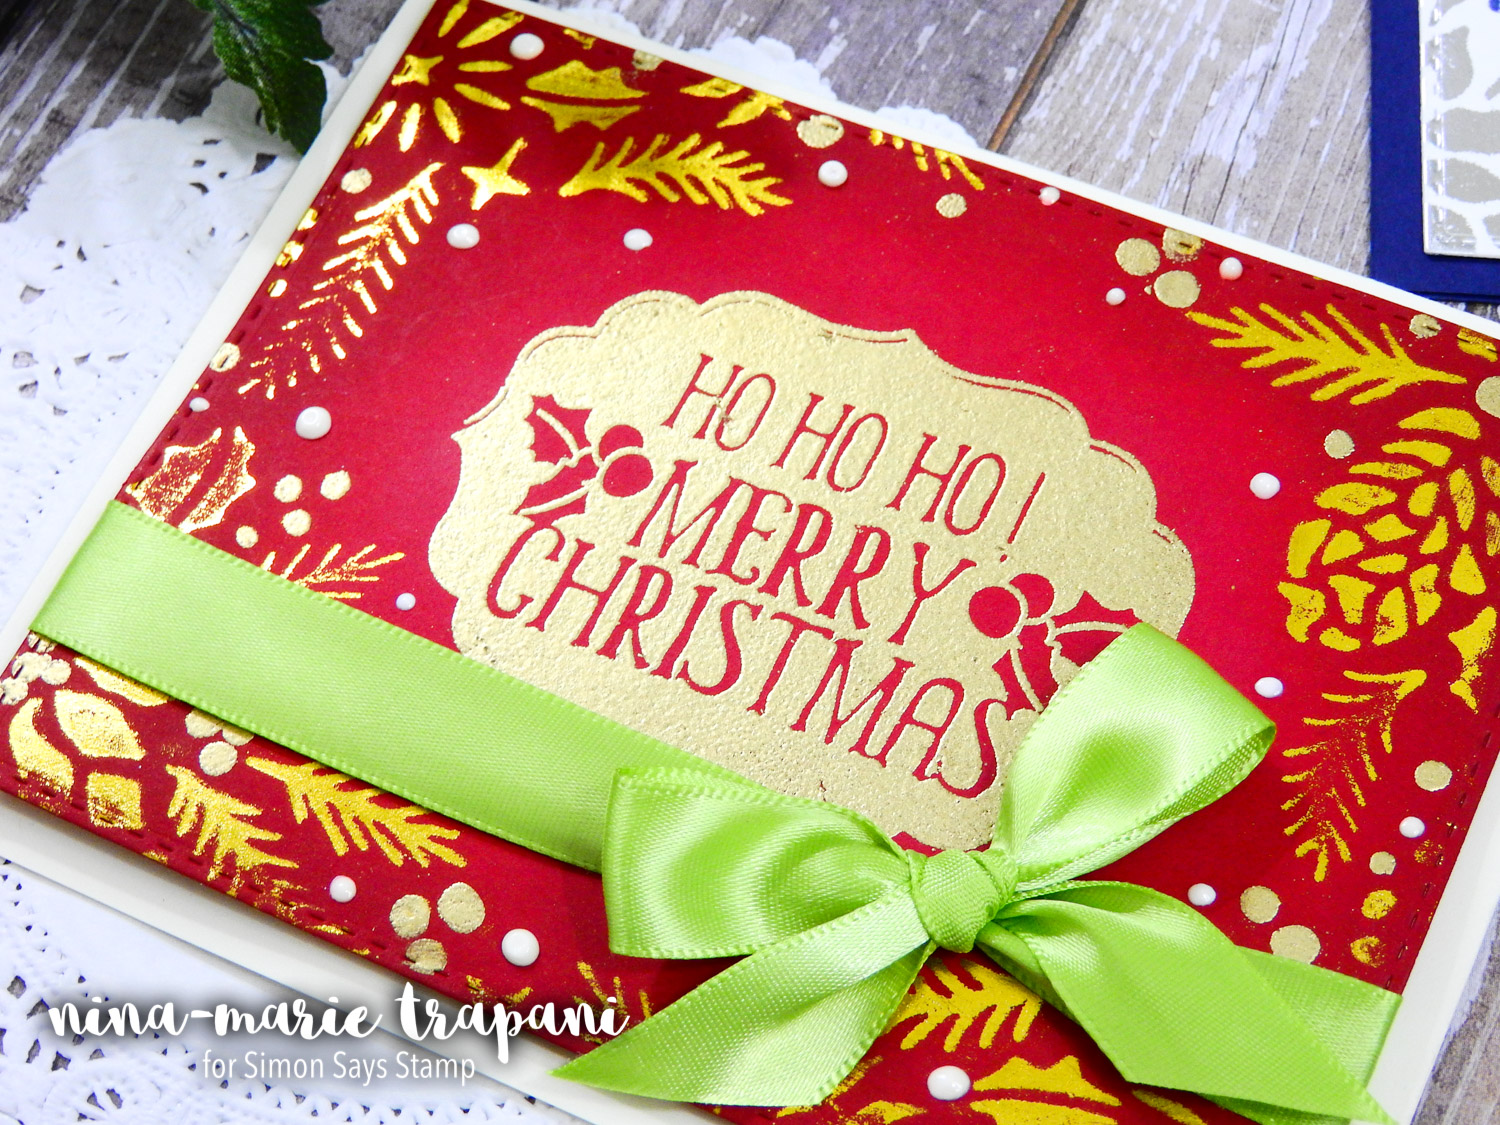
This was a result of not enough pressure in my die cutting machine; yet the “distressed” look actually goes nicely with the stamped greeting I placed in the center. It now looks like the “distressing” was intentional! I placed gold heat embossed and white Enamel Accent dots around the foiled pattern to bring things together. The bright green ribbon also helps finish the design off.
I hope that this encourages you to not give up on your “less than stellar” projects that you may end up with once in a while. Usually there is a way to salvage things!
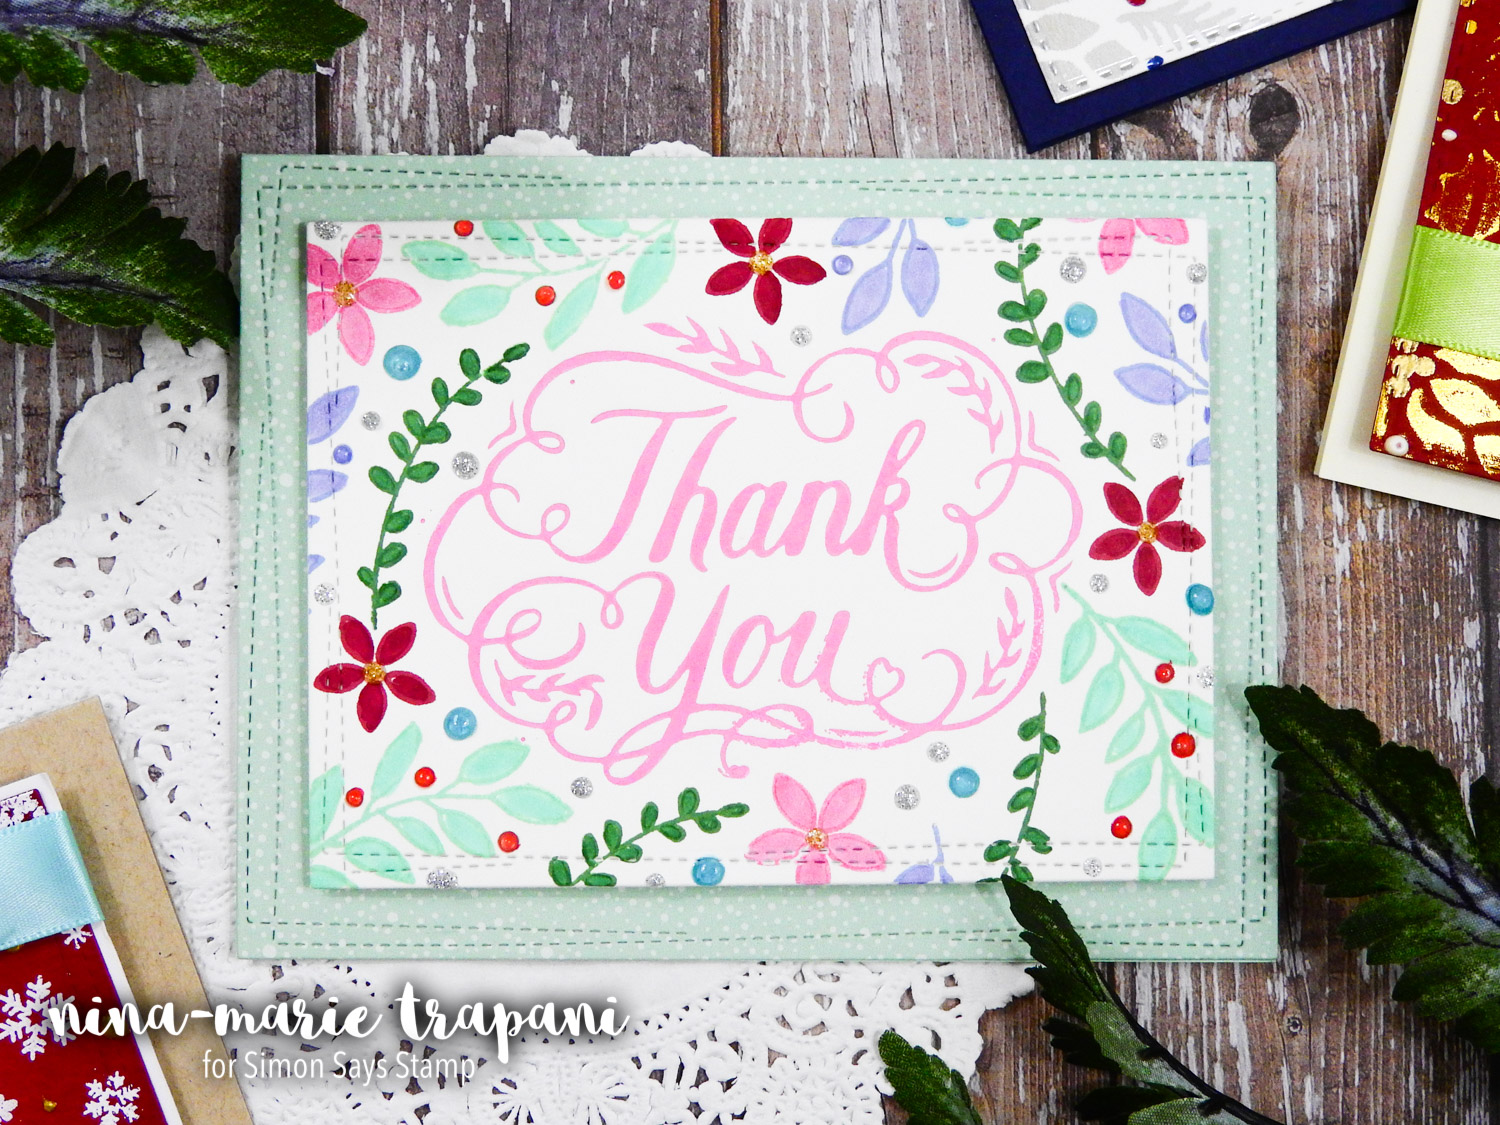
You can also do letterpress with the Go Press and Foil machine! This is such an easy technique when you use the Hot Foil stamps. This gorgeous thank you sentiment is another Couture Creations Hot Foil stamp and I inked it up with some Distress Oxide ink. The best ink transfer results are achieved with a pigment ink; because Oxides behave similar to pigment inks, you can use these as well. I explain the reason why pigment inks work best in the video (plus another idea for letterpress!). For letterpress with (or without) ink, you do not need to heat the machine up prior to running it through your die cutting machine.
I decorated this card with some floral stamp images, Nuvo drops and some patterned paper.
Thank you so much for stopping by and visiting with me today. Be sure to watch the video below! I hope that after reading this post and seeing the Go Press and Foil machine in action, you will try out this fun foiling tool for yourself!
WATCH THE VIDEO
SUPPLIES
|


Blog Candy Alert!! Follow our blog via email and comment on this post for a chance to win grab bags and blog candy! Remember to tag your awesome projects with #simonsaysstamp on social media so we can see what you are creating!


