Brand NEW CZ Design + Inspiration to LOVE!?
Hi friends! Happy Tuesday! Welcome to a BRAND-SPANKIN’ NEW release from the always fun and funny Cathy Zielske! We love the essential Archie Solid Letters, Archie Solid Numbers, and All Numbers wafer-thin dies that are fabulous to add to your daily collection. Are you a planner? Pick your planning route with two brand new stamp sets full of icons to match your actions in Making Plans and Fitness. In the market for some fun and unique sentiment dies? Look no further than Hey and Mehs (<—personal favorite!)
Last, but certainly, not least is the brand new Heartthrob clear stamp and coordinating dies that is perfect for crafting a crafting a little something special for your sweetheart on Valentine’s Day or ANY day! Shop the whole new collection below and continue scrolling for some special NEW inspiration by the one and only Cathy Zielske using the new collection! Enjoy!
|


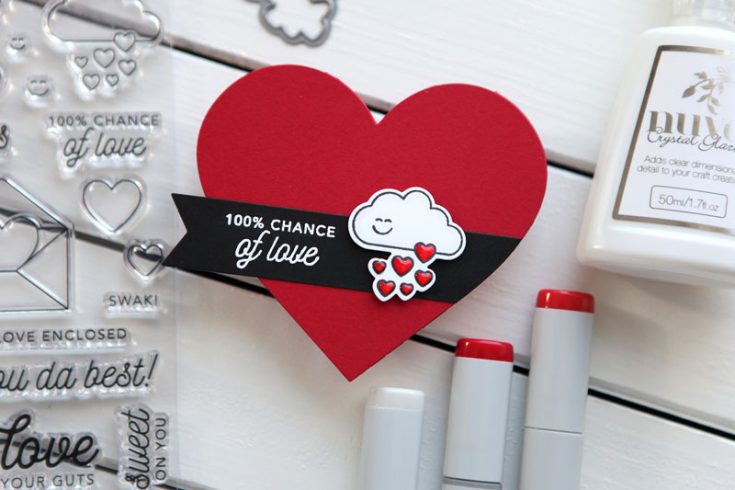
Happy new year, everyone! Cathy Z here, and I’m so happy to be sharing a card with you today featuring my newest release called Heartthrob. I’ve got a simple and sweet little card for Valentine’s Day or for any day when you’re in the mood to predict a forecast for love.
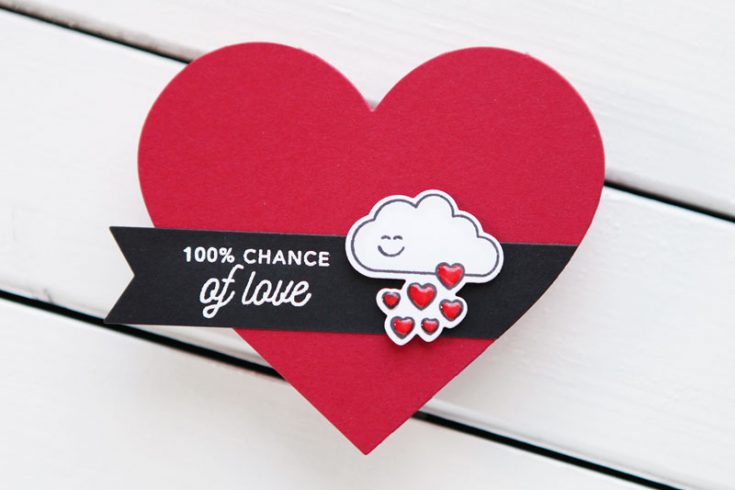
This shaped card uses a simple partial die cut technique to get a heart that opens and you could create either a top or side fold, whichever suits your style.
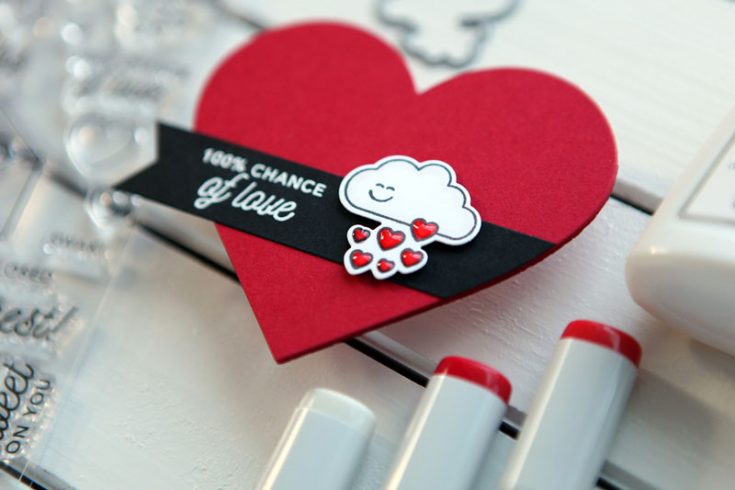
One of the things I love about this particular card is that it let me try a bunch of different techniques, but none of them were too tricky. Just some simple stamping, and coloring (only three markers needed!) and a touch of shine and dimension added at the end.
WATCH THE VIDEO:
SUPPLIES:
|


Thanks so much for reading today, and thanks to Cathy for being our guest!

Blog Candy Alert!! Follow our blog via email and comment on this post for a chance to win a special blog candy!
Studio Monday with Nina-Marie: 5 Ways to Use Freezer Paper
 Hello everyone, welcome back to the latest tutorial in my Studio Monday series! Have you ever utilized freezer paper in your crafting projects? Originally meant for storing food in the freezer (hence the name!), this versatile tool has since become a staple tool within the crafting industry. If you are a quilter, odds are you’ve used it for transferring patterns onto fabric. :) Additionally, freezer paper can be helpful to papercrafters too! I have used it in the past for various techniques and today we are going to look at 5 of my favorite ways to use freezer paper.
Favorite Freezer Paper Tip #1: Protecting Your Work Surface
 If you are a crafter that loves to get messy with like me, the benefits of having your surface covered with freezer paper are endless. Freezer paper has both a coated and uncoated surface, depending on which side you have it flipped to. When you have the freezer paper with the coated-side up, you instantly have a non-stick surface covering your work table (similar to a craft sheet). Any medium can be applied onto the freezer paper and most easily wipe off; this means you can reuse the sheet over and over and over… you get the idea! ;) Even liquid adhesives can be easily wiped off.
Favorite Freezer Paper Tip #2: Perfect with Alcohol Inks
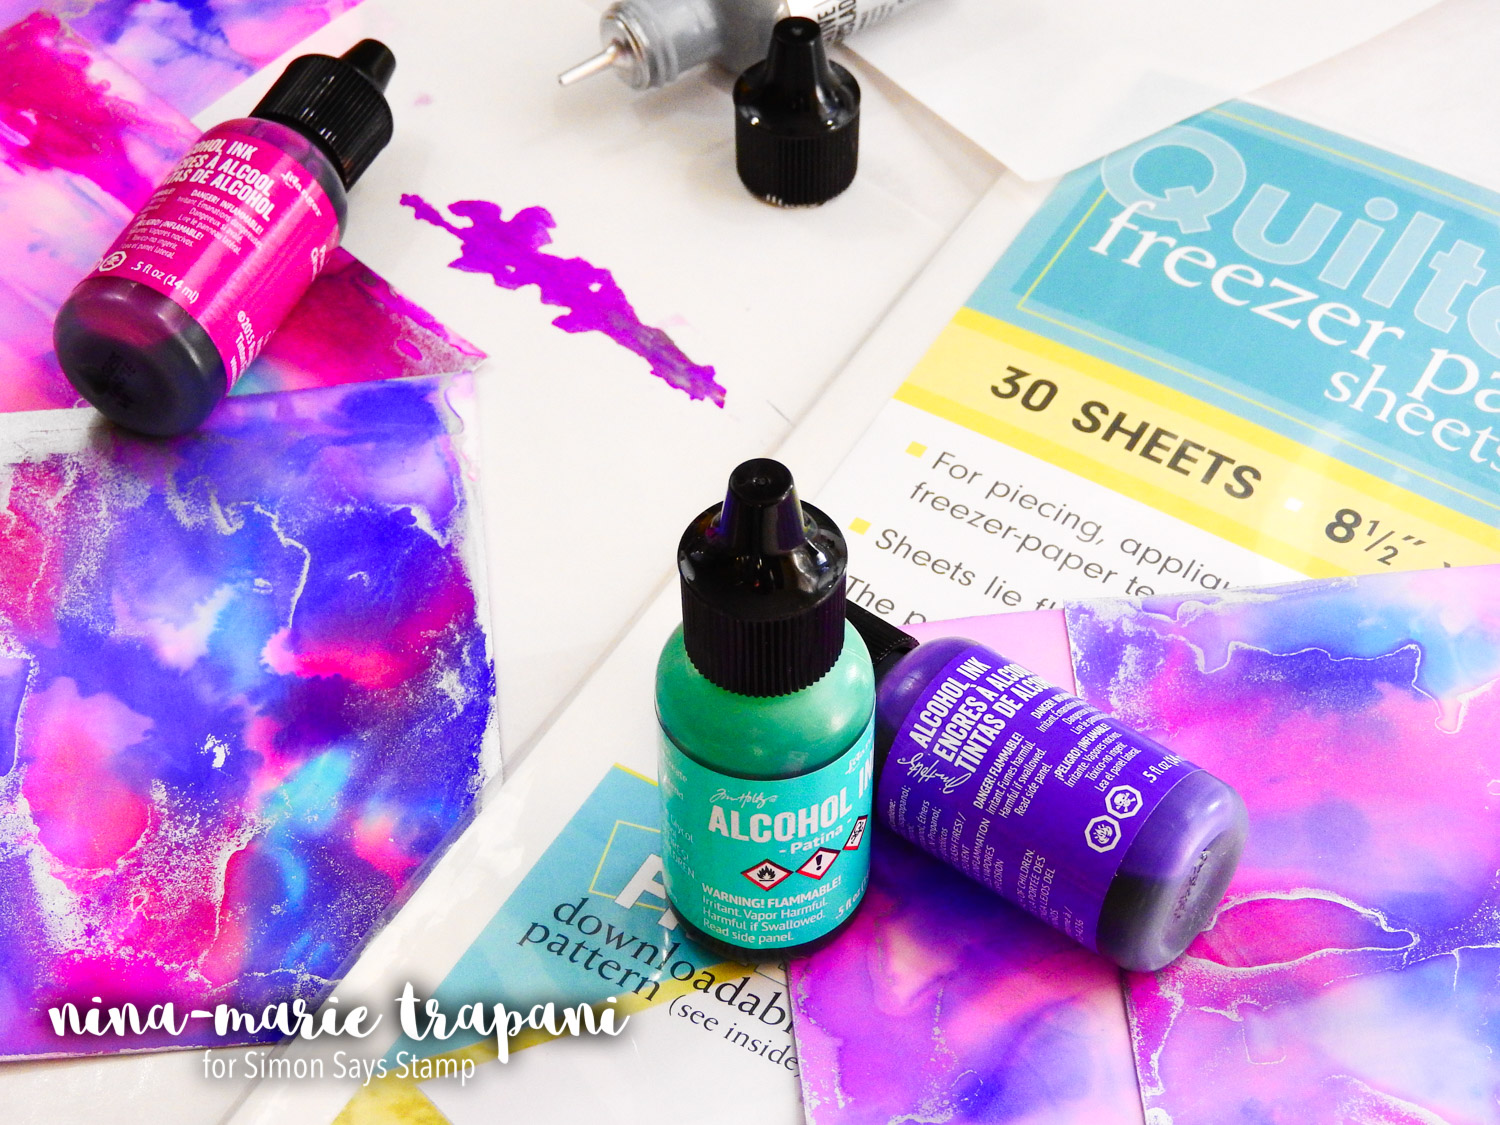 I’m sure most of you have seen that alcohol inks are all the rage at the moment; freezer paper is a great surface to work with alcohol inks on. It is especially fun to do alcohol ink smooshing on too! The slick surface of the paper allows the alcohol inks to be reactivated and re-smooshed almost limitlessly. They also clean up easily on the freezer paper; or you can simply throw the sheet of freezer paper out when you are done with the inks, making clean up a breeze.
Favorite Freezer Paper Tip #3: Distress Ink Smooshing
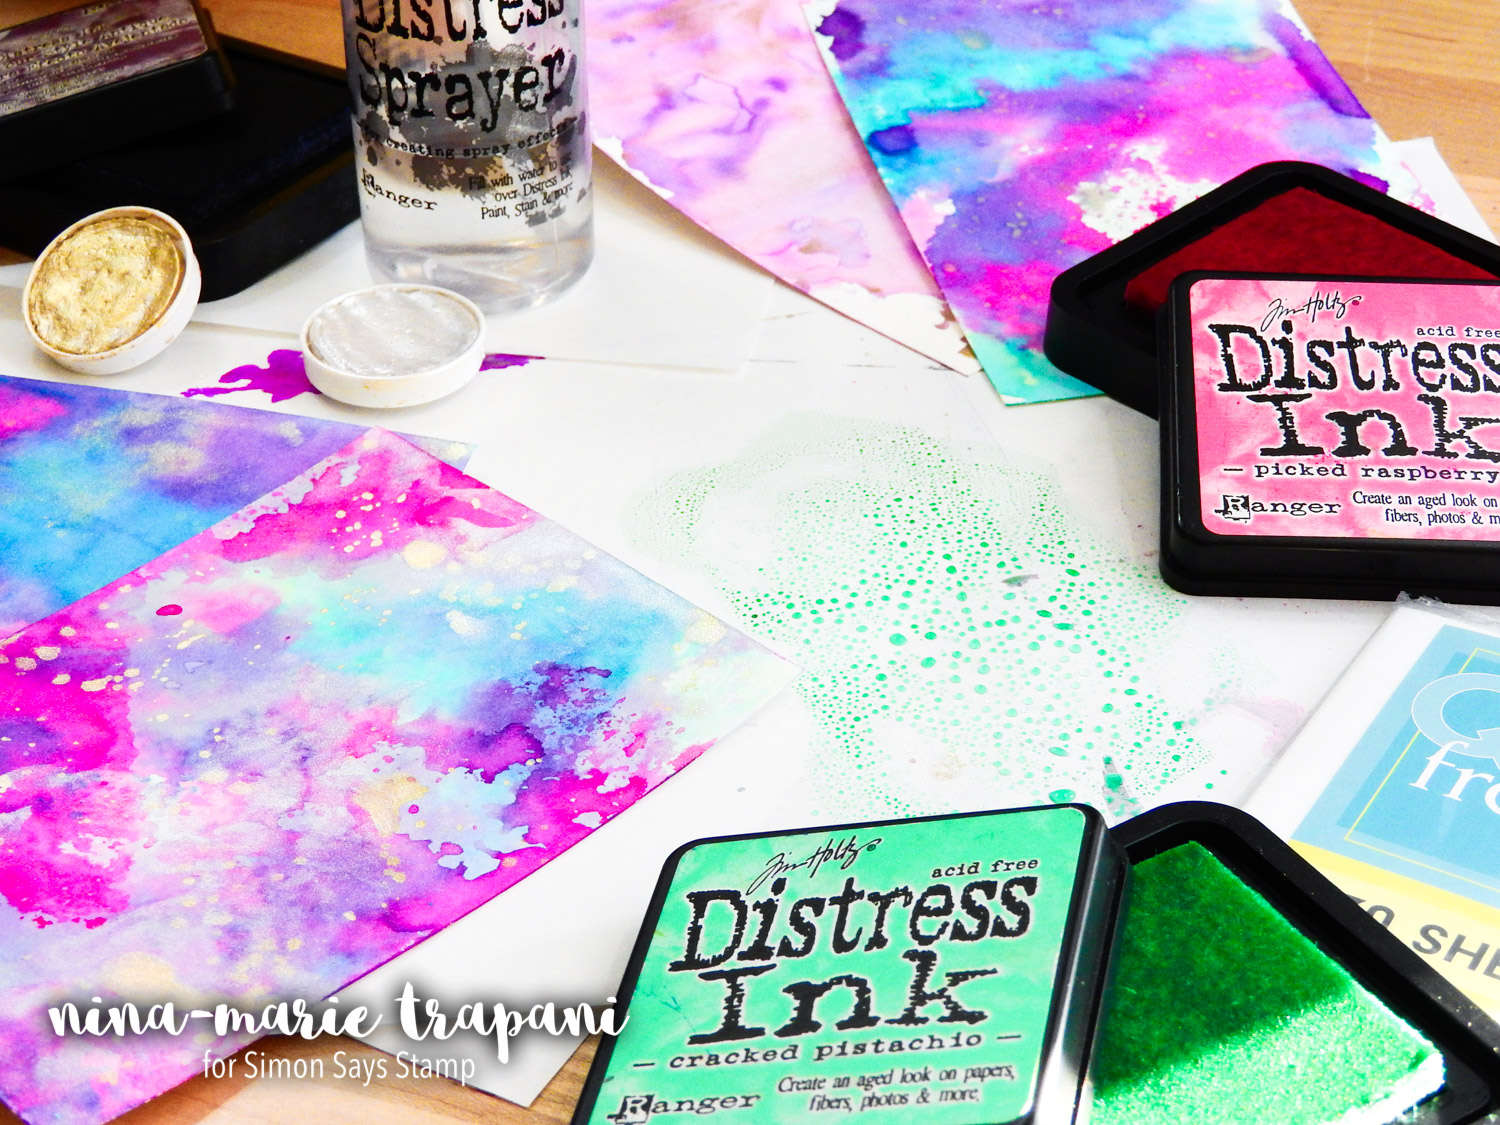 Speaking of smooshing, Distress Ink smooshing is equally as fun and easy with freezer paper! In the same way that alcohol inks can be reactivated, the coated surface allows Distress Inks to be reactivated also. You can make stunning backgrounds and textures with the ink smooshing! And because the Distress Inks are a water-based medium, they wipe away effortlessly, again letting you reuse the freezer paper over again!
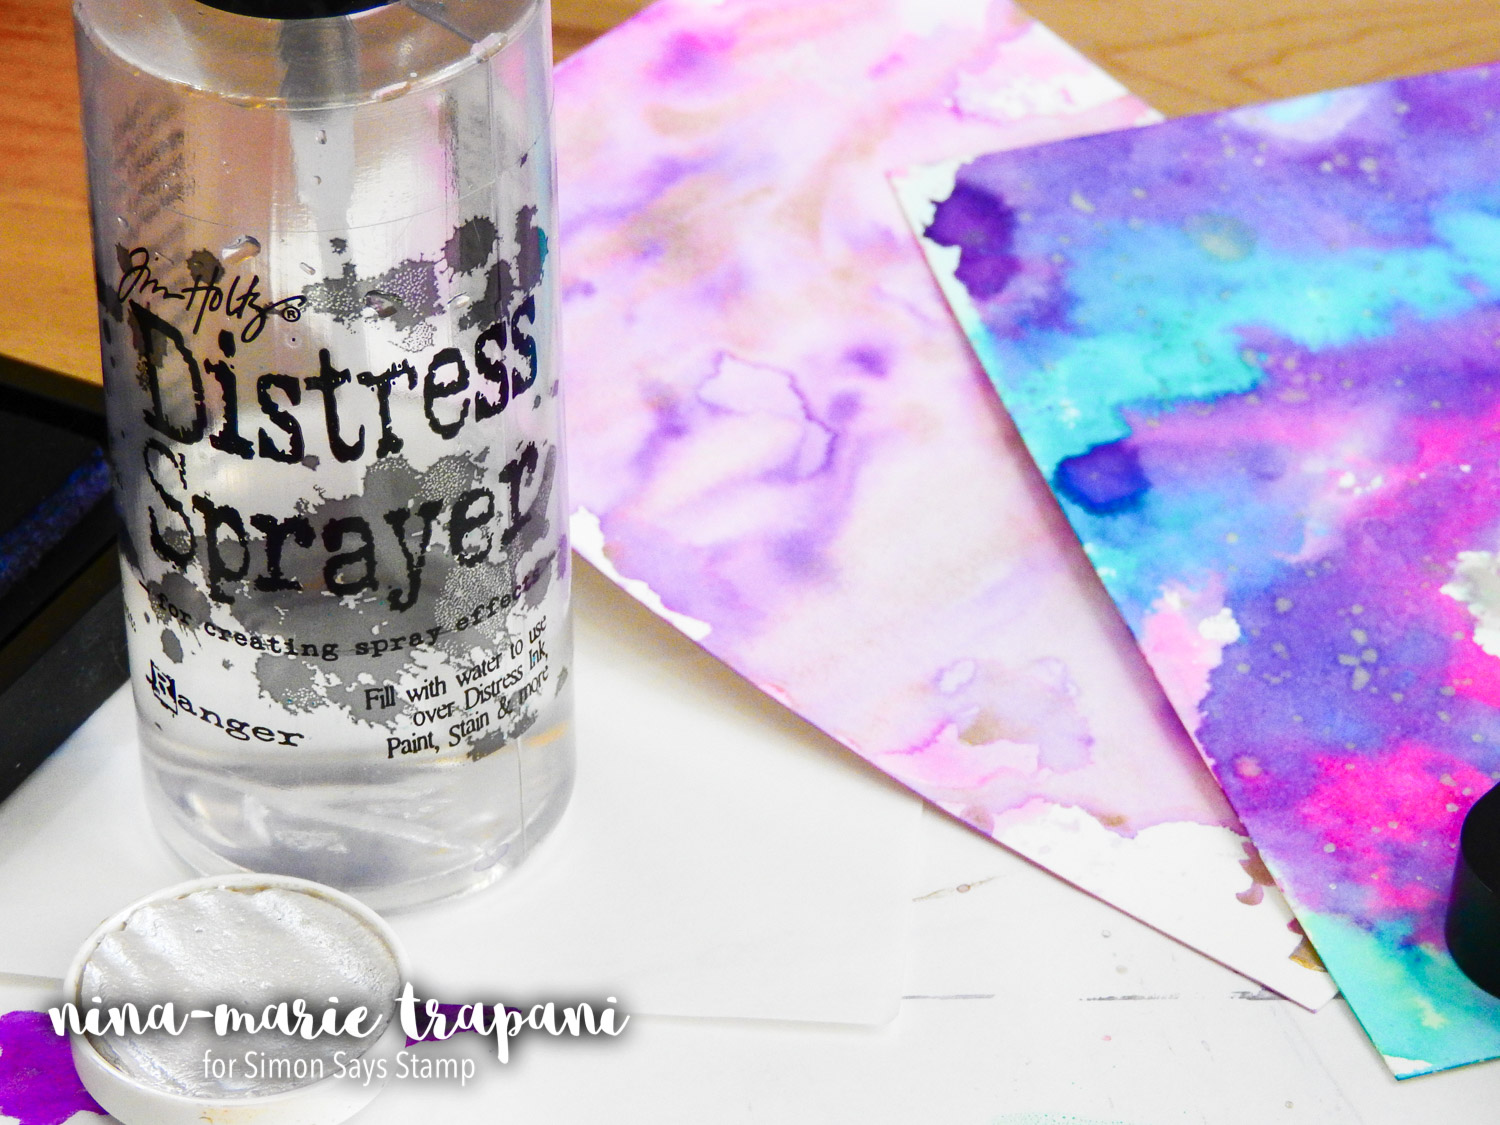
Favorite Freezer Paper Tip #4: Using as a Watercolor Palette
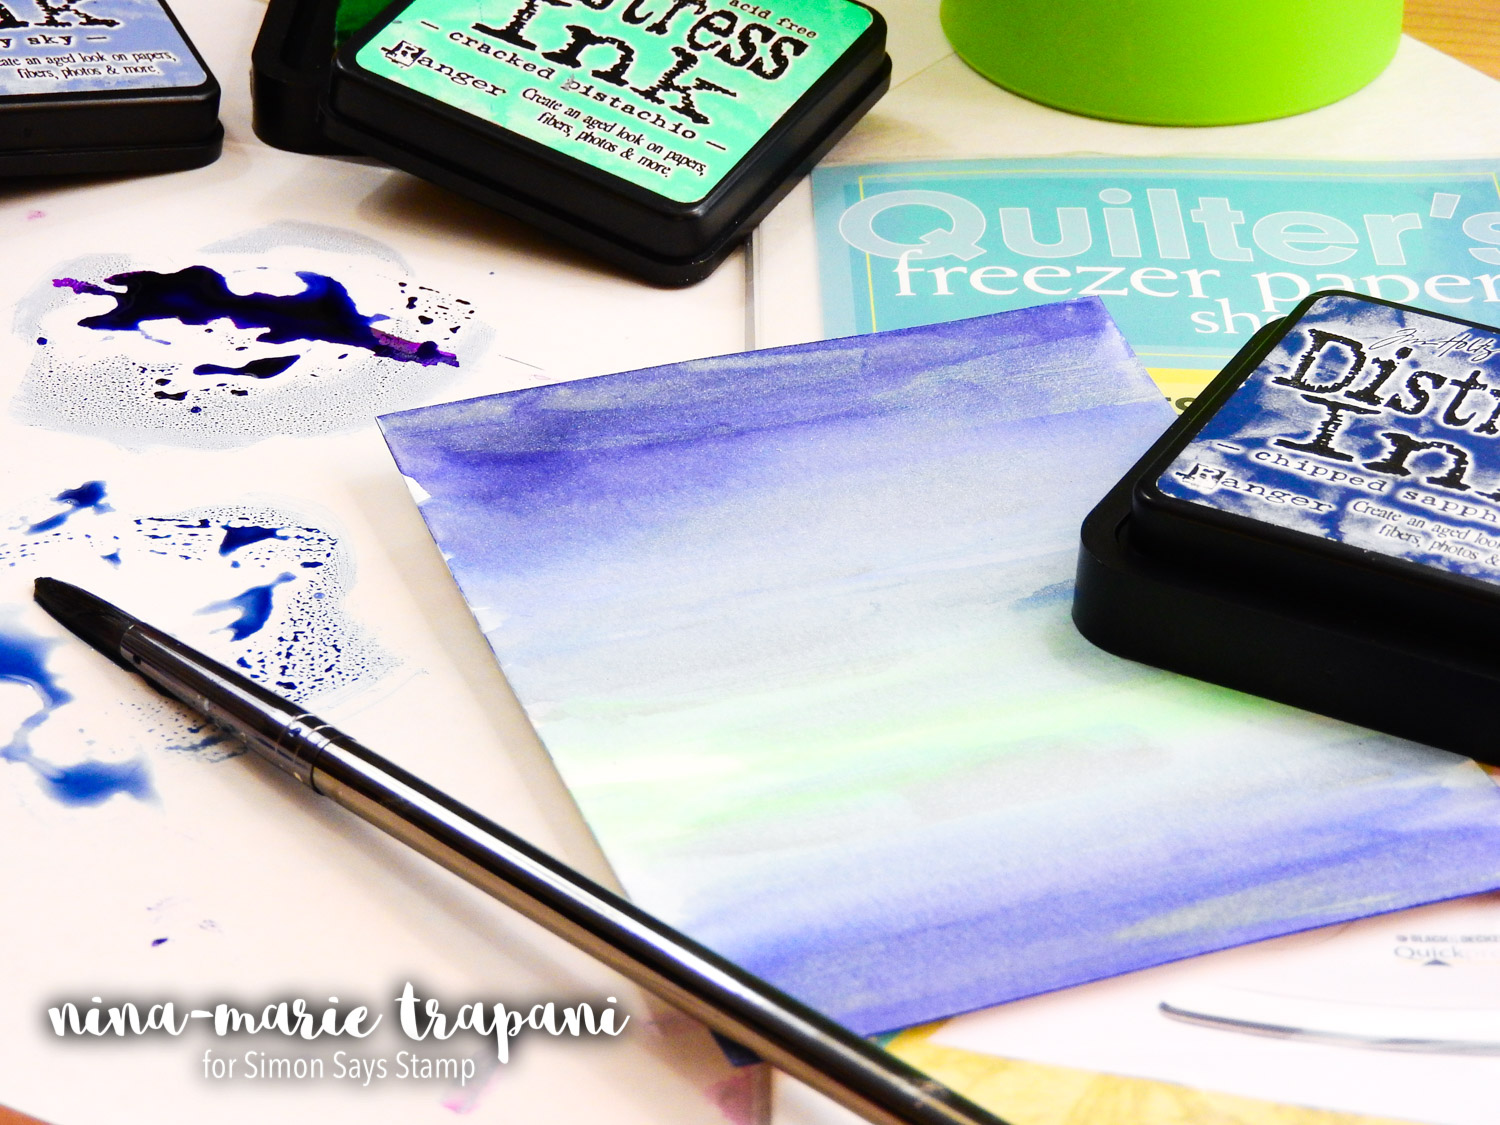 If watercolor is your thing, freezer paper could be a very useful tool for you, especially if you like to place your watercolors on a palette. Watercoloring on freezer paper not only protects your work surface underneath, but you also have a “palette” to work from too! One of my favorite reasons for using freezer paper as a palette is the fact that it is white, allowing me to see the colors in their true form.
Favorite Freezer Paper Tip #5: Perfect for Masking and Stenciling
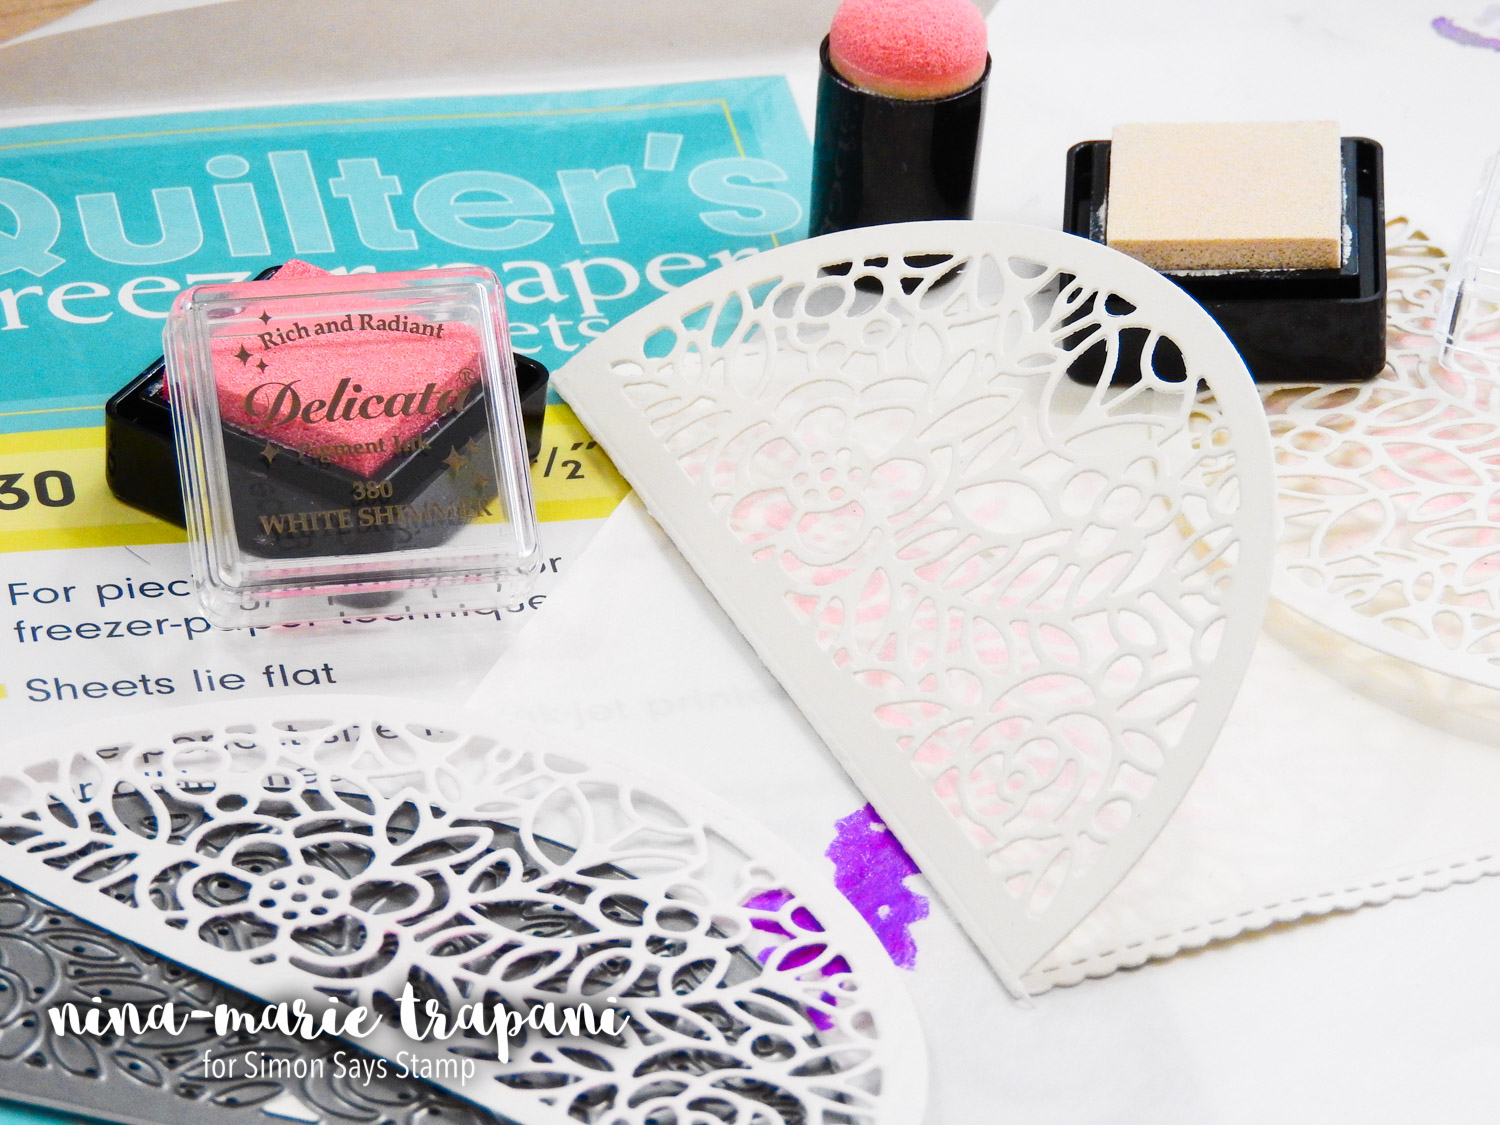
Do you like to create stencils with your dies, but find that your “stencils” wear out quickly? Freezer paper is a perfect remedy to that situation! Again, we’ve got that awesome, slick surface to use to our advantage. I adhere the uncoated side of the freezer paper to a sheet of printer paper (making the paper a bit more sturdy) and then cut the entire piece with my die of choice. Once cut, I am left with a non-stick “stencil” that has multiple benefits to a paper version: 1. it will resist the ink applied over it, 2. you can wipe it clean with a damp cloth when finished, and 3. it can be used over and over again! 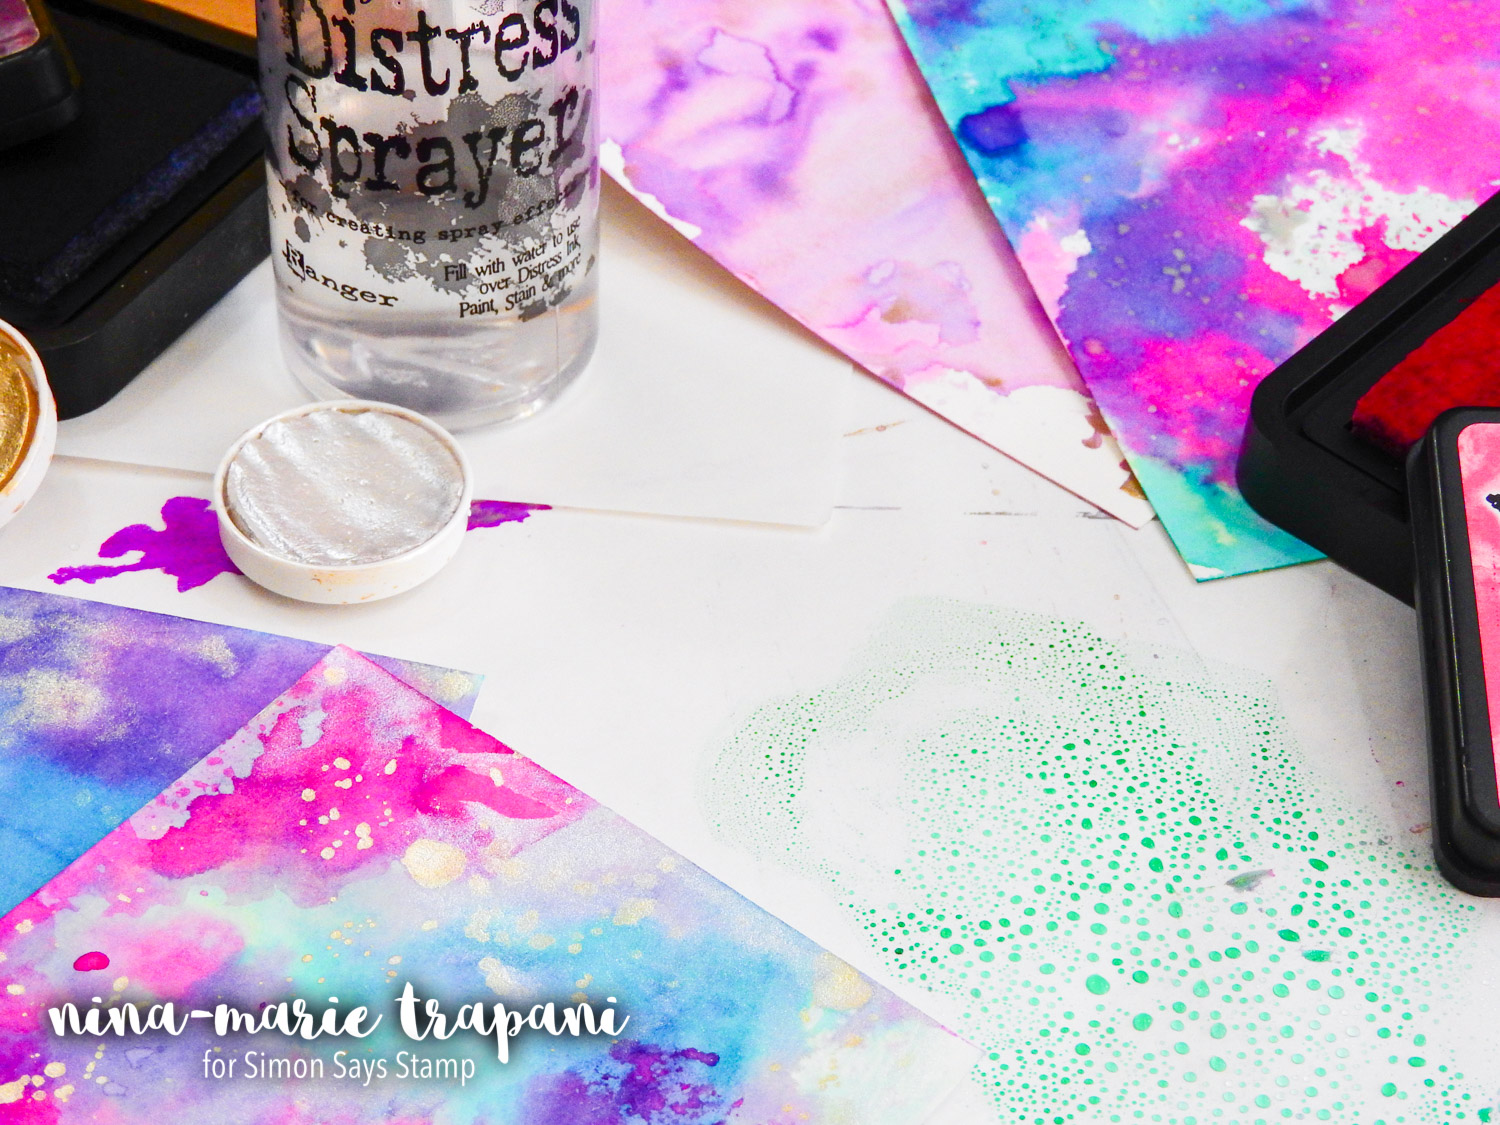 I encourage you to check out the video below to see all these ideas demonstrated. I think you will find that freezer paper could be a very versatile tool in your crafty projects too! As a side note: all of the designs and techniques you’ll see during the video will be featured in upcoming videos on my personal blog for Simon, along with finished cards! Today’s tutorial was about the freezer paper itself; so stay tuned! You’ll see those tutorials coming up later this month! Thank you so much for visiting with me today; don’t forget to subscribe to our blog and YouTube channel, as we post crafty inspiration for you daily! See you soon!
WATCH THE VIDEO
SUPPLIES
|


Blog Candy Alert!! Follow our blog via email and comment on this post for a chance to win grab bags and blog candy! Remember to tag your awesome projects with #simonsaysstamp on social media so we can see what you are creating!
Yippee for Yana: Shouting from the Rooftops
Hi friends! Happy Sunday! Welcome to the first edition of Yippee for Yana for 2018! Today the fabulous Yana Smakula is back with a gorgeous skyline card. Read on and be sure to check out the video for more info and enjoy!

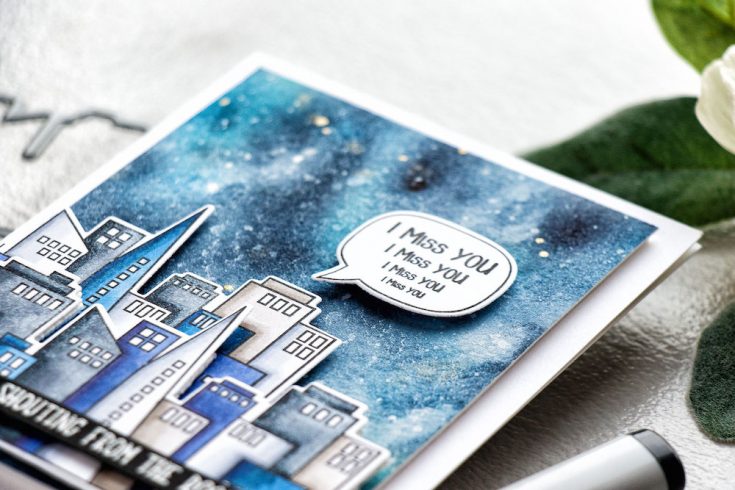
Hi everyone, this is Yana Smakula and I’m excited to bring you another episode from my bi-monthly “Yippee For Yana” video series! In today’s episode, I’m sharing a Miss You card incorporating watercolor and Copic coloring!
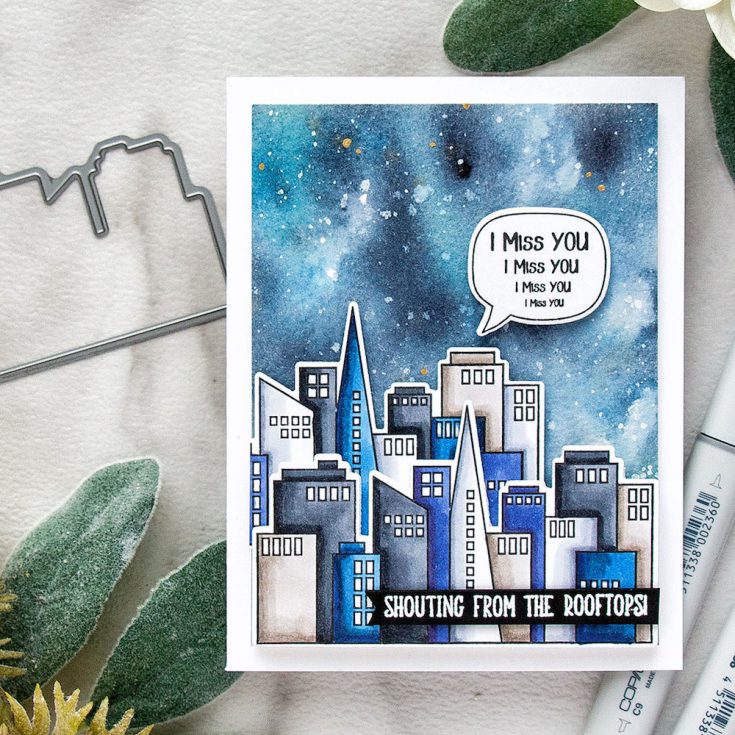
I started to work on my card by stamping cityscape image from Simon’s From The Rooftops stamp set in black ink onto white cardstock. I stamped this image several times as I wanted to build depth and dimension on my card and I needed more than just one row of skyscrapers for this.
I used Simon’s Intense Black ink for my stamping as I planned to color images using Copic markers; this ink is alcohol friendly and will not bleed when it comes in contact with alcohol. It’s also waterproof so it can be used for all things watercolor.
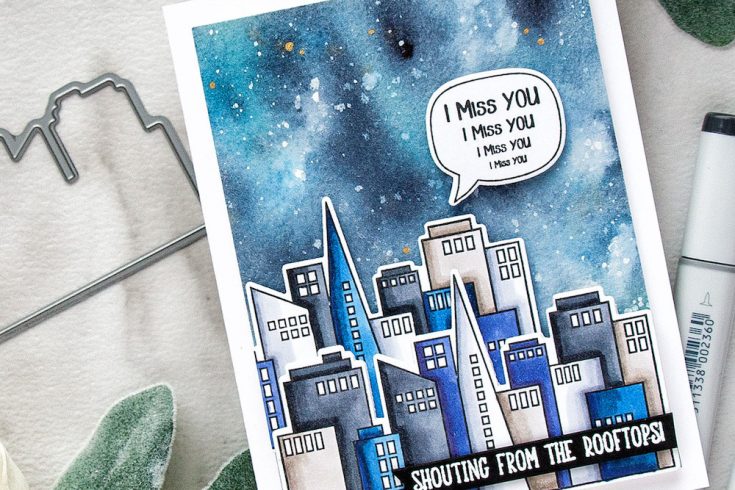
After stamping I cut my image out using a coordinating die and started coloring. I wanted to have my houses on a dark sky background, a galaxy background. I had a galaxy background ready, I painted it some time ago when I was working on another project.
I have shared how to paint a galaxy several times already so I’m not going to focus on that today. Check these videos to learn how you can create a galaxy background here, here, and here.
If you don’t like watercolor or you don’t feel comfortable enough watercoloring a galaxy background for your card you can create a simple ink blended background using Distress Inks or Distress Oxides. If you want – you can do a watercolor ombre background with the top portion of the panel being the darkest, almost black and the bottom portion lightest, a very light blue.
The colors of my galaxy background dictated the colors of markers I used to color my skyscrapers. I didn’t want to use something that would look odd so I made sure to pick the colors that went well with the background.
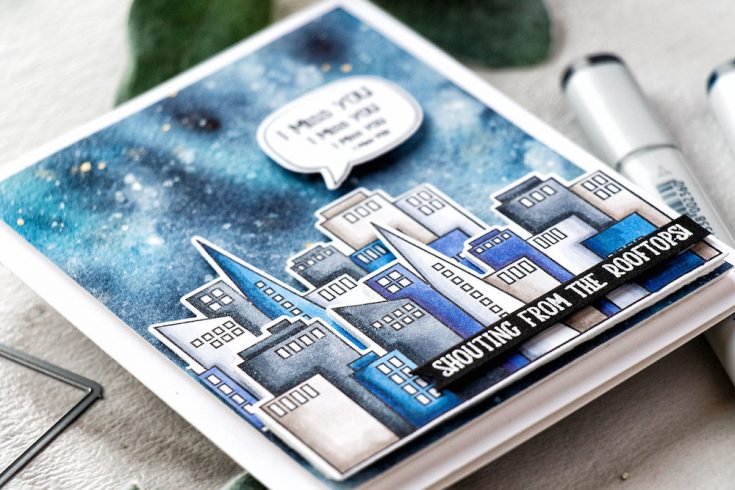
I used several color combos and I didn’t color every house in a different color, instead, I had 2-3 houses painted using same colors. I used C9, C7, and C5 – that ended up looking almost black and I love it, it really popped up against that night sky. I also colored several houses dark blue using B39, B99, and B45. I also used warm gray colors for some of the skyscrapers – W5, W3, and W1. I didn’t use any purples for my background, but I felt like I could bring a bit of dark purple to my coloring, so I used BV08 and BV04 to color some of the buildings. I also kept some of the building almost white and only added shading using a C5, C3, and C1.
To add a bit of bling and shine I used Aqua Shimmer Pen from Tonic Studios and coated my black houses with the shimmer. I also stamped a speech bubble with the echoing “Miss You” and white heat embossed “Shouting from the rooftops” on black paper.
I foam mounted my images onto the galaxy background, foam mounted the background onto an A2 card base and that finished my card!
Have fun stamping!
WATCH THE VIDEO:
SUPPLIES:
|


Thanks for reading, and thanks to Yana for being our guest!
Blog Candy Alert!! Follow our blog via email and comment on this post for a chance to win a special blog candy!


