How To: Adorable Lawn Fawn Teacher Thanks Card
Hi friends! Happy Tuesday! I’m delighted to welcome back special guest Elise Constable to our blog today to share some fresh inspiration from Lawn Fawn! Read on to learn more and enjoy!
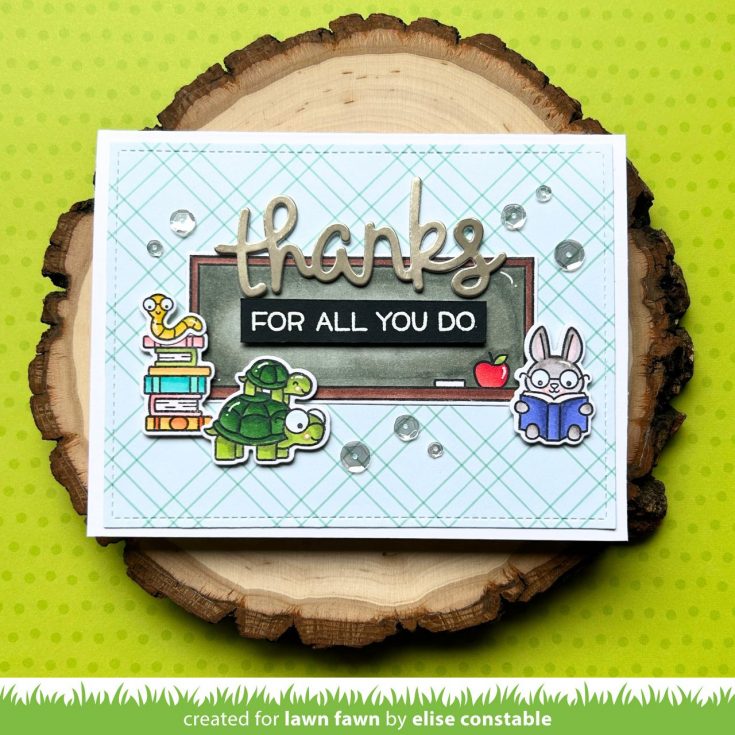
Hi everyone! I’m excited to be back to share a thank you card that features some cute critters from Lawn Fawn! With the school year wrapping up, it’s the perfect time to send thank you cards to the teachers for all of the hard work they do throughout the year.
I started by making the white card base, die cutting the background paper with the Outside In Stitched Rectangle die, and attaching it to the card base with double sided tape. The Outside In Stitched Rectangle die is my favorite because it leaves the perfect white border when it’s added to the card base.
Next, I stamped the chalkboard from the Simply Celebrate Graduation set and the critters and books from the Little Woodland Library Friends stamp set onto white cardstock with the Jet Black ink. The images were all colored with Copic markers and die cut with the coordinating dies.

To create the sentiment, I used the metallic champagne cardstock and die cut three thanks with the Scripty Thanks die. I like to glue three layers together for the sentiment to make sure it stands out against the background. The “for all you do” sentiment is from the Thanks Thanks Thanks stamp set and is white heat embossed onto black cardstock. I used a paper cutter to carefully trim the black cardstock into a rectangle around the sentiment.
After all of the card elements were ready, I started to assemble the card by glueing the chalkboard in the middle of the card. The thanks was also glued in place, but the books, critters, and the “for all you do” were all attached with foam tape to add some dimension to the card. To finish the card, I glued a few clear sequins to the background. This card turned out so cute and will be perfect to send to a teacher!

SUPPLIES:
|


Thanks so much for stopping by, and thanks to Elise for being our guest!
Stretching Supplies Beyond Their Season!

Hi friends! Happy Monday! Please join me in welcoming special guest Cheiron Brandon to our blog today! Sometimes it’s such a fun challenge to stretch your supplies, and today Cheiron has done just that using the Tim Holtz Sizzix Foliage Wreath die set for a fun “Spring-y” project! Read on and enjoy!


Hello there! It’s Cheiron Brandon and I am thrilled to be sharing a fun card with you today using Tim Holtz products. Today I am using the Vault Foliage Wreath die along with colorful textured Sizzix cardstock to make a wreath that is perfect for the spring season.


I love a wreath card, and I always think it looks great on a solid textured background. To begin, I ran a panel of Distress Watercolor Cardstock through the Vault Lace Embossing Folder. This folder gives the perfect amount of background texture. For the wreath, I like to cut out my base pieces first, then cut out my foliage and florals to figure out where on the card I want to place them. I cut the wreath pieces out of two different colors of greens.


Now it’s time to create our florals. I cut out florals and green leaves in many colors. To make my florals really stand out, I inked the edges of each with coordinating colors of Distress Inks and then adhered a center to each flower. Since we are making a spring themed card, I did not use the oak leaves or acorns.


After that, I arranged the wreath pieces together, slightly offsetting them. Once the wreath was assembled, I began arranging the leaves and flowers on top of the wreath, popping (almost) each one up with foam squares. When I was done putting the wreath together, I turned it over and added foam squares to the back.


I also wanted to add color to the Lace Panel, so gave it a mist of Distress Spritz, using Spritzes in Kitsch Flamingo, Saltwater Taffy and Weathered Wood and dried them with a heat tool. It adds just the perfect hint of sparkle. I adhered the Lace Panel to a card cut from Simon Says Stamp Peacock cardstock, then adhered the wreath to the panel. I added a sentiment strip using a Tim Holtz Small Talk sticker and to complete my card, I added a clear drop to the center of the bow.


I hope you had fun creating this card along with me and learning some tips to stretch your supplies into the next season!

SUPPLIES:
|


Thanks so much for stopping by, and thanks to Cheiron for being our guest!
2 Cute Card Designs Featuring Our Duck Trio with a Frame
Hi friends! Happy Sunday! Please join me in welcoming back special guest Heather Hoffman to our blog with this adorable duo of cards featuring newly released products from our exclusive You Are My Favorite collection! Read on to learn more and enjoy!

I love a cute critter die, and growing up in a rural area on 20 acres, I have a special fondness for farm animals as well! Some of my family currently have ducks, so when I saw the adorable Duck Trio dies – I couldn’t wait to create with it! I also love card ideas that allow me to create two for similar effort – especially when they help me avoid waste. Today’s cards are a perfect example of a way to do that!
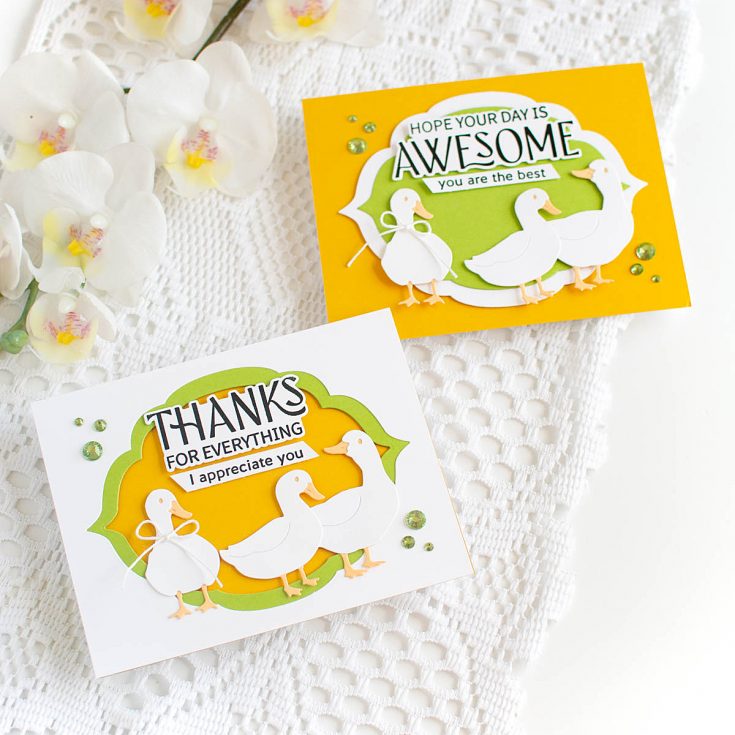

I started off by die cutting both elements of the Duck Trio dies twice – the main part from white cardstock, and the detail portion from Gina K Sunkissed Coral cardstock. I layered them together, using a touch of liquid glue to make it easy to adjust them perfectly in place.


Next, I pulled out the Petal Tipped Labels, and my Spellbinders Rainbow Hues cardstock pack – pulling out some of the Tuscan and Rainforest colors. I die cut a window using the second largest die from a panel of green cardstock, being careful to center it as perfectly as possible. I then cut the largest die from a panel of white cardstock, once again being careful to center it as best as I could. I layered them each together – the white positive over the green positive, and the green negative behind the white negative. I then grabbed a panel of the yellow cardstock to place behind each of those, mounting them with Big Momma foam adhesive for dimension that isn’t too bulky. I then mounted both of those on white cardbases.


Next up, I stamped the sentiments from Mandala Blossom (main sentiments) and With Thanks (secondary sentiments) using Nocturne ink, then heat embossing with clear embossing powder for some extra shine. I die cut the larger sentiments, and trimmed the smaller ones down into strips with a paper trimmer.


I added the ducks with small bits of the same foam adhesive to build the scene, and added the sentiments as well. Finished off with a tiny bow on one of the ducks created with Lawn Fawn white twine, and glued in place, then a few Dazzling Gems in Sprout!
Do you like to use both positive and negative die cuts to create two cards at once?

SUPPLIES:
|


Thanks so much for stopping by, and thanks to Heather for being our guest!


