One Stamp, Five Ways: Hello There
Hi friends! Happy Thursday! Welcome to a brand new installment of Suzy Plantamura‘s “One Stamp, Five Ways” feature – where, this month, she got SO EXCITED- she ended up making a 6th card!! This sweet stamp set named Hello There is from our brand new Sending Sunshine collection! Read on to find out more information and enjoy.
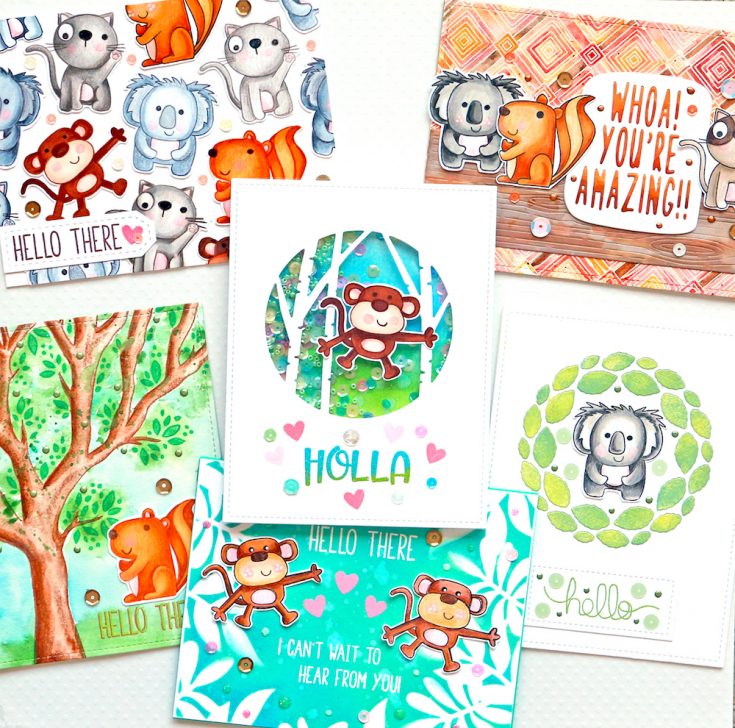
Today I get to share another “one stamp, five ways” post with you using a stamp set from the brand new Sending Sunshine product release called Hello There. My two favorite type of stamps are flowers and animals, so this one definitely jumped out at me! There are four cute critters in it as well as accessories and four sentiment choices. I actually made six cards today using the stamp set, so I’ll be including a bonus one at the end!

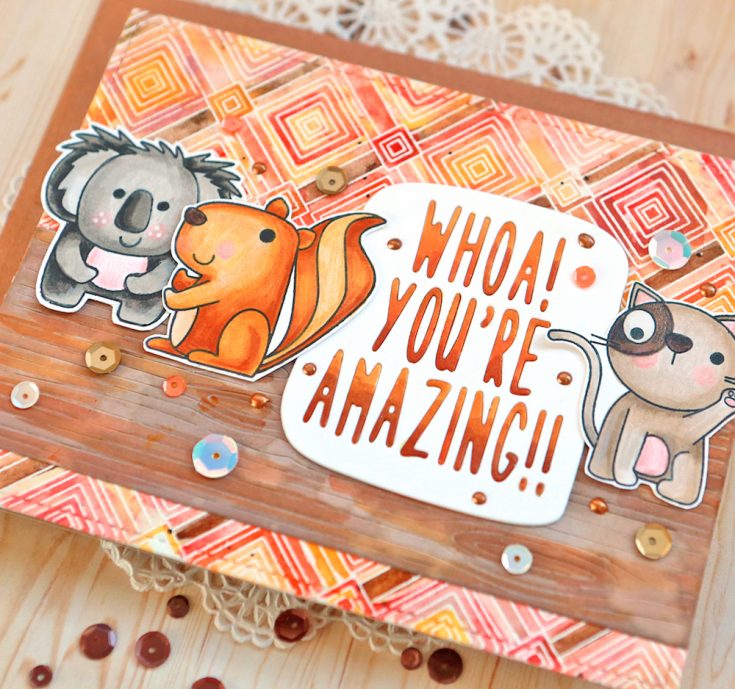
For this card, I started with a cling stamp called Deco Diamonds from the new Sending Sunshine Release watercolored in reds, yellows, and browns. I thought it would make a good background for some of these critters I also used two other SSS dies including the Woodgrain Block Die and the Whoa! You’re Amazing Die.
Here are some tips I used when creating this card:
When watercoloring the background, use a fine tip paintbrush for some of the areas keeping the color inside the lines, but then use a larger paint brush for other areas with lots of water so the colors blend together and look messy
Color the letters inside of the “Whoa! You’re Amazing” Die with Copic Markers to match your card and then when attaching the die, use the colored letters inside it
After you watercolor, the Woodgrain border die, add some shading with Copic Markers to give it more of a wood look
Color the critters with Copic Markers and then add shading with colored pencils – mixing coloring mediums is my favorite way of coloring!
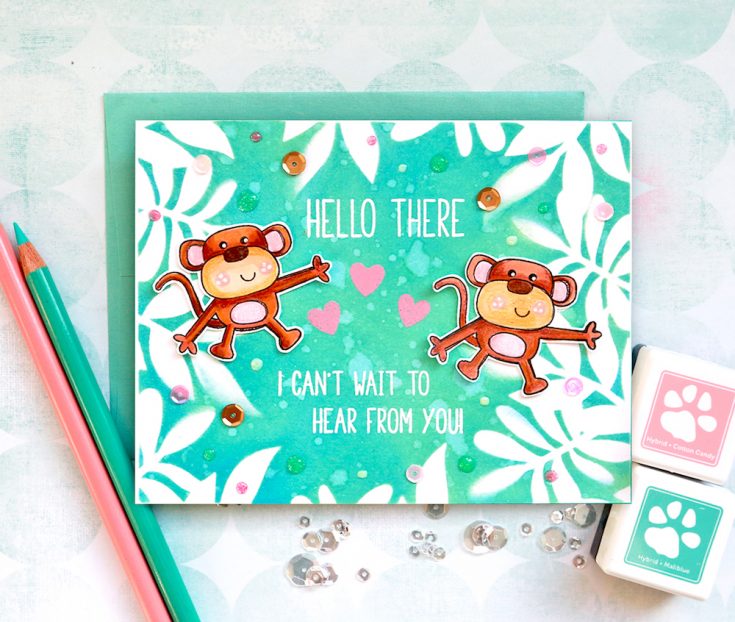
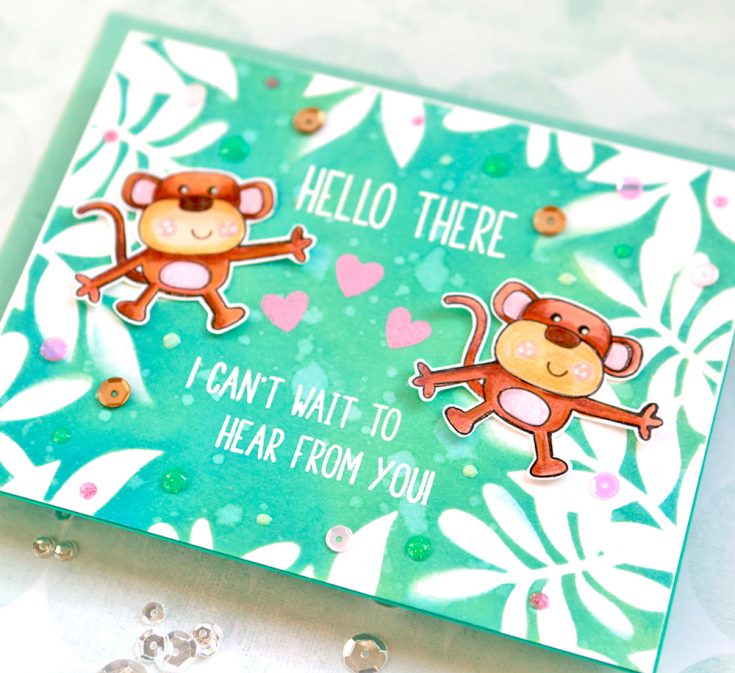
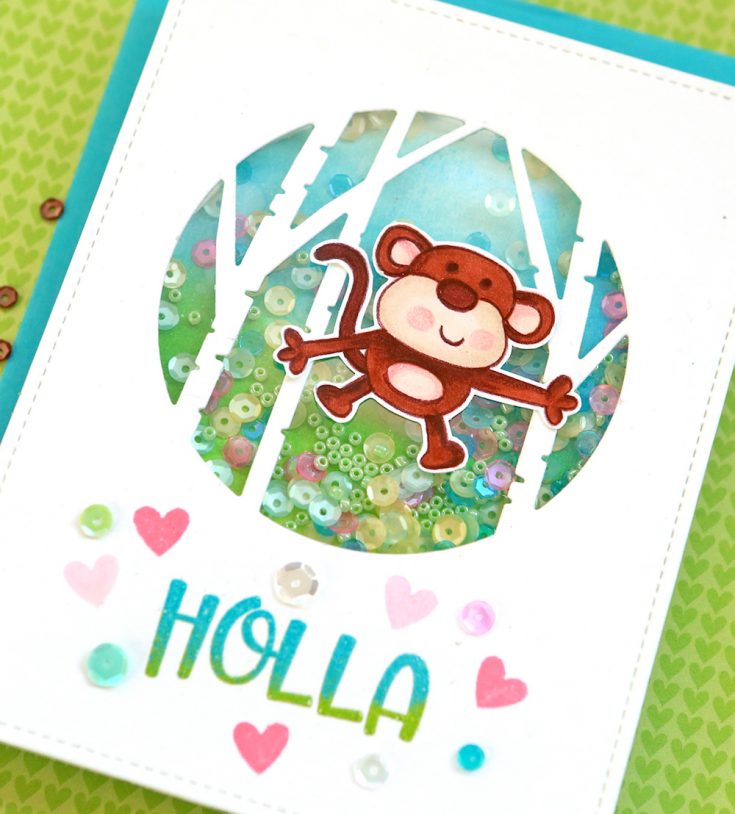
I created the background of this card using the Leafy Frames stencil from the new Sending Sunshine release and Distress Oxide Inks. I thought it made the perfect little jungle setting for the monkeys in the stamp set!
Here are some tips for this card:
Attach the stencil to the card front with removable tape so it doesn’t move around while you work with it; rub the inks over the stencil from the outside to the inside so the leaves stay put (you can see some spots where I rubbed ink under the leaves because it moved on me – oops)
When working with Distress Oxide inks, rub the darker color on first (I used Salty Ocean) to cover the entire area, then rub the lighter color (Cracked Pistachio) over it as it covers the layer underneath
Flick some water drops on the background and wipe them up for bleached areas in the background
Emboss some hearts in the center of your card to fill in that space and add some texture and “love”
Cut stamps apart when you stamp your sentiment so they fit into the space you have perfectly (is this terrible? I cut my stamps apart all the time!)

This new Leafy Circle Wafer die was perfect for a background for a koala bear! I rubbed ink on each of the leaves and replaced them into the wreath.
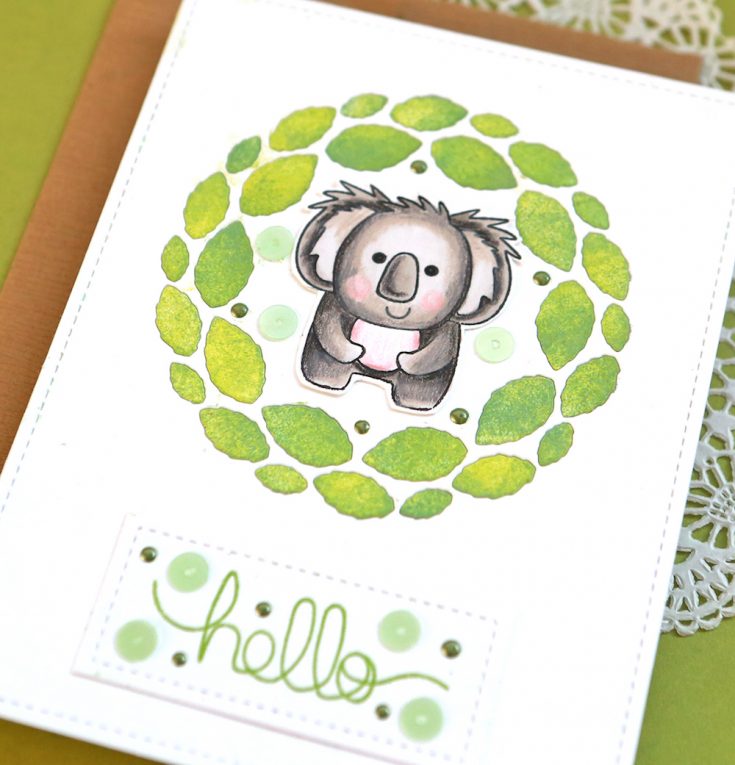
Here are some tips:
When rubbing ink over the leaves use a stipple brush for the darker color so they are speckled (I used Twisted Citron first and then Lucky Clover over it)
Apply adhesive to the entire card front so that when you are layering the leaves inside the wreath they will adhere without applying more adhesive!
Use a stitched rectangle for your sentiment (white on white) if you are trying to cover a mistake as I was (I got ink on my card front!)
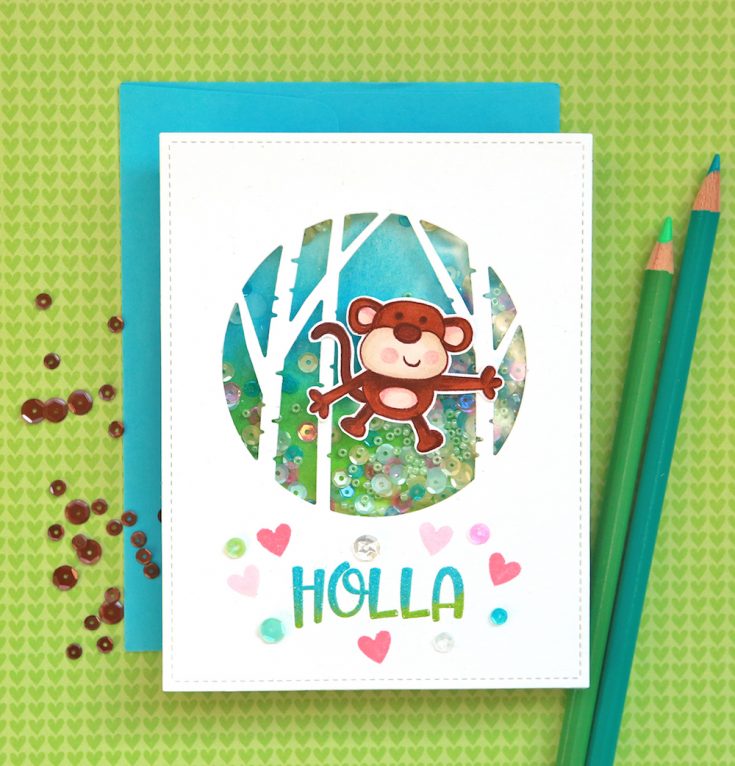
I always make a shaker card when doing a “one stamp, five ways” post. The new Pool Party sequin mix from the new release was so pretty I used it as inspiration for my card colors. I painted a watercolor piece for inside the shaker with blues on the top and green on the bottom. I stamped pink hearts on the front of the card to match the pink sequins in the shaker window.
Here are some tips for this card:
I love watercolor for soft card backgrounds under shaker windows – they are soft and don’t look too busy with sequins on top of them
The SSS circle dies are perfect for shaker windows on cards! This one with the trees worked so well with the monkey arms!
Use two colors of embossing powder on your sentiment by pouring some on the top of the letters and then another color on the bottom of the letters
I left the background of the card white so the monkey would really pop and be the focal point of the card.
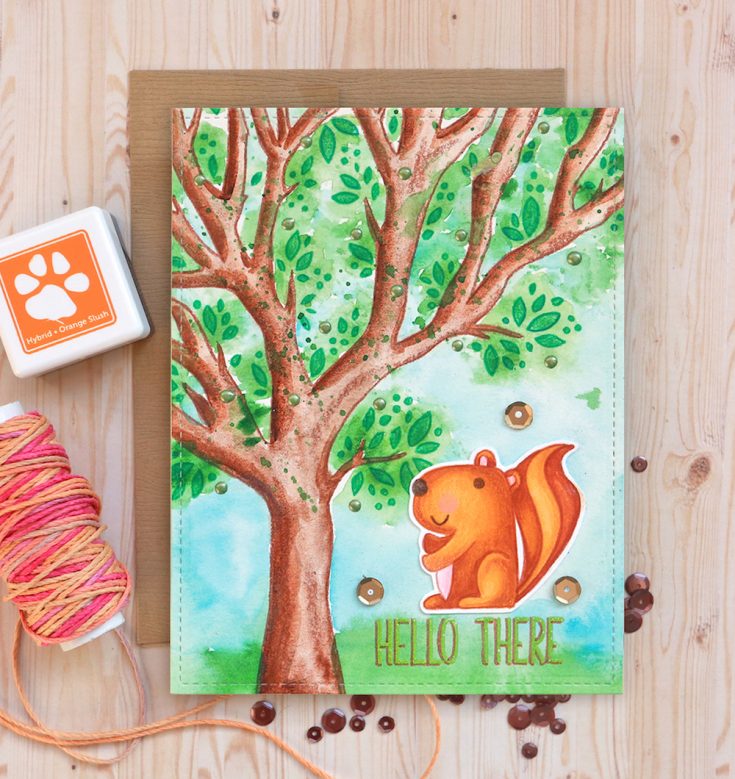
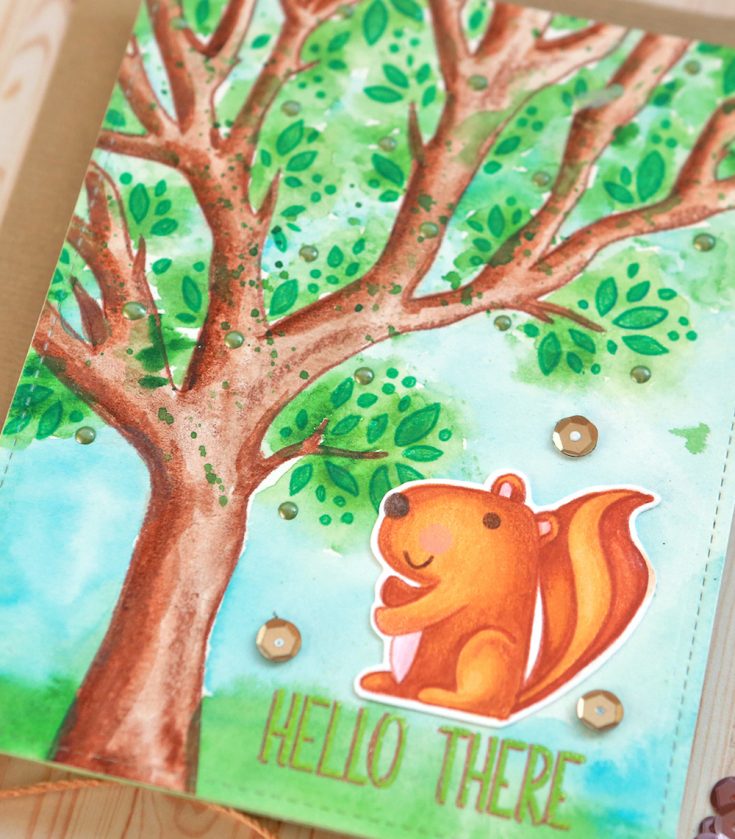
I used the New Beginnings tree stencil for the background of this card. Think of out of the box ways to use your stencils so you get more use out of them. I placed it on a card size piece of watercolor paper and traced inside all of the openings with a pencil. Then I outlined those lines with colored pencils in brown for the tree trunk and green for the leaves. I colored inside the lines with watercolor for the tree and colored pencils for the leaves to create my background.
Here are some tips:
When creating a background such as this tree one, outlining the areas of the stencil with colored markers or colored pencils instead of a black marker keeps it a bit more subtle so it doesn’t overwhelm the card (it is a background!)
Add shading to your watercolored tree trunk with colored pencils to make it look more realistic
Add watercolor (green) around the leaves with a wet on wet technique so it is very messy and looks like a group of leaves
Paint the background behind the tree blue white it is still wet so the colors run into each other and the ground green – I used LOTS of water on this
Stamp your critter with a natural colored ink that won’t show after you color it – I used MFT Natural Ink and colored him in with Copic Markers
Apply a marker (I used a Kaiser Kraft brown glitter pen) as shadows behind your embossed letters so they stand out more.
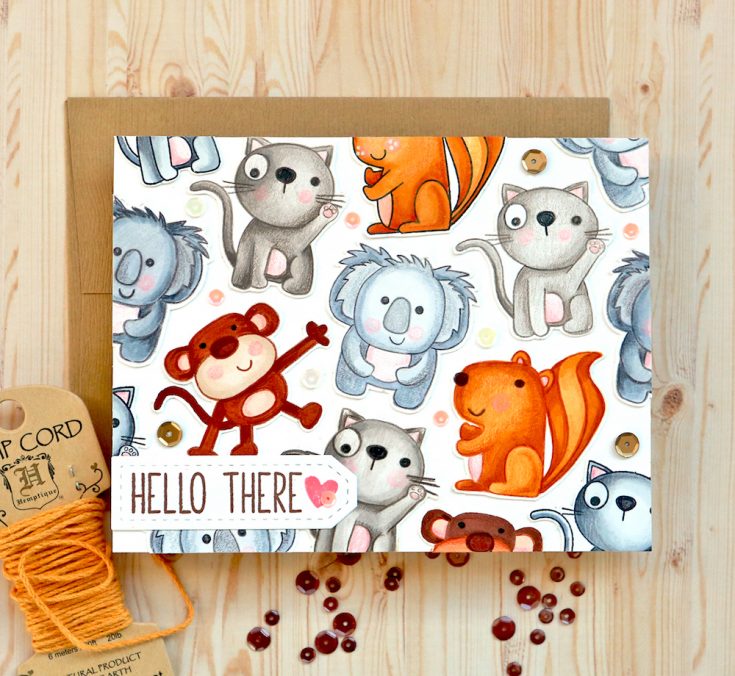
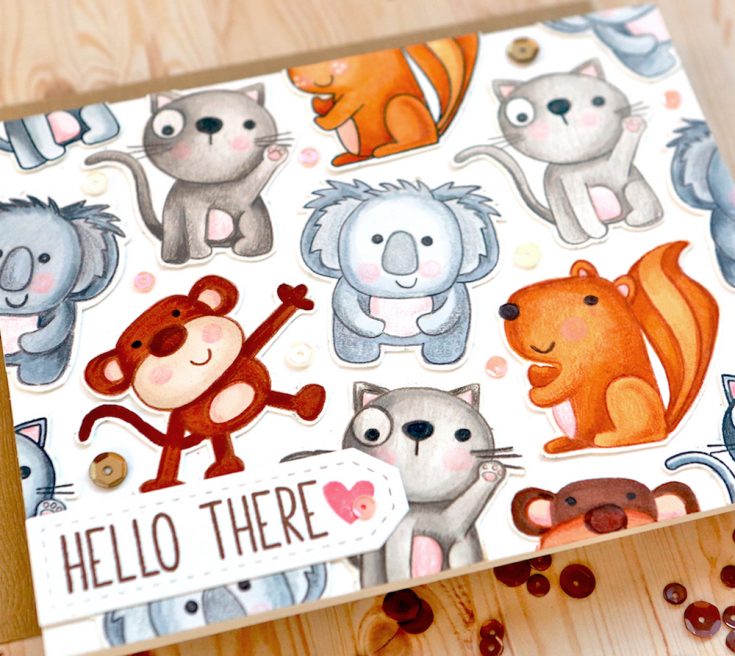
This is my bonus card today! I actually stamp and color all of my images for a “one stamp, five ways” post before I start making the cards. This means I usually have some extra images when I am done. This time I had quite a few extra and I didn’t want to throw them away, so I put a random stamped card together – which is just like last months so the tips may be the same!
Here are some tips for random stamping cards:
To create a background of critters like this, you don’t need to die-cut the images out first (or fussy cut them as I did) – just use a Misti to line them up like a puzzle and stamp several at one time
Let some of your critters overlap the edge so the entire card area is full
Add some of the embellishment stamps in between your main stamps to fill in areas – I could have used the heart or the marshmallows for this; if you don’t do that fill in the areas with sequins like I did
If your sentiment doesn’t fill all of the space on a banner like this one, fill in the extra space with another embellishment stamp or a sequin (I used both!)
Thank you so much for joining us on the SSS Blog today. I had such fun creating these cards and I hope they inspired you to create yourself. I always love to share ideas that will get others thinking of out of the box ways to use their supplies! Have a great week! Suzy
SUPPLIES:
|


Thanks so much for stopping by, and thanks to Suzy for being our guest!

What Would Kelly Make: Pattern Stamping
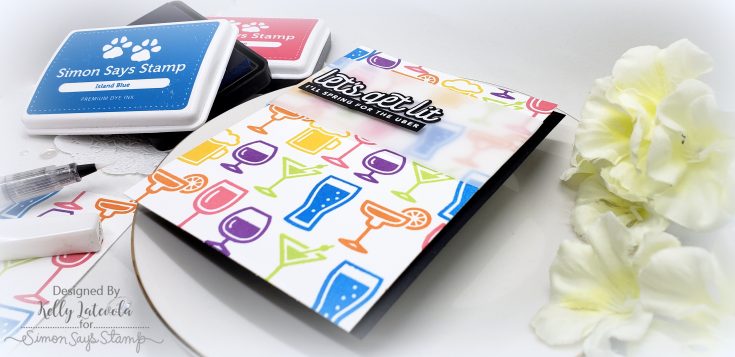
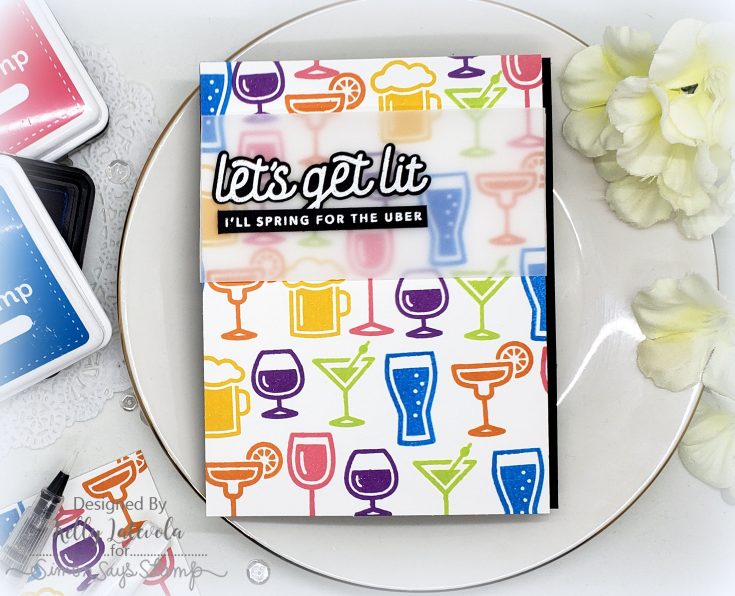
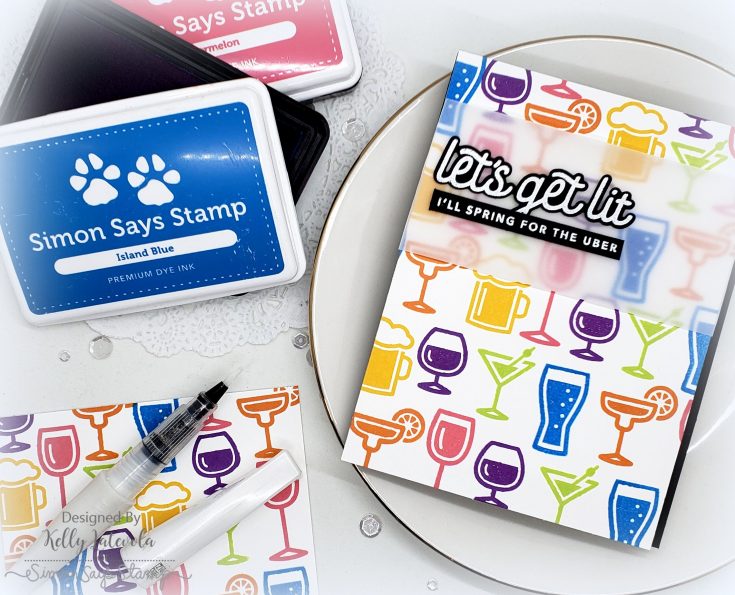
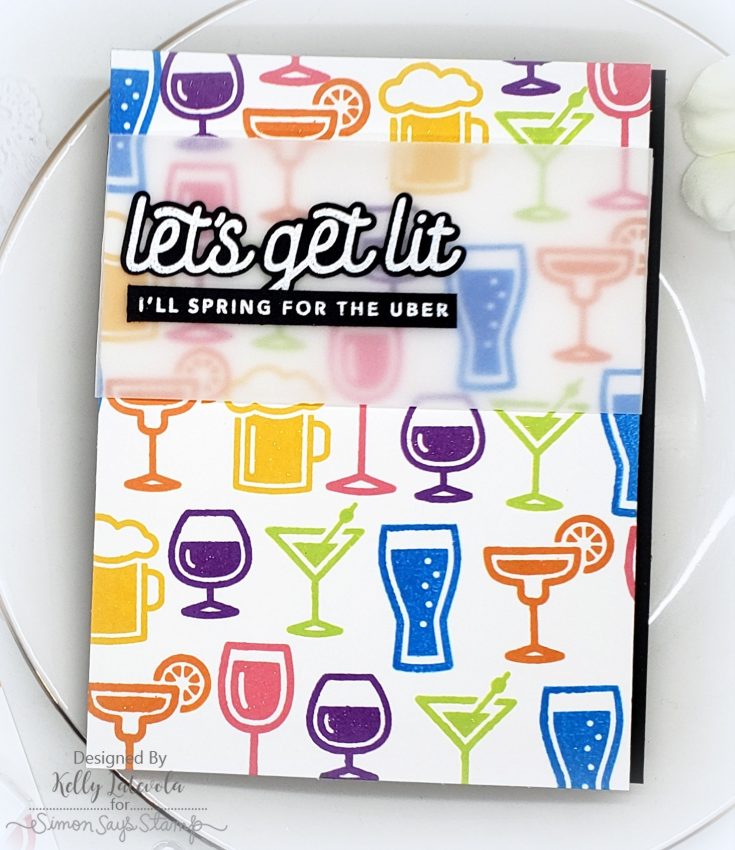
Hi friends! Welcome to the latest edition of What Would Kelly Make by Kelly Latevola where she is showcasing Pattern Stamping with this super fun Happy Hour stamp and die set from the one and only Cathy Zielske in our exclusive CZ Design collection! Be sure to watch the technique video for tips, tricks, and pitfalls to avoid when pattern stamping, and watch the full video to get the full picture of how to make this fun card! Enjoy!
WATCH THE TECHNIQUE:
WATCH THE FULL TUTORIAL:
SUPPLIES:
|


Thanks so much for stopping by today, and thanks to Kelly for being our guest!
Yippee for Yana: One Layer Floral Copic Colored Cards
Hi friends! Happy Tuesday! Please give a warm welcome back to the always super amazing Yana Smakula as a special guest in her second installment of Yippee for Yana for the month! Be sure to read on and watch the video for more information and enjoy!

Hello friends, this is Yana and welcome back for another Yippee For Yana video! By now, I’m sure, you’ve all seen the most gorgeous stamp set, Beautiful Flowers, that was included in Simon’s June Card kit. I couldn’t resist this set and used it to create several perfectly flat one layer cards.

One layer cards are not something that I do often because I always want to add something, but the floral image that I am using today is just so perfect, there really is no need to add anything else to it. I started to work on my card by stamping the floral cluster in Simon’s Intense Black ink onto white cardstock with the help of my Stamp Platform.
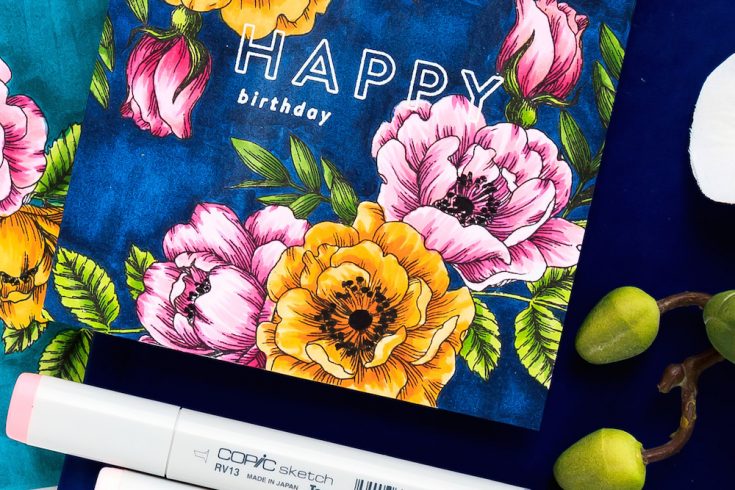
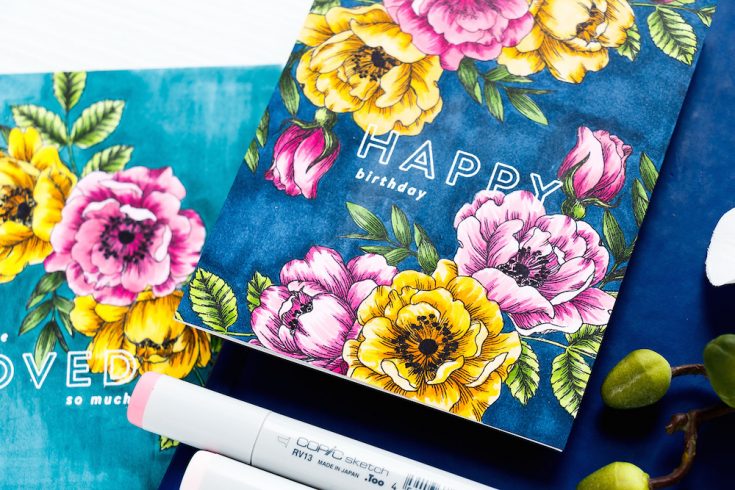
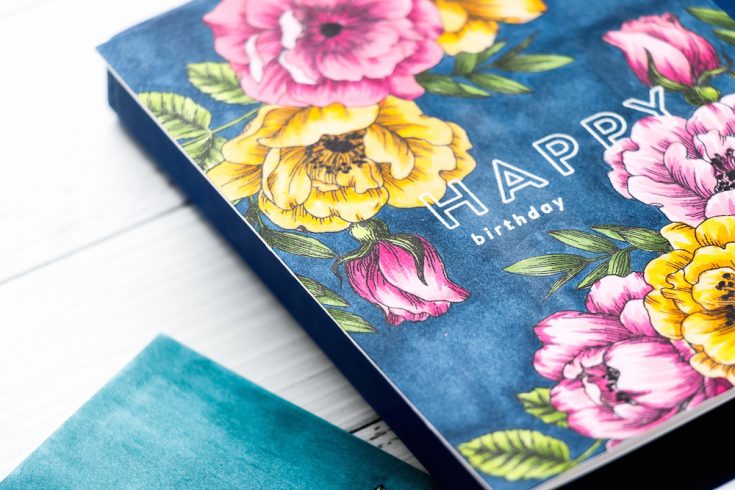
I like the look of bright vibrant flowers on dark backgrounds and I often color with colored pencils on dark papers. I wanted to have this floral cluster on a dark background as well and decided to use Copic markers and color not only the floral cluster but also the background the create the illusion that these flowers sit on a dark background.
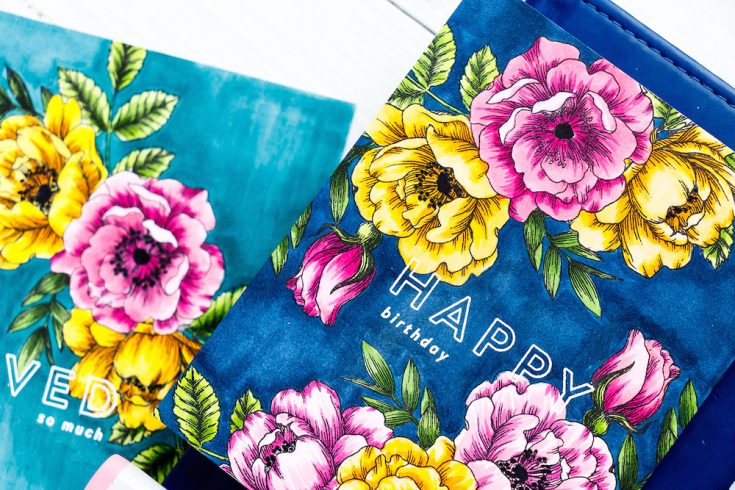
I used B99 to color the background on my original card and I just love that deep blue. For my 2nd card, I wanted to change things up and I used a BG18 color. You can go with any color you like, maybe you’d like to have a deep green or brown background or even black – you can add it to your image with the help of a marker. You just need to make sure to follow the lines of the stamped images and stay outside the lines.
If you look closely at the photos of my cards you’ll notice that my backgrounds aren’t evenly solid, the color isn’t even in all places. I didn’t spend a lot of time adding layer upon layer of the Copic coloring, so in some areas, my background color is darker and in some lighter. If you don’t like this look just make sure to go over your background a few times.
You can also color just the background and keep your flowers white if you want. I think this is also a fabulous look. Once my background was completely colored in I started coloring the cluster. I am far from being a Copic marker expert, I like to color just for the fun of it. What’s awesome about this stamp set though is that all the work has been done for you. You have areas that indicate where the shading has to be, you have the open areas that indicate where your lightest colors need to go. So it’s quite simple actually.
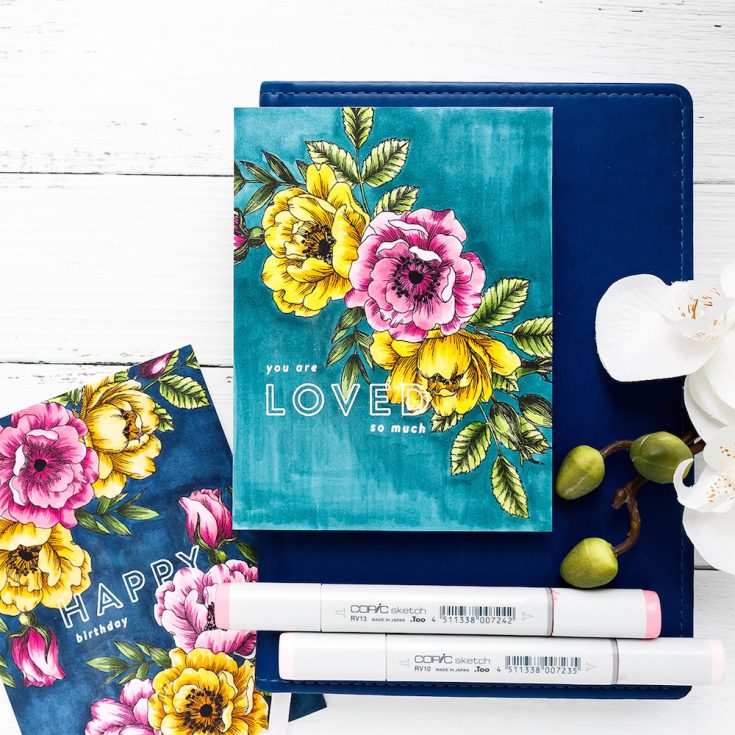
I used 3 colors to color leaves – YG03, YG17, and YG67. To color flowers, I went with yellows and pinks. I used Y15, Y17, and YR14 to color the yellow blooms and RV10, RV13 and RV17 for the pink flower.
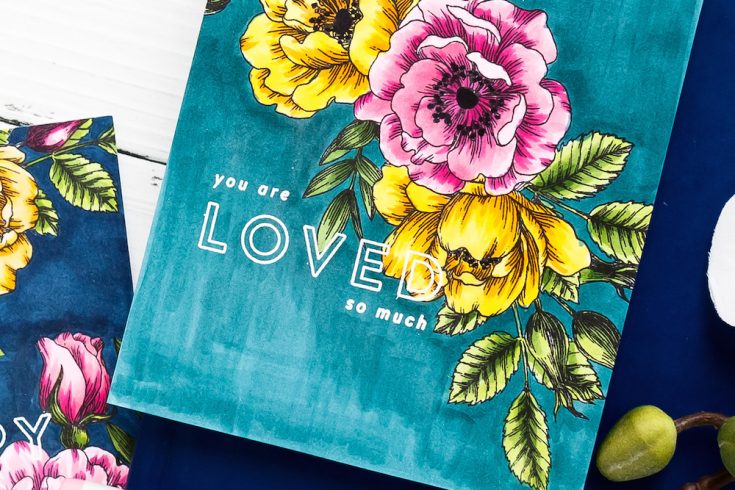
This entire coloring process – coloring the background and coloring of the floral cluster for me about 30 minutes. I think that’s awesome considering the end result. I can easily make a bunch of cards like this without having to spend too much time and effort. To add a sentiment on to my colored background I white heat embossed it slightly overlapping the florals. I did give my background a few minutes to dry, but this coloring does dry fairly quickly especially considering that I didn’t add too many layers of ink.
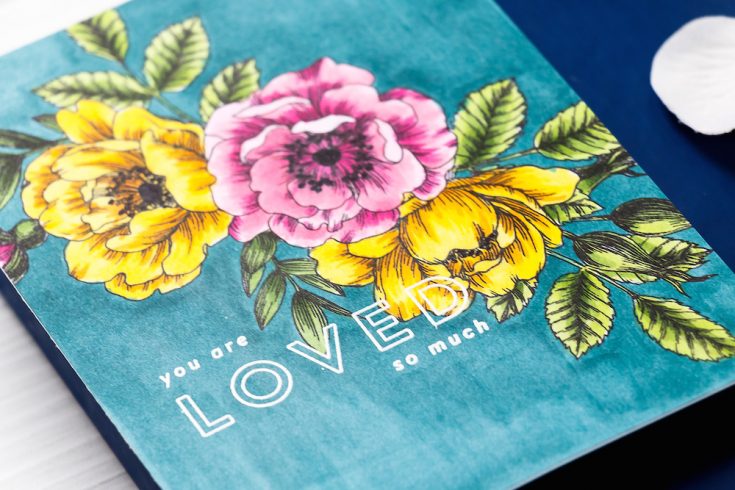
I stamped You Are Loved So Much, added white embossing powder and heat set it with my heat tool. Next, I adhered my background on an A2 white side folding card base and my card was done!
Have fun stamping!
WATCH THE VIDEO:
SUPPLIES:
|


Thanks so much for stopping by and thanks to Yana for being our guest!
From:
Lawn Fawn: Intro to Sweetest Flavor + Reveal Wheel Add On: Sharon Gullikson
Amore Laura Fadora, Hex Yeah: Amy Brown
Interactive Cards by Jess: Pivot Pop Up!!!!: Gail Scott
Studio Monday with Nina-Marie: Reveal Wheel Undersea Scene: Teresa Doyle
Please email [email protected] with the name of the blog you won from, the prize you won, and your address (if applicable) to redeem your prize(s)!


