One Stamp, Five Ways: Ornamental
Hi friends! Happy Tuesday! Welcome to the latest edition of Suzy Plantamura‘s famous “One Stamp, Five Ways” feature! Today, we’re in a festive mood and using the NEW Ornamental set from the one and only… Cathy Zielske!
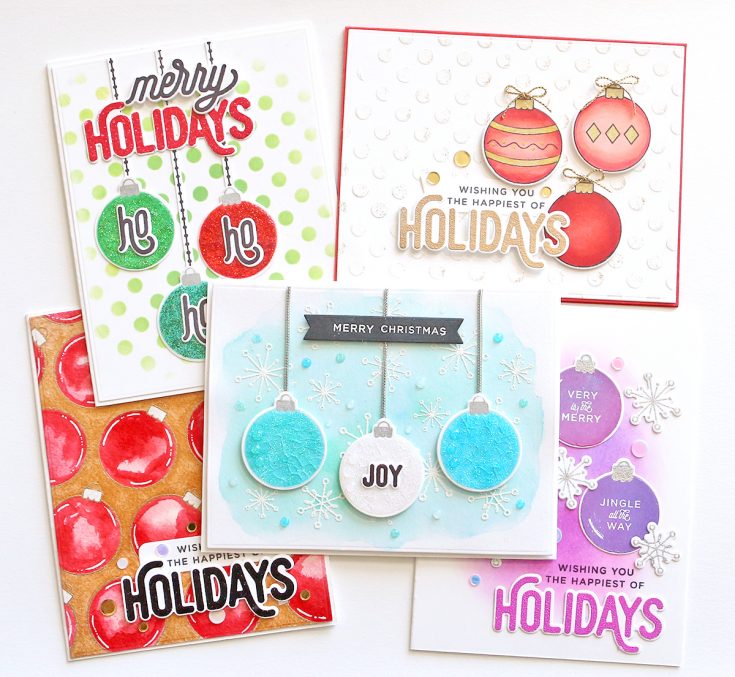
It’s getting closer to the holidays, which means I get to start making my Christmas cards. This always gets me in the holiday mood, especially if I shop for new Christmas stamp sets which come out around this time each year! Today I have a “one stamp, five ways” post to share with you using the new stamp set called CZ “Ornamental” that was part of the Fun and Festive release. I have five cards to share with you with directions and supplies used for each.
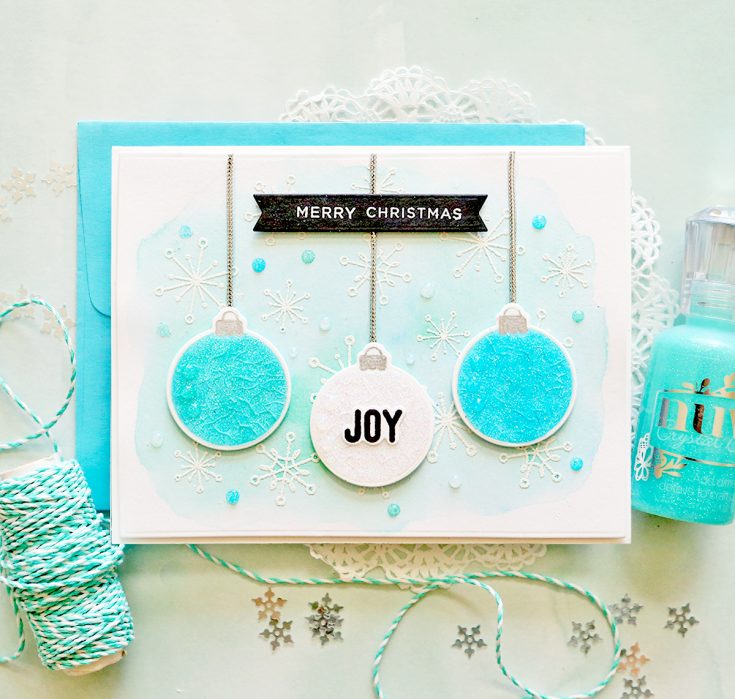
I love using soft blues and aqua’s for Christmas cards. The snowflakes in this stamp set fit on the ornaments, but they also work well embossed with a watercolored background in this color palette. I used WOW embossing powder called White Puff Powder for the snowflakes – I love the soft textured look it gives them!
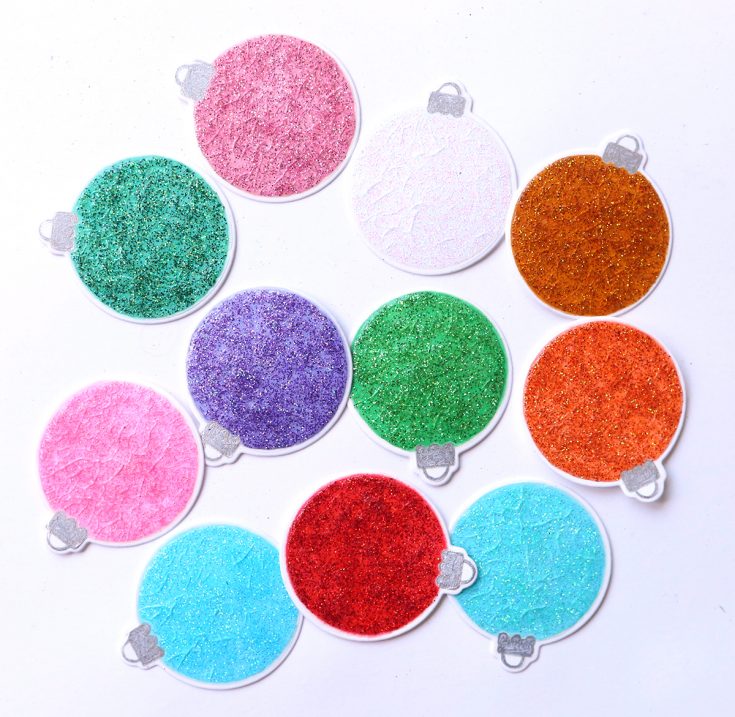
I wanted to create some ornaments that used my Tonic Nuvo Glitter Drops. I started by stamping the ornament stamp with MFT Natural Ink for a no-line coloring look. I then colored them with one color of Copic markers each (no need to shade since they would be covered). I then used the Glitter Drops over the top of each and used a Silver Uniball for the holders. I love how these turned out and I ended up using them on two of the cards I’m sharing including this one.
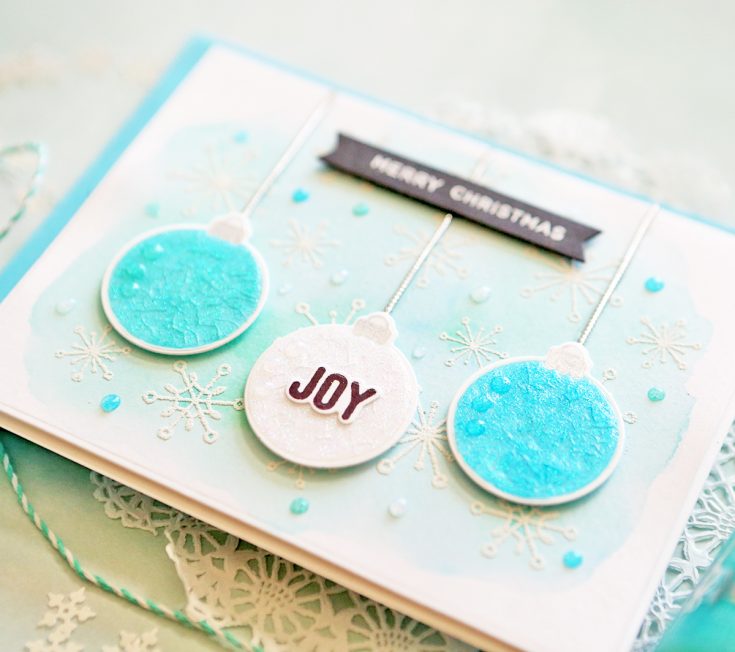
I arranged three of these ornaments on top of the background with foam tape underneath them. I used silver cording to hang them. I stamped the sentiment from the stamp set on a black cardstock banner using the Honey Bee Sentiment Banners and Ranger White Embossing Powder.
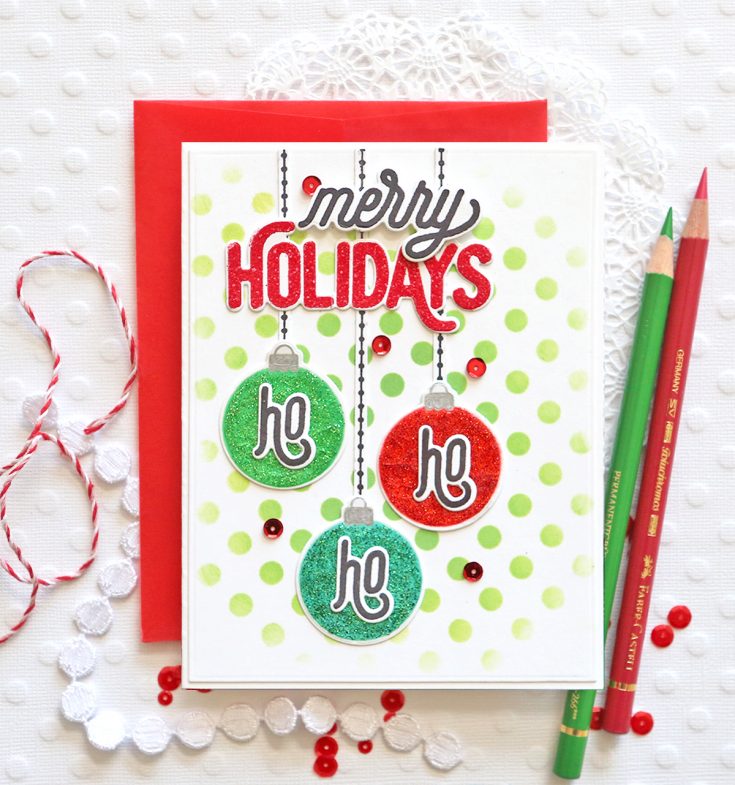
I recently posted a blog post called “Making Backgrounds Ahead of Time” that you might want to check out. I made this background and some of the others I’m using on this post ahead of time. I love mass producing backgrounds so I have them ready to go when I am making cards. This one was made by rubbing Distress Oxide Inks (Mowed Lawn and Twisted Citron) over the SSS Medium Dot Stencil (notice I didn’t ink it all the way to the edges).
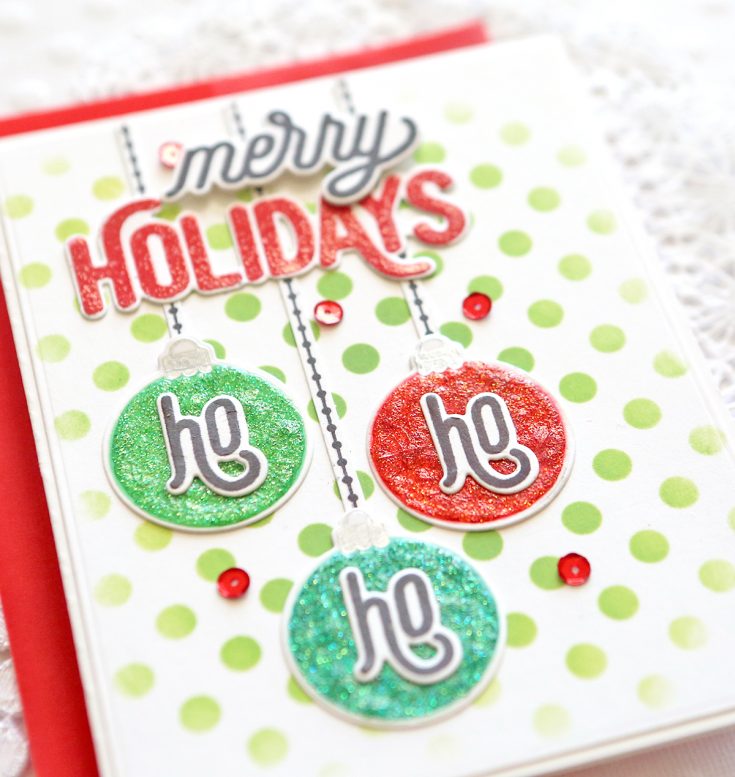
I used three more of the glittered ornaments I showed you in the last card directions on this one. I stamped the word HO three times with SSS Intense Black Ink and glued those to the top of each ornament. I stamped the word Merry with the same ink and embossed the word Holidays with Wendy Vecchi Red Geranium Embossing Powder. I arranged the title over the ornaments popping up the word Merry. I made the hangers using the SSS Critter Sweaters stamp set and SSS Black Intense Ink (so clever, right?!?!?!) haha I added some red sequins from the SSS Christmas Magic Sequin mix.
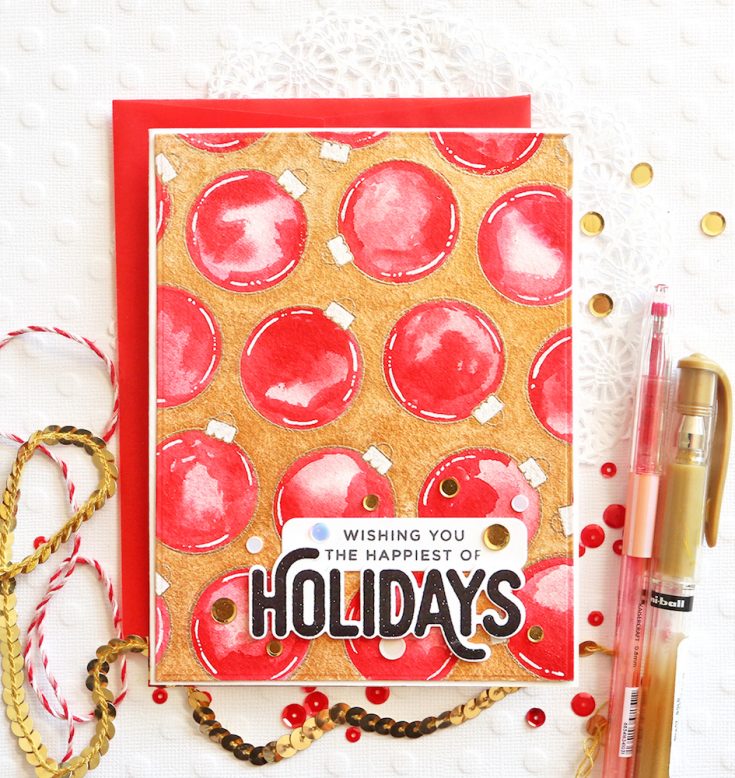
This is my “random stamped” card I like to include each time, but I always try to do a different take on this technique. This time, I embossed only the ornament over and over on a piece of watercolor paper using SSS Antique Gold Embossing Powder. I then painted them with Daniel Smith Permanent Red watercolor and painted the background with Quinacridone Gold paint. I built up layers of gold paint so the background was very opaque. I colored in the hangers with a white Uniball Marker.
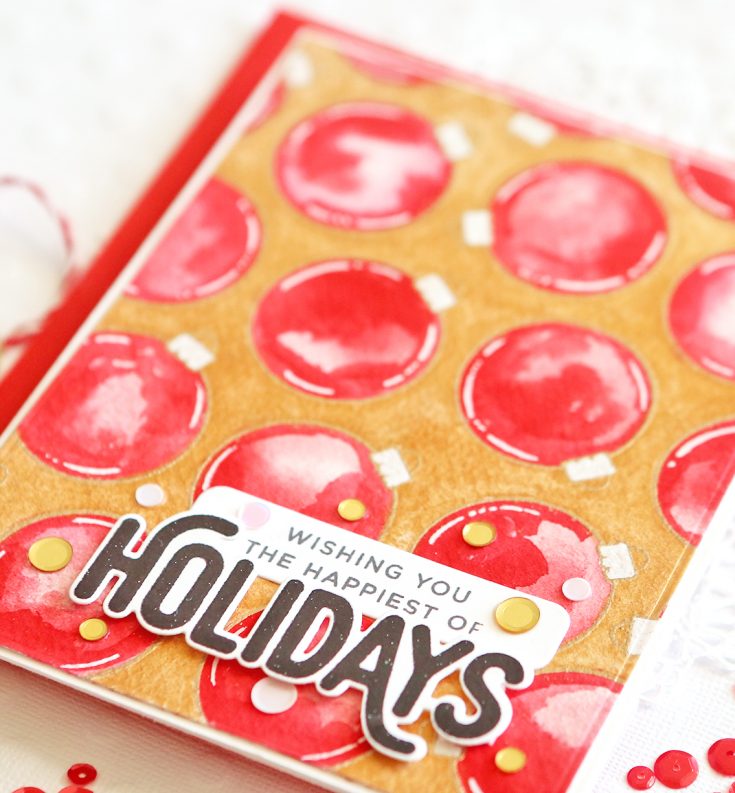
I stamped the word Holidays with SSS Intense Black ink and then I embossed over it with Ranger Clear Embossing Powder. I watched a Jennifer McGuire video once that said not to use black embossing powder, but rather to use clear over black ink and it would give you a better result. I have to admit, this black word looked PERFECT this way as the embossing powder added some nice shine and texture. I stamped the rest of the sentiment on a small banner using SSS Intense Black Ink. I added some Gold and White Confetti Sequins from the SSS Holiday Wreath Mix.
This is another card background that I had already made and is shown in my “making backgrounds ahead of time” blog post. I used Texture Paste over the SSS Medium Dot Stencil. Then I poured gold glitter over the texture paste while it was wet. Unfortunately, it didn’t stick or at least not much of it did. You can still see some little remnants of the glitter! I want to try this again with a wet glue over the stencil so the glitter will stay put!
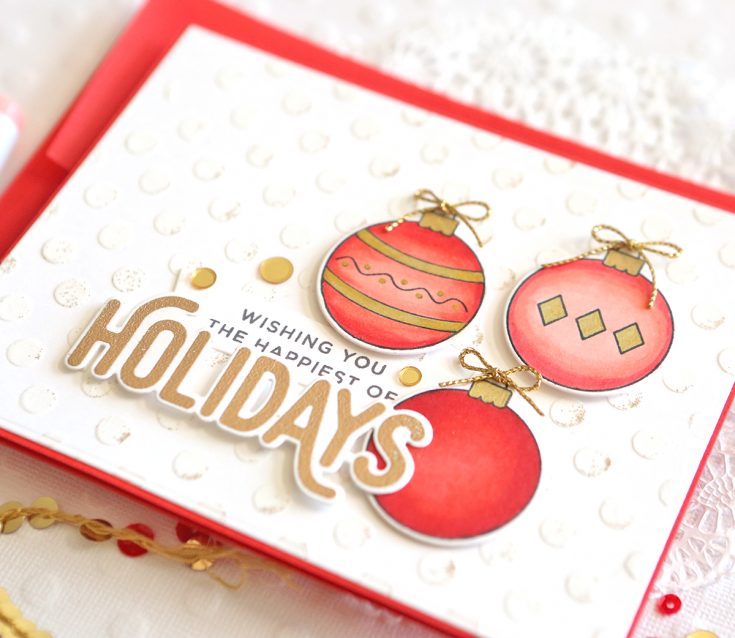
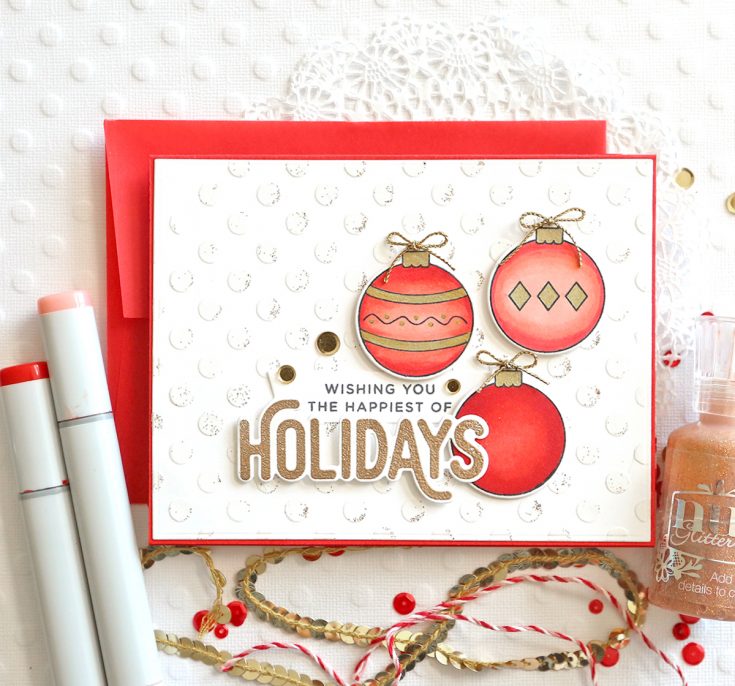
I stamped these three ornaments with SSS Intense Black Ink and colored them in with Copic Markers. I used some of the added details from the stamp set on each and colored them in with a Gold Uniball Marker. I embossed the title using SSS Antique Gold Embossing Powder. I added some gold cord to the top of each ornament and some gold confetti sequins from the SSS Holiday Wreath sequin mix.
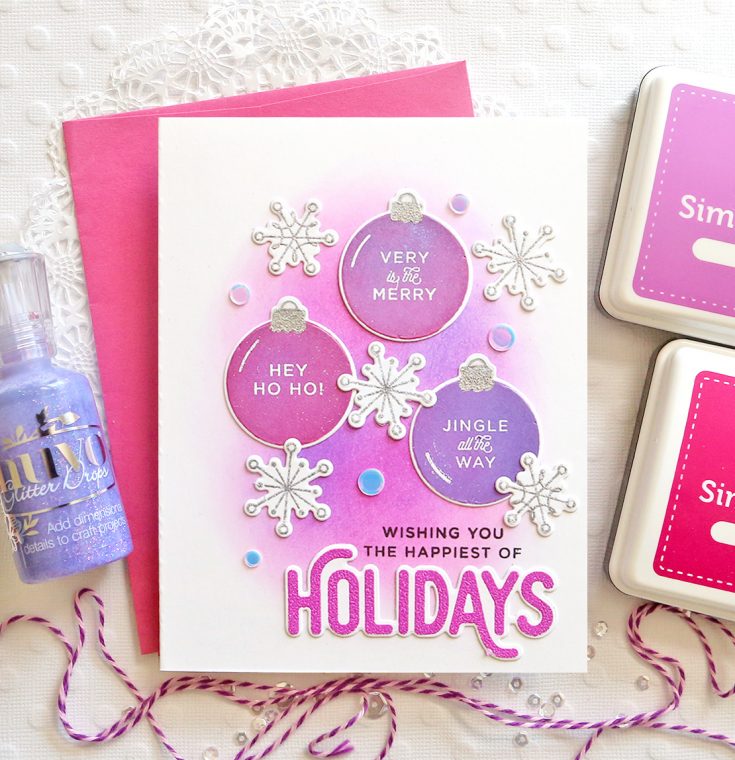
For the background of this card, I used a Ranger Blending Tool and rubbed on Distress Inks in Wilted Violet and Picked Raspberry. I used them very lightly by rubbing them on scrap paper first so the color stayed soft and there weren’t edges of the applicator showing. I stamped the ornaments using SSS Hot Mama, Lavender, and Doll Pink inks so they were really bright. I used Wow Whisper Embossing Powder for the holder on each ornament as well as for the snowflakes. I used Ranger White Embossing Powder for the sentiment inside each ornament as well as for the little line on each.
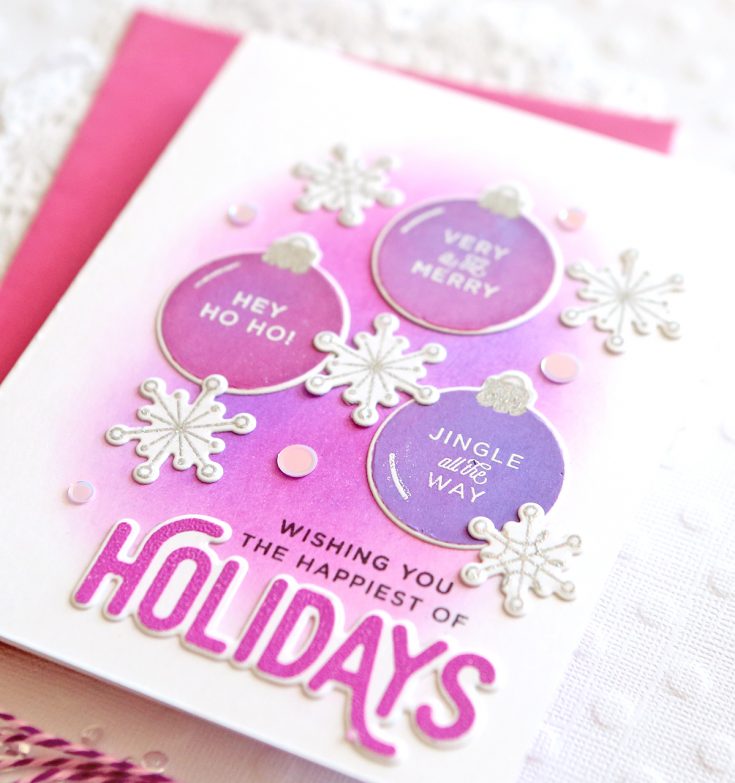
I arranged the three ornaments over the inked background and then arranged the snowflakes around them. I stamped the beginning of the sentiment directly on the card with SSS Intense Black Ink and then embossed the main part of the sentiment with Wendy Vecchi Cactus Flower embossing powder (best color ever!). I finished the card with some sequins from the SSS Holiday Wreath sequin mix.
Thank you so much for visiting today and I hope I have inspired you to start making holiday cards. I promise it will get you in the Christmas spirit which hopefully will help us get our shopping started early this year! Merry pre-holiday-season to all! Suzy
SUPPLIES:
|


Thanks so much for stopping by and thanks to Suzy for being our guest!

Blog Candy Alert!! Follow our blog via email and comment on this post for a chance to win special blog candy!
Congrats! Blog Candy Winners!
From: Studio Monday with Nina-Marie: A Mele Kalikimaka Holiday!: Bonnie Eng!
From: Yippee for Yana: One Layer Christmas Ideas to Try!: Bev Page!
From: Color Coordinates with Shari Carroll: Using Embossing Powders: Nancy Kenny Monahan!
From: Amore Laura Fadora: Hippopartymus: Kristine Reeves!
From: An Interactive Lawn Fawn Christmas Card: Jeanne Beam!
Please email [email protected] with the name of the blog you won from and the prize(s) you won along with your mailing address if applicable!
Studio Monday with Nina-Marie: A Mele Kalikimaka Holiday!

Hello everyone! Welcome back to a brand new Studio Monday with Nina-Marie tutorial! Today I have the please of featuring the gorgeous, Mele Kalikimaka stamp set that Stephanie Low illustrated for our recent Fun and Festive Simon exclusive release!
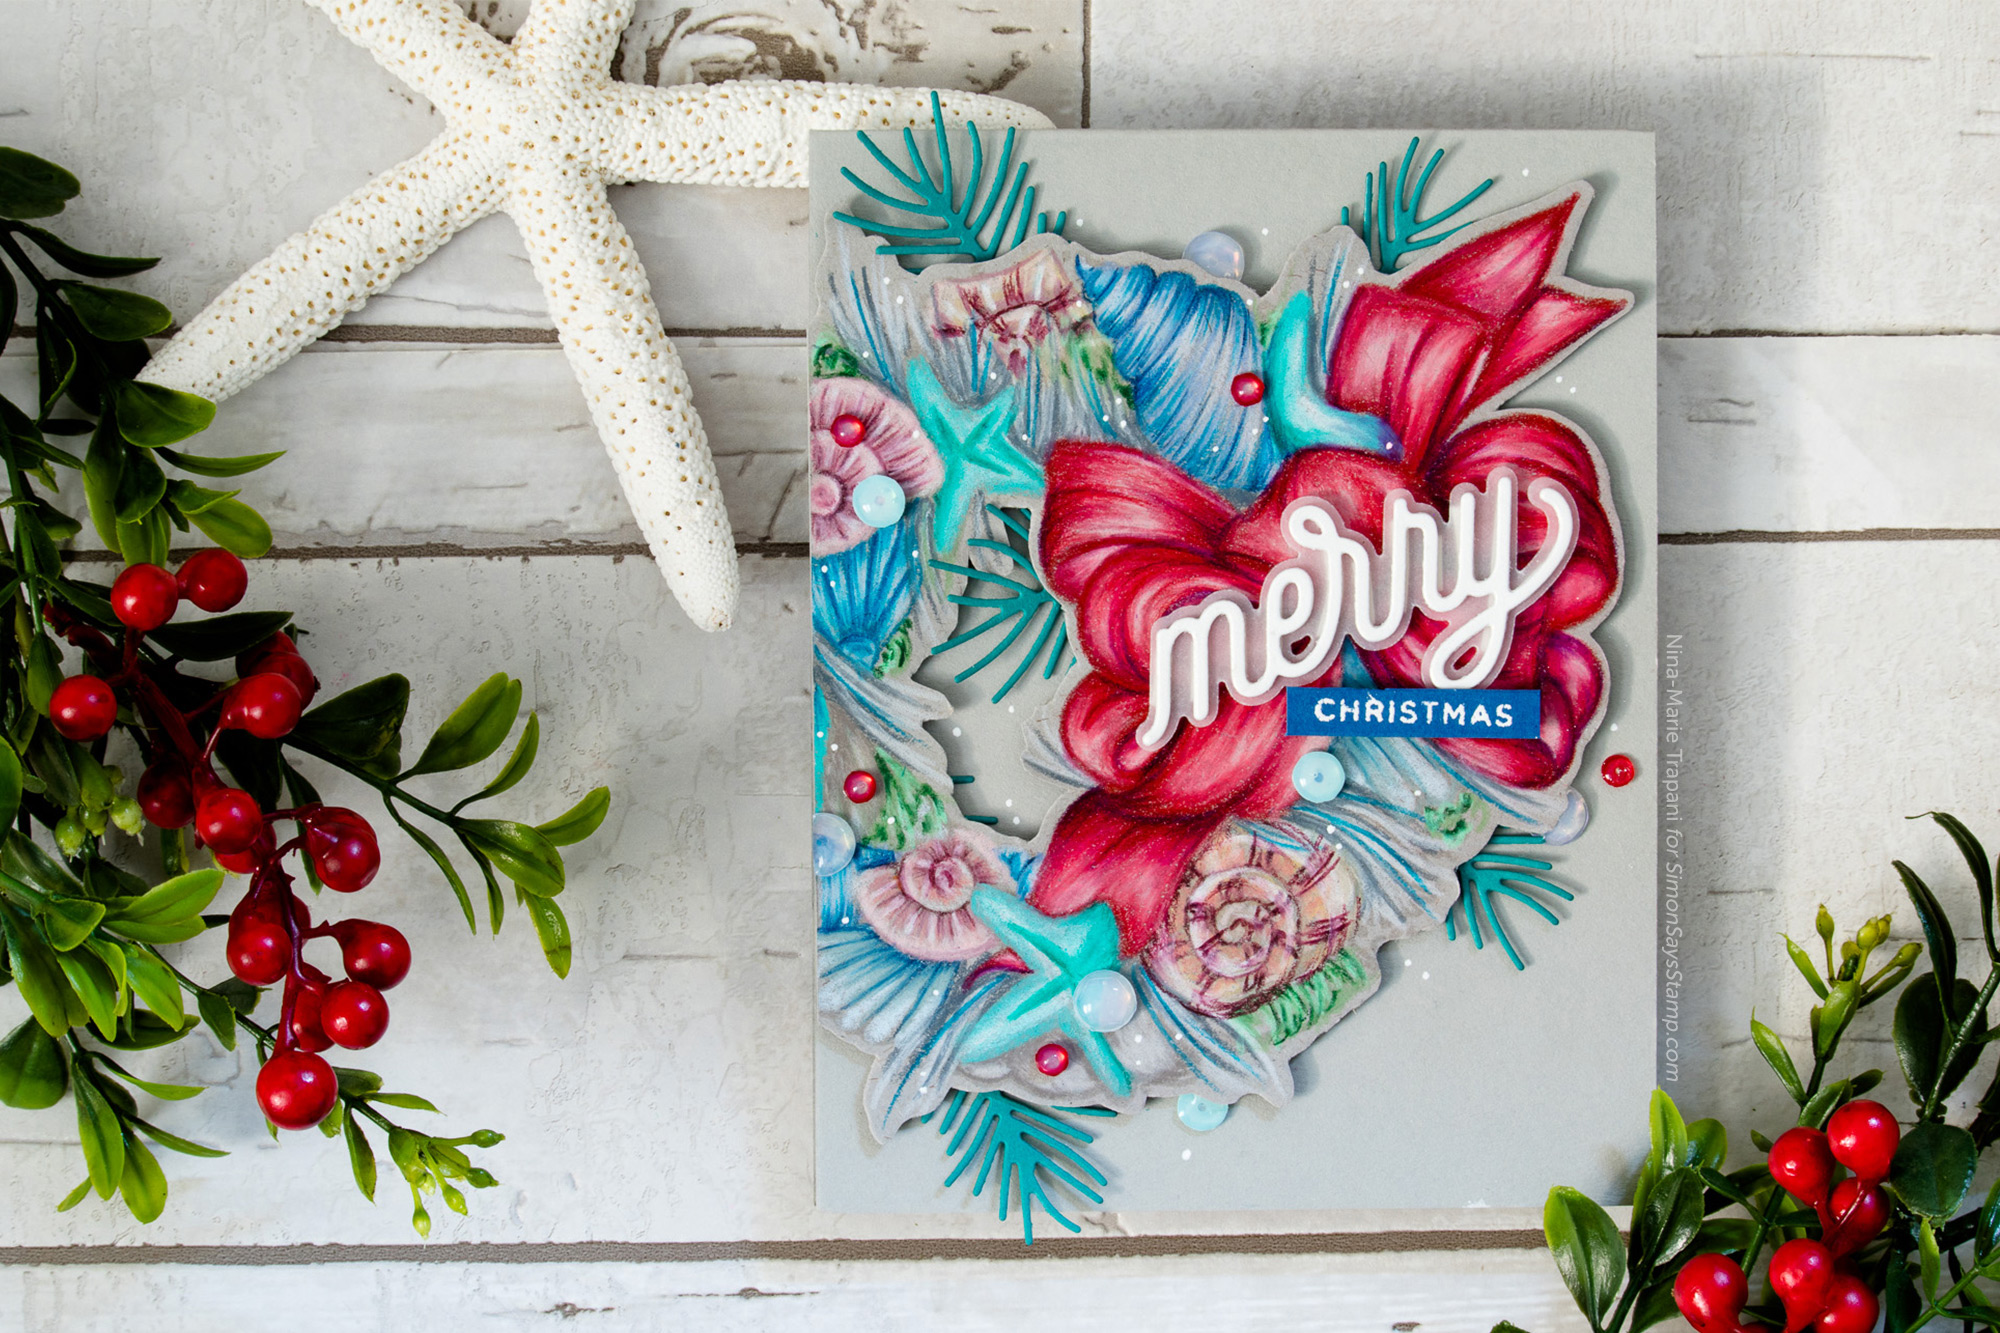
If you know me, I adore the ocean and anything related to it. This Mele Kalikimaka set is my most-favorite stamp set from the Fun & Festive collection and I could not wait to create a card with it! The wreath is made up of stunning seashells, seagrass and starfish, completed by a giant bow. I wanted to use nautical colors, as that would complement the red I used for the bow perfectly.
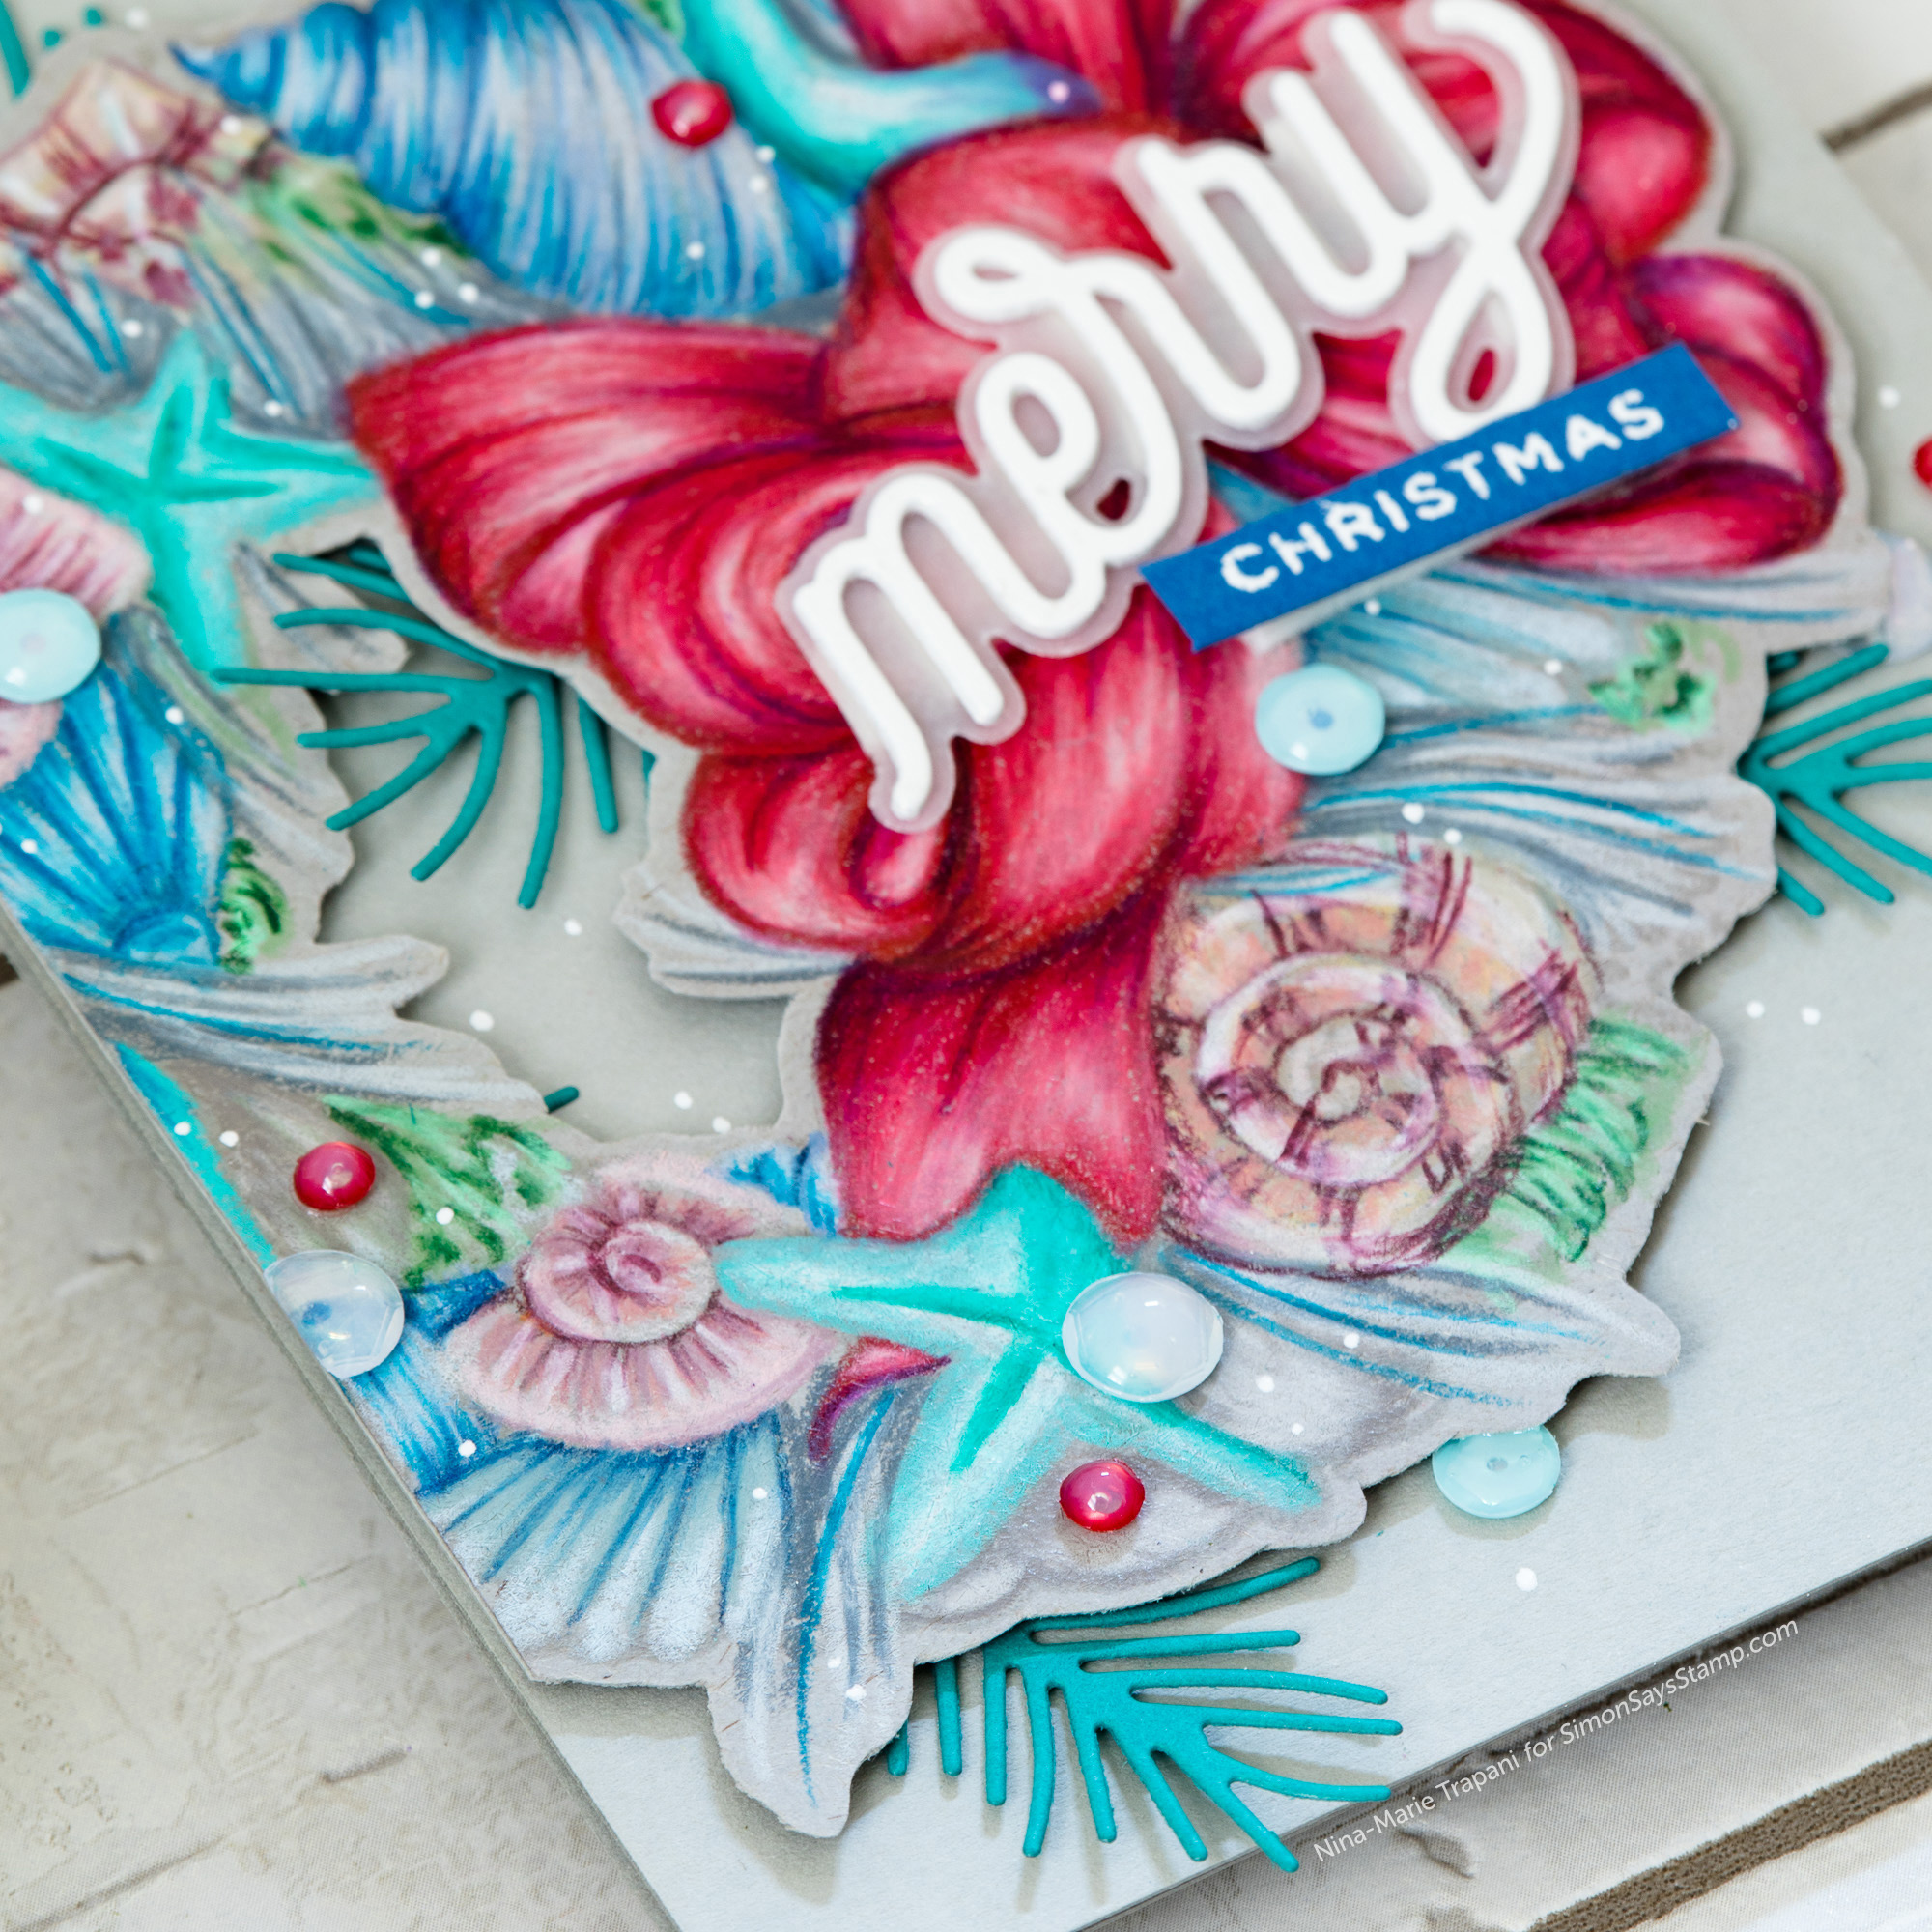
To color the wreath, I used Prismacolor colored pencils on gray toned paper. I achieved the no-line effect by stamping the image with Fog ink from Simon.
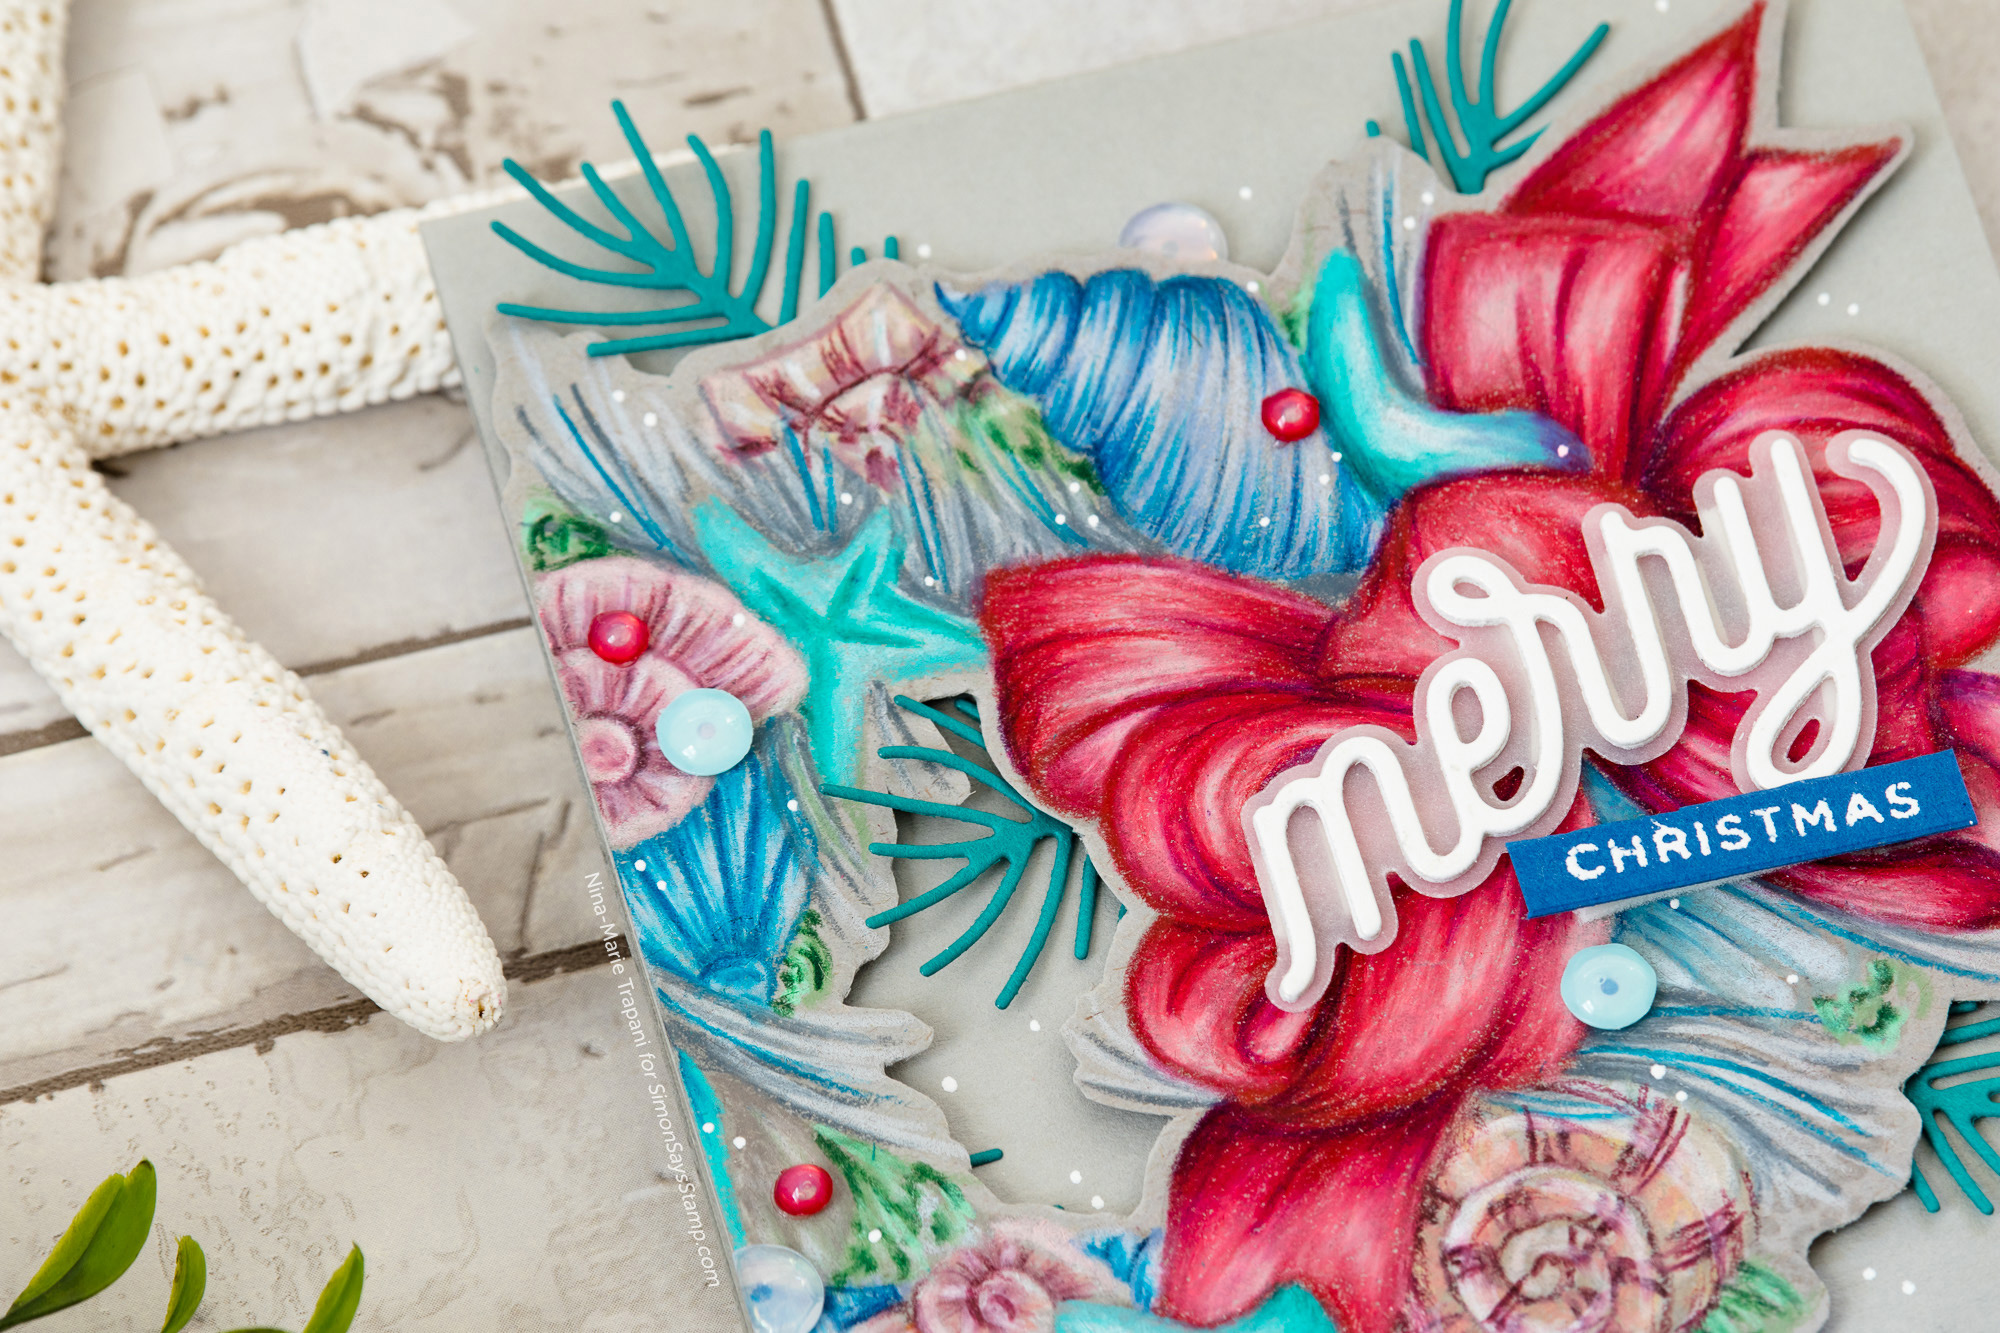
The beautiful Ornamental stamp set and Merry script die by CZ Design fit perfectly over the bow; I tipped the script greeting to follow the flow of the bow in the top right corner.
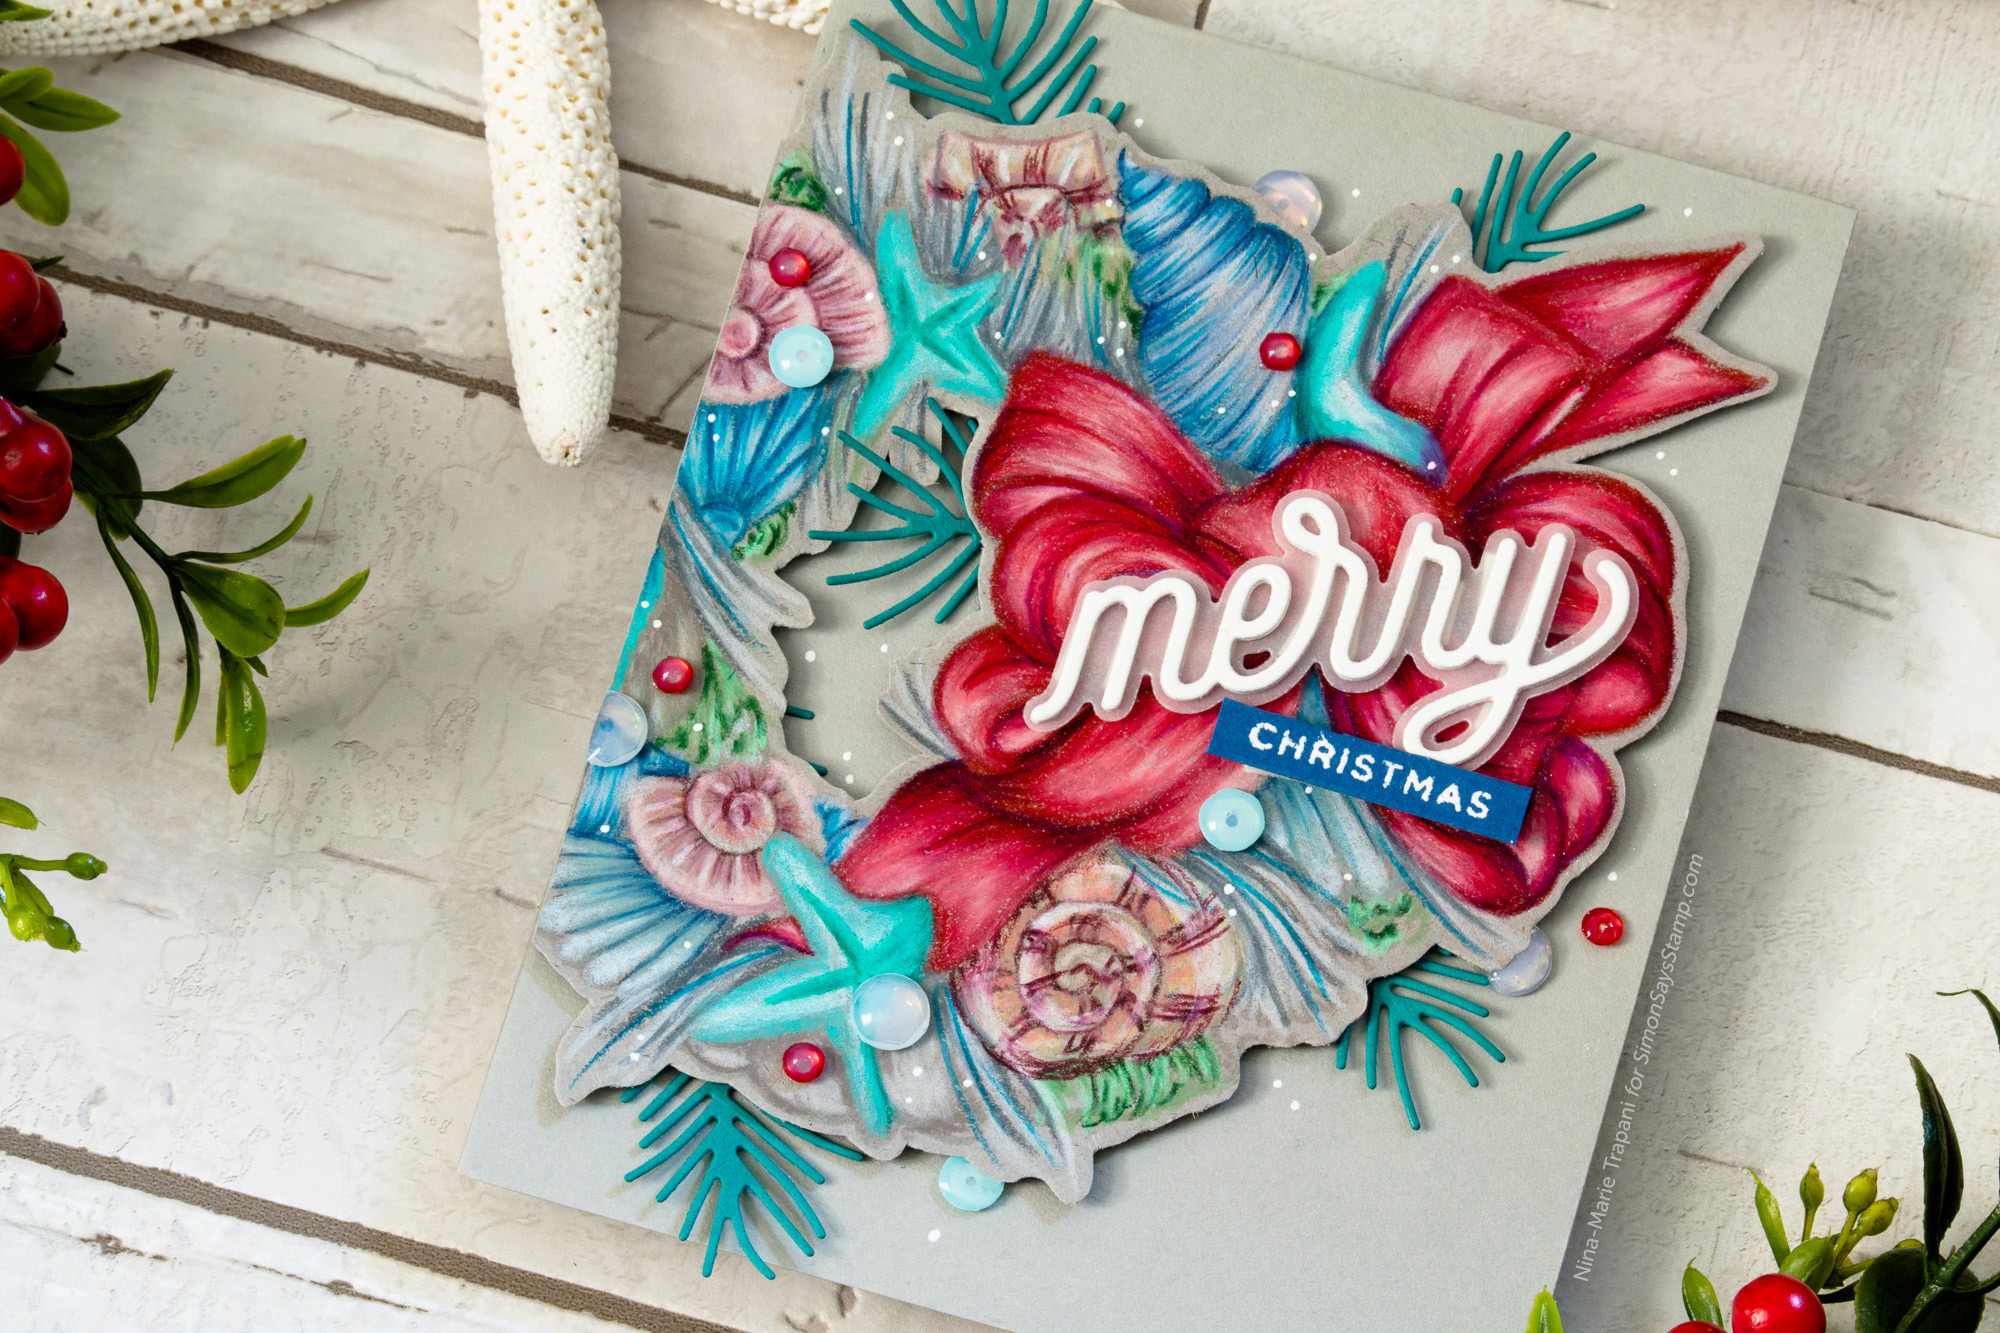
Finally, I finished this “Christmas by the Sea” card off by adding a few Christmas Magic sequins and Pine Needle die cuts around the wreath, which really filled everything in nicely!
I hope today’s video leaves you insoured to create a natuical holiday card of your own! Be sure to watch the video below to see how it all came together!
WATCH THE VIDEO
SUPPLIES
|


Blog Candy Alert!! Follow our blog via email and comment on this post for a chance to win special blog candy!
Yippee for Yana: One Layer Christmas Ideas to Try!

Hi friends! Happy Sunday! Can you believe this is the last Sunday in November?! We’re in high gear on holiday planning, cardmaking, and crafting gifts! Please join me in welcoming back the super awesome and inventive Yana Smakula in her latest episode of our Yippee for Yana series where she is sharing FIVE unique one layer Christmas card ideas! Be sure to give her video a watch for more info and enjoy!
Hi everyone, this is Yana Smakula and welcome back for another Yippee For Yana video!
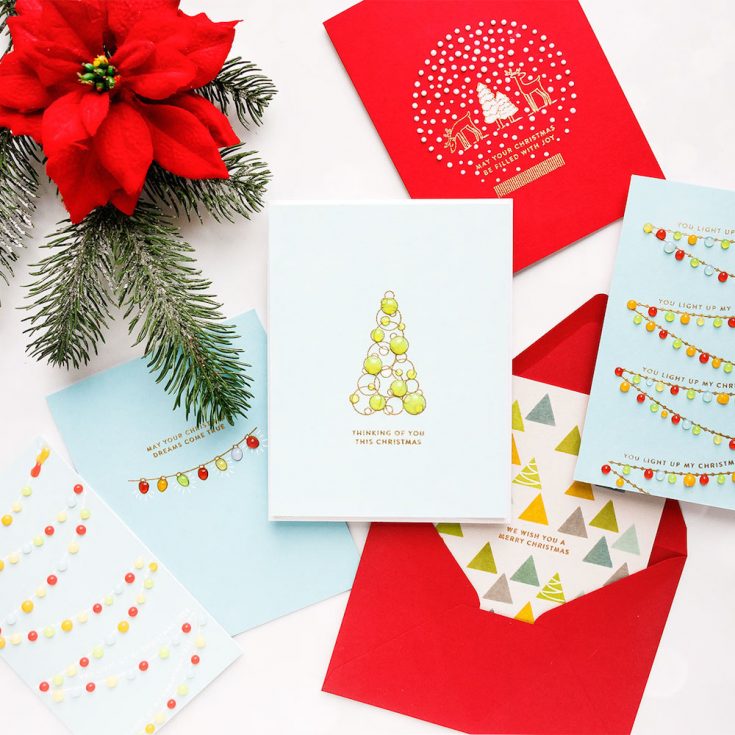
Today I have not one, not 2, and even not 3, but 5 one layer Modern Christmas card ideas that you can make. These are very simple, they don’t require a ton of supplies or special skills and most important – they are one layer, so easy to pop in an envelope and mail to your friends or colleagues.

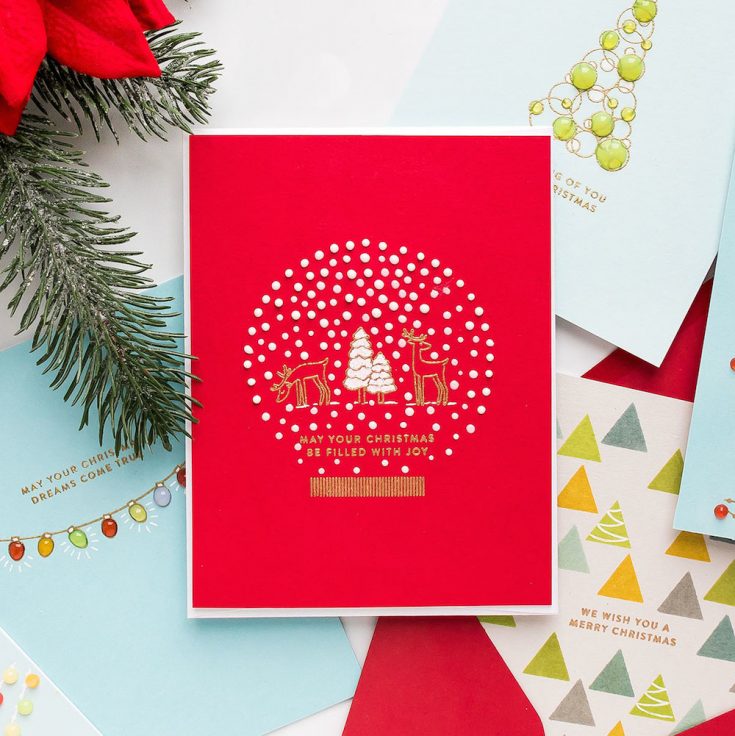
You will need just a handful of things for these cards starting with colored cardstock of your choice, I’m using various colors from Simon Says Stamp, embossing powder in gold and white (or some other color if you like), you’ll also need other supplies you usually use for heat embossing, a white pen to add accents, Nuvo Jewels drops in bright and cheerful colors (I used 6 different colors), you’ll also need Nuvo Drops in Gloss white to add dimensional white dots and finally – you’ll need clear stamps! I’m using 4 stamp sets for these cards starting with Critter Sweaters, Winter Scene, Tiny Words Christmas, and Festive Trees.
I started working on these cards by heat embossing selected images on colored cardstock. Less is more with these simple and modern Christmas cards, so try to add avoid adding a ton of stuff onto your cards. Go with a simple, but meaningful sentiments and one or three images to make a little scene. You can add in the rest using tools such as a white pen on Nuvo Drops to spice up the card design.
To make these cards your own you can try using another color of cardstock for your background and another color of embossing powder for the heat embossing. I also want to encourage you to always look at your stamps in a different way. Have a simple triangle image? How else can you use it besides it being just a triangle? Can it be used a mini Christmas Tree? Can you stamp 2 tier or even 3 tier trees by layering triangles one on top of the other and have different size trees for your cards?
Have fun stamping!
WATCH THE VIDEO:
SUPPLIES:
|


Thanks so much for stopping by, and thanks to Yana for being our guest!

Blog Candy Alert!! Follow our blog via email and comment on this post for a chance to win special blog candy!


