Studio Monday with Nina-Marie: Foiling with Transfer Gel and Stencils

Hello crafters, it’s Nina-Marie here with you today, featuring a fun way to use our Simon exclusive Heart Layers stencil set with Transfer Gel to achieve a gorgeous foiled finish to your stenciling!
![]()
The Heart Layers stencil set comes with 3 stencils that can be used on their own or together for a layered look. These cards are simple to create, yet provide a powerful punch with the final layer of stenciling foiled.
![]()
The foiling was created by applying ThermoWeb’s Transfer Gel through the stencil; once dry, you run your panel through a laminator or foiling machine to transfer a foil of your choice onto the gel. The Transfer Gel reacts with the heat and bonds the foil onto the gel-applied area only.
If you follow the steps I take in the video below, you too will end up with a design much like the ones you see here!
![]()
![]()
![]()
![]()
Each of these cards feature the Birch Press Designs Big Love and Big Hugs Sugar Script dies, along with additional sentiments from the Simon Says Stamp Love Messages stamp set.
I used a variety of ThermoWeb and Gina K. Designs foils as well, including Amber Watercolor, Twinkling Pink, Radiant Red, and Silver Sequins.
![]()
I hope you will tune in to the video below to see how I created this set of foiled cards, perfect for not just Valentines Day, but a year long too!
Thanks for stopping by and visiting… I will see you again very soon!
WATCH THE VIDEO
SUPPLIES
|


Blog Candy Alert!! Follow our blog via email and comment on this post for a chance to win special blog candy!
Blog Candy Winners!
From: Amore LauraFadora: So Loved: Lagene!
From: Crafty Quintet – Top Five Crafty Tools: janet sisk!
From: Color Coordinates with Shari Carroll: Ghost Images: MandaLJ!
Please email [email protected] with the name of the blog you won from, your prize(s), and your address if applicable!
Color Coordinates with Shari Carroll: Ghost Images

I’m having fun with the Pantone Color of the year 2019 LIVING CORAL. It’s a beautiful shade that sits right dab in the middle of pink and orange. To celebrate this color I’ve come up with a Color Coordinates using Simon Says Stamp inks.
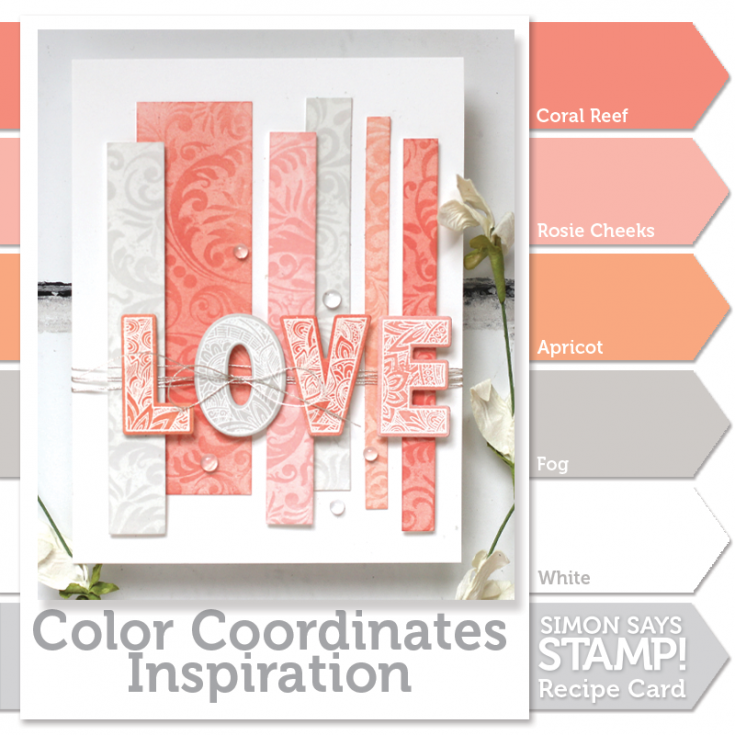
I’ve stamped a panel of white cardstock with the Simon Damask Background Cling using Simon Says Stamp white ink. Once it had a chance to dry, I cut the panel up into strips of various sizes. This is where the cool part comes in. I colored each of the strips with my ink colors using a blending tool. The image of the Damask leaves a ghosting effect with the inks.
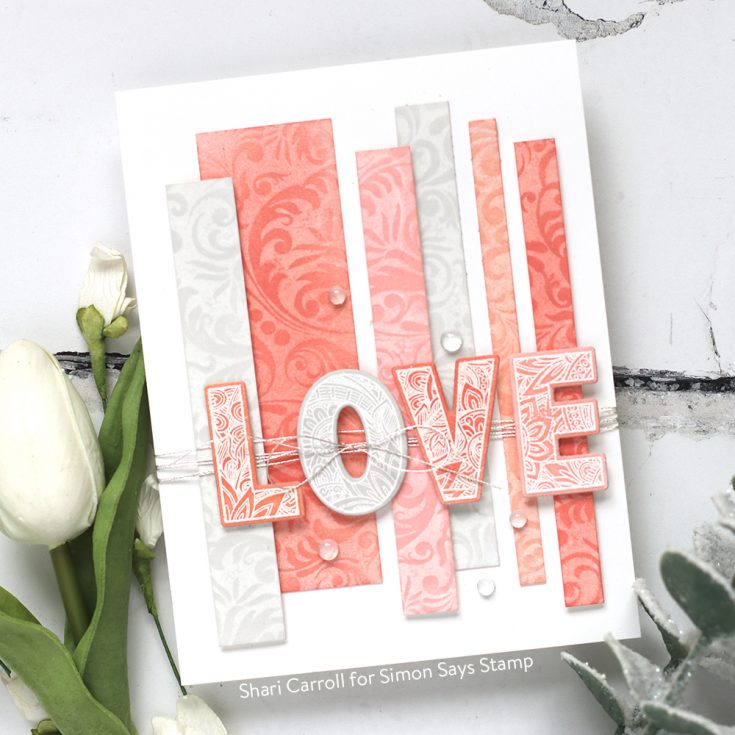
I varied how dark I colored the strips so I could get lighter and darker tones of the inks. I used the Simon Ornate Love stamp set where I white embossed the letters LOVE and inked up each of those with the same color inks. I adhered some of the strips flush onto the card base and some are lifted up with foam tape. I wrapped the card with Silver Metallic thread trying it in a bow. I pulled the bow through the “O” and place the rest of the letters onto the strips. To finish it up, I added a few Studio Katia clear drops.
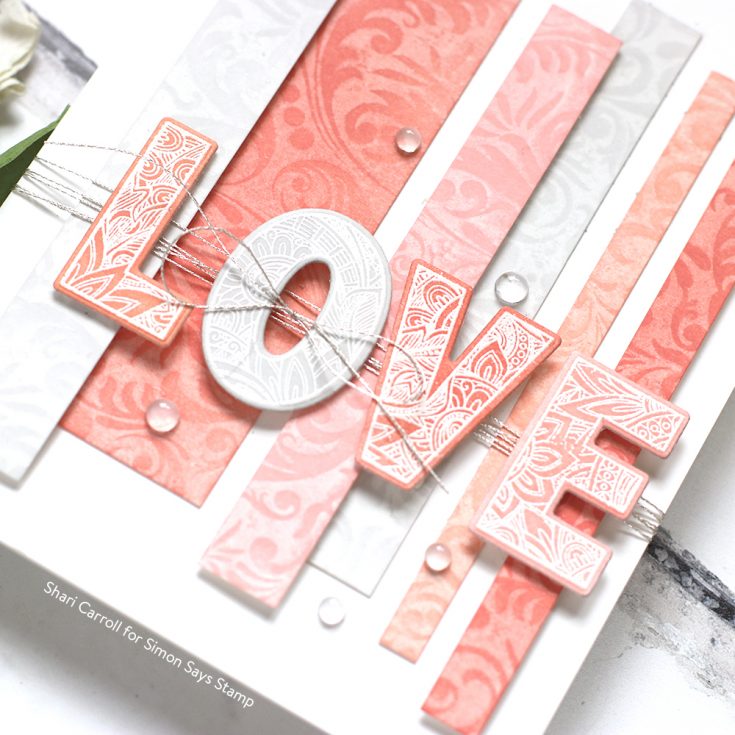
If you are interested in printing out the Color Coordinates and creating a swatch book, I have the downloadable templates available below.
Blog Candy Alert! Follow our blog via email and comment on this post for a chance to win special blog candy!
|


Crafty Quintet – Top Five Crafty Tools


Hi friends! Happy Saturday! Welcome to the latest edition of Jessica Frost-Ballas’ Crafty Quintet blog series exclusive to Simon Says Stamp! Her top five crafty tools are the Misti, Therm O Web Purple Tape, Picket Fence Studio’s Life-Changing Blender Brush set, Simon Says Stamp Grid Paper Pad, and Simon Says Stamp Sentiment Label dies. Be sure to watch the video on all the details of how she makes this lovely card using all her favorite tools!
WATCH THE VIDEO:
SUPPLIES:
|


Thanks so much for stopping by, and thanks to Jess for being our guest!

Blog Candy Alert!! Follow our blog via email and comment on this post for a chance to win special blog candy!


