Sea Treasure: Simon Says Stamp Card Kit Reveal and Inspiration
Our September Card Kit, Sea Treasure will magically whisk you away to the imaginary wonders of the ocean floor!
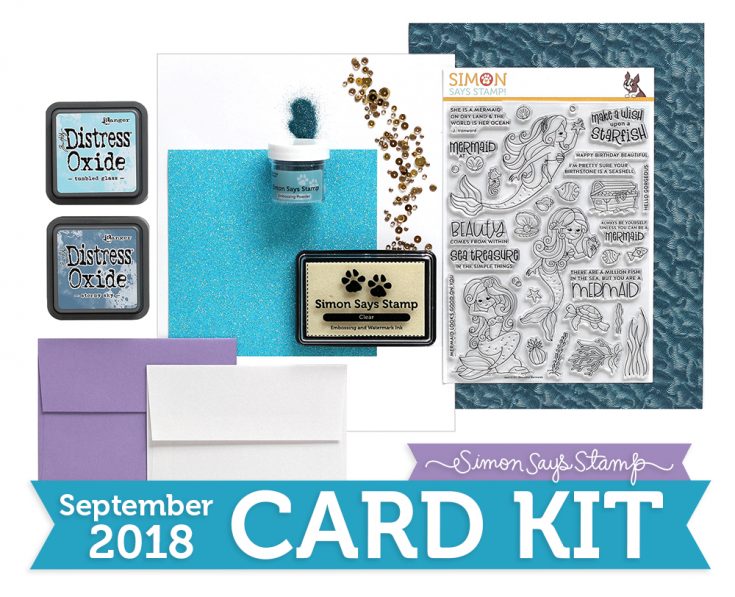
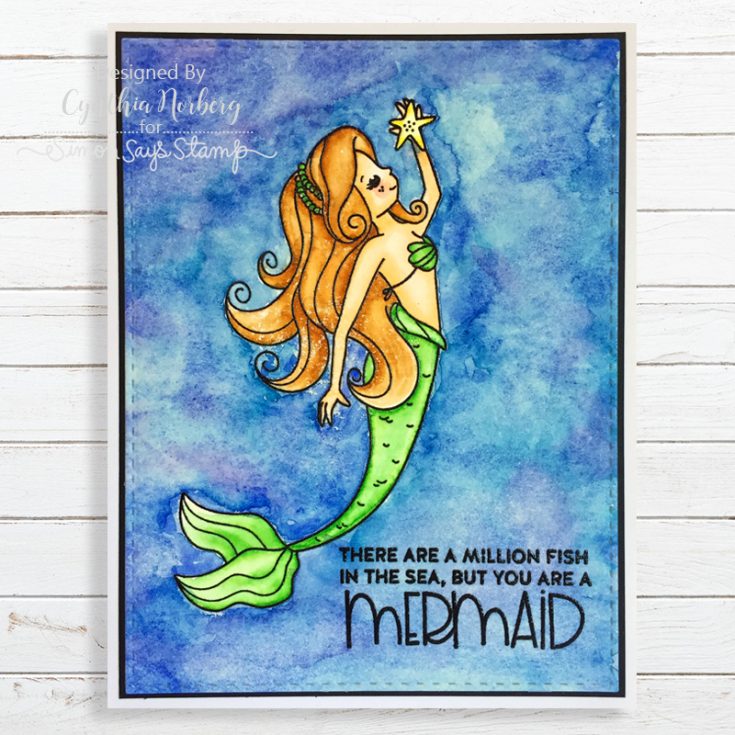
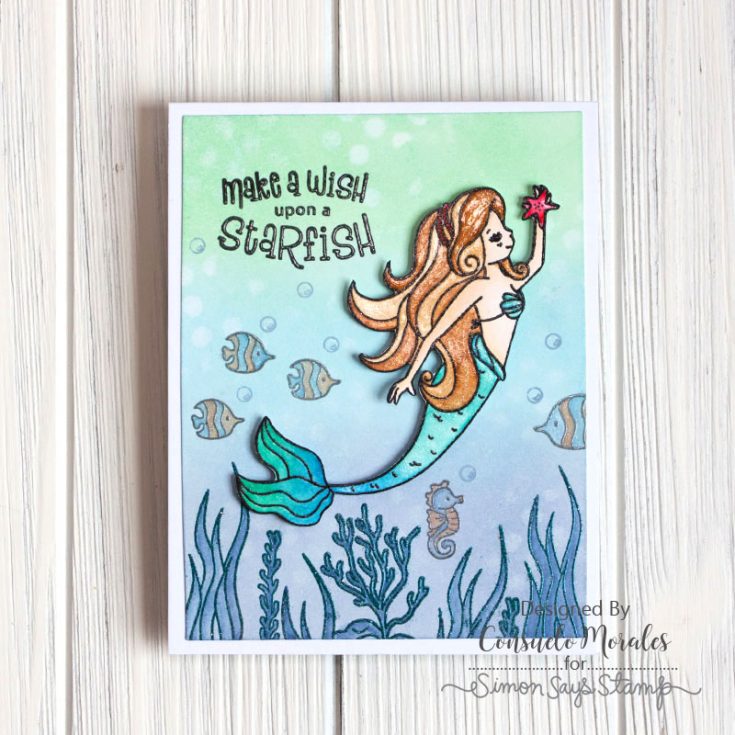
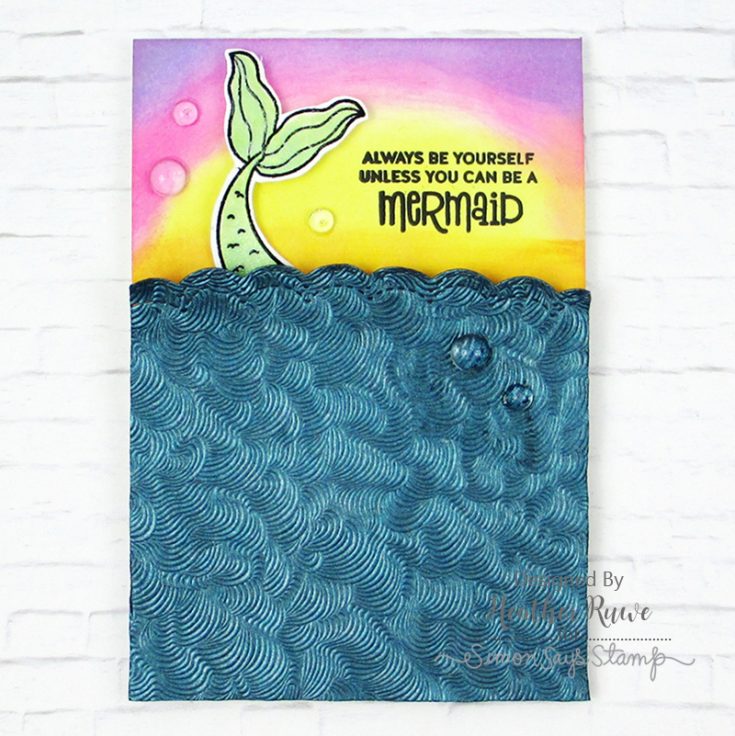
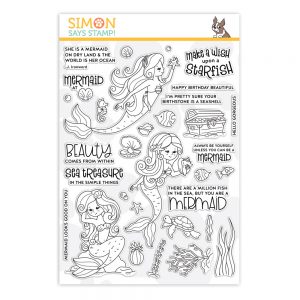
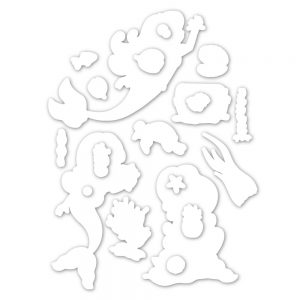
Start your alluring, under the sea designs with our enchanting Simon exclusive 6×8 Beautiful Mermaids stamp set! Beautiful Mermaids features three gorgeous, mythical mermaids with fabulous flowing tresses, and each adorned with pearl and shell accessories. You’ll find eleven seaworthy sentiments to inspire your delightful designs. Also included in the stamp set is a treasure chest overflowing with glittering riches, an oyster (with a pearl, of course!), underwater plants, fishes, a starfish, a turtle, a conch shell, bubbles, and the sweetest little starfish EVER… all of which will help you create captivating ocean scenes!
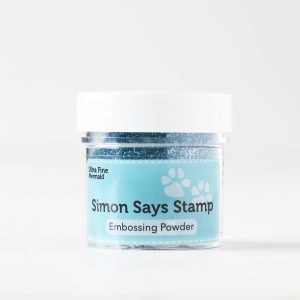
In addition, this kit rocks your world with THREE ink pads (seriously!) to make beautiful blue magic. Yep, two shades of Distress Oxide ink pads from the newest Ranger and Tim Holtz release, in both Tumbled Glass and Stormy Sky (OMG!). And we’ve included a Simon Says Stamp clear embossing and watermark ink pad. Use the embossing ink to make seawater sparkle with our brand new, Mermaid Ultra Fine embossing powder! And for even more marine blue, you’ll get one sheet of Tonic Deep Sea Dive embossed paper, along with a 6×6 sheet of Simon Says Stamp Aqua glitter paper. There’s nothing fishy about that!
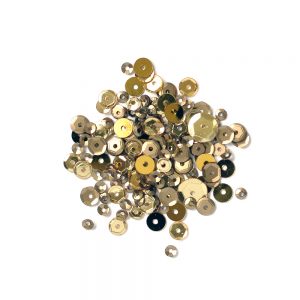
Rounding out this enchanting and aquatic kit is a sparkling gold package of our brand new, Simon exclusive Treasure Chest sequins, one sheet of Neenah Solar White cardstock, and two Simon Says Stamp metallic envelopes in White and Lavender so that you can send your magical, mythical mermaid designs to your favorite sea goddess!
You’ll make a splash with our September Card Kit, Sea Treasure!
Don’t forget! We have LOTS of gorgeous card kit inspiration to access and add to in our Card Kit Galleries!
You can purchase the kit at $34.99, or you can subscribe to our kit of the month program for just $29.99 (plus S&H) per month to have our kits delivered right to your door each month!
If you are a subscriber who used Paypal to purchase your subscription, please be sure to pay the invoice that we send you within 3 business days. We have a limited number of this card kit in stock and don’t want you to miss out. For easier and quicker monthly processing, please contact us via email or telephone and we will put your credit card on file as a courtesy for you. Card kits bill and ship between the 16th and 29th days of every month.
Studio Monday with Nina-Marie: Art Impressions Interactive Flutter Card

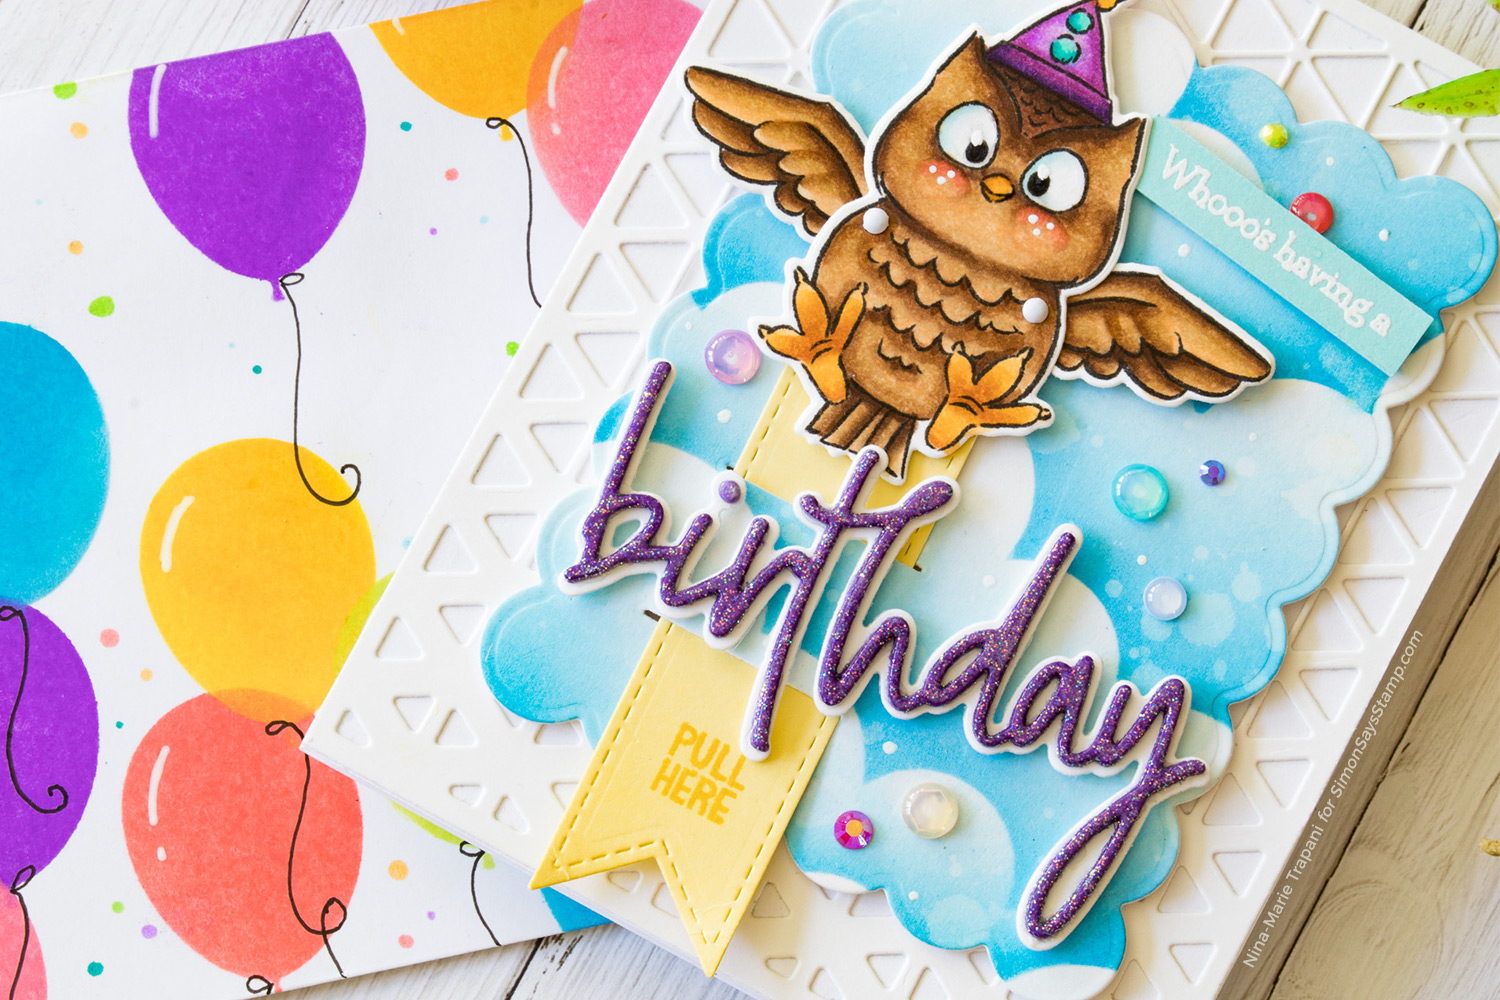
Hello creative friends! It’s Nina-Marie here with you today and I’m sharing a fun, interactive card idea featuring the Owl Art Impressions Flutter set! Have you tried one of these fun stamp and die sets? It goes with everything you need to make adorable “fluttering” cards! The effect is super cool; you have to check out the video and see this card in action!
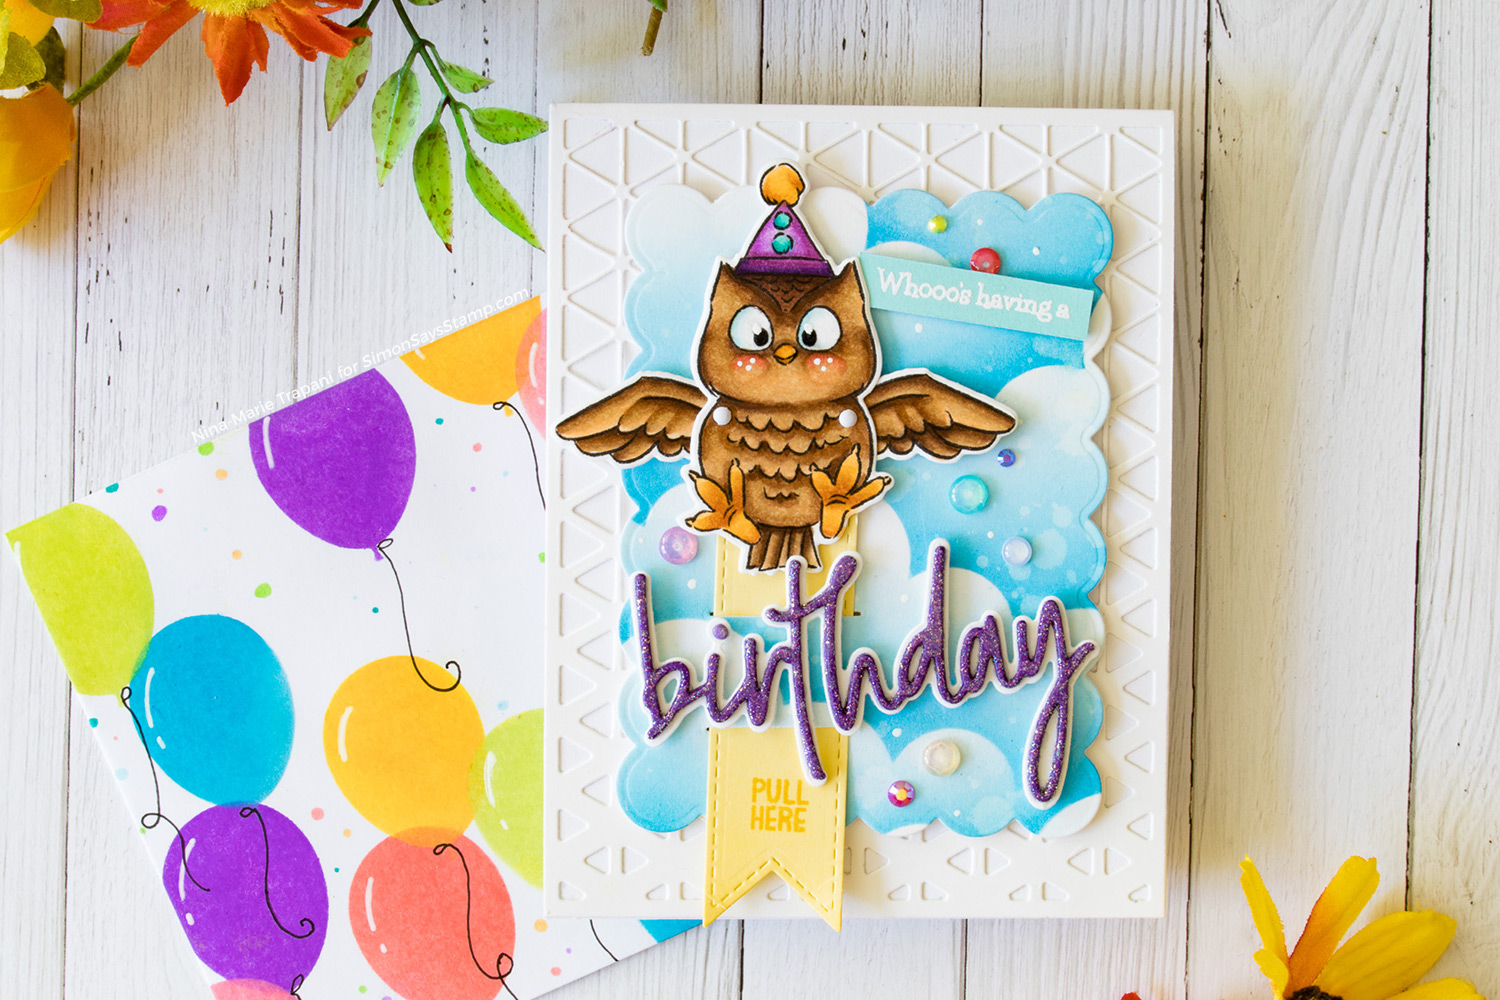
I created a colorful scene behind the owl with our Simon Says Stamp, Clouds for Days stencil; I used Tumbled Glass and Mermaid Lagoon Distress Oxides for the blending. There are bright sequins and gems on the background from the Happiness mix by Lucy’s Cards; that mix is fittingly named, as it always makes me feel so happy when I use it!
The greetings on the card are stamped with the Owl Flutter set, and die cut using the Memory Box Jotted Birthday Script die. On top of the purple die cut “birthday” I added a layer of Singing in the Rain embossing glitter from Wow. This glitter is literally my all time favorite right now!
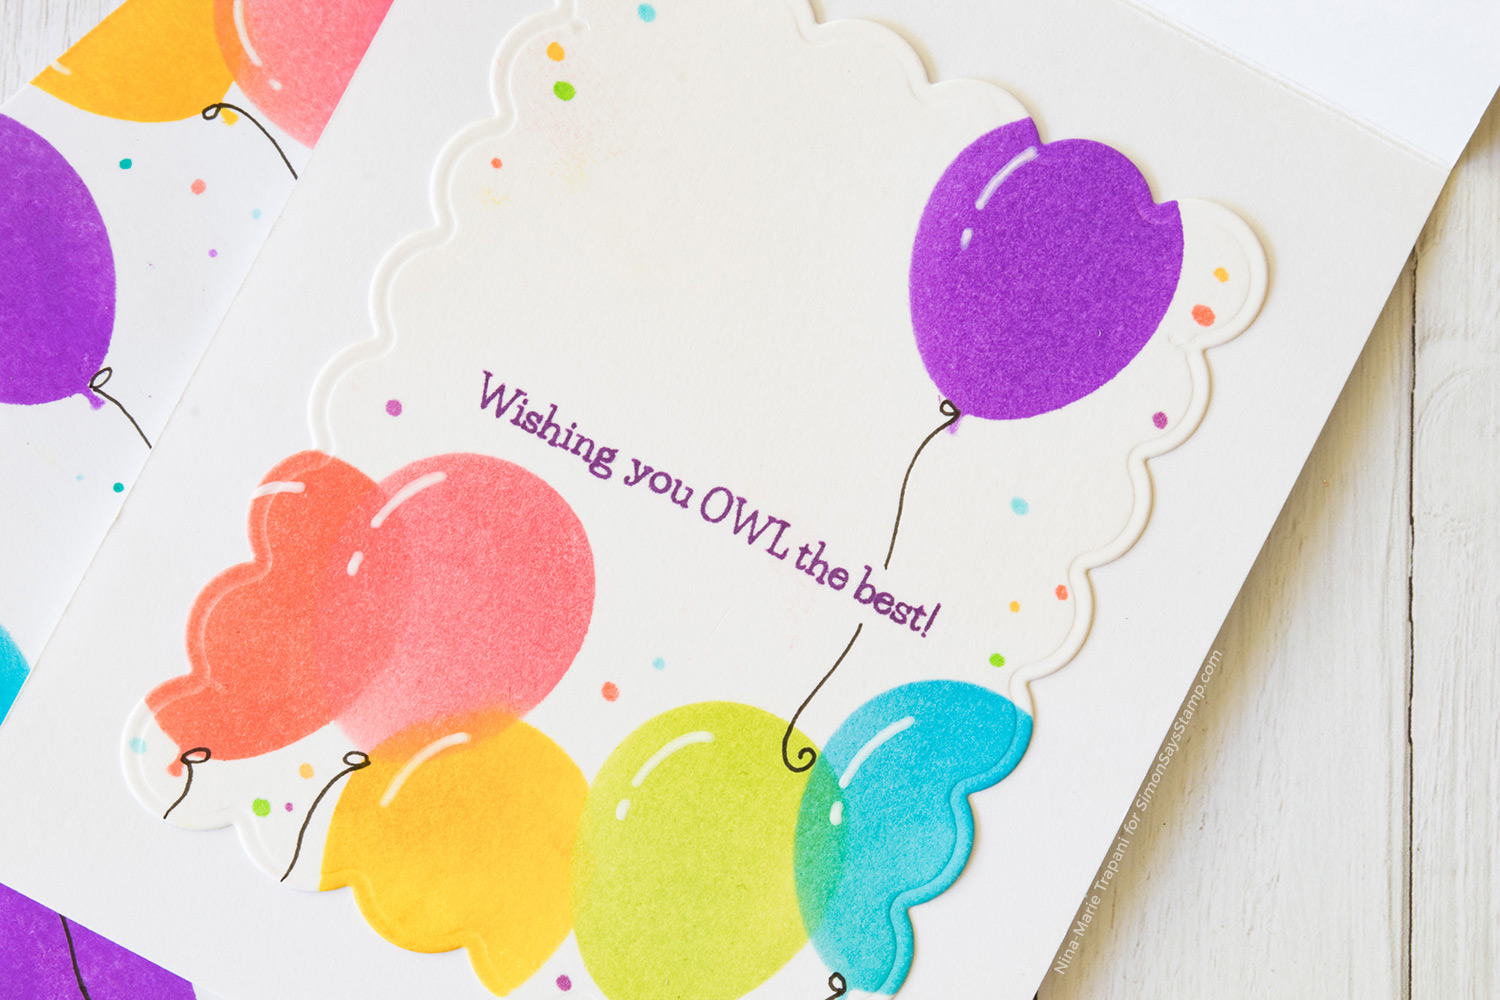
On the coordinating envelope and inside my card, I did some additional stenciling with a myriad of Oxide inks and the Balloon Duo stencil from Neat & Tangled. I used the rest of the sentiment included in the Owl Flutter set to stamp the inside of the card.
I hope you will watch the video to see how I created this super-happy and interactive birthday card! Thanks so much for tuning in for this week’s Studio Monday tutorial; I will see you again very soon with more creative ideas to share!
WATCH THE VIDEO
SUPPLIES USED
|


Blog Candy Alert!! Follow our blog via email and comment on this post for a chance to win special blog candy!
Under the Sea with Newton’s Nook!
Hi friends! Happy Sunday! Please welcome special guest Larissa Heskett from Newton’s Nook to share two adorable card samples featuring new stamp and die sets. Read on and enjoy!
Hello, crafty friends Larissa here today with a couple FUN Projects using some of the NEWLY released Newton’s Nook Designs Products! I’m SUPER HAPPY to be here and I hope I can INSPIRE you to try something NEW with my Projects today!!
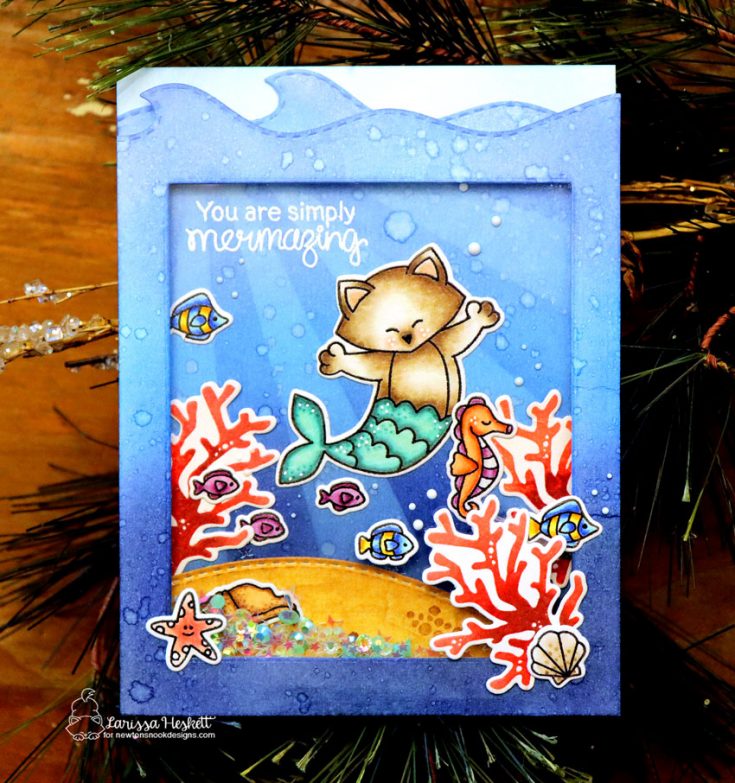
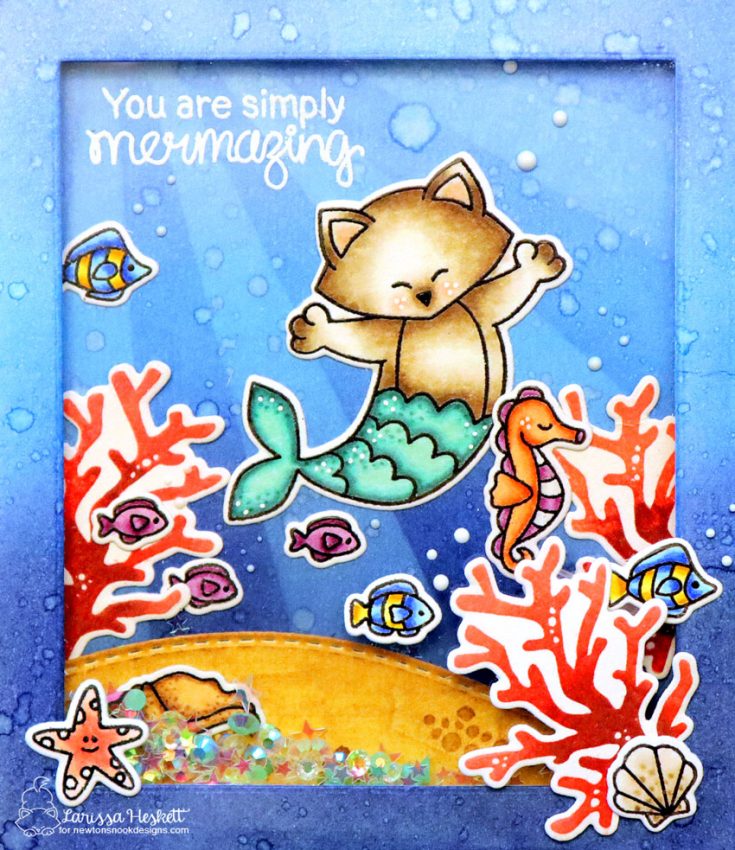
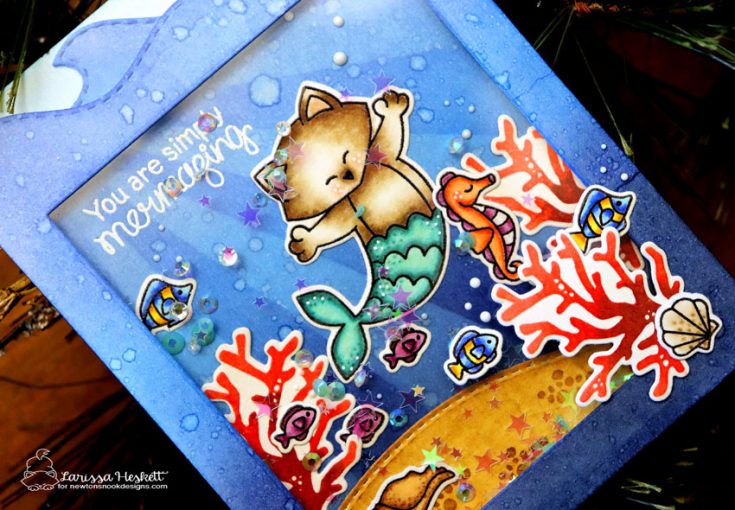
My first card is a shaker card. I LOVE to make shaker cards. Building a scene that mixes both new and older stamp sets. Its FUN to look through your stash and bring NEW life to some of the images you might not have used in a while. I started by stamping and embossing the Images from the Newton’s Nook Designs Purr-Maid Newton Stamp Set, Narly Mermaids, and Manatee-rific. I colored the images using Copic Markers.
Newton: E40, E43, E47 R20
Mermaid Tail: BG10, BG13, BG18
Starfish: R00, R20, R14
Angel Fish: Y11, Y13, Y19 B000, B12, B18
Seahorse: YR00, YR02, YR18 V01, V06, V12
Purple Fish: V01, V06
Sea Shell: E40, E43, E44
Then I used some Distress Oxide Inks in Tattered Rose, Abandoned Coral and Aged Mahogany to stamp the coral images from the Tranquil Tides Stamp Set. Then embossed them using some Wow clear embossing powder. I used the coordinating Dies from Purr-Maid Newton, Narly Mermaids, Manatee-rific and Tranquil Tides to Die Cut the images out and added some white gel pen details then set them aside.
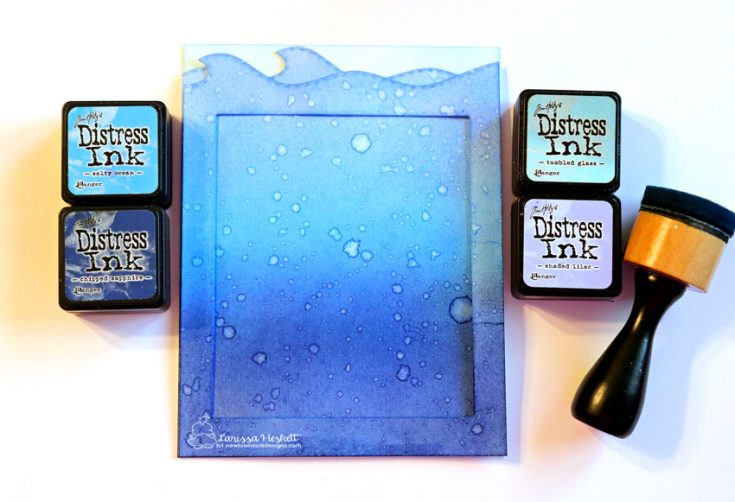
For the base, I started with an A2 Distress watercolor panel and inked it up using Tumbled Glass. Then I inked two more panels using Distress Inks in Tumbled Glass, Shaded Lilac, Salty Ocean and Chipped Sapphire. I added some water droplets using a Distress Sprayer for some dimension. Then I die cut the top of each of the panels to create some waves using the Newton’s Nook Designs Sea Borders die set.
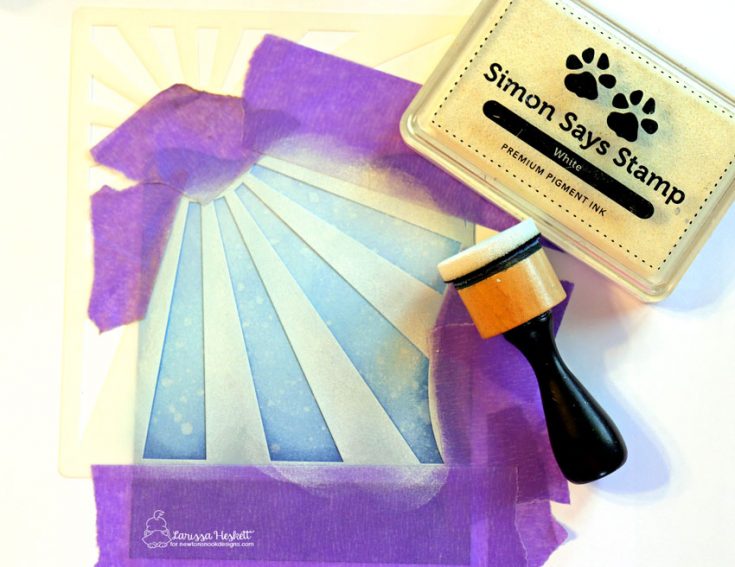
To add even more interest to my underwater scene I took the Newton’s Nook Designs Sunscape stencil and adhered it over my Distress inked panel with some Therm O Web Purple Tape. Then used some Simon Says Stamp white pigment Ink and inked it up using a Ranger mini ink blending tool. I love the look of light filtering in from up above. I used the Newton’s Nook Designs Land Borders Die Set to die cut a sandy bottom and used Distress inks in Antique Linen and Gathered Twigs to Ink it up. I added some stamped details using the image from the Tranquil Tides Stamp Set and Gathered Twigs.
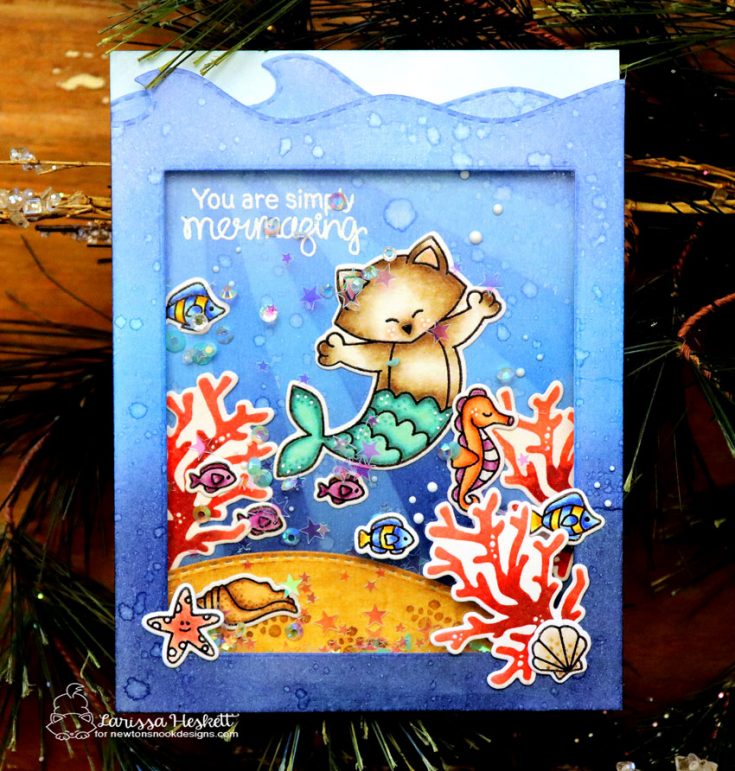
I stamped and embossed the sentiment from the Narly Mermaids Stamp Set in Wow Opaque Bright White Super Fine Embossing Powder. Then I adhered all of my images creating the FUN underwater scene using Therm O Web Mixed Media Multi-purpose Adhesive. Some Tonic Studios Simply White Nuvo Drops were used to create some water bubbles coming from the images and set aside to dry. I adhered some Hot Off the Press Acetate Sheet to the back of my card front panel using some Therm O Web iCraft Double Sided Tape. I used several Therm O Web 3D mounting squares to create my foam frame layer and added a mixture of Pretty Pink Posh Iridescent Mini Star Confetti, Sea Glass Jewels and Studio Katia Iridescent Crystals for the shaker elements.
I adhered a few of the images to the front of the frame to make it even more of a 3D Design and I really LOVE the way it turned out!
SUPPLIES:
|


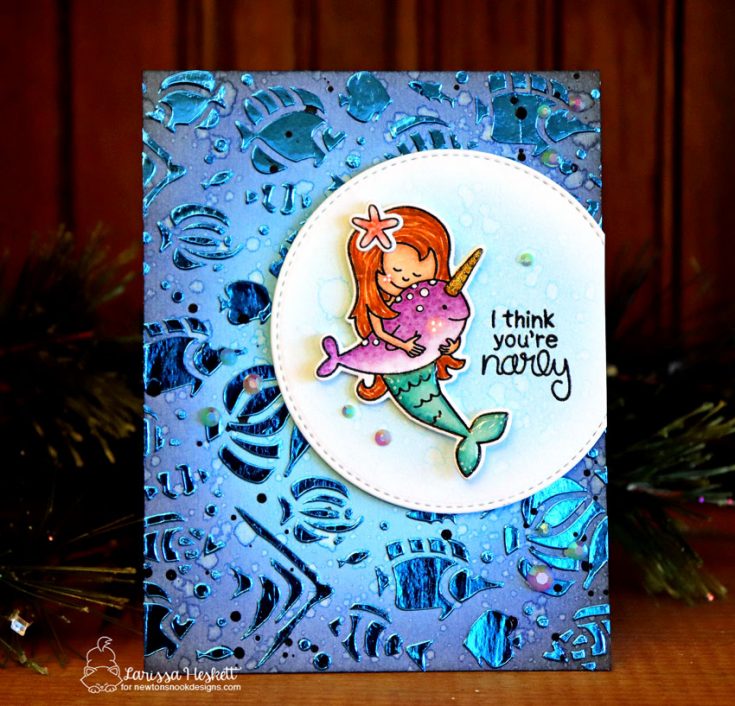
For my second card, I created a BEAUTIFUL stenciled and foiled background using the NEW Newton’s Nook Designs Tropical Fish Stencil and some Therm O Web Transfer Gel and Denim Deco Foil.
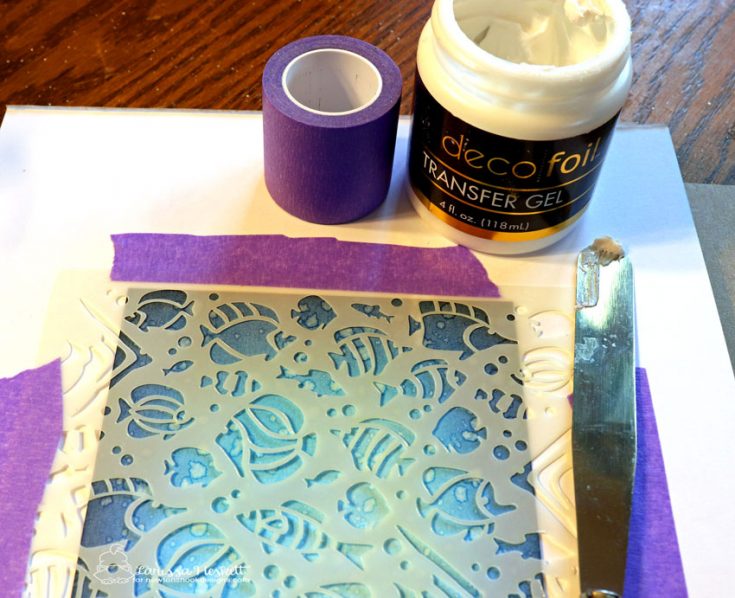
Adhere your Tropical Fish Stencil over a distress inked background. I used Tumbled Glass, Shaded Salty Ocean, Chipped Sapphire and Black Soot using some Therm O Web Purple Tape. Then I used a Tonic Studios Metal Palette Knife to apply an even layer of Therm O Web Transfer Gel. Remove the stencil and set aside to dry.
Once its dry cut a piece of Denim Deco Foil and run it through your laminating machine.
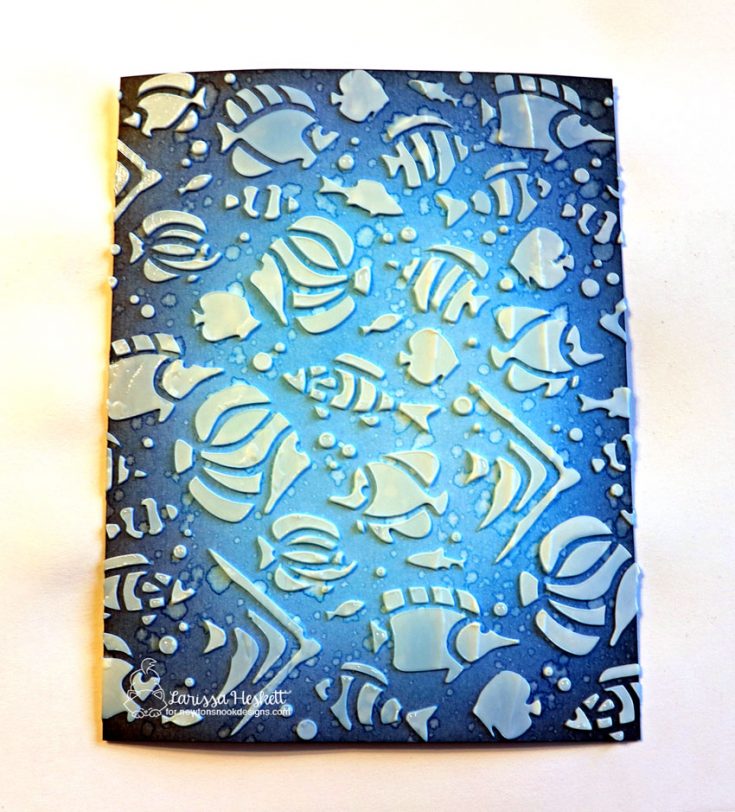
Then SQUEAL in delight after you remove the backing paper! I added some Black Soot Distress Paint Splatters and my background was finished.
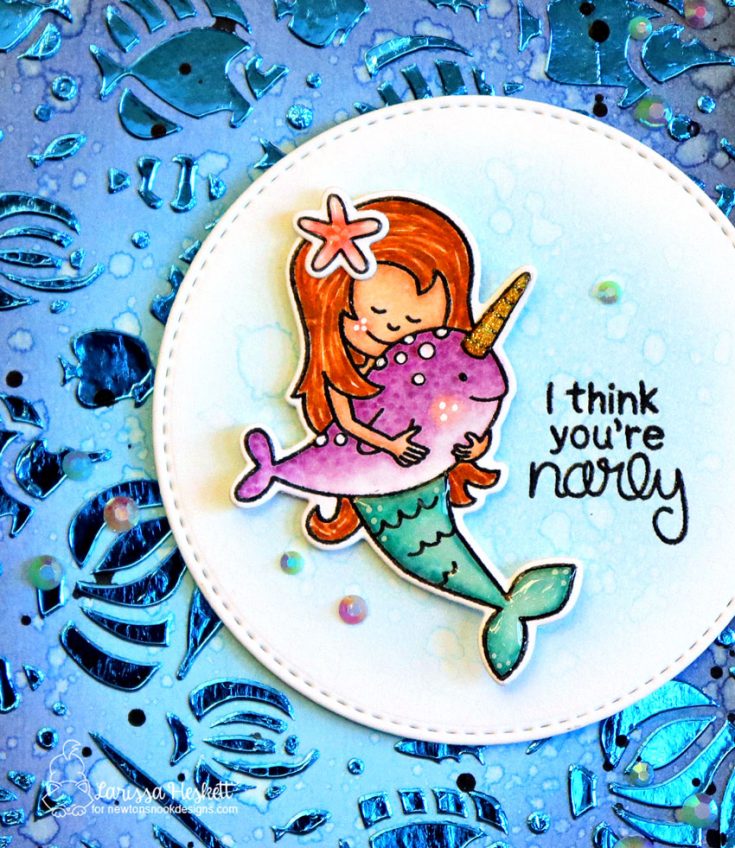
I stamped and embossed the Narly Mermaids and Manatee-rific images and colored them with Copic Markers.
Mermaid Tail: BG10, BG13, BG18
Mermaid Hair: E97, E99, E39
Mermaid Skin: E00, E11, E13 R20
Narwhal: V01, V06, V12 R20
Narwhal Horn: Y11, Y19, YR23
Starfish: R00, R20, R14
I used the coordinating Narly Mermaids and Manatee-rific Dies to die cut the images out and added some white gel pen details along with some Tonic Studios Morning Dew, Sea Breeze, and Honey Gold Glitter Nuvo Drops for some Dimension and Shine. I die cut a Simon Says Stamp Stitched Circle and inked the center using some Tumbled Glass Distress Ink. I stamped and embossed the sentiment and added a sprinkling of Pretty Pink Posh Sea Glass Jewels and Pansy Purple Jewels to finish it off.

THANKS SO MUCH for stopping by today and I hope you have a FABULOUS WEEK!
SUPPLIES:
|


Thanks so much for stopping by and to Larissa for being our guest!

Blog Candy Alert! Follow our blog via email and comment on this post for a chance to win special blog candy!


