One Stamp, Five Ways: Orange Blossoms

Hi friends! Please join me in welcoming back special monthly guest Suzy Plantamura with another fun rendition of “One Stamp, Five Ways” featuring our newly released Undersea Friends set! Read on and learn more! Enjoy!
Thanks so much for stopping by, and thanks to Suzy for being our guest!
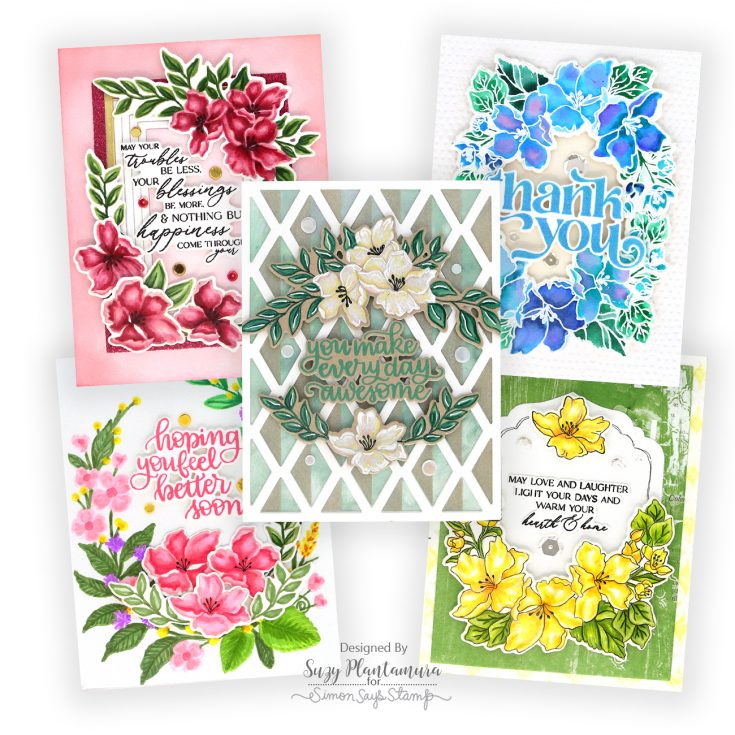
For my August “one stamp, five ways” post, I picked a stamp set from the Moments in Time release which was a couple months ago. I loved this stamp set and didn’t have the time to work with it. I knew it would be perfect for making 5 cards with the beautiful floral designs and all of the versatile greetings. Here are my cards:
I colored my first set of stamped images using no-line coloring and Copic Markers. I always use Latte PSInk for my no-line coloring as it is the perfect color to blend in with all marker shades. I used a black fine tip Micron marker to draw over the tendrils before I colored the flowers so I could see them. I die-cut all the images out with the matching dies.
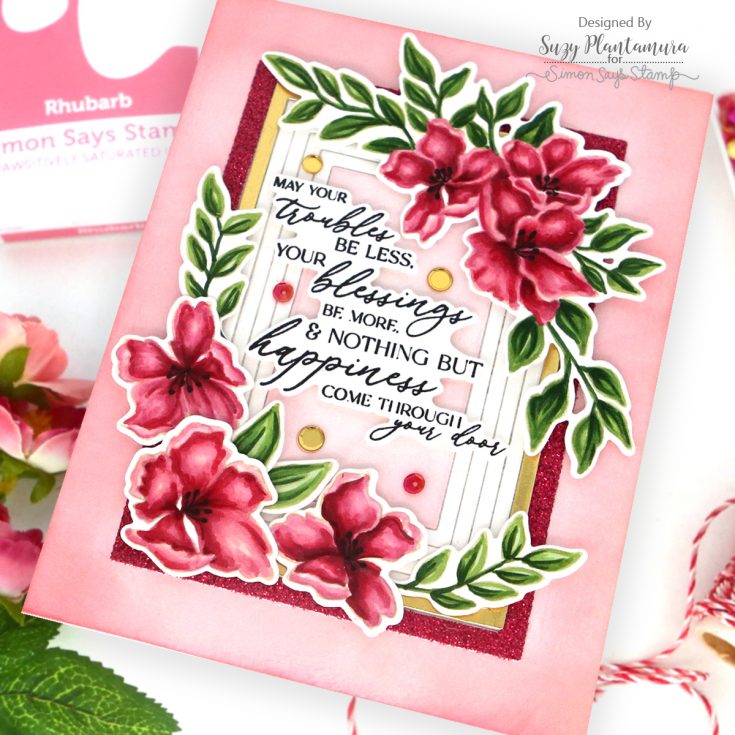
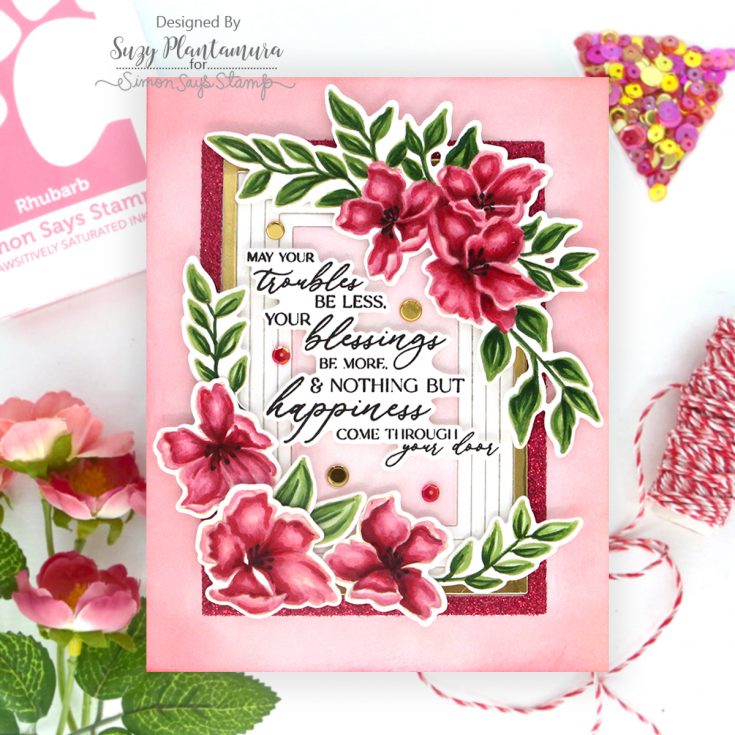
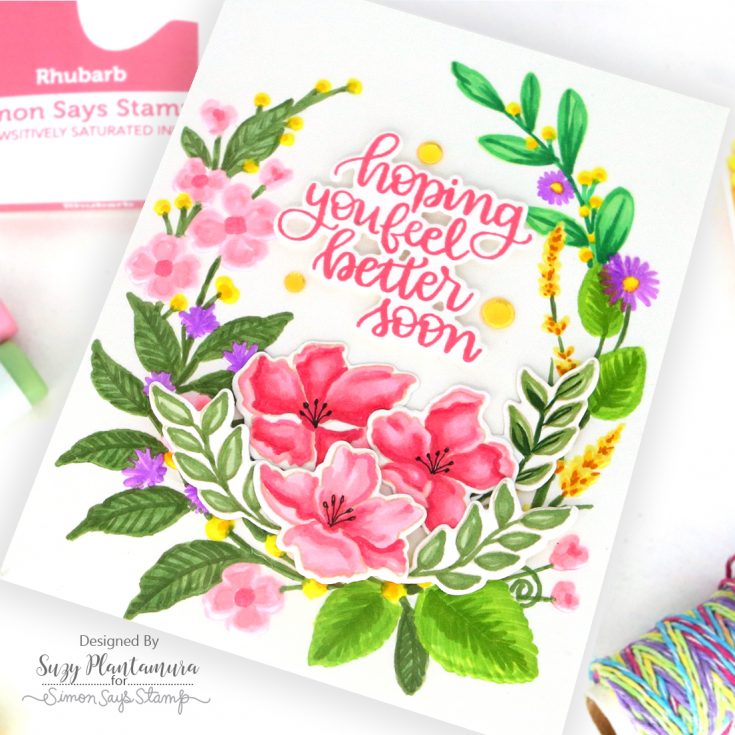
I made the background using the A2 Frame Dies. I didn’t cut mine apart allowing me to use both the frames and the in-betweens as frames which are the same size, so you get twice as many size frames with the set! I die-cut one from Flamingo Glitter Cardstock and one size smaller from Gold Matte Cardstock. I then cut all the ones that were smaller than that one from white cardstock. I applied some Rhubarb Ink on the which cardstock background as well as the inside piece of the frames. I attached them to the center of the background piece. I stamped a sentiment from the stamp set with Versafine Ink and die-cut it out. I attached all the flowers, leaves, and sentiments over the background using foam tape beneath all of them. I used the rose red and gold sequins from the Hot Tamale Embellishment Mix around the sentiment.
I embossed the Blossom Swag Embossing Folder using white cardstock and colored it with Copic Markers. I stamped 3 of the single flowers and three of the leaf clusters from the stamp set with Latte PSInk again and colored them in with Copics as well to match the background. I used a fine tip black Micron to draw in the tendrils again.
I attached the colored embossing folder to a white card base. I attached the flowers and leaves using foam tape beneath just the front flower and gluing the leaves only at the base so they kind of float. I stamped a sentiment from the Handlettered Encouragement Stamp set with Rhubarb PSInk and die-cut it out with the new matching dies. I attached it with foam tape behind it to the top of the card. I added three yellow sequins around the greeting.
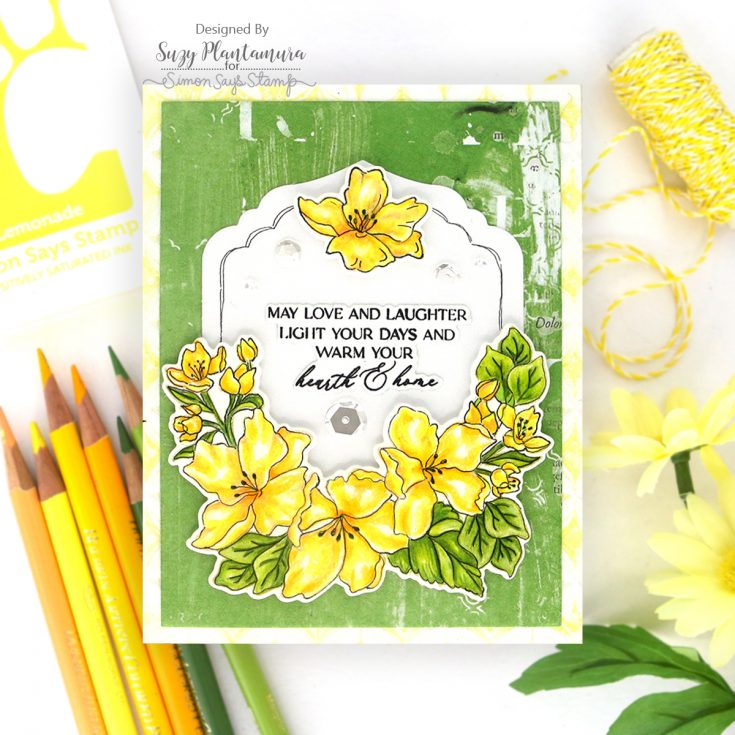
I embossed the Lumen Embossing Folder using white cardstock and rubbed Lemonade PSInk on the raised portions. I die-cut a piece of green patterned paper in the Kaleidoscope Paper Pack by 49 & Market using the second largest die in the A2 Nested Dies. I attached it over the embossing folder. I die-cut one of the new Modern Teardrop Wafer Dies from white cardstock and attached it to the center of the green paper.
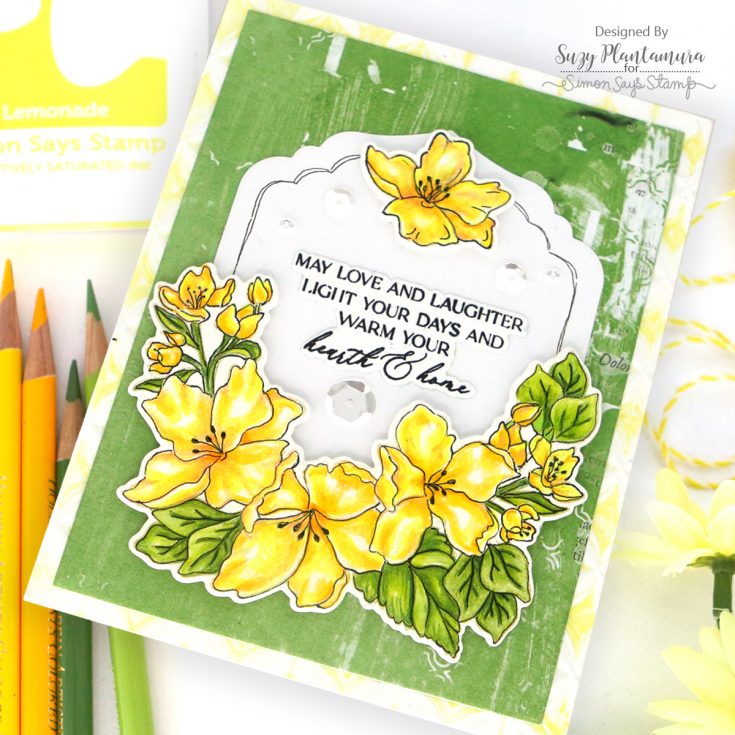
I stamped the large floral swag and one small flower with Latte PSInk and this time I colored them in with colored pencils. I just purchased Holbein Pencils and I absolutely love them – they go on like oil paints and blend together beautifully. I ended up wanting these to have outlines since they were yellow, so I drew around them with a fine tip black pen. You could just stamp them with black ink for the same look! I die-cut them out and attached them over the teardrop die with foam tape beneath them. I added a black frame around the inside of the teardrop die. I stamped a sentiment from the stamp set with Versafine black ink and die-cut it out. I glued that to the middle of the flowers. I added three sparkling clear sequins sequins around the sentiment.
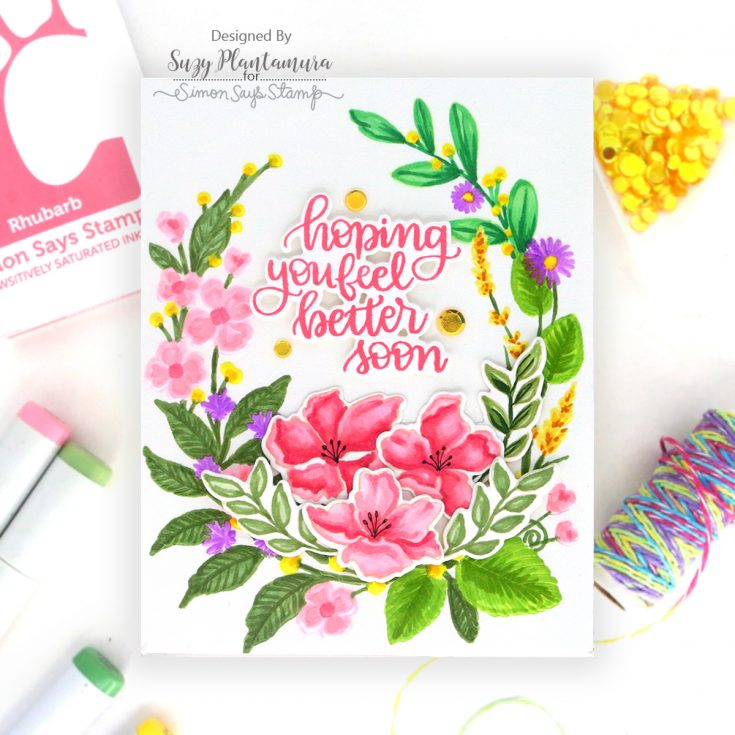
This card started as a quick one-layer card idea and turned into my most time consuming detailed card! I stamped some of the flower images with Latte PSInk on two corners of an A2 piece of kraft cardstock. I colored them with colored pencils and used a white Uniball on the flower edges. I didn’t like how plain it was, so I die-cut the flowers out.
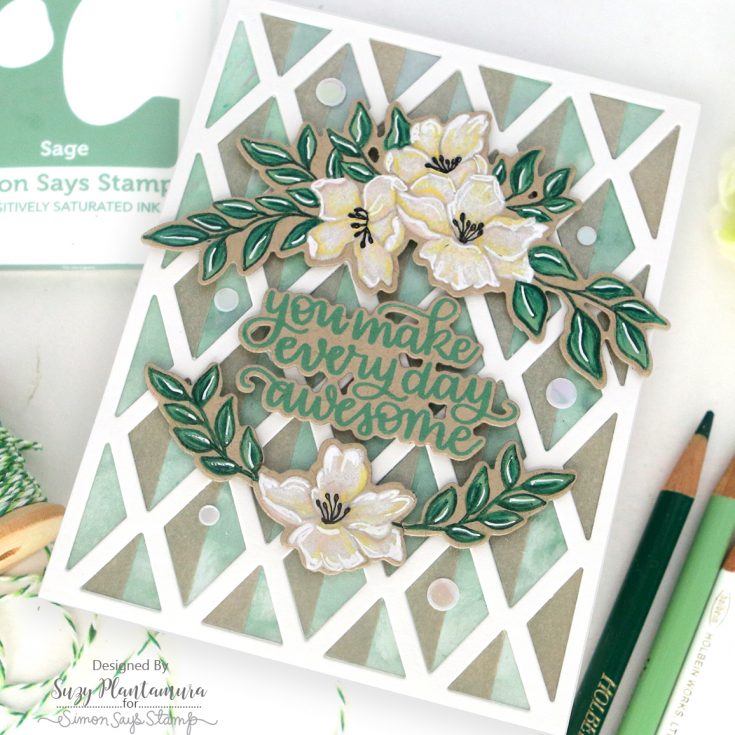
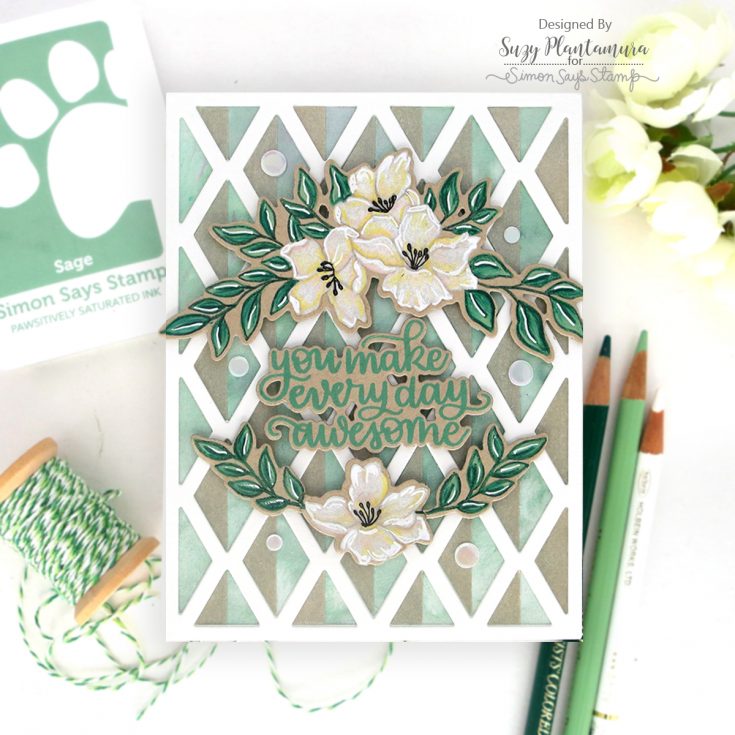
I die-cut two of the new Dual Diamonds Wafer Dies from White Cardstock. I die-cut another using Bronze Vellum which matches kraft cardstock perfectly. I glued one of the frames to a piece of watercolor paper I had painted with a sage watercolor. You could also use sage cardstock or blend sage ink over white cardstock. I then glued the bronze vellum inside pieces to half of the spots leaving the green showing in the others. I glued a second white frame over the first one so it had more depth and covered any messes I made glueing the vellum pieces in. I attached the two floral groupings with foam tape beneath them to the front. I stamped a sentiment from the Handlettered Encouragement stamp set with Tidepool PSInk on kraft cardstock. I die-cut it out and attached it between the flowers. I added a few white sequins around the card front.
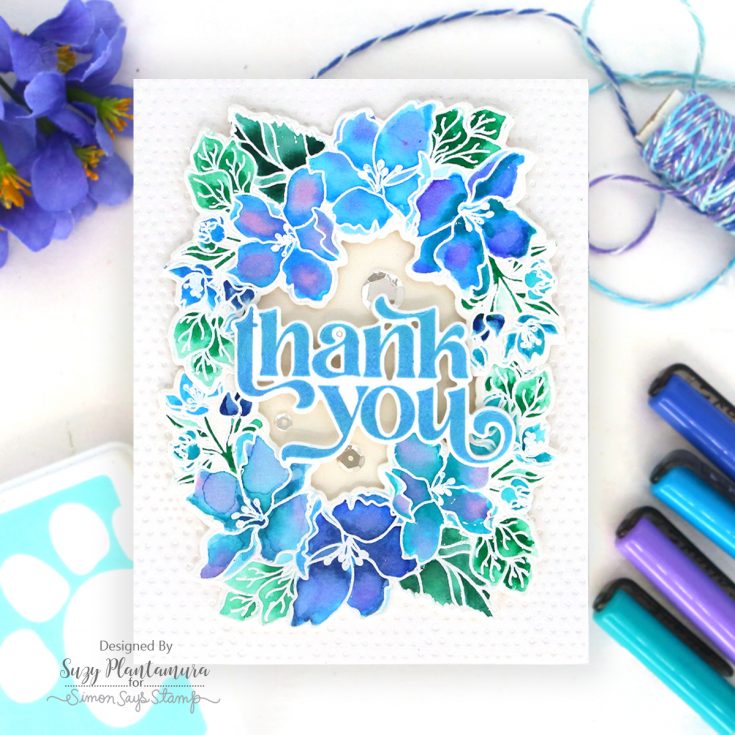
For the background of this card, I used the Dotted Diamond Embossing Folder’s backside. I loved the texture of the little dots on the outside of my card. I die-cut an oval out of the center of my cardstock before I embossed it. I attached it to a cream card base as my watercolor paper was creamy, so I wanted it to match even though you can’t tell it does in the photos.
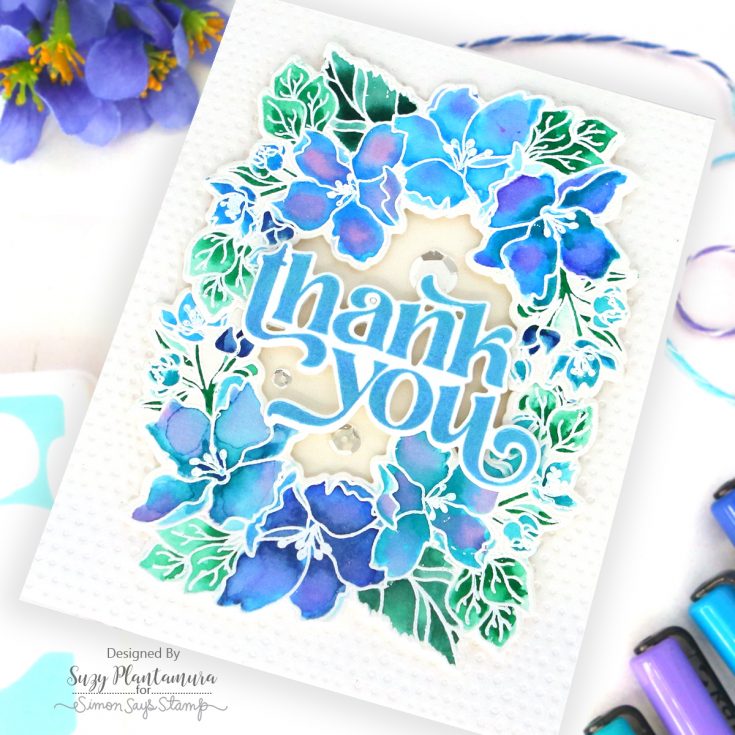
I embossed two of the rounded floral stamps with white embossing powder on Arches watercolor paper. I painted them with Karin Brushmarkers. I primarily used all the turquoise blues but then I added some pink and lavender inside the petals. I die-cut them out and attached them to the top and the bottom of the oval opening with foam tape beneath them. I stamped a sentiment from the With Thanks stamp set using Marine PSInk. I die-cut it out with the matching die and attached it to the middle of the card with foam tape behind it. I added three sparking clear sequins to the center around the sentiment.
I hope you like this Orange Blossom Blessings stamp set as much as I do now that you have seen all these ways to use it! I love doing this “one stamp, five ways” guest post as it is so fun thinking of different ways to use the same set without all of the cards looking the same. It’s such a good exercise to get more use out of our stamp sets! Thanks for vistiing today and have a great STAMPtember!!! Suzy
SUPPLIES:
|


Thanks so much for stopping by, and thanks to Suzy for being our guest!


If you’re looking to stay updated, discover bold new voices, or simply enjoy your downtime with a good binge-watch, head over to Baddies East. It’s more than a blog—it’s a growing hub for fans who love to Baddies Africa Free like Broken silenze and explore what’s next in the world of authentic entertainment.
Bob’s Discount Furniture offers a wide range of stylish and affordable options for every room. Whether you’re redesigning your living room, updating your bedroom, or adding a touch of style to your home office, Bob’s Discount Furniture provides both practicality and flair. From cozy sofas and elegant dining sets to functional storage solutions, their selection combines quality with budget-friendly prices. Decor enthusiasts will also love their assortment of rugs, lamps, and accent pieces that add personality and charm to any space.