Ink Blended Stencil + Dry Glitter Paste Scraping with Kristina Werner
Hello, all! Kristina Werner here with some card inspiration! And this card was a journey to create!
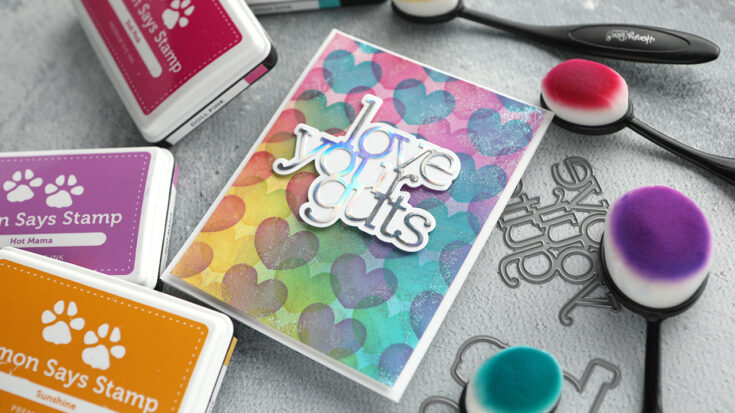
I first started by ink blending onto white cardstock. I used the Layering Hearts stencil set and four colors of Simon ink: Doll Pink, Hot Mama, Sunshine, and High Dive.
After ink blending, I applied some Cosmic Shimmer Paste in Aurora Sparkle and Iridescent Glitz Glitter Gel from Gina K Designs on top. I wanted to apply a thin layer of the glitter pastes, however both were a bit drier than usual. I thought I had ruined my project and started to scrape off the glitter pastes. However, that’s when the magic happened!
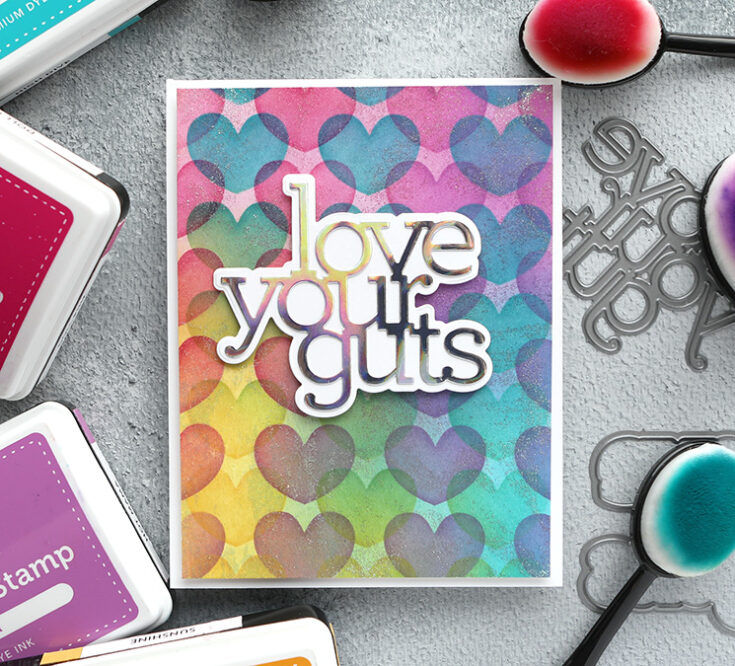
When I scraped the drier glitter paste off the surface of the cardstock with the palette knife, it left behind awesome distressed glitter areas. The texture and sparkle was unexpected and beautiful! I decided right then and there to continue with my card!
This surprise technique could be replicated with regular glitter paste by applying a thin layer and letting it dry just a few minutes. Then scrape some of the paste off with the edge of a palette knife (or whatever you’ve used for spreading out the glitter paste).
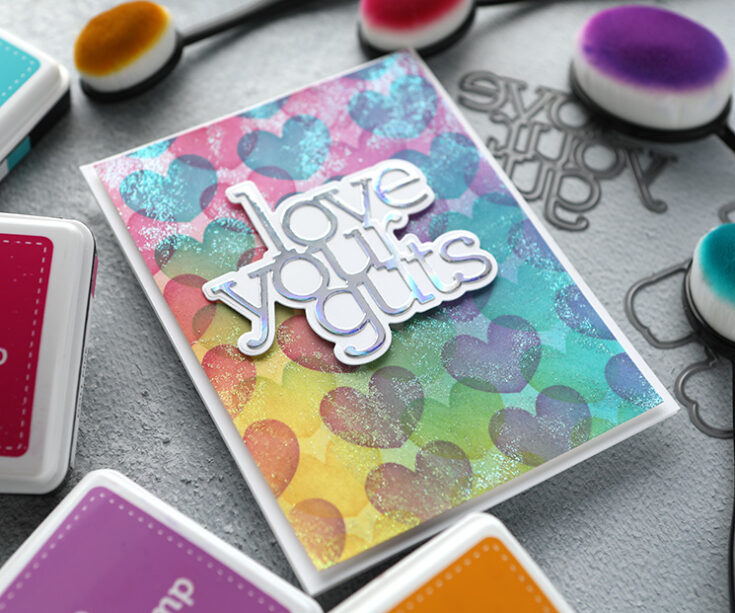
To finish off the card, I diecut the Love Your Guts dies from CZ Design with holographic cardstock and white cardstock. I then adhered the greeting to the front of the card.
Thanks for stopping by! You can grab all of the supplies I used today on this card at Simon Says Stamp!
Supplies
|


Art Journaling with Shari Carroll: Good Vibes Only

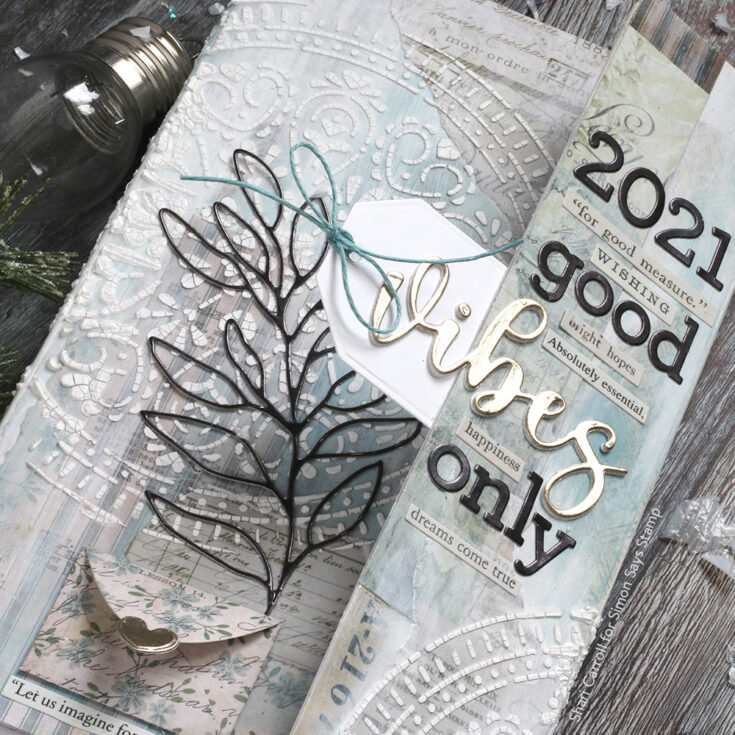
HAPPY NEW YEAR!!! We made it to 2021!!! This is a great time to start fresh with a new art journal that will hold GOOD VIBES ONLY! To kick things off, I’m working with the Tim Holtz Travel Folio and will continue adding to it until it’s stuffed full of all the delicious details it can hold.
I don’t typically start with the cover but thought I’d set the stage for how I want the interior pages to look and I’m feeling the Shabby Chic vibe with Speckled Egg.
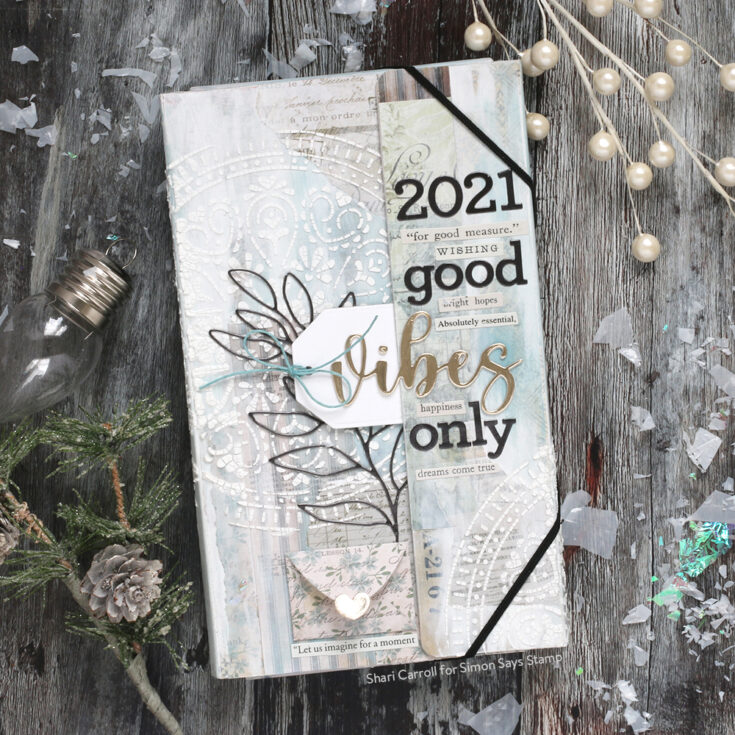
Texture is a favorite element for me and for that I’ve used crackle paste with the BoHo Circle stencil. Since I’ll be using this journal a lot for the next few months, I’ve sealed the crackle paste with a coating of Matte Gel Medium to keep loose pieces from falling off.
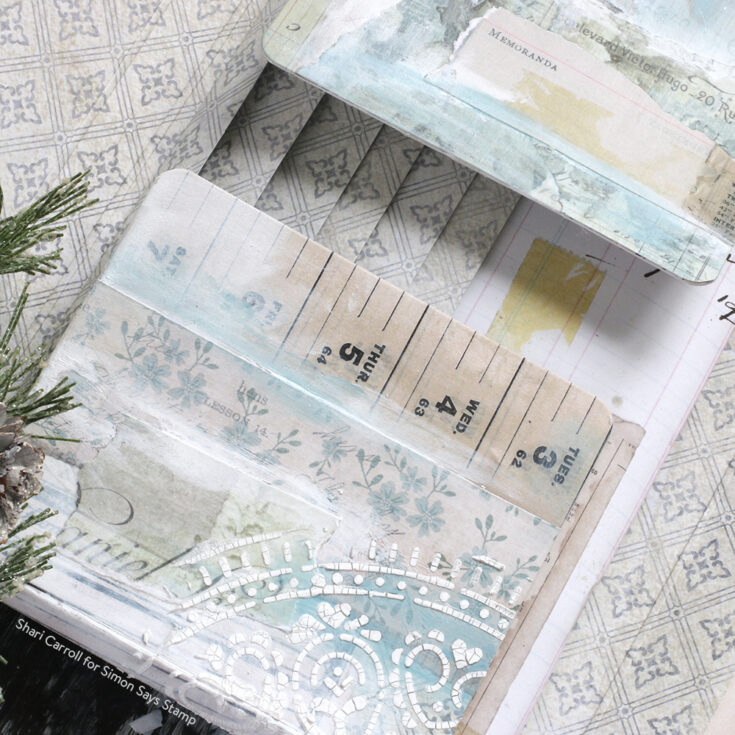
The interior has a notebook with plenty of pages to jot down personal thoughts or even sketches, and the waterfall tabs are perfect to add mini pieces of art. The flaps of the folio bring the outside in. I love this folio because it closes securely with elastic straps.
I’ve filmed a process video that you can view below. Again, Happy New Year!! Enjoy!!
SUPPLIES:
|


One Stamp Five Ways: You Have My Heart

Hi friends! Happy last day of 2020! We’re excited to be back with a gorgeous variety of 5 cards by Suzy Plantamura in the latest One Stamp Five Ways blog series showcasing our NEW You Have My Heart clear stamp set. Read on to learn more and enjoy!
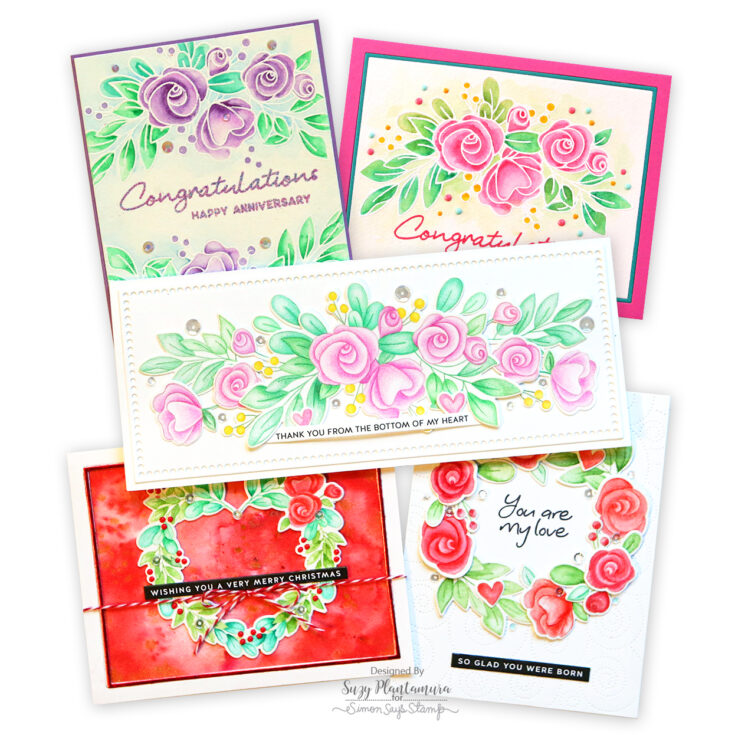
It’s the last day of the month, the last day of the year, and my last “one stamp, five ways” post for the year. Which of these statements brings you joy? Haha (please don’t answer that one). Today I have a “one stamp, five ways” post to share with you using the gorgeous new floral stamp set from the Love You release called You Have My Heart. And I think we are all ready to be creating some love cards as we move ever so much closer to Spring! Above you can see my five cards and now I will give you details and directions on making each one!
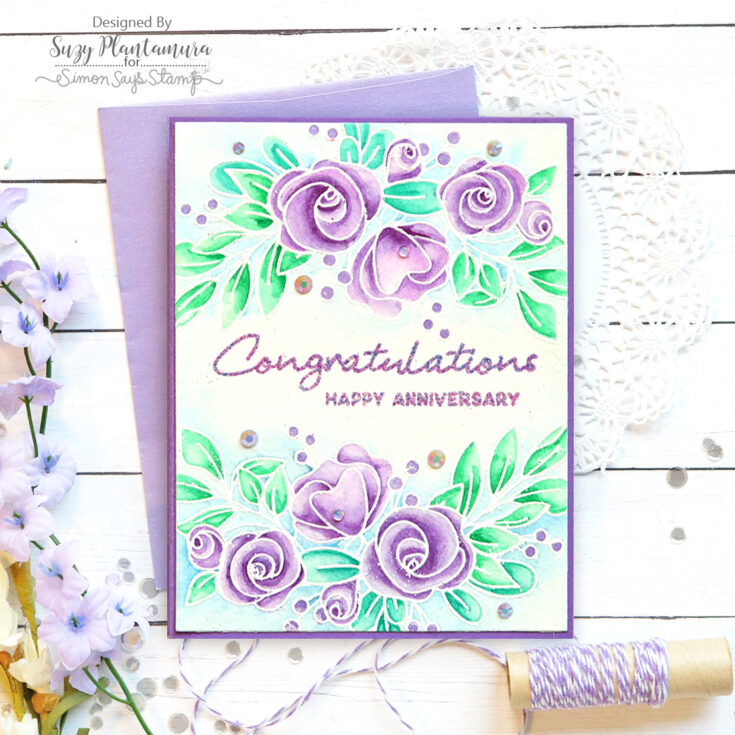
I die-cut a piece of Arches watercolor paper with the largest frame die from the SSS Thin Frame dies – I use this die on almost every card I make as I love to see the card base color framing my cards! I then embossed the large floral design from the You Have My Heart stamp on the top and bottom with white embossing powder.
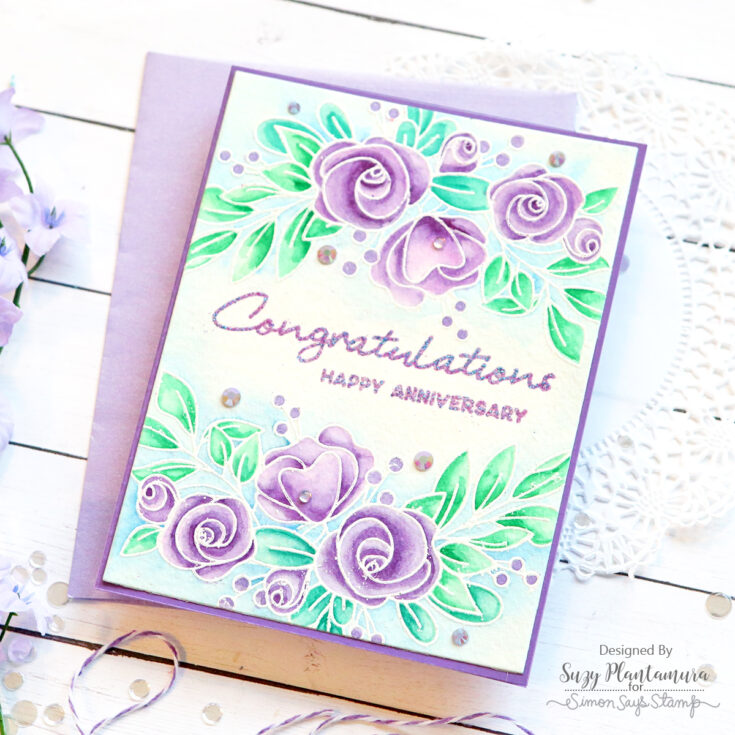
I painted the flowers in with my Daniel Smith watercolors. I resisted the urge to add shading with colored pencils! I embossed the sentiment with WOW Royal Crush embossing powder – I love this powder as it is lavender with blue glitter in it. I added some Pretty Pink Posh Amethyst jewels around the flowers.
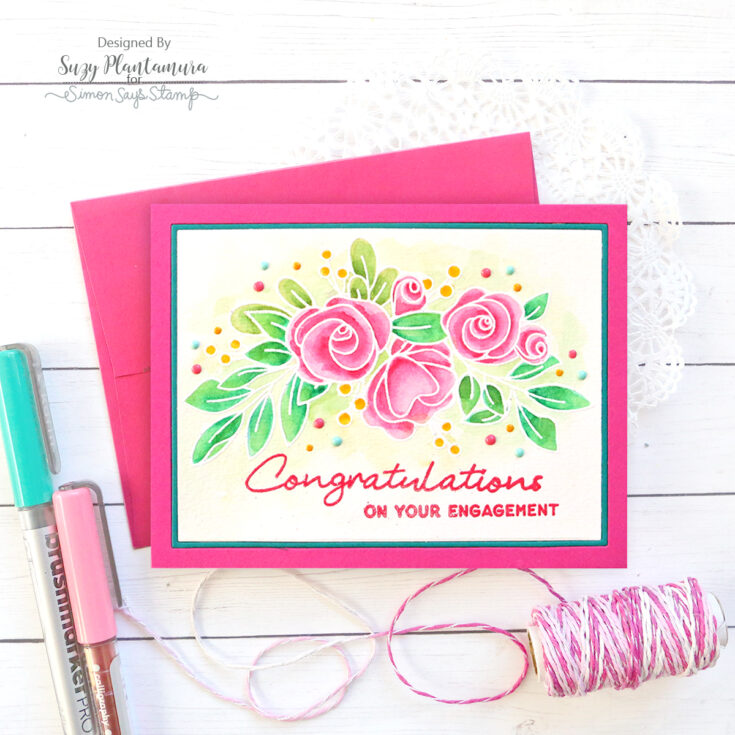
For this card, I made the background first using the same SSS A2 Thin Frames dies. I die cut the second largest frame die from teal and fuchsia cardstock and the inside piece from Arches watercolor paper. I embossed the large floral design with white embossing powder and I painted it with Daniel Smith watercolors.
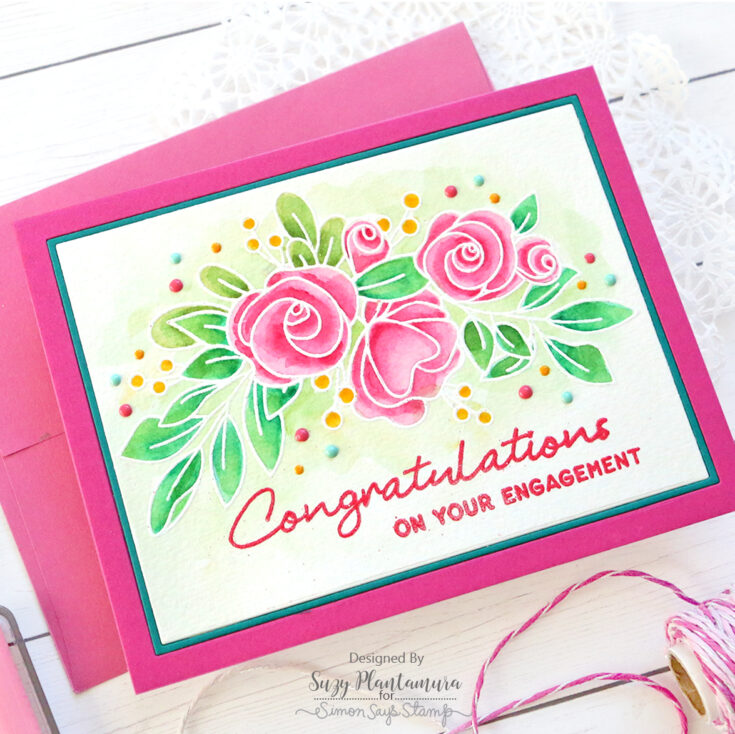
! I embossed the sentiment with Hot Pink embossing powder from the Ranger Brights embossing powder set. I used one of the larger sentiments with the smaller one under it. This set gives you the option to mix and match perfectly for your occasion. I added some glossy Nuvo drops in Calming Aqua, English Mustard, and Rhubarb Crumble around the flowers.
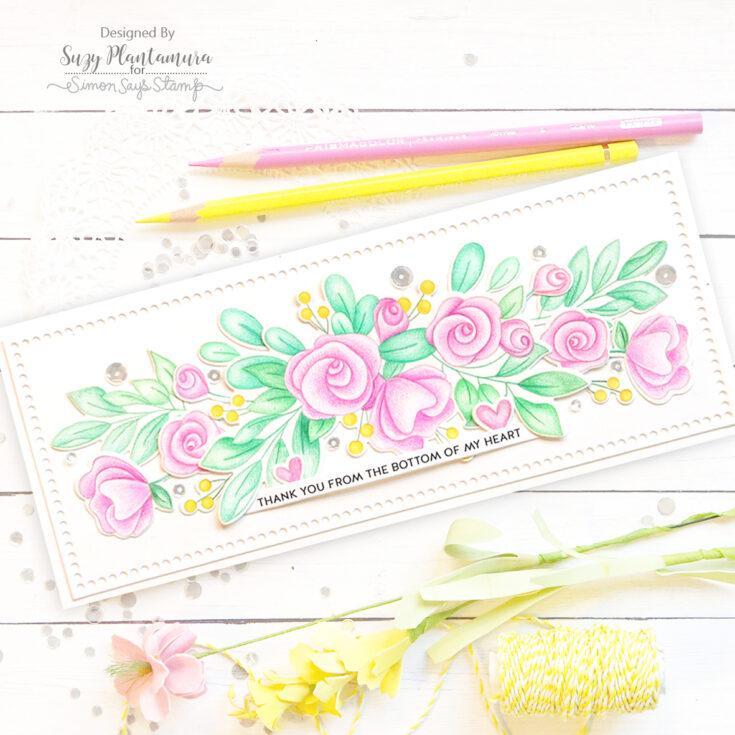
I wanted to make a slim-line card with the large floral stamp in the center and some of the individual blooms on the edges to elongate the design. I started by die-cutting the largest Slimline Marquee die from white cardstock and attached that to a white cardstock card base (3.5” x 8.5”). I stamped a bunch of the flower stamps on white cardstock with MFT Natural Ink and colored them all in with colored pencils.
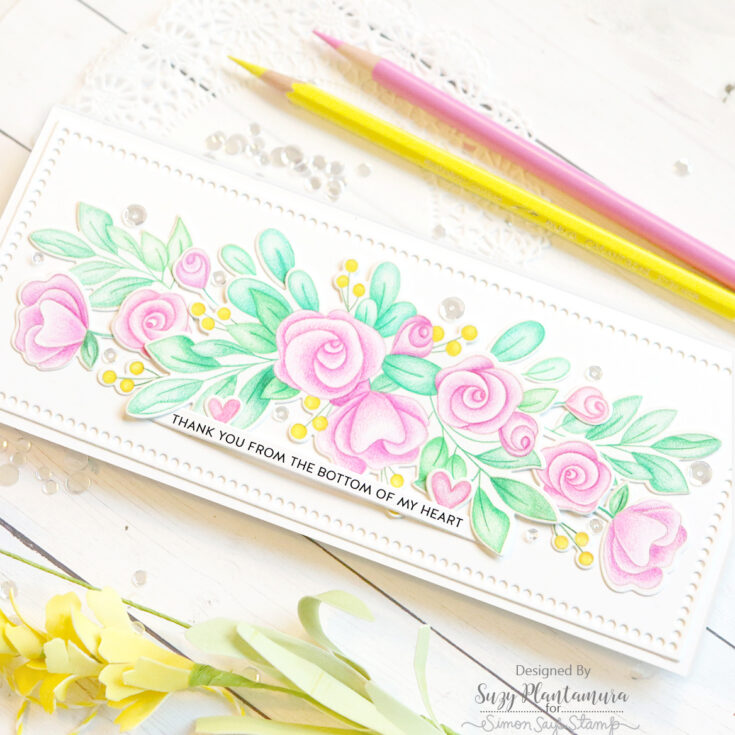
I arranged the flowers on the front of the card base with the large floral design in the center and all of the additional flowers and leaves tucked under each of the edges so the design covered the full front of the card. I then die-cut a pre-printed sentiment from the Thanks set with the Sentiment Label dies and attached that to the bottom of the card only using adhesive under the two ends. I finished it with some sparkling clear sequins.

I thought this set would make a pretty Christmas card and since it came out at Christmas time, it seemed like a good idea! I started using the same A2 Thin Frame dies, die-cutting the second largest frame from white cardstock and red metallic paper for the frame, as well as Arches watercolor paper for the inside. I painted the inside piece with Nuvo Shimmer Powders in Catherine Wheel and Golden Sparkler. I lightly tapped the bottle of red shimmer powder over the wet piece so there are lots of little red splotches. I also used the “red gold” paint in the Zig Kuretake Starry Colors watercolor paint set (this is the best set ever for holiday cards). I tapped a paintbrush over the wet piece to get lots of gold splotches on it.
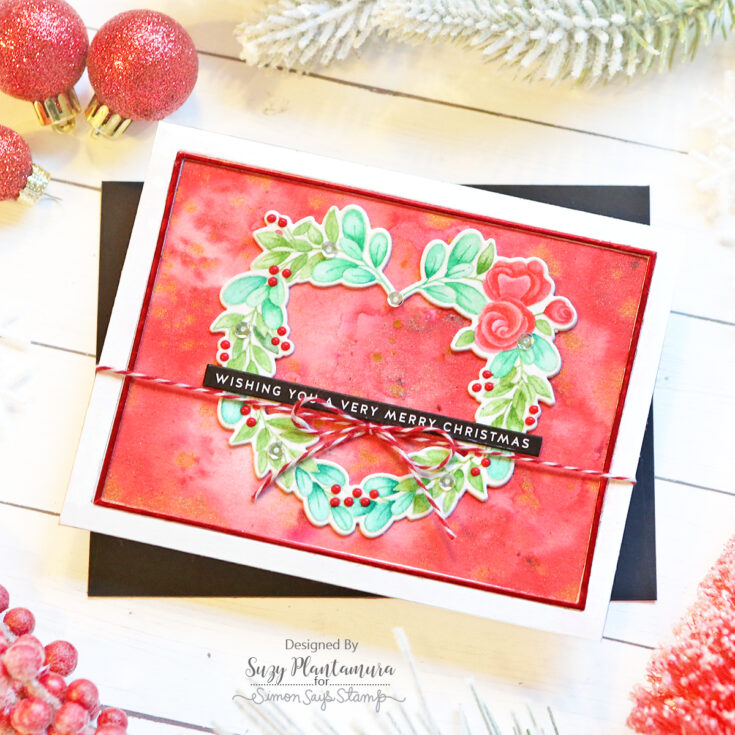
I stamped the heart floral stamp with MFT Natural Ink and then painted it with watercolors. I die-cut it out and placed that in the center of the front of the card. I added some Nuvo drops in Glossy Red over the berries. I tied a piece of red/white twine around the center of the card/wreath. I then die-cut a sentiment strip from the Reverse Holiday set with the Sentiment Label dies and attached that above the twine. Last I added some 4mm sparkling clear sequins around the wreath.
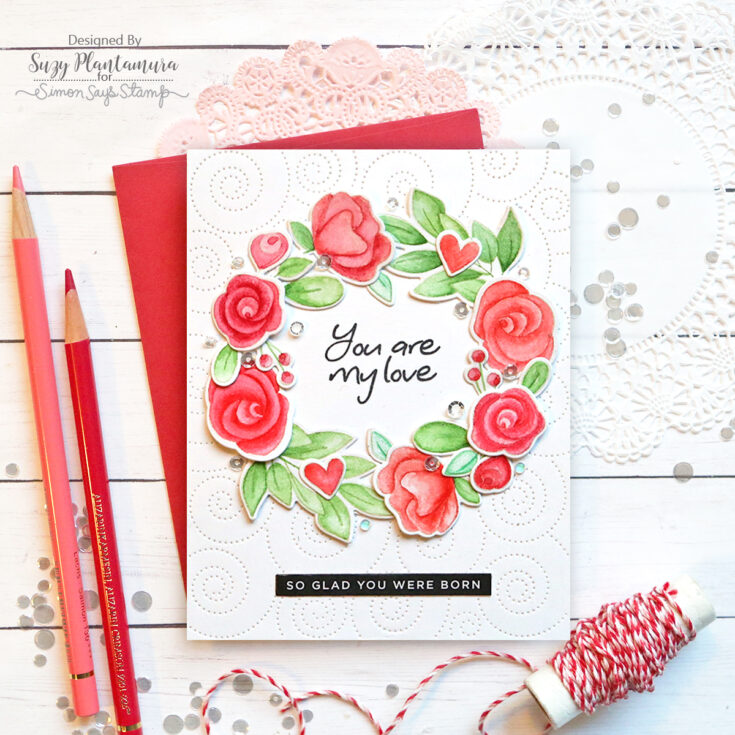
I made the background of this card with the new gorgeous Detail Swirls Plate out of white cardstock. I die-cut a white circle out of white cardstock as well and attached that to the center of the plate design. I then stamped all of the floral images with MFT Natural Ink on Ranger Watercolor Paper. I painted them in with Karin Brush markers. I die-cut all the flowers, leaves, and hearts and arranged them over the circle into a wreath design.
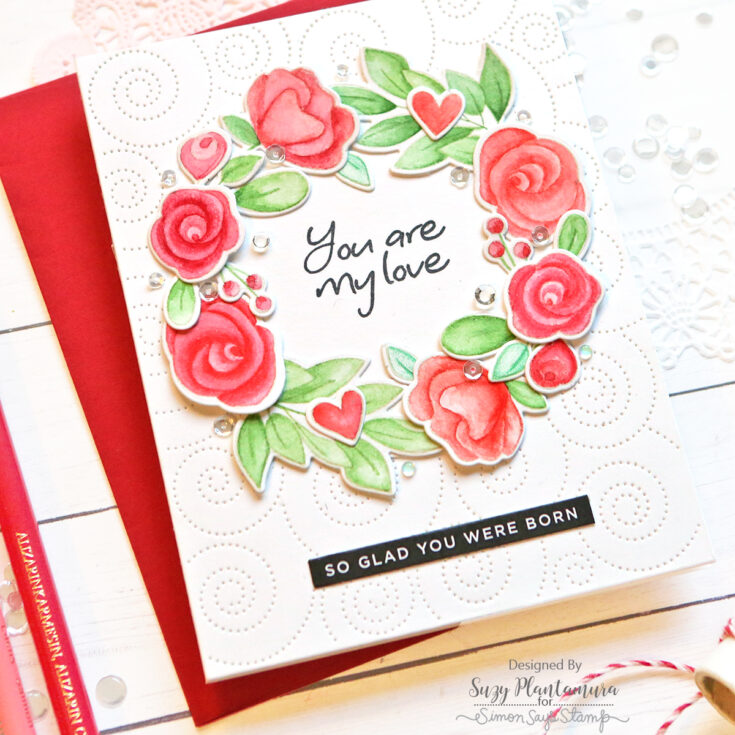
I stamped a sentiment from the stamp set in the center of the floral wreath with Intense Black Ink. I then added a pre-printed sentiment strip die-cut with the Sentiment Label dies to the bottom of the card. I also added some sparkling clear sequins around the wreath.
That’s it for today and 2020 is officially over friends! I ended up using watercolors on almost all these cards as it is so fun to paint flowers and gives them a soft beautiful look. I hope I have inspired you to use this stamp set if you have it or any other floral stamp set you have to try to make a holiday card out of them, stretch them out on a slimline card, and try to form a wreath from them. Happy New Year friends and thank you so much for visiting the SSS blog today! Xoxo suzy
SUPPLIES:
|


Thanks so much for stopping by, and thanks to Suzy for being our guest! We’ll see you in 2021! :)


