Amore Laurafadora: Slimline Scene Builder

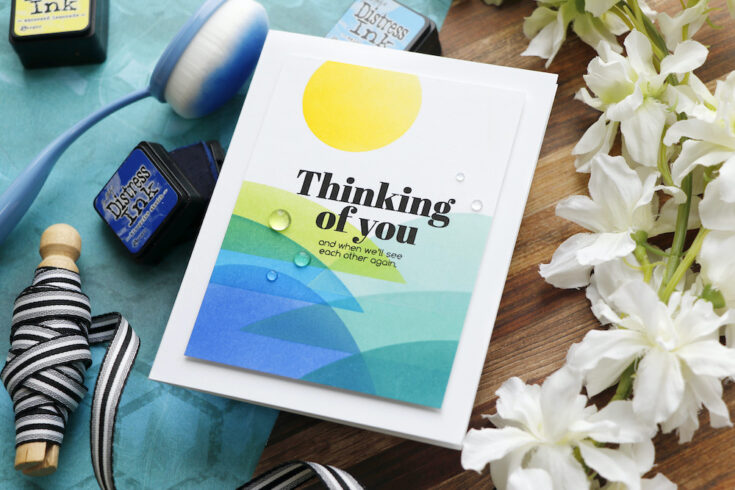
Hi friends!! TGIF! Welcome to the latest edition of Amore Laurafadora, our bi-monthly blog series with Laura Bassen! Today she’s spotlighting our new Slimline Scene Builder stencil coupled with our Greetings Mix 2 stamp set for a great sentiment to send a card now! Be sure to watch the video for more info! Enjoy!

WATCH THE VIDEO:
SUPPLIES:
|


Thanks so much for stopping by, and thanks to Laura for being our guest!
Yippee for Yana: Pun Intended Greeting Cards
Hi friends! Happy Thursday! Welcome to the first edition of Yippee for Yana for 2021! Keep scrolling and be sure to watch the video to see how Yana made 5 gorgeous clean and simple cards! Enjoy!

Hi everyone, this is Yana Smakula, welcome back for another Yippee For Yana video! The cards I have for you today are all extremely simple to make, and each offers some sort of wordplay. These are fun and quirky to give to your loved one, your partner, or even your close friend.
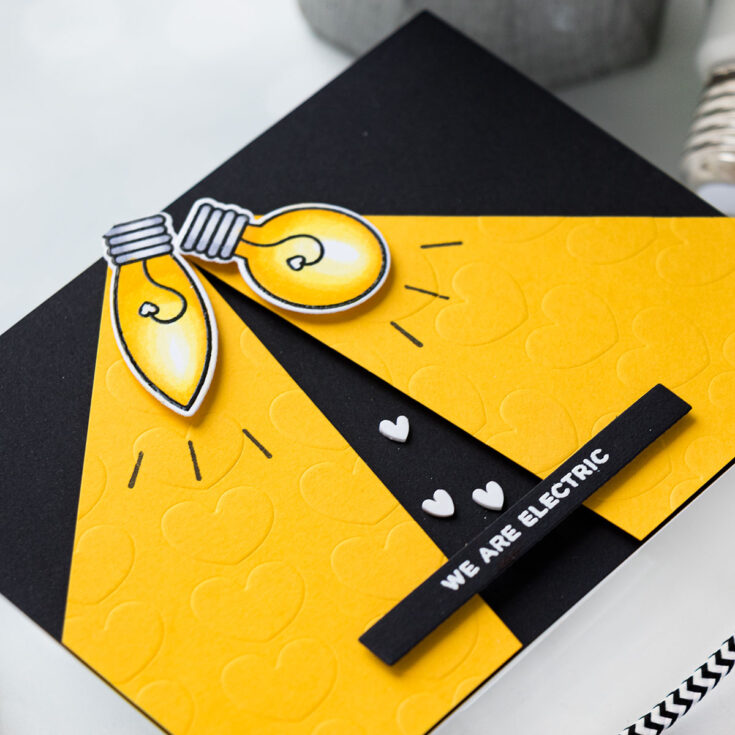
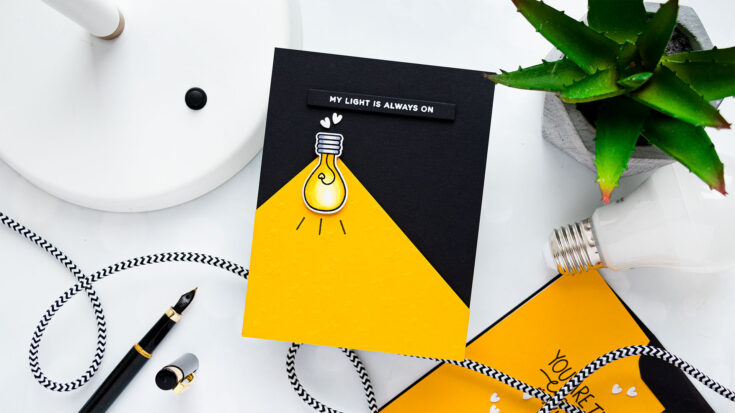
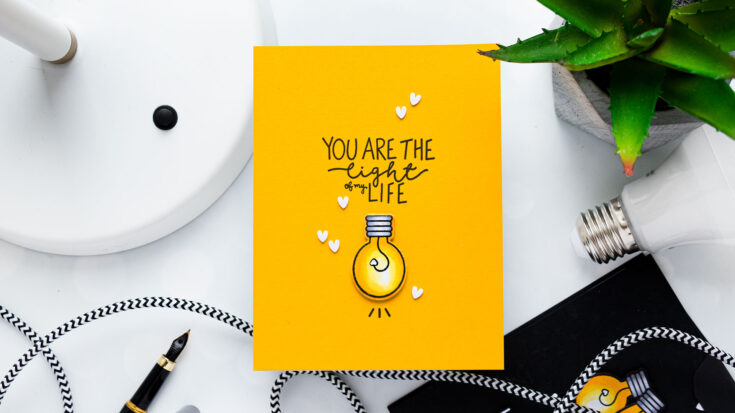
The star of the show for today’s projects is this awesome Light Me Up stamp set from Cathy Zielske for Simon Says Stamp. This stamp set has loads of wordplay sentiments, such as – You Light Me Up, You Are the Light of My Life, Love You Watts and Watts, My Light is Always On, We Are Electric, and more! It also has several images of light bulbs in different shapes. There are additional other images in this set, but we will just be using the light bulbs for the cards I have in mind today.
This stamp set has coordinating dies available, they are sold separately, and I encourage you to pick up the dies as well – they not only cut the images but also the sentiments from this set. Of course, if you have a similar set in your stash – do take it out and play! I urge you to join me and create several punny greeting cards.
In addition to this stamp set, we will also need black cardstock, to symbolize darkness, yellow cardstock to symbolize light, some Copic marker friendly ink, to do our stamping, and a handful of Copic markers to color the light bulbs for our cards.
These cards can’t get any simpler. Begin by stamping the images of the light bulbs on white cardstock in Memento Tuxedo Black ink and do simple coloring.
I used several gray and several yellow markers. I used C5, C3, and C1 gray markers, these are cool grays and they work really well for coloring nonliving things gray. Like this metal part of the light but. Next, color the light bulbs yellow. For this, I used 4 markers – Y11, Y13, Y15, and Y35.
Use your coordinating dies and cut the light bulbs out. With the main element ready, we can build the other elements for our cards. Use black and yellow cardstock, white heat emboss sentiments, and white plastic hearts to pull these cards together.
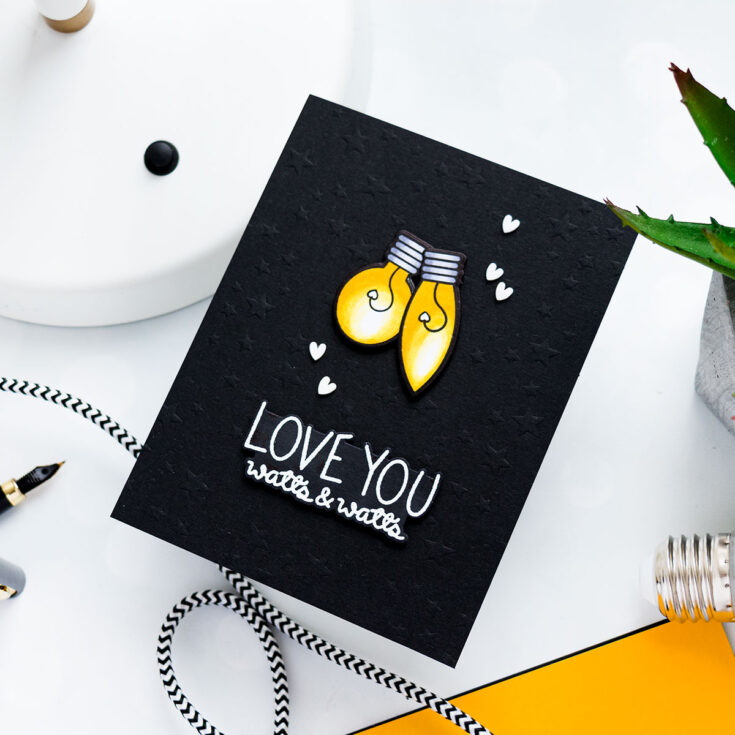
Love You Watts & Watts card:
- Dry emboss 4 ¼ x 5 ½ black cardstock panel using Scattered Stars stencil. Adhere panel to A2 white card base.
- Color the white border around the lightbulbs black using a black marker. Foam mount onto the card.
- White heat emboss “Love You Watts & Watts” sentiment. Cut out with coordinating die. Foam mount to the card.
- Embellish card with white plastic hearts.
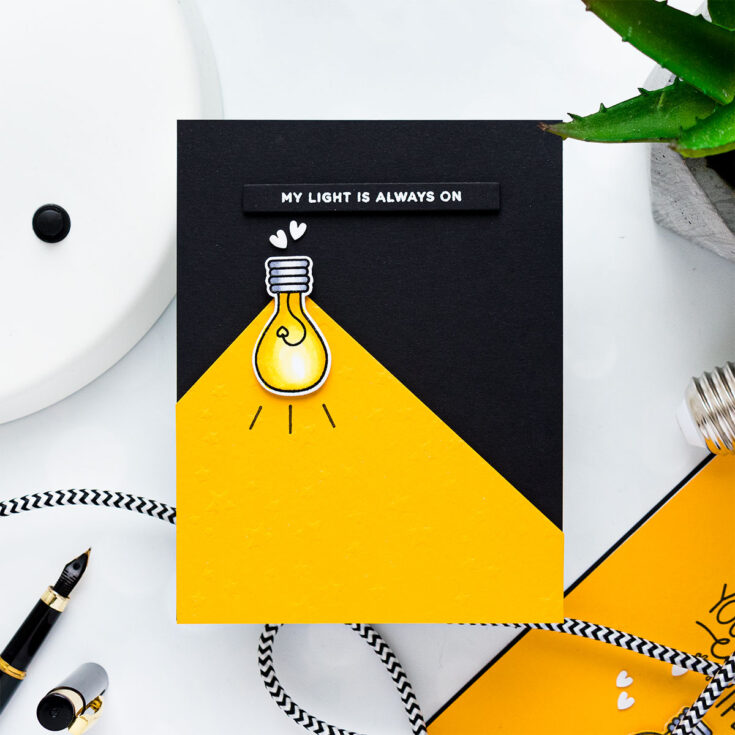
My Light is Always On Card
- Cut black cardstock panel to 4 ¼ x 5 ½”. Adhere to A2 white card base.
- Cut yellow cardstock at an angle. Dry emboss using Scattered Stars stencil. Foam mount onto the card.
- Foam mount light bulb. Stamp black lines under the light bulb.
- White heat emboss “My Light is Always On” sentiment. Cut out using a strip die. Foam mount to the card.
- Embellish card with white plastic hearts.
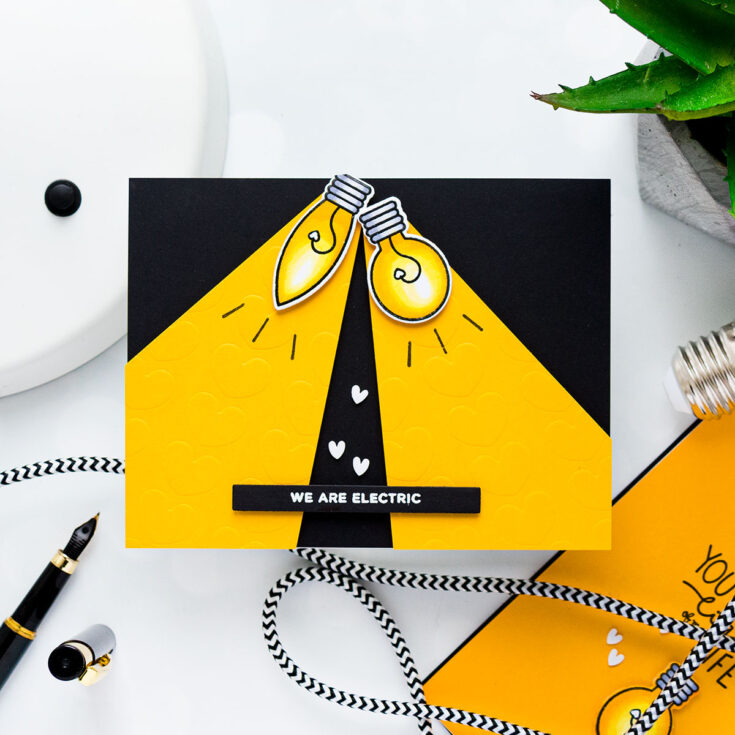
We Are Electric Card
- Cut black cardstock panel to 4 ¼ x 5 ½”. Adhere to A2 white card base.
- Cut 2 yellow cardstock panels at an angle. Dry emboss using Layering Hearts stencil. Foam mount onto the card.
- Foam mount light bulbs. Stamp black lines under the light bulbs.
- White heat emboss “We Are Electric” sentiment. Cut out using a strip die. Foam mount to the card.
- Embellish card with white plastic hearts.
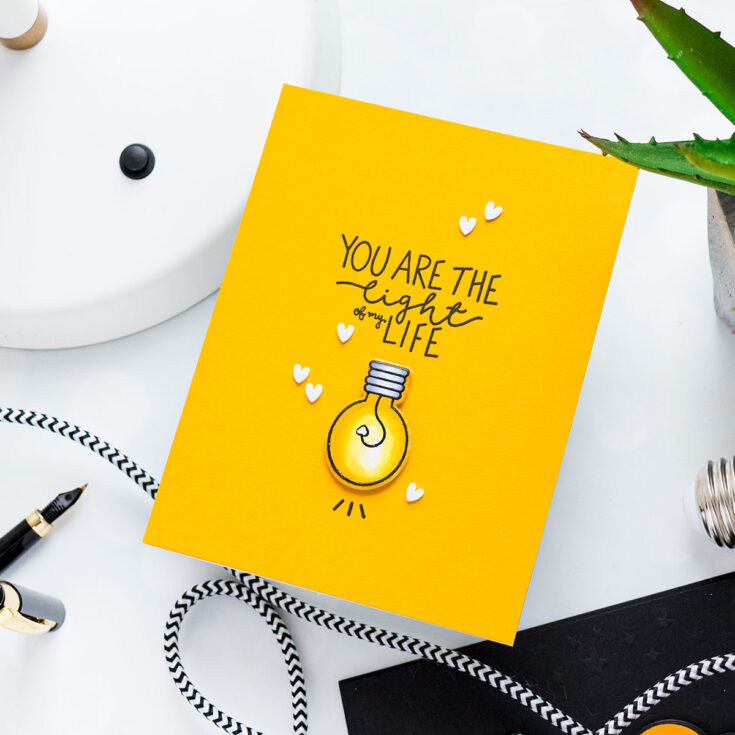
You Are The Light of my Life Card
- Stamp sentiment, lightbulb, and lines in VersaFine Onyx Black ink onto yellow panel cut to 4 ¼ x 5 ½”. Adhere panel to A2 white card base.
- Foam mount light bulb onto the card.
- Embellish card with white plastic hearts.
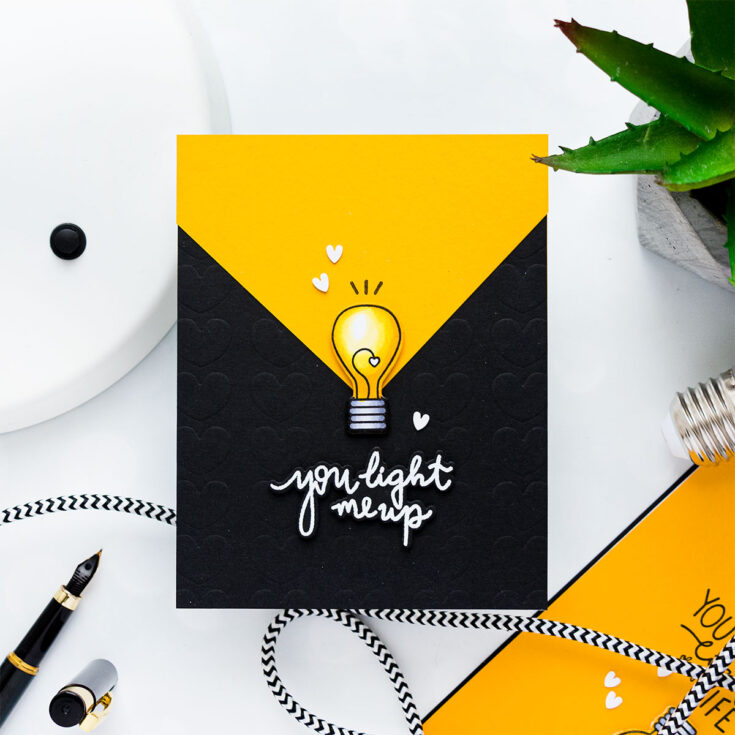
You Light Me Up Card
- Cut black cardstock panel to 4 ¼ x 5 ½”. Dry emboss using Layering Hearts stencil. Adhere to A2 white card base.
- Cut yellow cardstock panel at an angle. Adhere to the card.
- Foam mount light bulb. Color white border using yellow and black marker to match the background. Stamp black lines above the light bulb.
- White heat emboss “You Light Me Up” sentiment. Cut out using a strip die. Foam mount to the card.
- Embellish card with white plastic hearts.
Have fun stamping!
WATCH THE VIDEO:
SUPPLIES:
|


Thanks so much for stopping by, and thanks to Yana for being our guest!
You da BEST! Watercoloring with Karin Brushmarker Pro Markers: reprise!
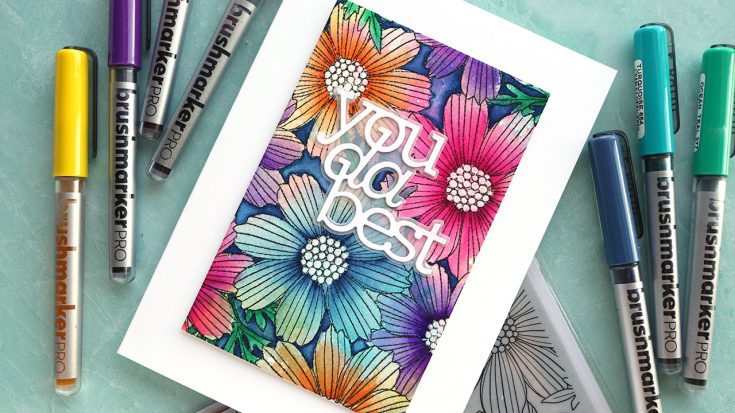
Hello, all! Kristina Werner here. Have you tried these amazing markers yet? Brushmarker PRO markers from Karin are dye-based liquid ink markers and work beautifully for watercolor! Today I’m sharing with you a card made using various colors of markers and the new Cosmos Bloom Background stamp.

I used two techniques for watercoloring with the Karin Markers. First, I scribbled three different colors on a slick surface, sprayed the ink with water to liquify it more, and then smooshed the watercolor paper into the ink. The colors mixed and melded and created a beautiful, organic background.
For the second technique, I took the markers and colored directly onto the watercolor paper. Then I spread the ink with a water brush. The ink spread out so easily and seamlessly! Practically effortless.
I finished off the card by cutting the watercolor panel with an A7 Layers die from Waffle Flower, and diecut a greeting from CZ Design’s You Da Best die set.
Thanks for stopping by today! You can check out all of the Karin Markers in the Simon store HERE.
Supplies
|


