Altenew 7th Anniversary Blog Hop Day 1

Welcome everyone to the 7th-anniversary celebration blog hop for Altenew!! If you’ve come from Nathalie DeSousa, you’re in the right place!!!
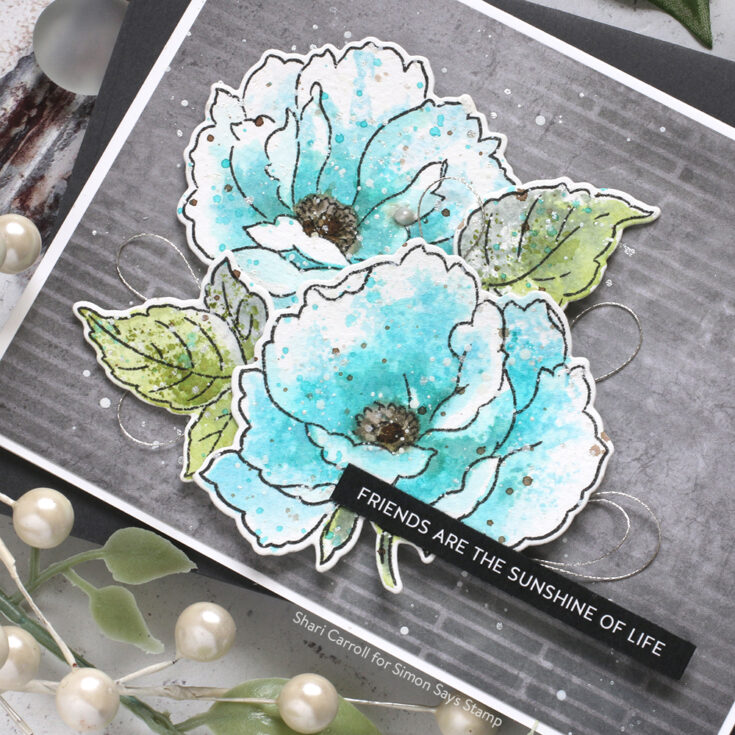
As part of the celebration, I’ve created a fresh card using the Altenew Airbrushed Anemone Flower stamp set, matching dies, and the Narrow Brick stencil.
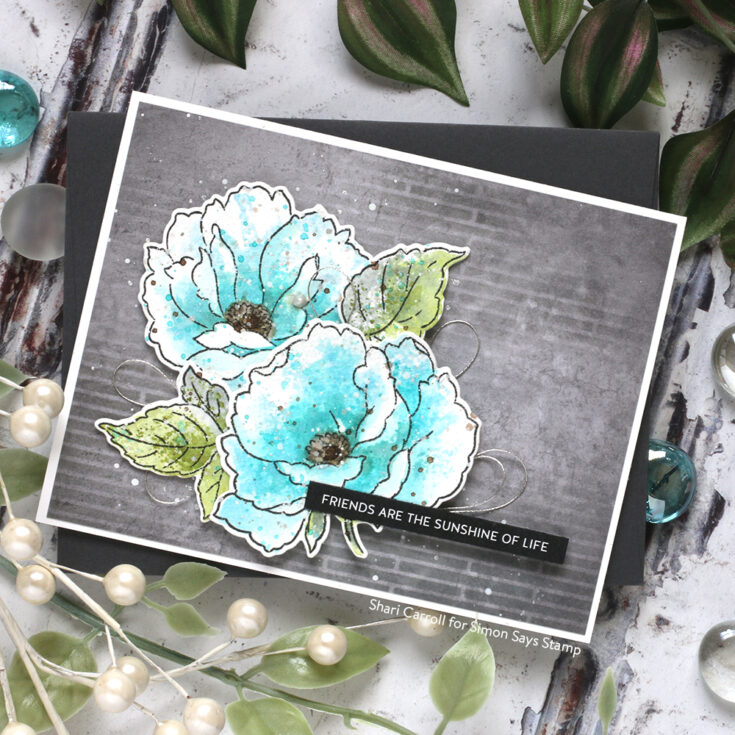
i stamped the outlines of the flower images onto watercolor paper, then started layering the colors with the lightest inks first, adding darker colors on top. The stamp label and backing sheet give you complete instructions for successful layering!
Ready to hop along? Follow the links below.
For more information about a bunch of fantastic giveaways from various sponsors, visit the Altenew blog HERE! Be sure to leave comments by 4/18/2021 for a chance to win! 41 winners will be chosen at random from the comments left on any of the blogs listed above and will be announced on the Altenew Blog on 4/24/2021.
Thanks for stopping by!!! Your next stop on the hop is to the lovely Svitlana Shayevich. Enjoy!!
SUPPLIES:
|


Yippee for Yana: Background Stamping with Thankful Flowers Reprise
Hi friends! Happy Wednesday! We shared this gorgeous card by Yana a little over a year ago and it’s so bright and beautiful, we wanted to share it again in case you missed it! I instantly smiled when I saw this bright & happy card, and hope you will to! Read on and be sure to watch the video for all the details!

Hi everyone, this is Yana Smakula, welcome back for another Yippee For Yana video! It’s been a long time since I did any pattern or background stamping using non background stamps; and since pattern stamping is one of my favorite ways to make backgrounds for my handmade cards I challenged myself to find a floral stamp I like and use it to create a pretty background for card.

I picked the floral cluster from the Thankful Flowers stamp set. I pulled out my MISTI stamping tool, Simon’s Intense Black ink and Neenah Solar White 80 lb cardstock and stamped my heart out. It only took 4 impressions to cover the panel for an A2 card and I made sure to rotate the floral cluster so that my stamping didn’t look identical. I would like to make this card again, but use a gray ink pad instead of black for stamping the flower outline, or perhaps even do some heat embossing in gold or like gold color for a softer look.
Having stamped the background I picked several colors, I settled on a color combo, and from there I picked my Copic markers to do the coloring. I started by coloring the leaves for the panel. I used YG01, YG03, G94 and G99 markers to color the leaves. Next, I used R20, R22 and R22 markers to color some of the flowers red; Y35, Y13 and Y11 markers to color some flowers yellow; RV34, RV11 and RV00 to color some flowers pink; and finally the last flower was colored using violets, BV11, BV00 and BV000.
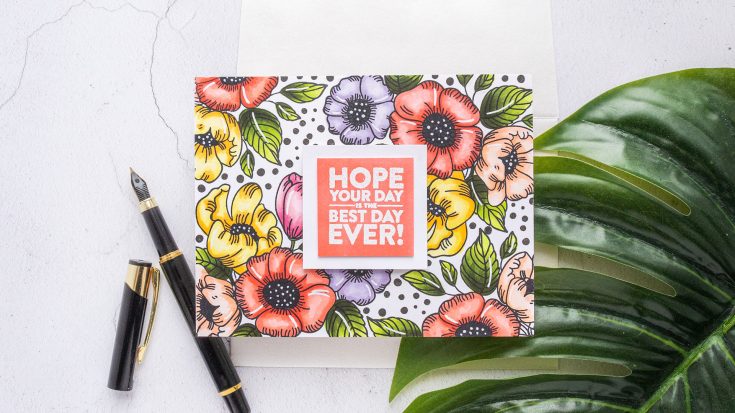
The flower centers were colored using a C9 marker to look almost black. I wish i had picked a lighter color, maybe a C7 marker or a C5, I think that would have looked a bit better.
The stamp set, the Thankful Flowers includes small dot clusters and so I used those dots to fill in the gaps in between the images. I stamped them in black ink and I used Versafine Onyx Black for this.
To create a sentiment I used an R22 marker and colored a piece of white cardstock to create a custom color paper. Next, I waited for the paper to dry and then heat embossed a simple sentiment that reads “Hope Your Day is the Best Day Ever” in white embossing powder; the sentiment comes from the Birthday Word Mix 1 set from Simon Says Stamp.

I cut the sentiment out using my paper trimmer and adhered 3 pieces of scrap cardstock to the back of the panel to create dimension. I wanted to add some dimension, but I didn’t want to use foam adhesive squares as that would have added too much dimension, so I added just a little bit to dimension by adhering 3 panels of cardstock. Then I used foam adhesive to adhere the sentiment panel to the card.
I also used a white pen and added white dot details to the flower center and added highlights to some of the flower petals.
I hope you like this card idea!
Have fun stamping!
SUPPLIES:
|


Thanks so much for stopping by, and thanks to Yana for being our guest!
Center Fade Embossed Backgrounds with Kristina Werner
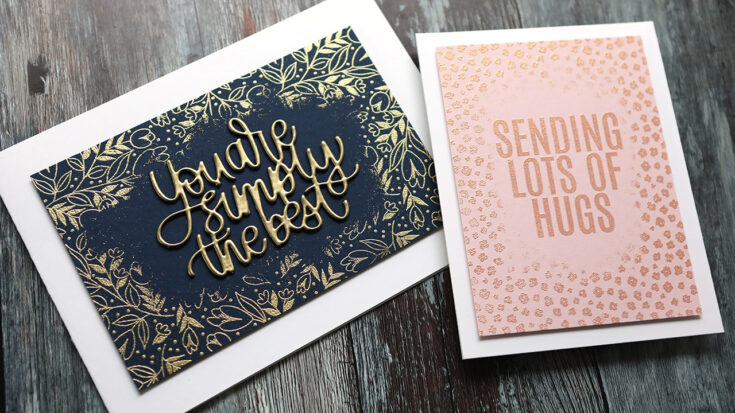
Hello, all! Kristina here with a fun idea for background stamps! In today’s video, I show how to create a center fade embossed background. It’s simple and you don’t need any extra tools to get a great result.
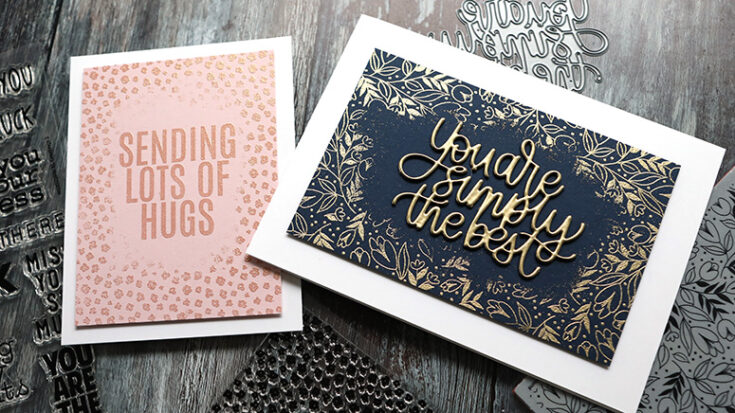
For my first card, I used gold embossing powder on Midnight cardstock from Concord and 9th with the Spring Flowers Background stamp. The greeting was die cut multiple times using the You’re Simple the Best die set for stacking, with the top layer embossed in gold.
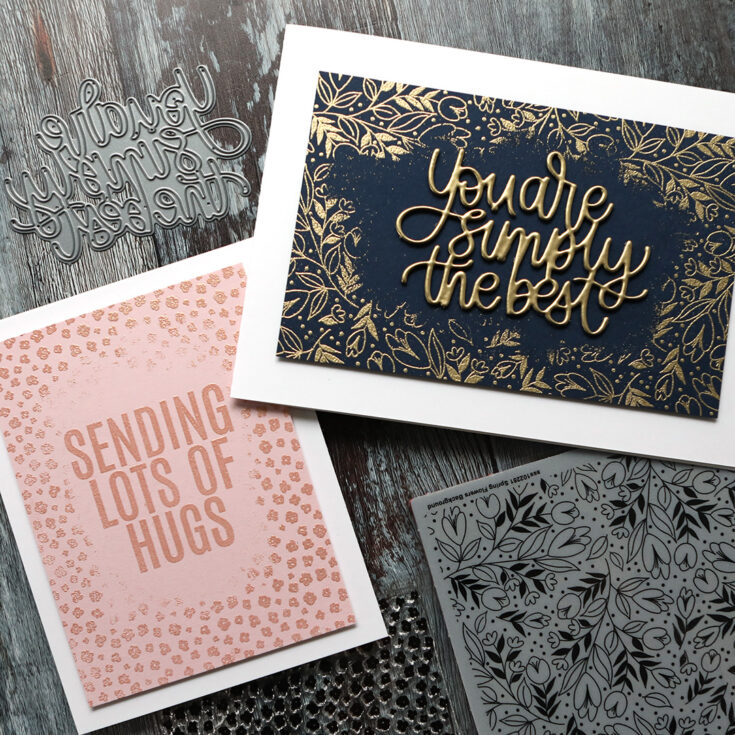
My second card was even more simple since it’s a one-layer card! I used rose gold embossing powder on Ballet Slipper cardstock from Concord & 9th with the Sweet Garden Background stamp. The greeting in the center was stamped and embossed using the XL Greetings 2 stamp set.
Be sure to watch the video below for tips on how to get that center fade! Thanks for stopping by!
Supplies
|


