Making the Cut: Slimline Die Cut Scene Card

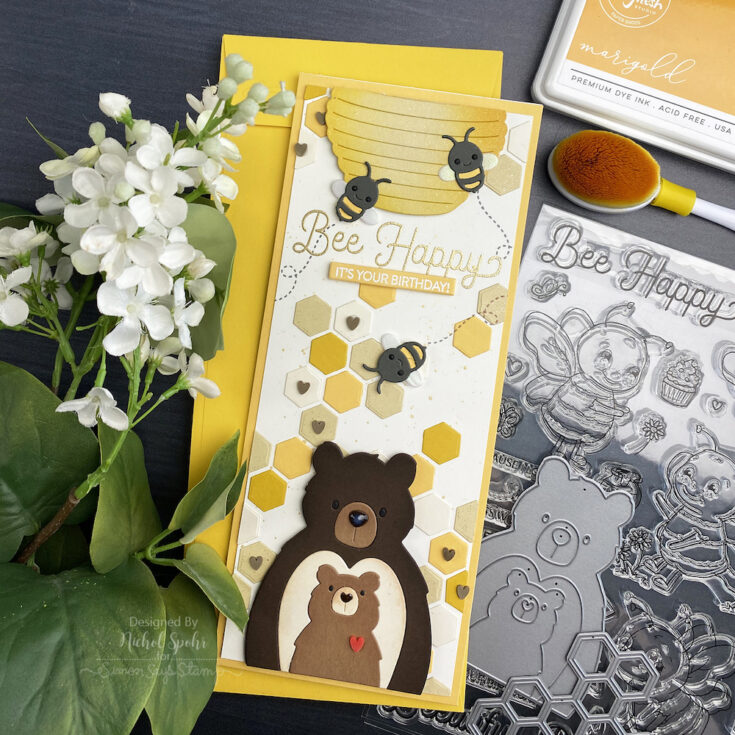
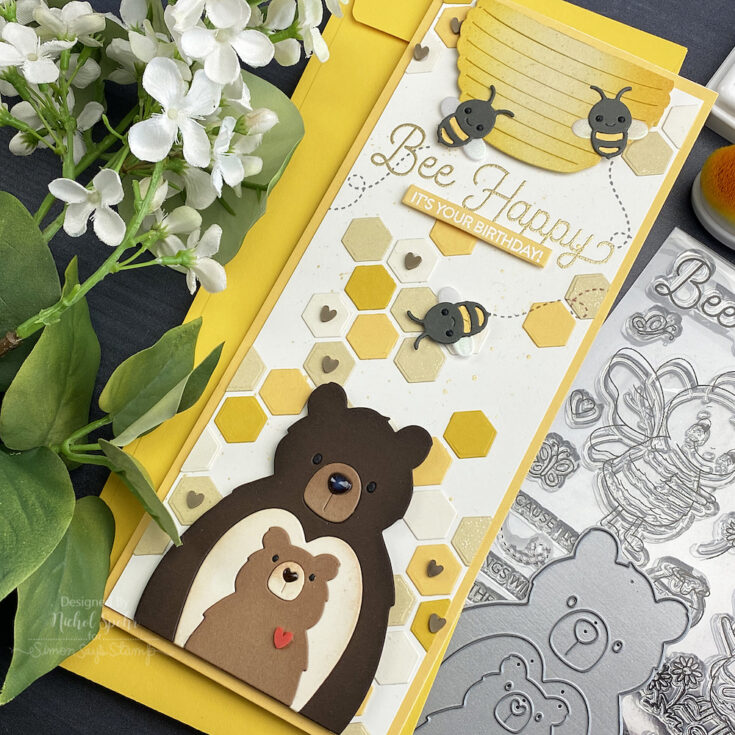
Hi friends! Happy Tuesday! Please join me in welcoming back special guest Nichol Spohr in our Making the Cut monthly blog feature to our blog for a really adorable Honey Bear slimline card showcasing our NEW Bear Hugs die set and Hexagon Element die! See those cutie bees buzzing at the top? They are in the Portrait Meadow Backdrop set from Lawn Fawn! Be sure to watch the video for more information and enjoy!
WATCH THE VIDEO:
SUPPLIES:
|


Thanks so much for stopping by, and thanks to Nichol for being our guest!
Doodling with Debby: Simple Watercolored Scene

Hi friends! Happy Monday! Please join me in welcoming back special guest Debby Hughes for our monthly installment of Doodling with Debby. Read on, and be sure to watch the video for all the details. Enjoy!
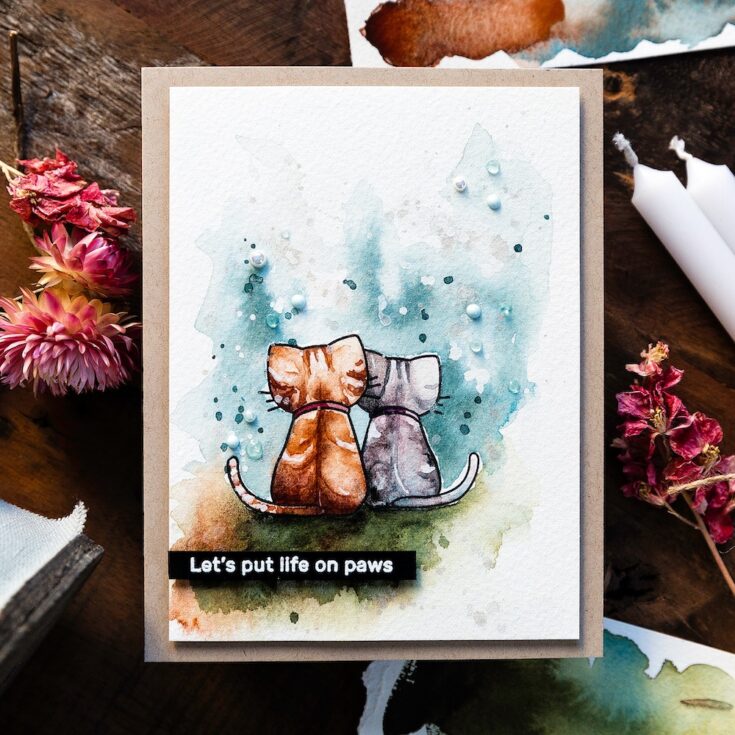
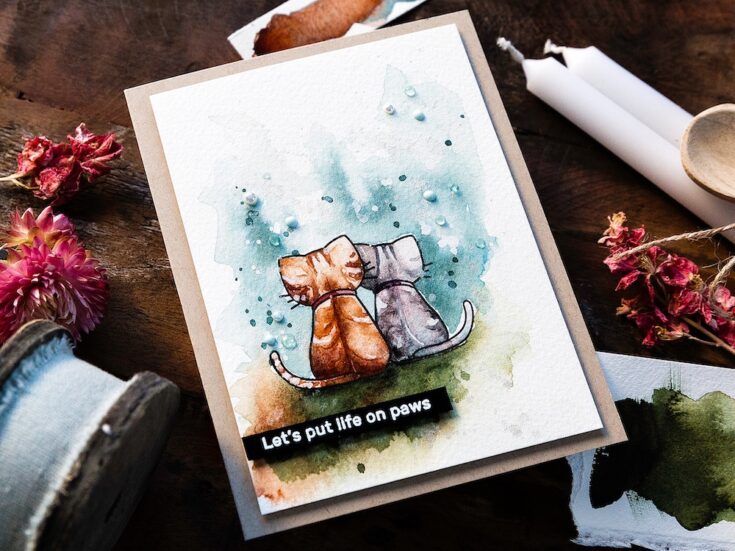
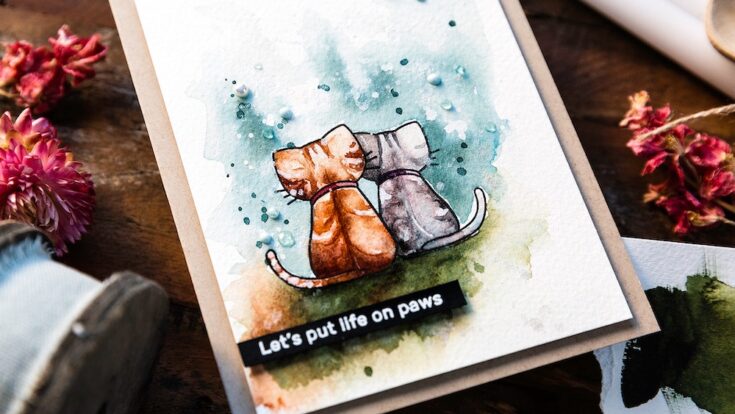
Hello, it’s Debby here. I do love keeping things simple, two kitties stamped together and then watercolored. A little colour around them to set the scene and done. I also love this sentiment which I cut apart from a longer version on the stamp set. I think we all need time to pause or paws as in kitty paws at the moment.
STEP BY STEP HOW TO
- Stamp the larger cat from the Simon Says Stamp Happy Meowther’s Day set in Nocturne ink on masking paper and trim out.
- Stamp the larger cat again but this time on Fabriano watercolour card.
- Cover the image with the mask and then stamp the smaller cat just slightly higher than the larger cat so that it appears as if it is in front.
- Remove the mask and tape the card to a board. Watercolour. I used Daniel Smith paints.
- Splatter with white gouache and perfect pearls solution while the paint is wet for them to disperse slightly in the wet paint.
- Watercolour around the highlights with darker paint to emphasise them.
- When fully dry, splatter again with white gouache, perfect pearls and left-over paint.
- Cut apart a greeting from the Meowther’s Day set and stamp on the Black card, treated with anti-static powder, with clear embossing ink and white heat emboss.
- Trim the sentiment to a skinny strip and also trim the watercolored panel to be just smaller than an A2 card base.
- Cut and score an A2 card base from Neenah Desert Storm card in the 100lb weight for sturdiness.
- Add the watercolored panel with foam tape and also the sentiment strip.
- Accent with Sea Breeze and Duck Egg Blue Nuvo droplets along with Eggshell Pearls.
Well, that’s me for this month. I hope you enjoyed this tutorial; you’ll find the video below. Thanks for joining me and I hope to see you next time for Doodling With Debby.
WATCH THE VIDEO:
SUPPLIES:
|


Thanks so much for stopping by, and thanks to Debby for being our guest!
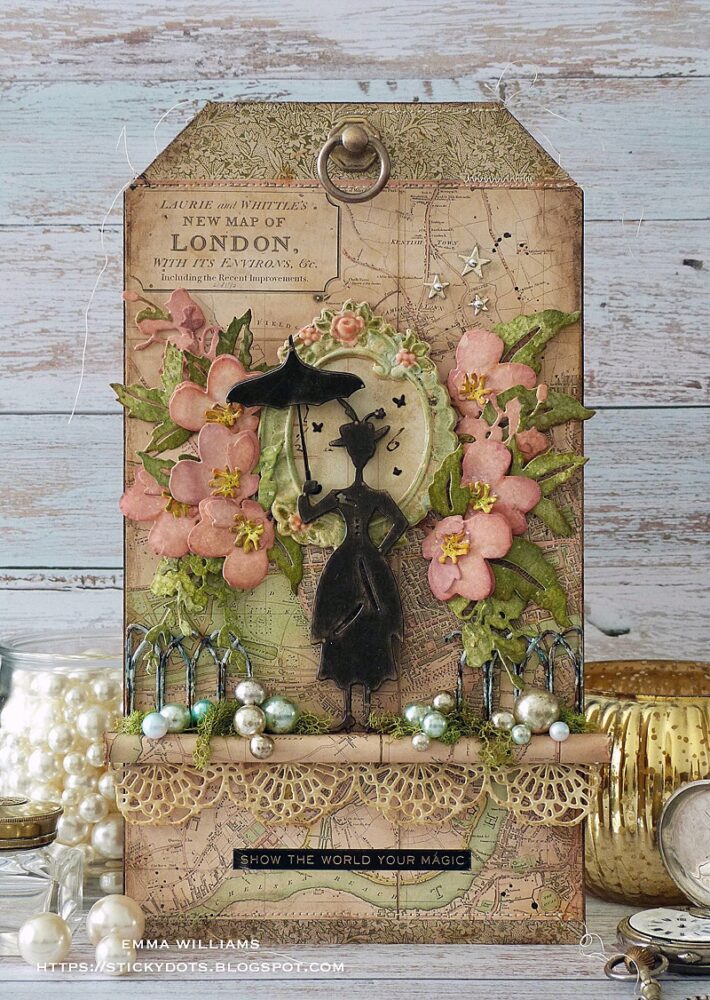
Show The World Your Magic Etcetera Tag
Hi friends! Happy Sunday! Please join me in welcoming back the magnificent Emma Williams as a special guest on our blog! We’re always inspired, and hope you are too! Read on for more information, and enjoy!
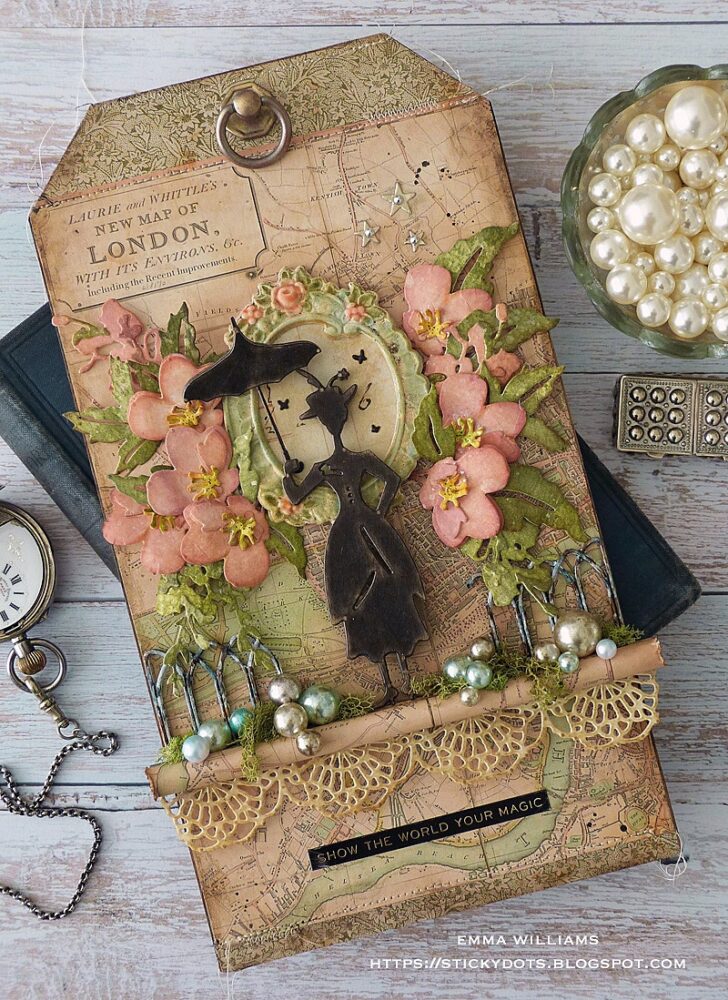
Hello everyone! I’m thrilled to be back on the Simon Says Stamp blog, and so excited to be sharing my latest project with you all! With Spring finally arriving and all the beautiful cherry blossom that has suddenly burst open on the trees in my garden, I decided to combine this wonderful time of year with a few of my favorite Tim Holtz dies from the Sizzix Chapter 1 release to create a home decor etcetera tag, inspired by my home town of London and a magical character.
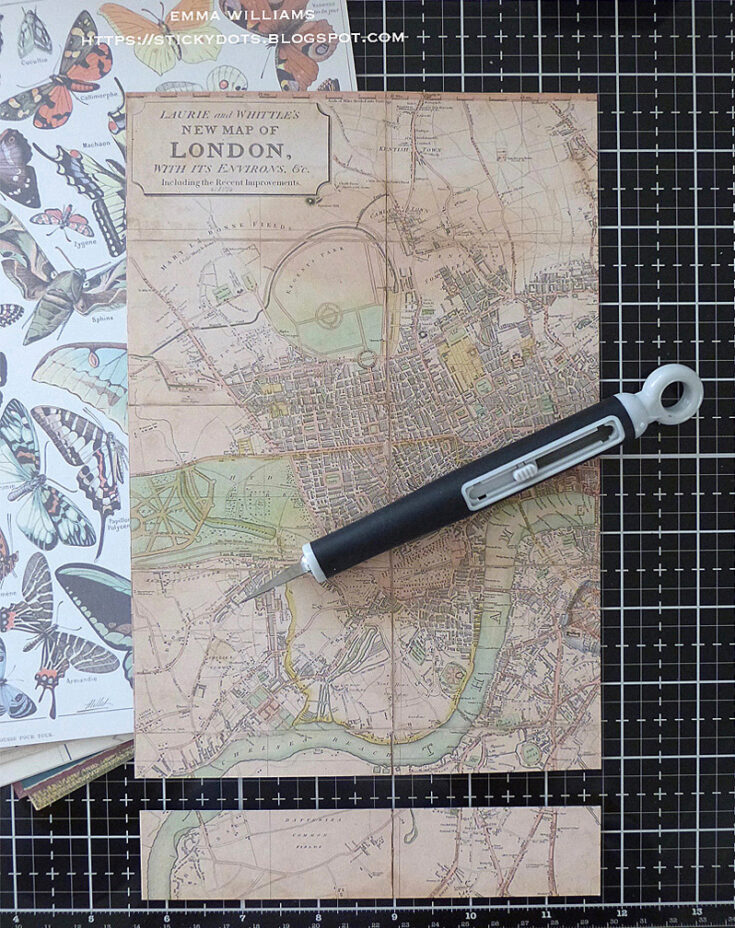
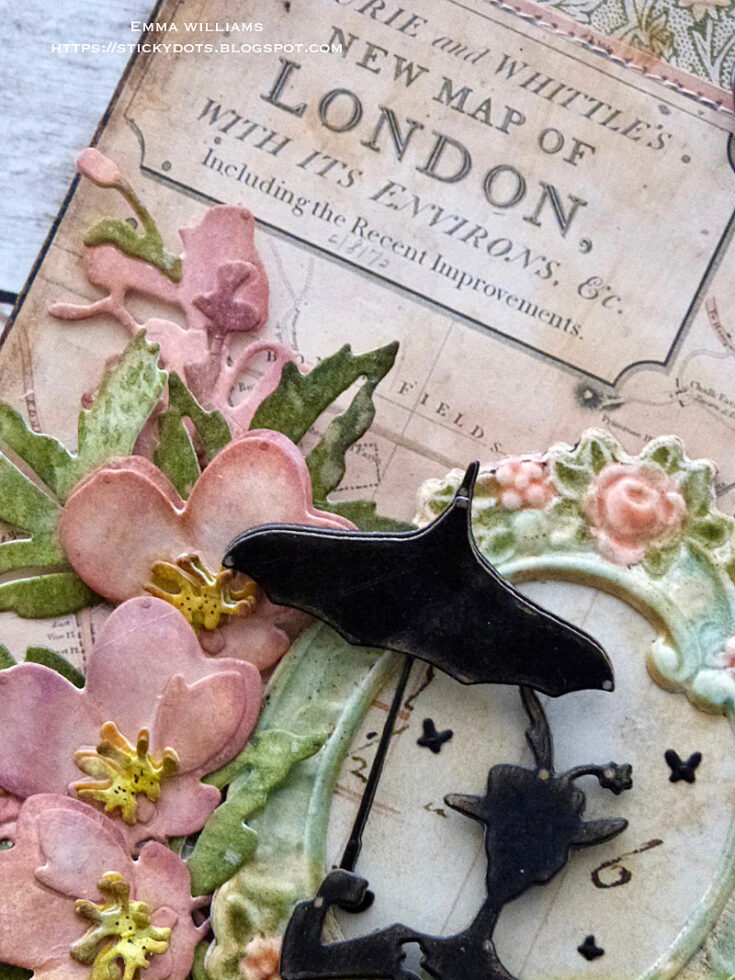
So, let’s get begin and I started by covering my Etcetera Tag with papers from the Backdrops Volume 1 set and cut the London Map design paper to measure 22.5 x 14cm, cutting away the bottom section of the paper and the right hand side.
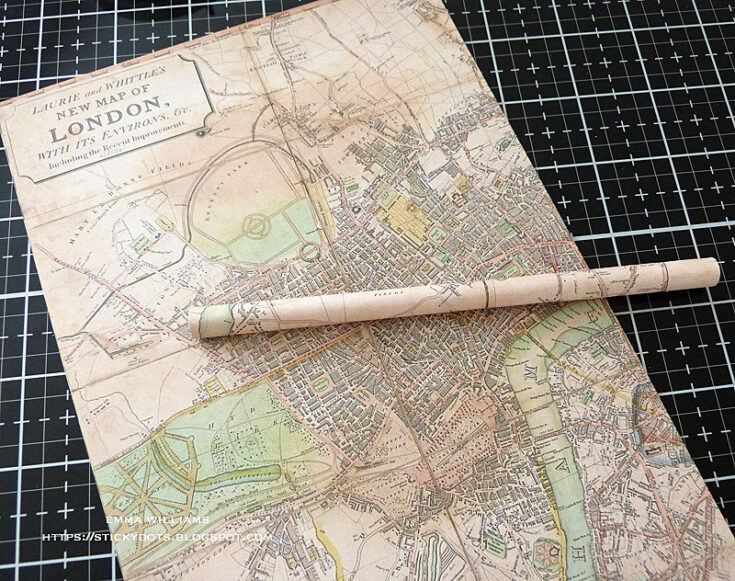
Taking the off cut strip, I rolled the strip of paper around a pencil, securing the edge with a line of red liner tape. This will form the ledge across the tag.

The London map will fit the central section of the tag but to create a panel that will fit the length of the tag, I cut two strips of the green floral paper from the Backdrop Volume 2 paper set and stitched these strips to the top and bottom of the map.
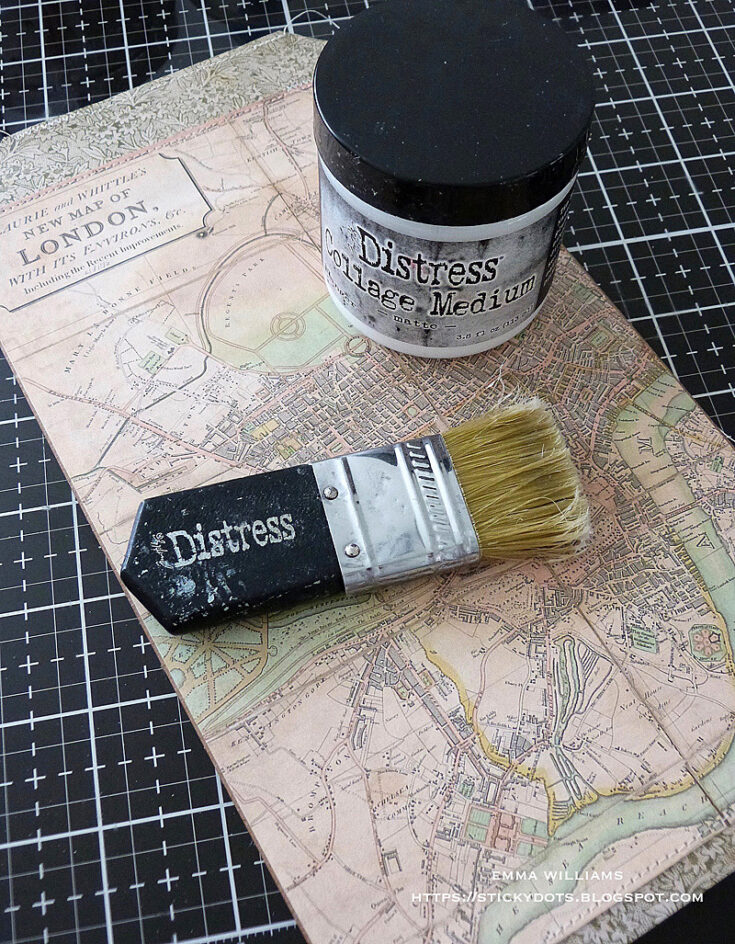
After adhering the stitched paper to my tag using Matte Collage Medium, I applied a coat of the medium over the top to seal the paper.
Once the medium is dry, I used Walnut Stain Distress Crayons around the edge, blending out the color to create a vintage look to the paper and added a few splatters of Black Soot Distress Paint.
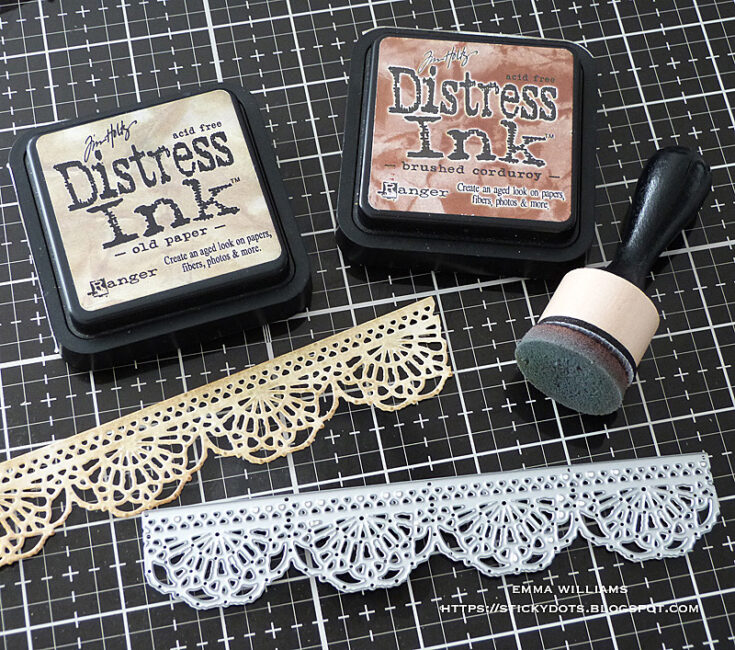
Take one of the dies from the Sizzix Crochet Die Set by Tim Holtz to die cut a strip of Mixed Media Heavystock card, and ink the die cut with Old Paper and Brushed Corduroy Distress Inks.
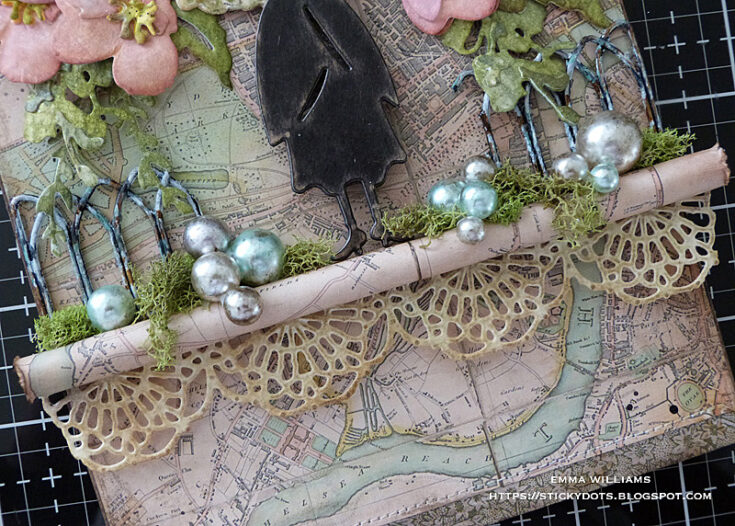
After attaching the roll along the top of the crochet strip, I placed foam pads on the back, ensuring they won’t show through the crochet strip and attached this across my covered tag.

Using an idea-ology Metal Gate, very carefully, bend the metal so that it will break in half. Taking the two sections, I painted them with Picket Fence Distress Paint before attaching them to my tag, placing them to sit on the paper roll ledge.
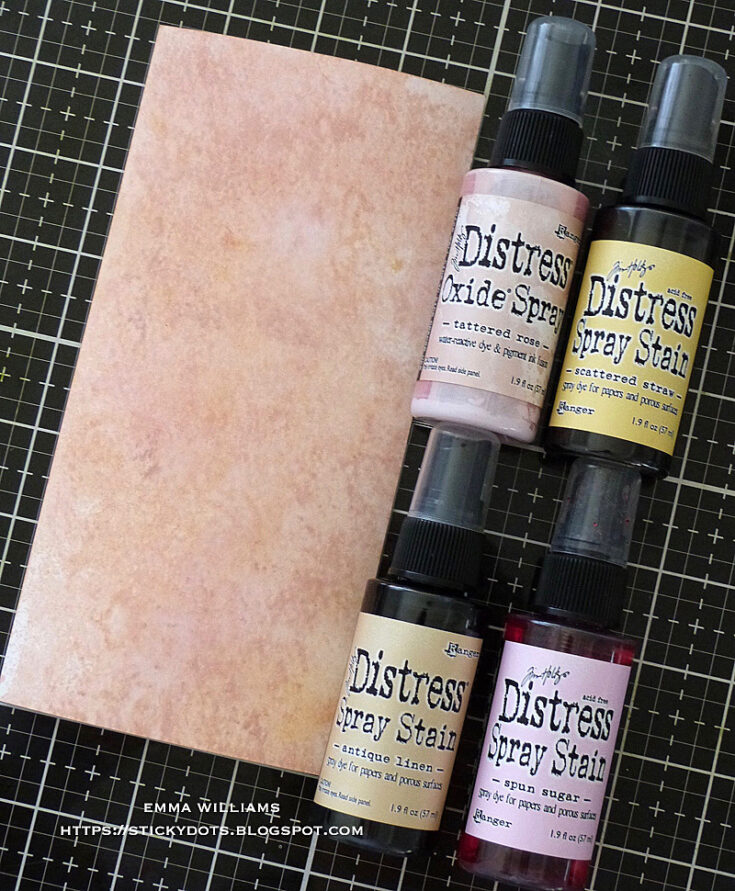
Setting the tag to one side, I moved onto creating my cherry blossom. For the flowers I used the smallest flower and the sprig from the Brushstroke Flowers 2 Thinlits die set. I colored some Distress Watercolor Card with Scattered Straw, Spun Sugar and Antique Linen Distress Spray Stains, together with Tattered Rose Oxide Spray and after spritzing the card with a mist of water, I applied each spray to obtain the color I wanted for my blossom.
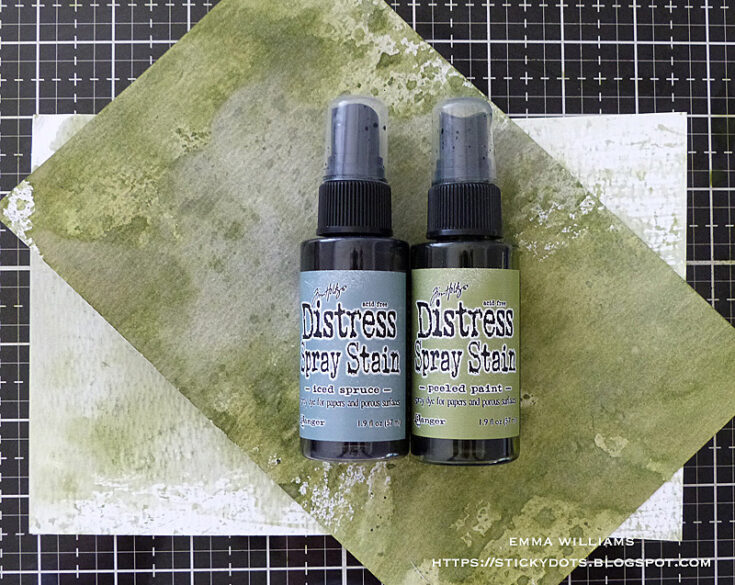
For the leaves, I colored another panel of card using Peeled Paint and Iced Spruce Distress Spray Stains and for the centers, I used Mustard Seed Spray Stain to color the card.
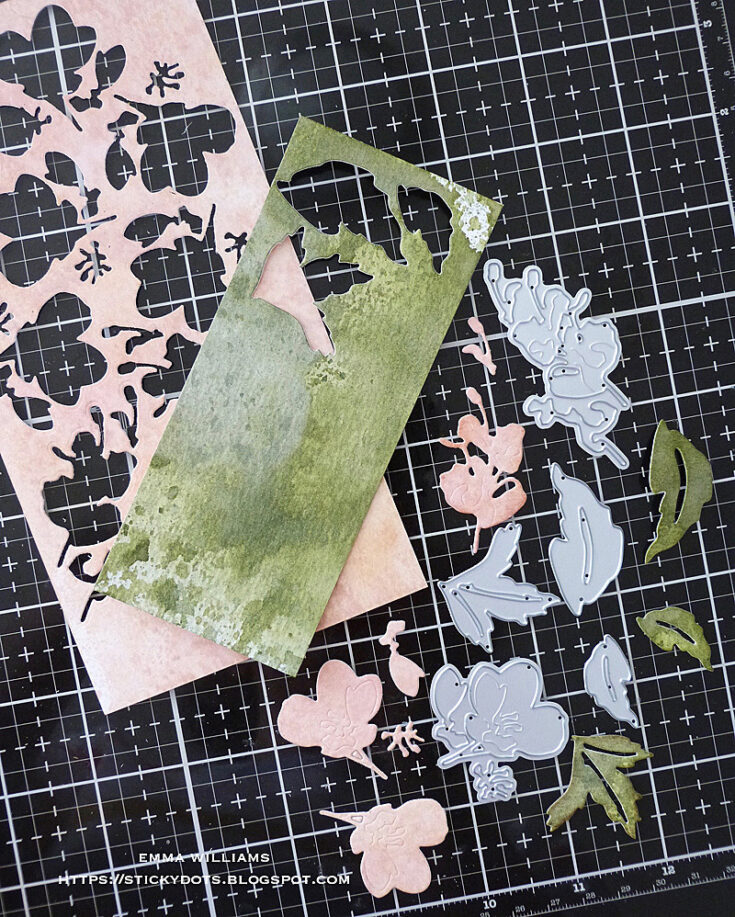
Once all the panels of card are dry, at this stage, I would recommend that you apply adhesive sheets to the back of your inked cardstock before die cutting as this will be your friend when piecing the flowers together.
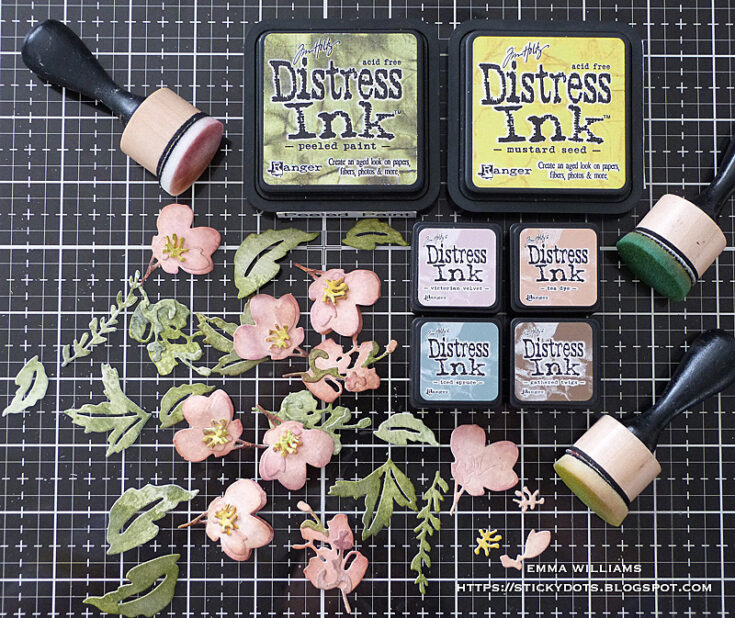
After die cutting a selection of the flowers, 9 in total and a selection of leaves, I inked the edges of my die cut pieces to add a little more shading and for this I used Distress Inks in a selection of colors. Peeled Paint, Mustard Seed, Victorian Velvet, Tea Dye, Gathered Twigs and Iced Spruce. I then layered all the pieces together to form the foliage and the blooms.
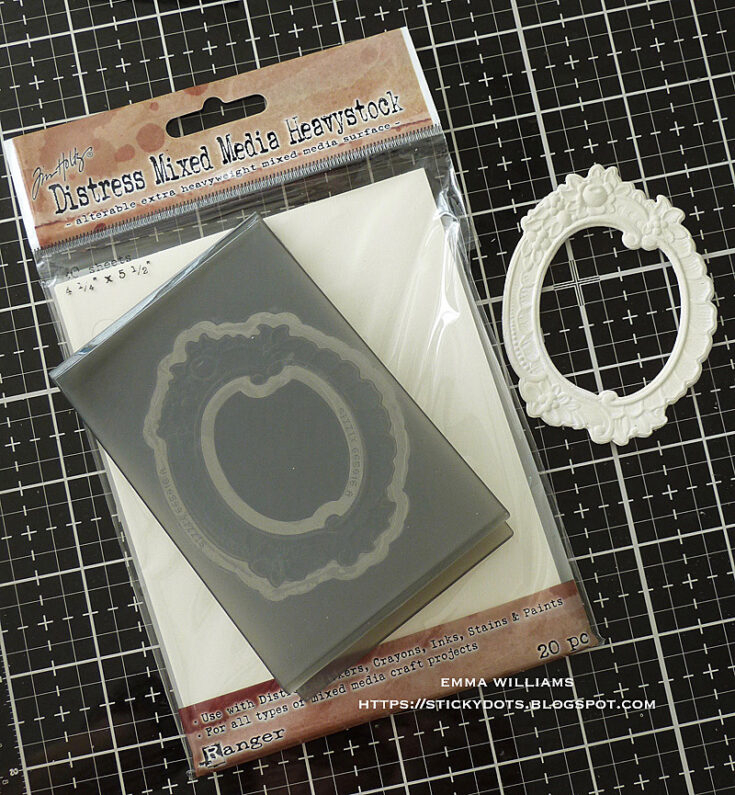
Moving onto the frame, I used the Floral Frame 3D Impresslits Cut and Emboss Folder to die cut Distress Mixed Media Heavystock card. Because I want the frame to be quite thick and substantial, I cut three separate frames and then stuck them together to form one frame.
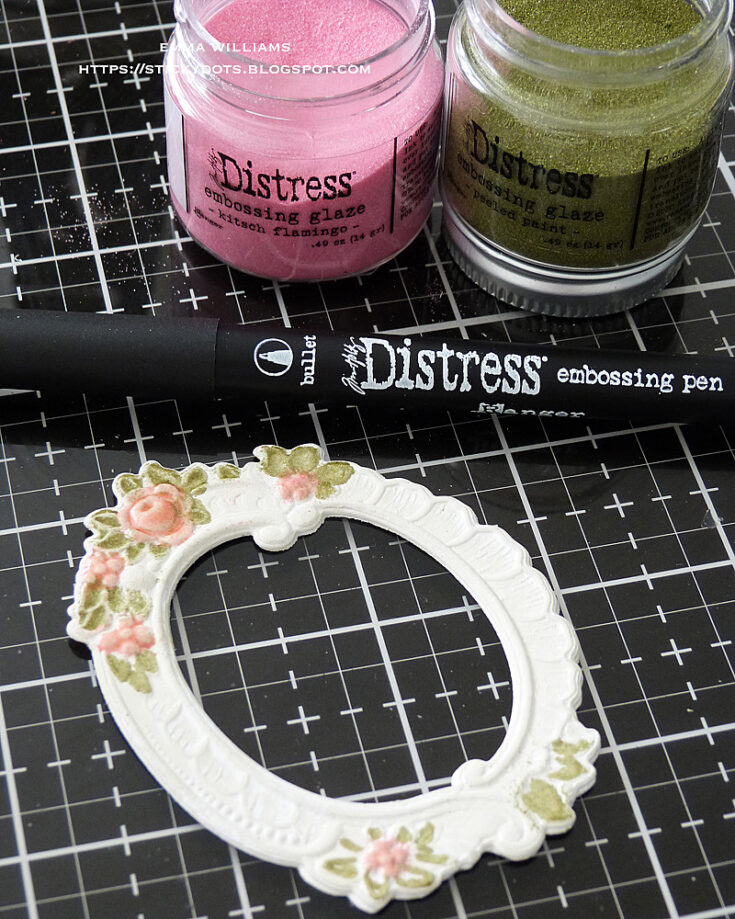
To add color to the frame and create a beautiful enameled effect, I used Distress Embossing Glazes, Kitsch Flamingo and Peeled Paint. Using the bullet tipped Embossing Pen, I applied the ink to each of the individual detailed areas of the frame, starting with the flowers first. I then sprinkled the pink glaze over the top before heat embossing the powder to become molten before repeating the process and adding the pen to the leaves, and sprinkling Peeled Paint over the top.
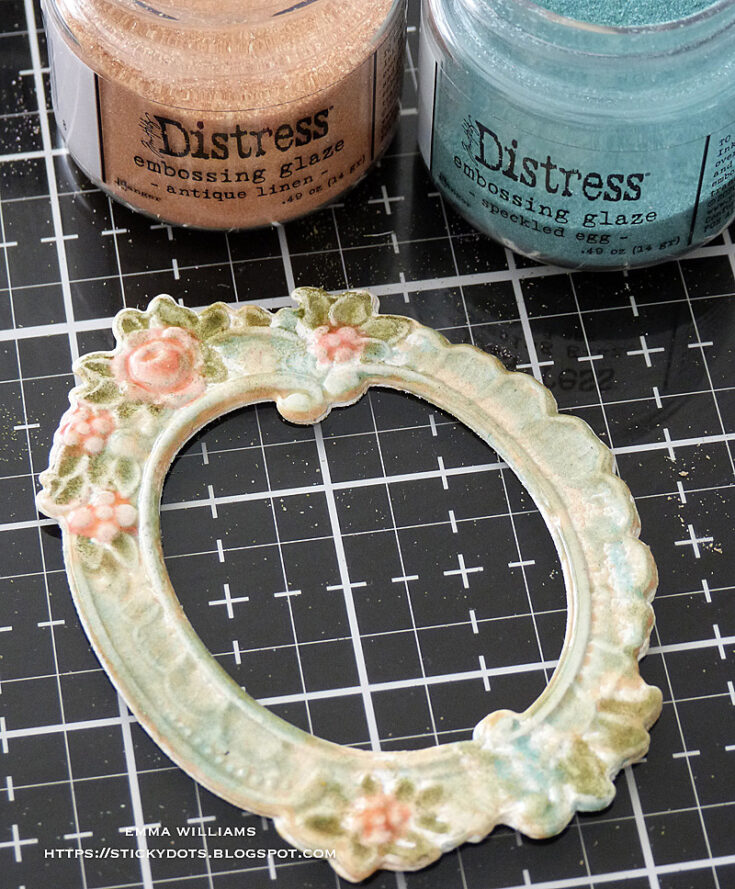
To complete the main body of the frame, I used the Brush Pen and applied this over the remaining part, that hasn’t been embossed and then sprinkled Speckled Egg Embossing Glaze over the top. After heat embossing the glaze, I once again used the brush point embossing pen and just added this randomly onto the frame, over the top of the Sprinkled Egg glaze. I then sprinkled Antique Linen Glaze over the embossing ink, tapped away the excess and heat embossed.
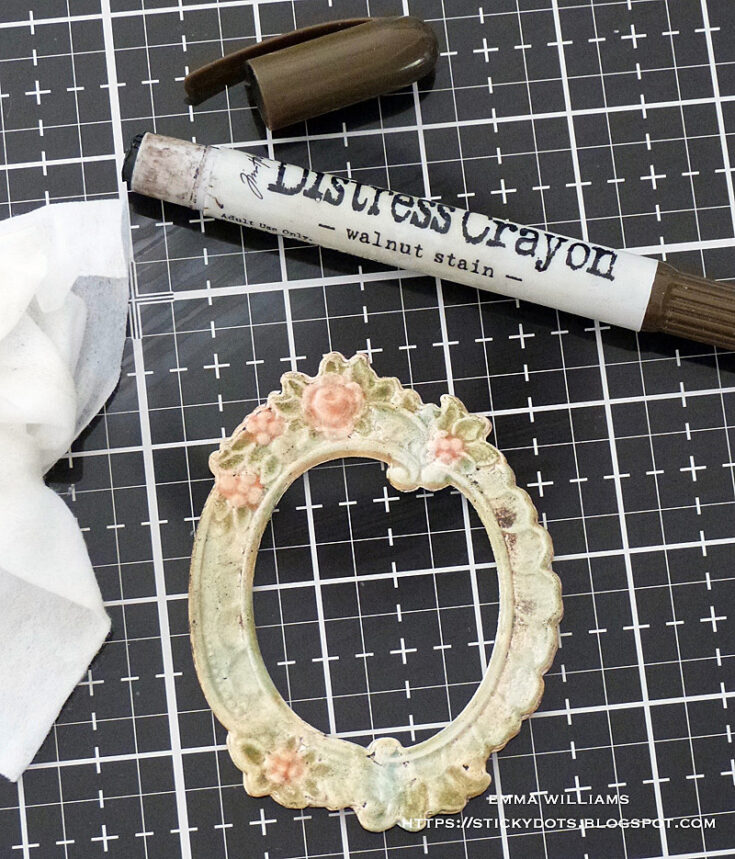
To add a vintage feel, I then applied Walnut Stain Distress Crayon over the top of the glazed frame. Blend the color into the frame and using a semi dry baby wipe, gently wipe away any excess crayon, leaving the Walnut Stain color to accentuate the recessed areas.
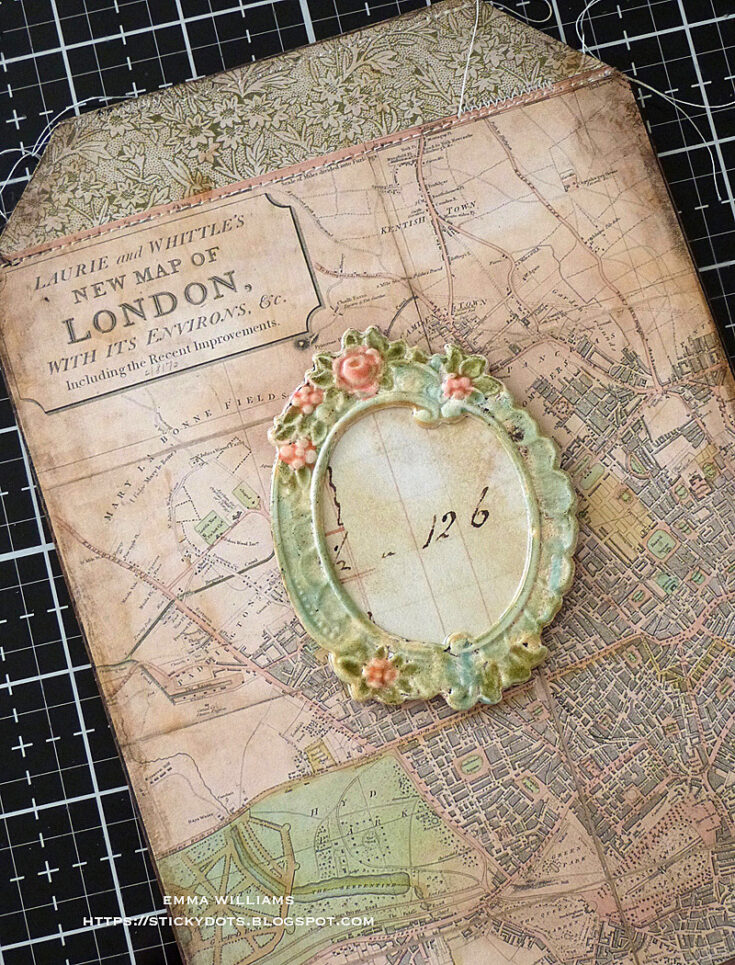
Using an off-cut of paper, I placed this behind the aperture of the frame and then attached it to my tag, using foam pads.
With the frame in place, I arranged the flowers and foliage around it, attaching some pieces with Matte Collage Medium and others with foam pads, so that it will create different dimensions and heights to each piece.
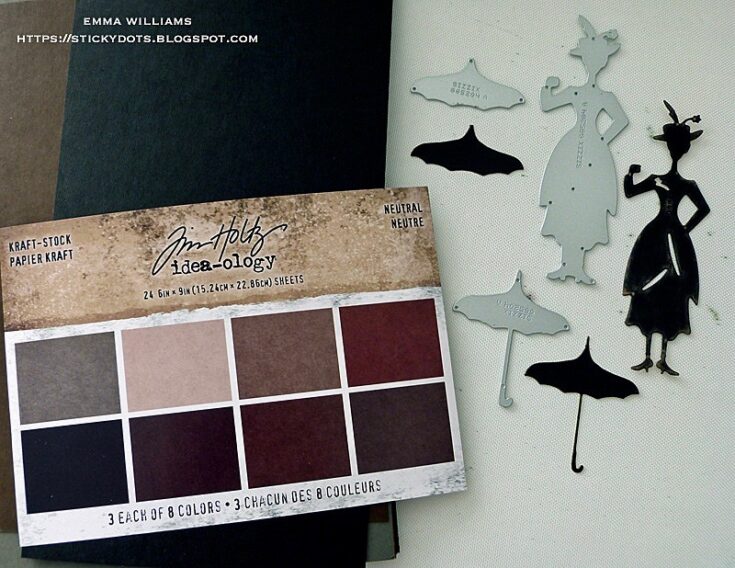
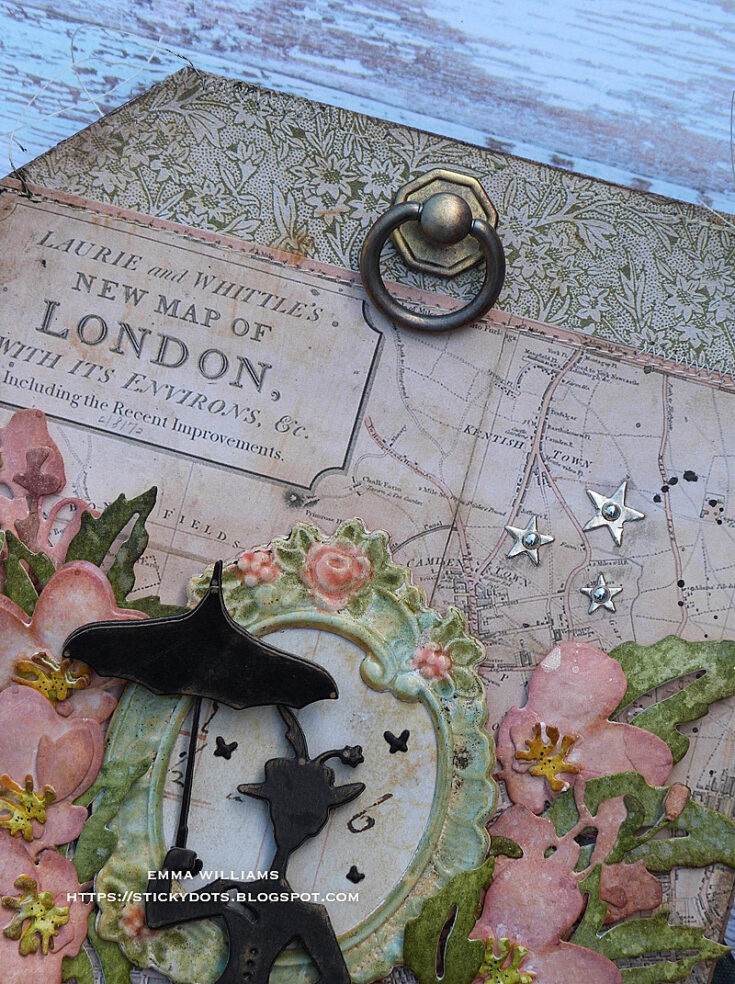
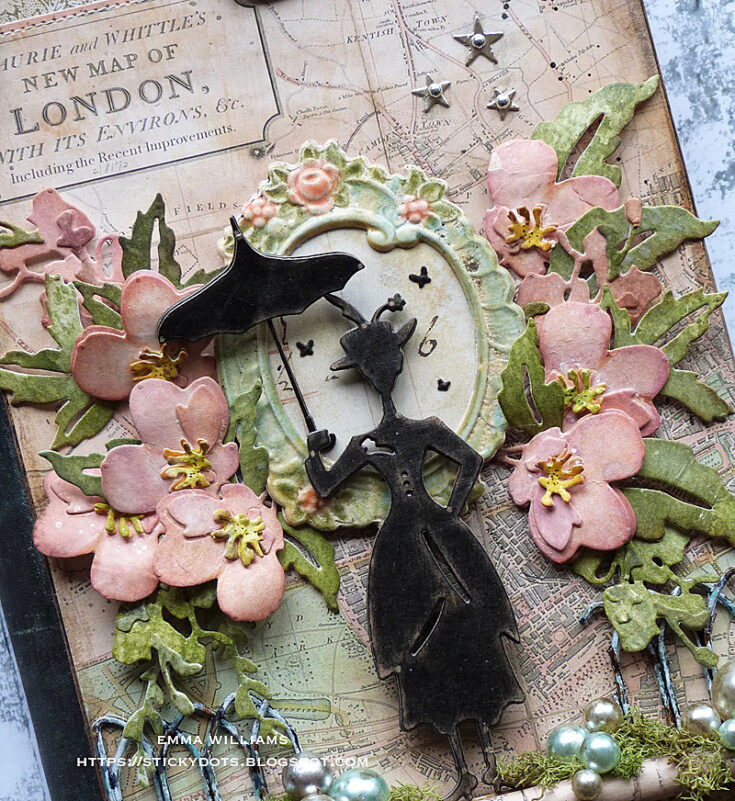
Moving onto the star of the show and using the lady and her umbrella from the Sizzix The Park Thinlits die set by Tim Holtz, I cut three separate pieces from the black card in the Neutrals Kraft Stash. I layered the card pieces together to form one image and then lightly sanded the surface of the die cut image to reveal the kraft core of black card.
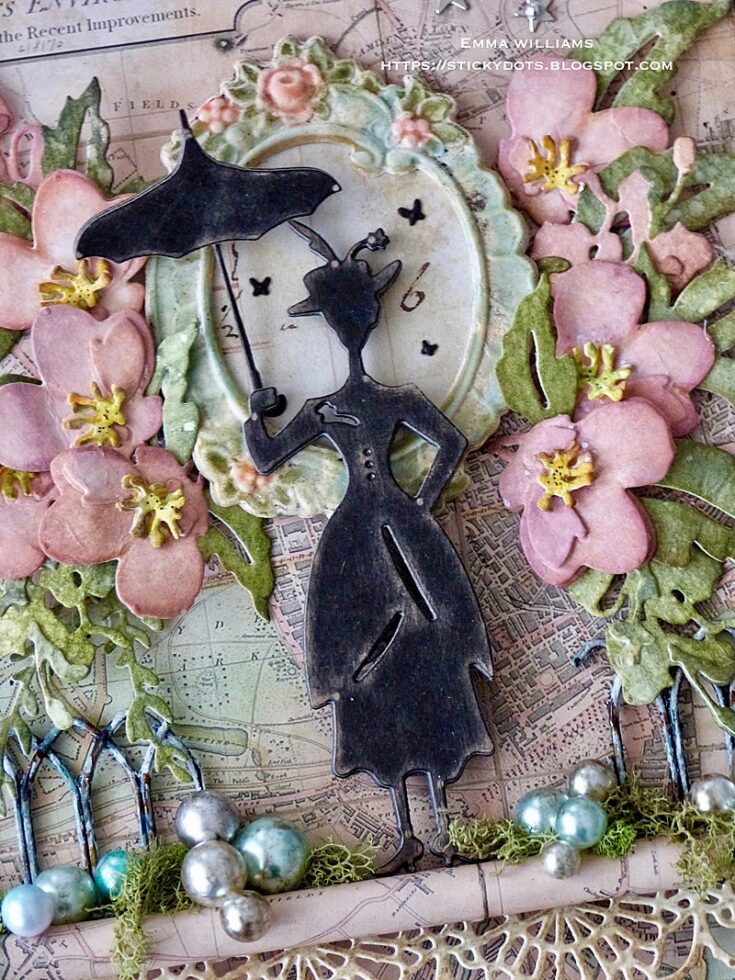
I attached the die cut image to the tag using foam pads and placing her so she stands on the paper roll ledge.
I attached the umbrella so she looks as if she’s holding it in her hand.
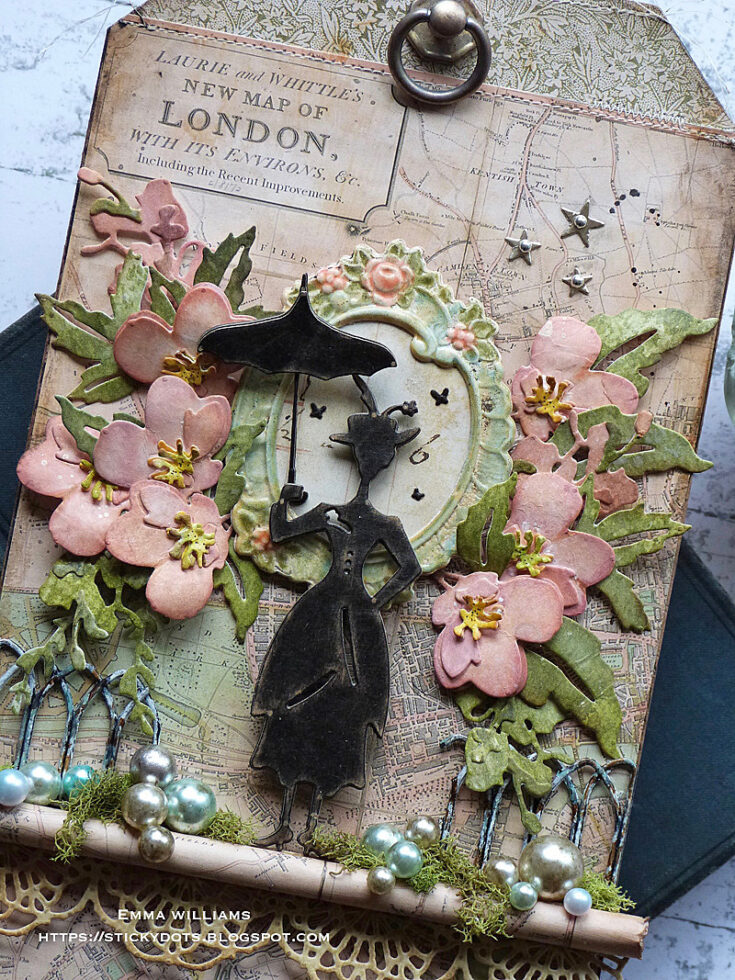
Using Matte Collage Medium, I adhered small pieces of moss around the base of her feet.
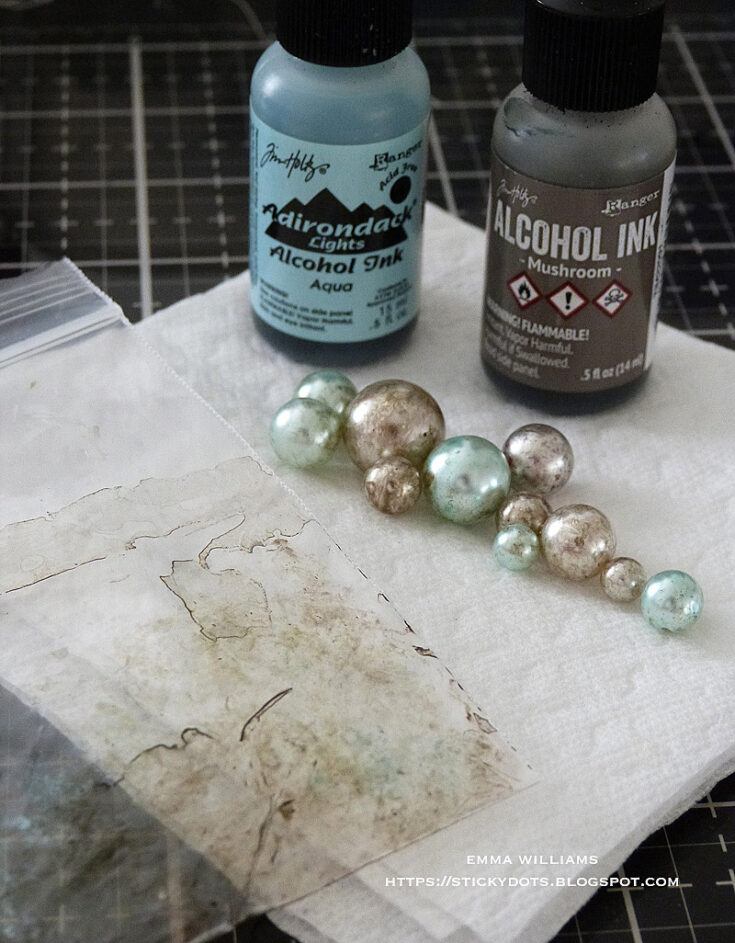
To color a selection of Tim Holtz idea-ology Bauble Findings, I placed the pearls into two separate sealed bags, and added drops of Aqua Alcohol Ink into one of the bags and Mushroom Alcohol Ink into the second. Shake the pearls to give a good coverage of the ink before tipping them out onto a kitchen towel. (If you haven’t got any of these Bauble Findings in your stash, then you could substitute them for other pearls, or with Pearl Drop Embellishments).
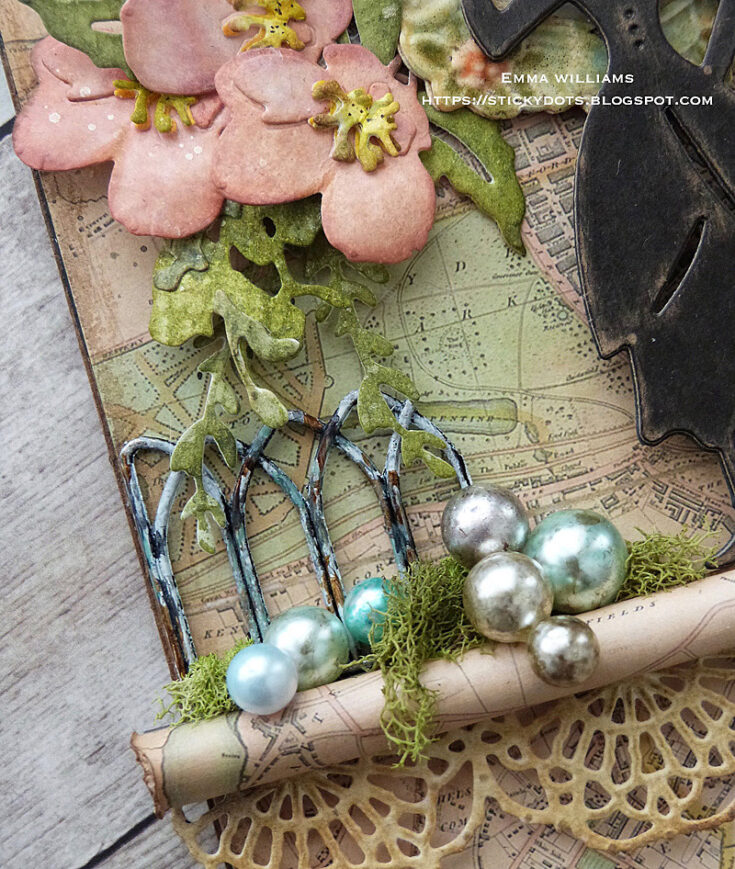
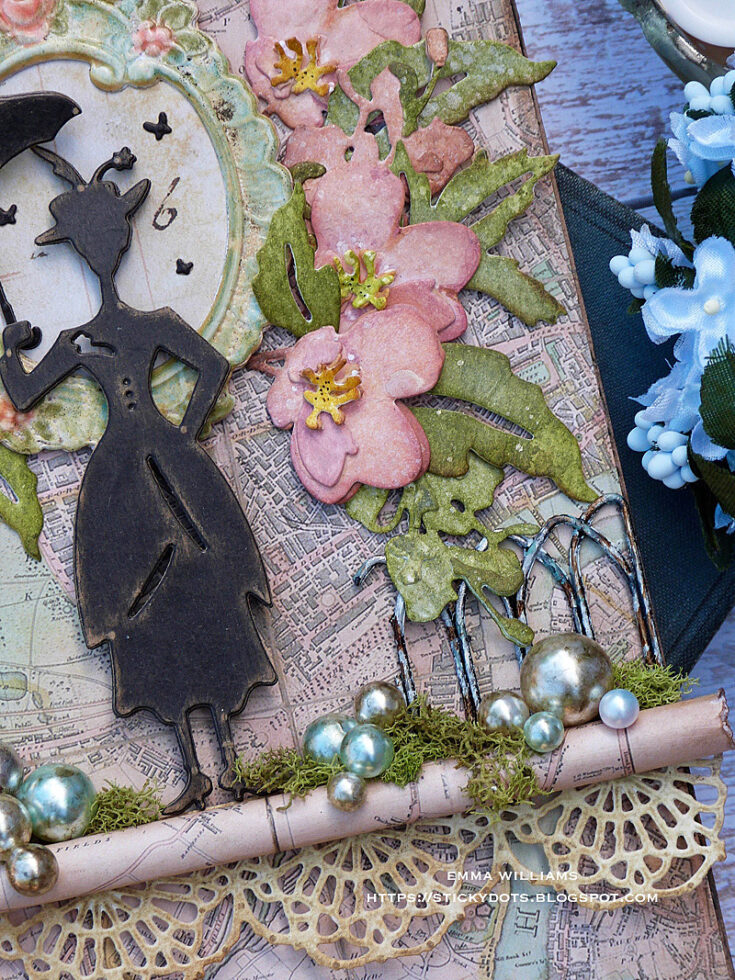
Arrange and attach each of the baubles along the ledge, using Matte Collage Medium.
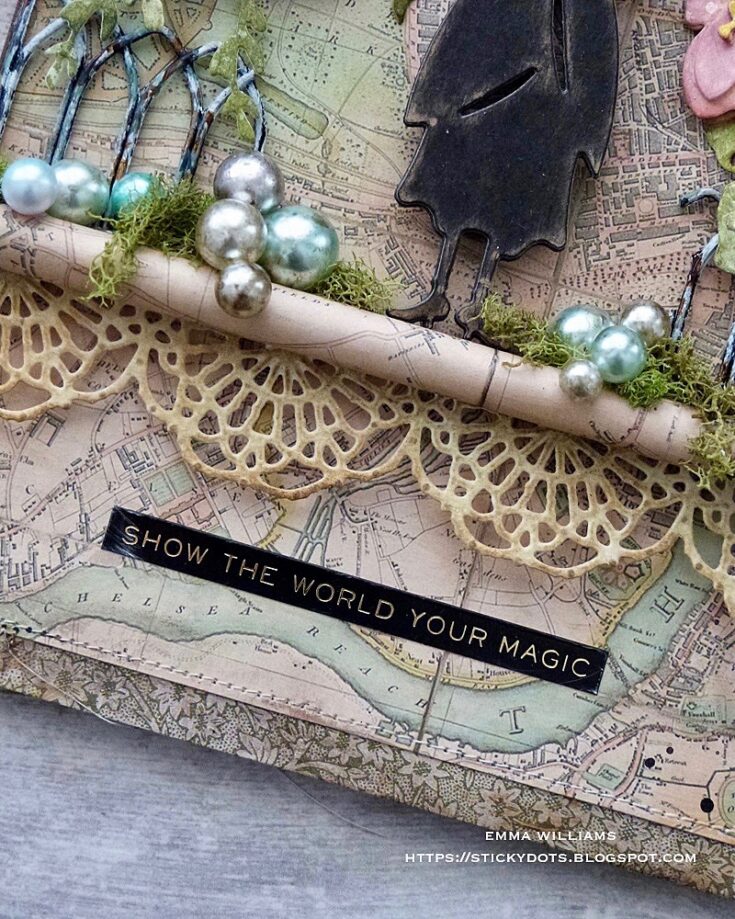
Underneath the ledge, I placed a Metallic Quote Sticker, ‘Show The World Your Magic’.
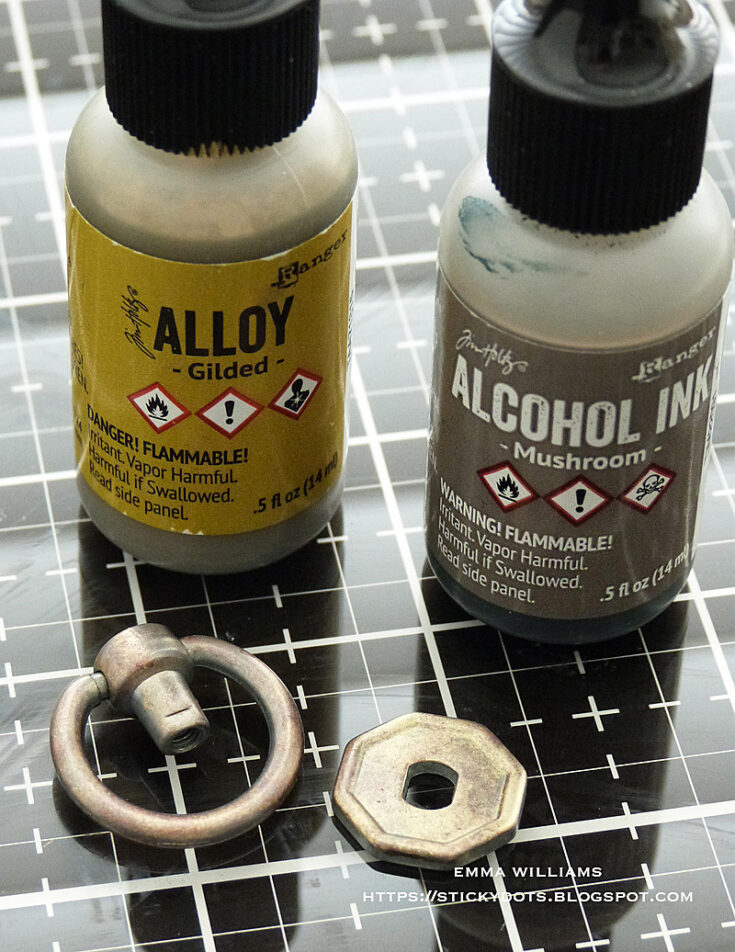
Finally, at the top of the tag I attached a Mini Hardware Finding and applied Mushroom and Gilded Alloy Alcohol Ink to the metal to alter the color.
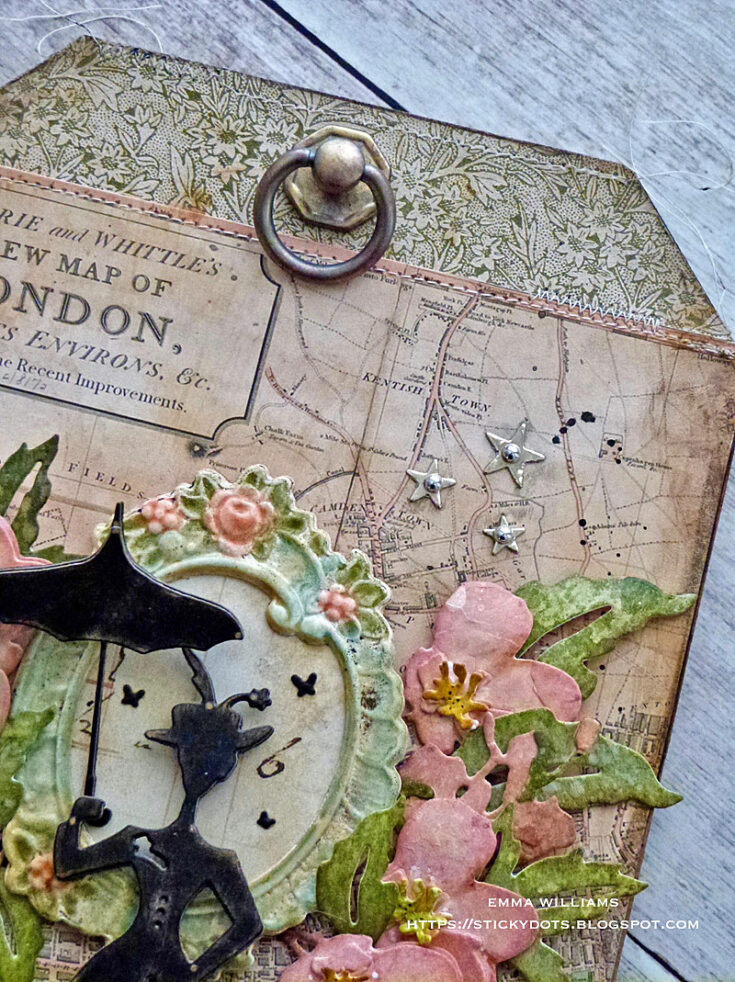
Attach the finding to the tag with Matte Collage Medium and allow to dry. Finally, I added some small die cut stars that I had leftover from a previous project. These were cut from gold metallic kraft stash, using the Falling Stars Thinlits Die by Tim, and adhered onto the top right hand corner using Matte Collage Medium before I placed a Metallic Droplet into each of the centers.
Thank you so much for stopping by today and I hope you’ve enjoyed the creative process of this home decor tag. It was such a fun project to make and the ideas that I’ve used, could also be used on cards, frames and book covers ~ the choice is up to you but I would love to see what you create and hope I’ve inspired you with my project. See you again soon…Emma x
SUPPLIES:
|


Thanks so much for stopping by, and thanks to Emma for being our guest!


