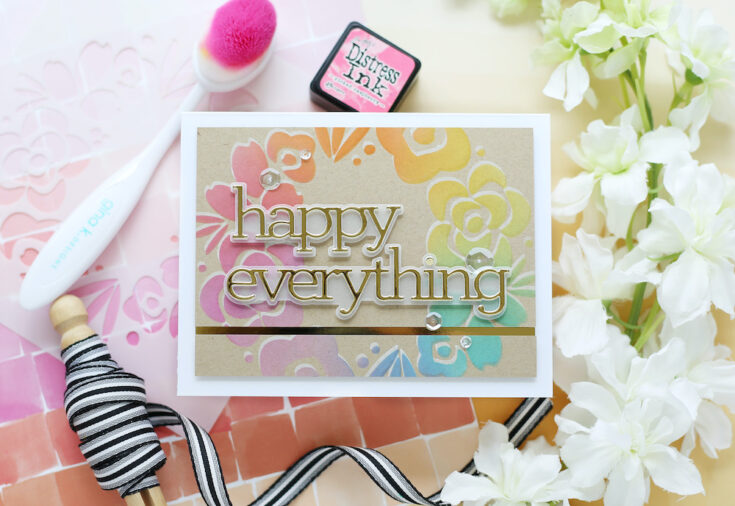
Amore Laurafadora: Happy Everything

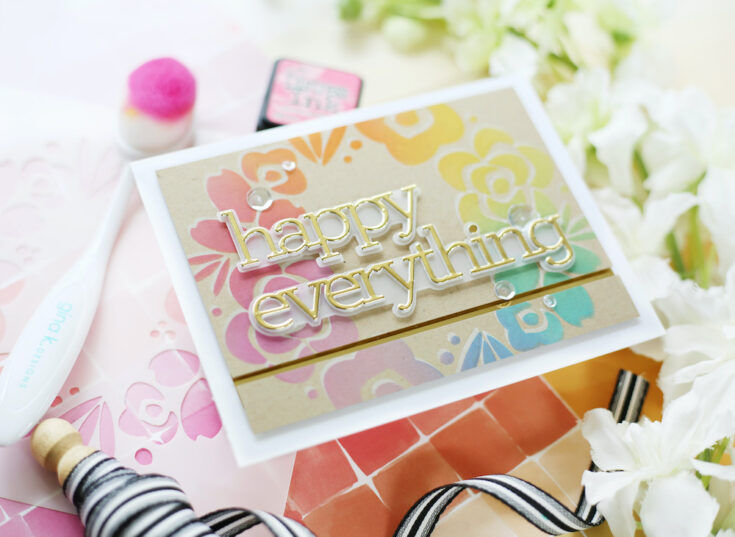
Hi friends! Happy Tuesday! Welcome to the latest edition of Amore Laurafadora, our bi-monthly blog series with the one-and-only Laura Bassen! She is showcasing our Painted Flowers Wreath stencil and Happy Everything die on this pretty card! Want a tip on how to make colors pop on kraft cardstock? Start with a base of white pigment ink!! Have you seen Concord & 9th’s new Neutrals Foil paper pack? It’s one shiny mix!! Be sure to watch the video for more information and enjoy!
WATCH THE VIDEO:
SUPPLIES:
|


Thanks so much for stopping by, and thanks to Laura for being our guest!
One Stamp Five Ways: Be Kind

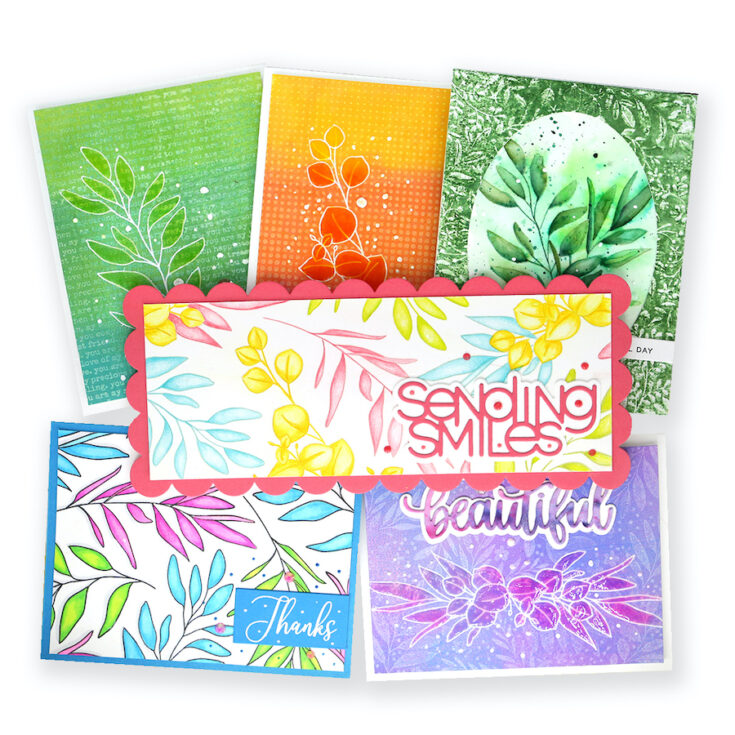
Hi friends! Happy Monday! We’re bringing you our monthly One Stamp Five Ways feature this month slightly ahead of schedule to make room on the blog for something very exciting to come! Stay tuned! :) Read on for 5 GORGEOUS ways to use our Be Kind stamp set by Suzy Plantamura! Enjoy!
Hello friends! Today I have a “one stamp, five ways” post to share with you using a stamp set from the Hey Bestie release called Be Kind. I love this stamp set, but I had never had a chance to play with it. I thought it would be perfect for a 5 card post since it has such versatile images. I’ve mixed in quite a few new products into my cards as I love using my older sets with new sets. I’ve also tried a new technique for me – gel plate. So let’s get started!
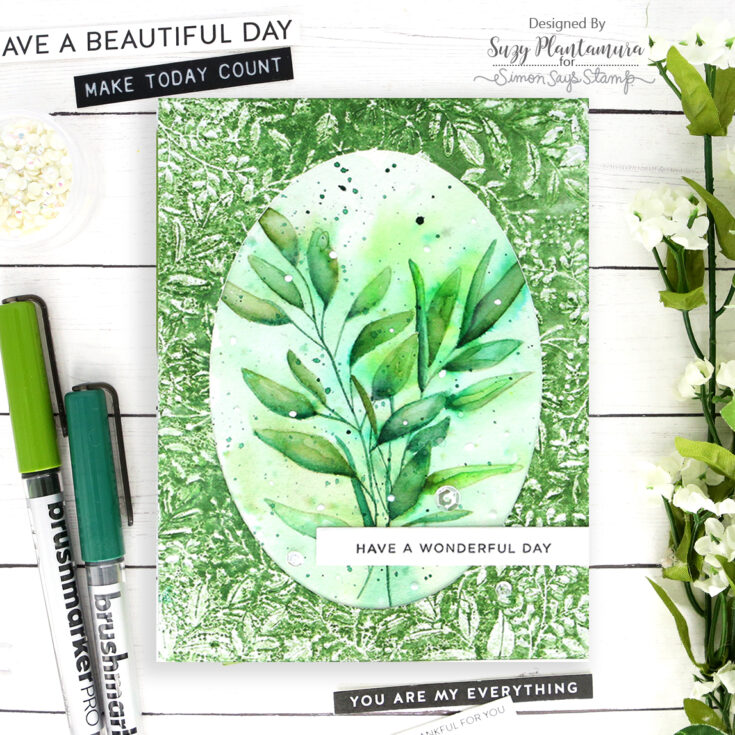
My first card started as a standard watercolored image, but then I ended up adding an embossed frame as well. I first stamped one of the leaf images on a piece of Arches watercolor paper with MFT Natural Ink. I also stamped it on masking paper and cut out the leaves. I attached the leaves over my stamped image and stamped another leaf stamp beside it so they were overlapping. When I removed the masks, it appeared that one was behind the other. I painted them with Karin Brushmarkers. I then used a wet brush to move some of the color around the leaves for a soft background. I went back and repainted some of the leaves so some looked more messy and some had more defined edges. (I have such a hard time with messy even though it looks good!). Once it was dry, I flicked some green paint and some white opaque paint over the image.
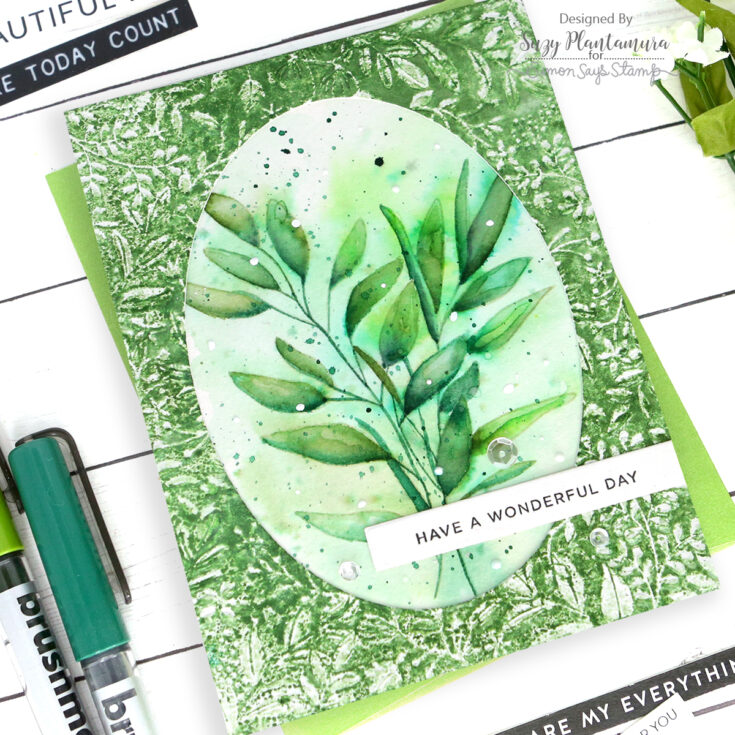
I could have used it as is, but I took it up a step be creating a frame with the Splendid Leaves Embossing Folder. I applied Rustic Wilderness Distress Oxide ink on the flat side of the embossing folder which gave it this inked look. I then die-cut an oval out of the center of it with the SSS Nested Oval dies. I attached it over my painted image. I used a pre-printed sentiment on the bottom of the oval and added some sparkling clear sequins around it.
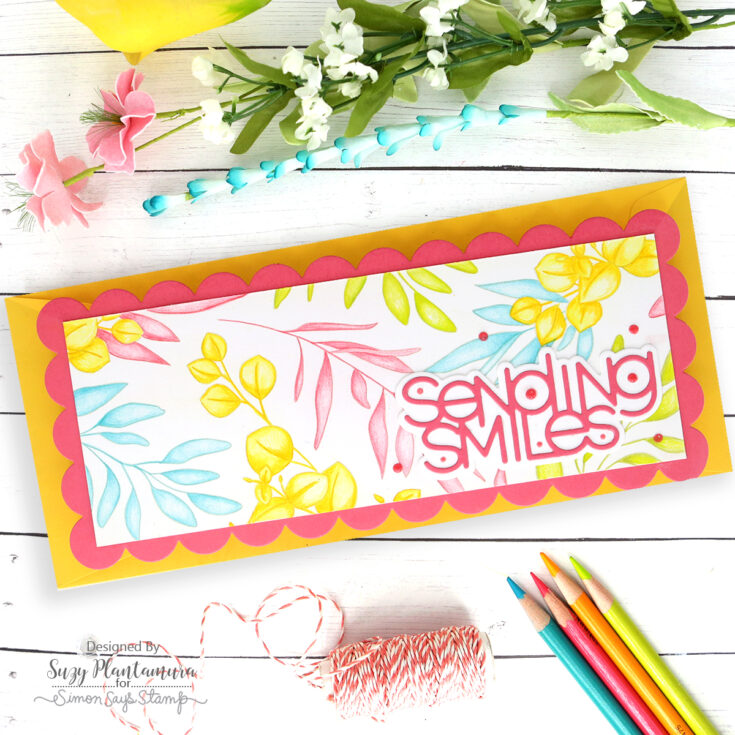
I love the SSS Chunky Slimline Scalloped Border dies for the edges of my slimline cards. I die-cut one from Lawn Fawn Guava Cardstock which is my favorite color ever as it isn’t pink or red – it’s the perfect mix! I then cut a piece of white cardstock to fit inside the scallops. I also created a white card base that was just a bit smaller than the edges of the scallops also so it wouldn’t show on the edges. I stamped several of the plant images randomly over the cardstock with MFT Natural Ink.
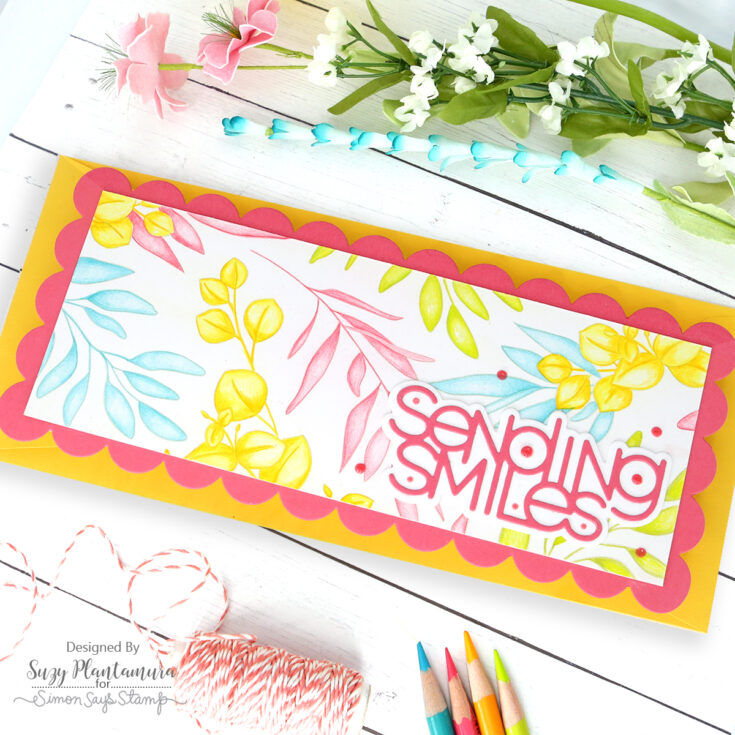
I colored the images in with colored pencils and kept them very soft. I went for a tropical feel with my color scheme. I used the SSS Sending Smiles die for the sentiment with the words cut from the same cardstock. I also applied some Nuvo drops in and around the words.
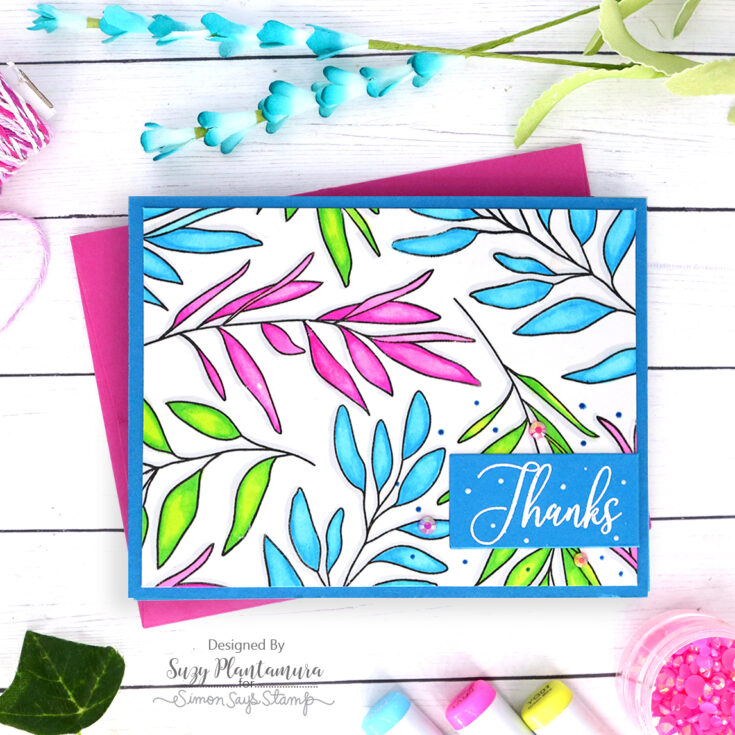
I used basically the same technique for this card that I call random stamping. I used just two of the branch stamps for this one and SSS Intense Black Ink. I colored them in with Copics and used really bright colors, again going for a tropical look. One thing I love about Copics is you can use a light color marker in a similar shade to remove or lighten areas of your image. I felt like my leaves were too dark, so I lightened them all by doing this in the center of each.
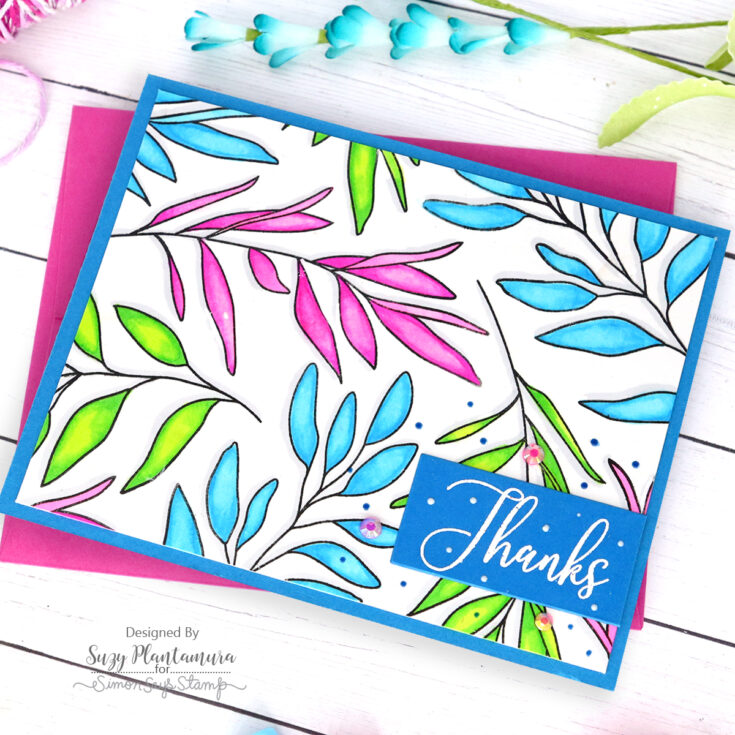
I used the SSS Sentiment Label dies for the sentiment strip. I embossed one of the sentiments in the stamp set with Ranger white embossing powder. I attached it to the bottom of the card. I used some white and blue Nuvo drops around the sentiment and added 3 Flamingo Pink jewels to finish it.
My next 3 cards use a new technique I just tried with a Gel Press. I watched a video by Jennifer McGuire on how to use a Gel Press with stencils and stamps to create layers. I give her all the credit for this technique, but I didn’t do it nearly as good as she did! But I had SO much fun creating these backgrounds!
First, I embossed one of the stamped images with white embossing powder on white cardstock.
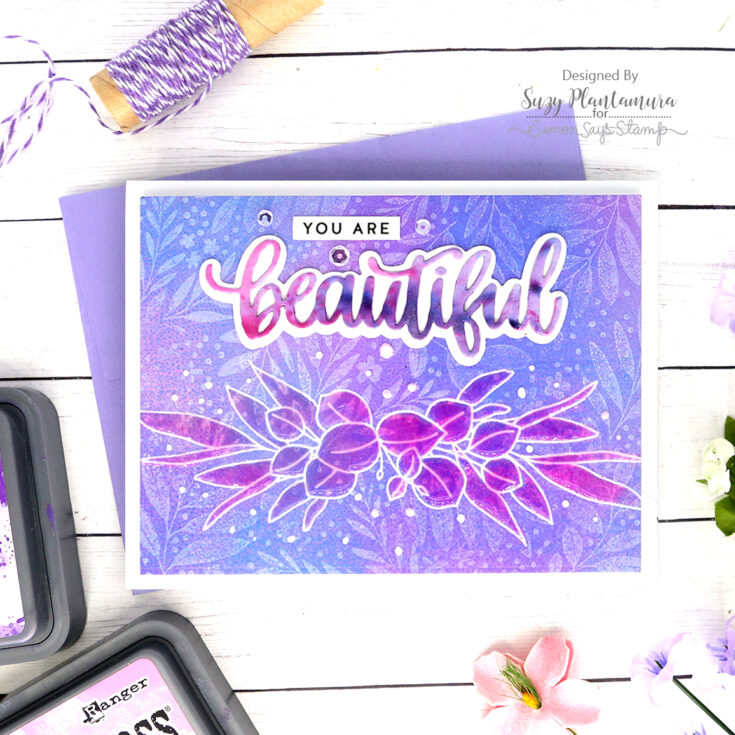
I applied Distress Oxide Ink in Wilted Violet and Picked Raspberry ovel my gel press by pressing the ink pads directly onto it here and there. I then used a brayer to move the color around mixing the two shades together in places. I pressed a piece of cardstock onto the gel press picking up the ink. I did this again to intensify the color. I used a soft cloth to gently wipe off any excess ink from my embossed image. I then applied white pigment ink to the Botanical Split Background stamp and pressed it onto the gel press. I applied my inked cardstock to it to pick up some of the white color from the stamp. I loved how subtle the stamped image was.
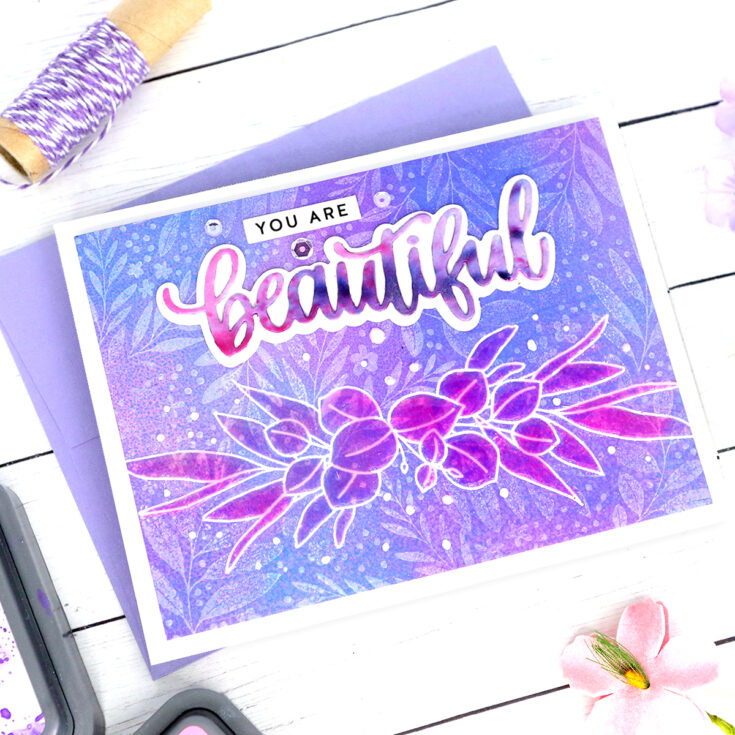
I cut this piece to fit on the front of a white card with foam tape behind it. I used Tonic Crystal Glaze over the image so it had a shiny texture to it, but it also intensified the colors of ink behind it making the image really pop (lucky accident). I die-cut the word beautiful from a piece of scrap paper I had using shimmer powders in Cherry Bomb and Violet Brocade. I cut out a preprinted sentiment for the “you are”. I added some white Nuvo Drops around the image, but they turned the color of the background as they dried. So I used the end of a paintbrush to apply some white paint over the drops so they stayed white!
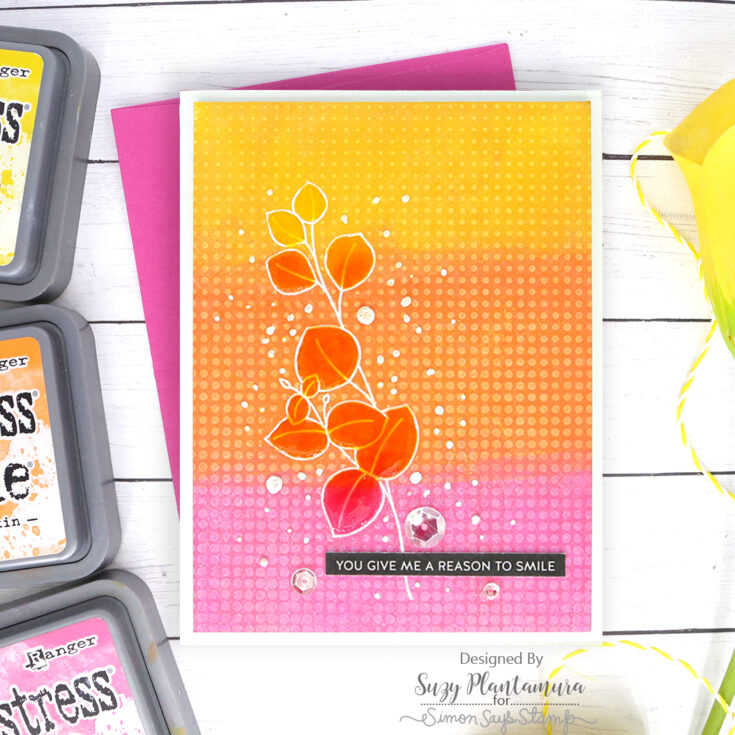
I embossed the stamp on this one with white embossing powder first. Then I used a similar technique with my gel press. I applied three colors of Distress Oxide Ink (Mustard Seed, Carved Pumpkin, and Picked Raspberry) in rows across the gel press. I then used a brayer to mix the colors so they would blend better. I applied my cardstock to the gel press to pick up that gorgeous color. I reinked it and did another layer to intensify the color. Next, I stamped this image on masking paper and cut the leaves out and applied them over the inked leaves. I then used white ink on the Halftone Background cling stamp and applied that to the gel press. I pressed my inked paper onto the gel press to pick up the stamped image. I removed the masking paper showing the leaves without the stamped image on them. I was super excited with this one – I thought it turned out so pretty.

I cut the piece down and used foam tape behind it and attached it to a white card base. I used a pre-printed sentiment to make this part easy! I applied Tonic Crystal Glaze over the leaves again and it intensified the colors making the image pop. You can tell if you look close that the stamped image isn’t on the leaves this time. I added some sparkling clear sequins and some white acrylic paint drops (no Nuvo drops this time as I learned my lesson – they pick up the Oxide ink colors below them).
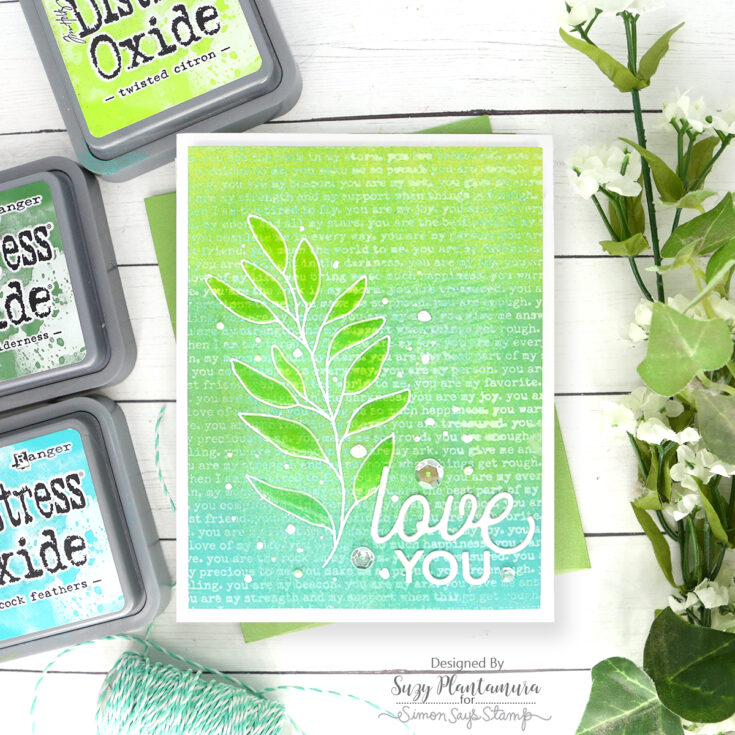
I used the exact same technique for this one as for my last one starting with an embossed image of the leaves. This time I applied Twisted Citron, Mowed Lawn, and Peacock Feathers Distress Oxide Inks to the gel press and mixed the colors with the brayer. I used the Friendship Text cling stamp with white ink on the gel press and re-pressed my inked background onto it. This time I didn’t use masking paper, so you can see the words inside the leaves as well.
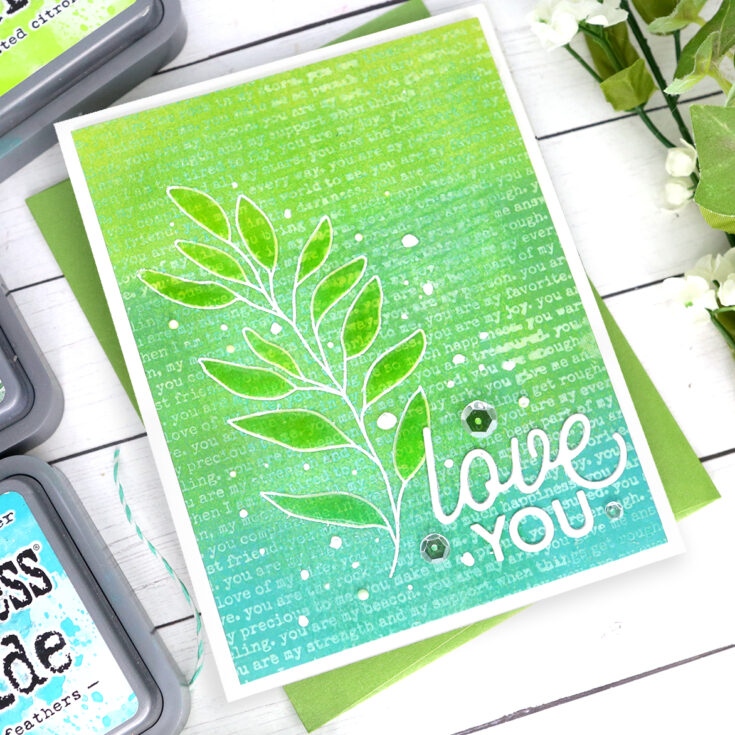
I cut the piece down and attached it to a white card base with foam tape behind it. I used the CZ Love You die for the sentiment. I added some sparkling clear sequins and white paint drops around the image to finish it.
If you are counting, my “one stamp, five ways” post ended up with six cards. I loved trying this gel press technique and strongly encourage you to watch Jennifer’s video if you are going to try it. She actually has several videos showing different ways to use the gel press and create beautiful layered backgrounds, so I’m excited to try other techniques with mine as well. As usual, I encourage you to try and find multiple ways to use each of your stamp sets. I love doing this series on my blog as each time I post, I end up thinking of new techniques and ways to use a set and I feel like I am really getting my money’s worth out of each stamp! Thanks for visiting and have a great week friends! Suzy
SUPPLIES:
|


Thanks so much for stopping by, and to Suzy for being our guest!
Mixed Media Cards with Shari Carroll

Welcome, everyone!! It’s Shari here with some card ideas using mixed medium techniques.
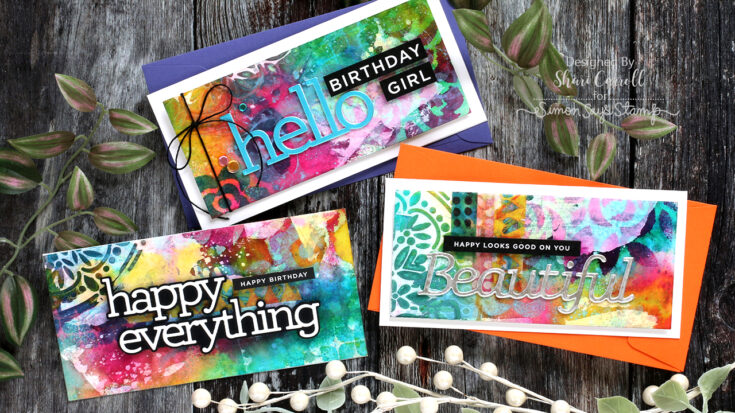
I absolutely love starting out with white paper and transforming it into a colorful masterpiece! These cards were made from one sheet of Ranger Watercolor paper, Tim Holtz Distress Sprays, some Gesso, texture paste, and Stencils.
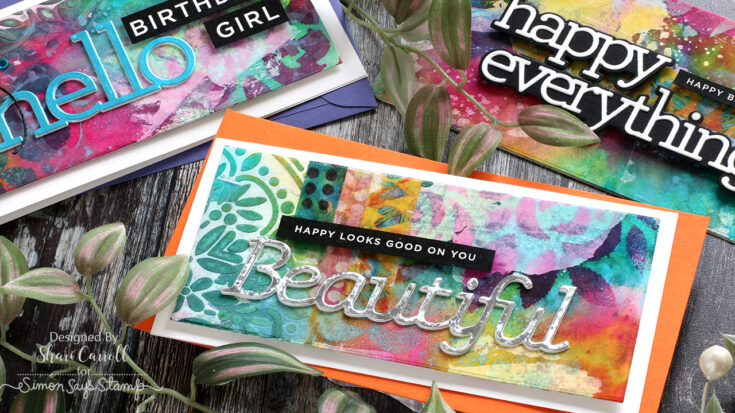
Once I had the background done, I die cut the panels using the Mini Slimline dies. Then I added additional color with stencils, some colorful tissue tape in areas for added interest. And finally, I finished the cards off with word dies and Simon Says Stamp Sentiment Strips.
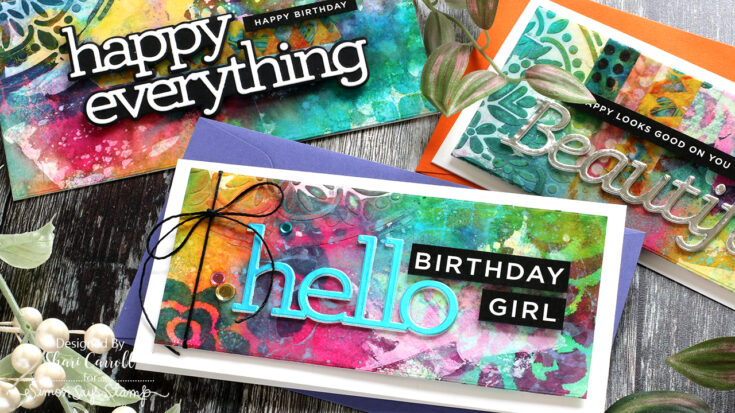
I’ve filmed the process of creating the background which you can watch below. Enjoy!!!
SUPPLIES:
|


