Birthday Cocktail
Hi friends! Happy Monday! Please join me in welcoming special guest Cheiron Brandon back to the blog! She’s made a colorful and delicious looking Birthday card to share today! Read on to learn the details and enjoy!
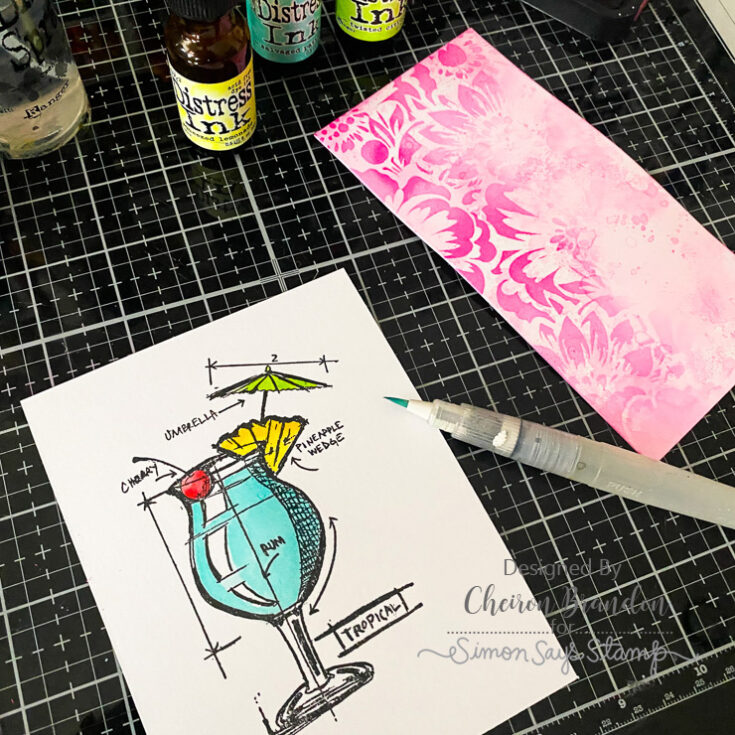
Hi there crafty friends! It’s Cheiron here with my monthly post using Tim Holtz products. I am sure by now you have seen the newest color in the Tim Holtz Ranger Ink Distress line…Salvaged Patina. When I first swatched this fabulous color it made me think of a Blue Hawaiian cocktail and inspired the fun mixed media style card I have for you today.
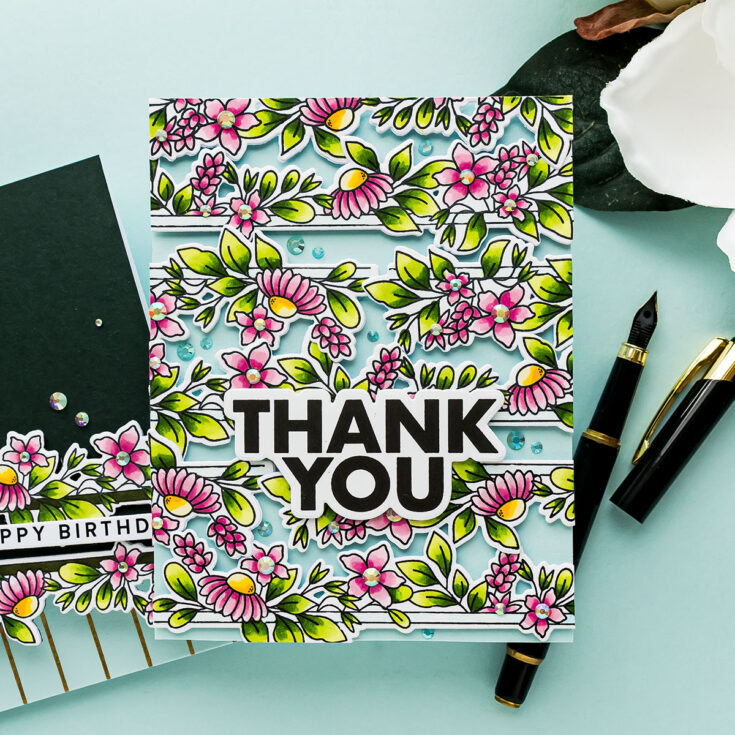
I love making Mini Slimline cards. These are really close to a #8 tag size and are super fun to work with using mixed media techniques. I cut a panel of Distress White Heavystock using the Simon Says Stamp Mini Slimline Rectangle dies. I ink blended the entire panel using Kitsch Flamingo Distress Ink, then I stenciled over it with the Bouquet stencil using Picked Raspberry Distress Ink. I stenciled only part of the panel to give it a more organic effect.
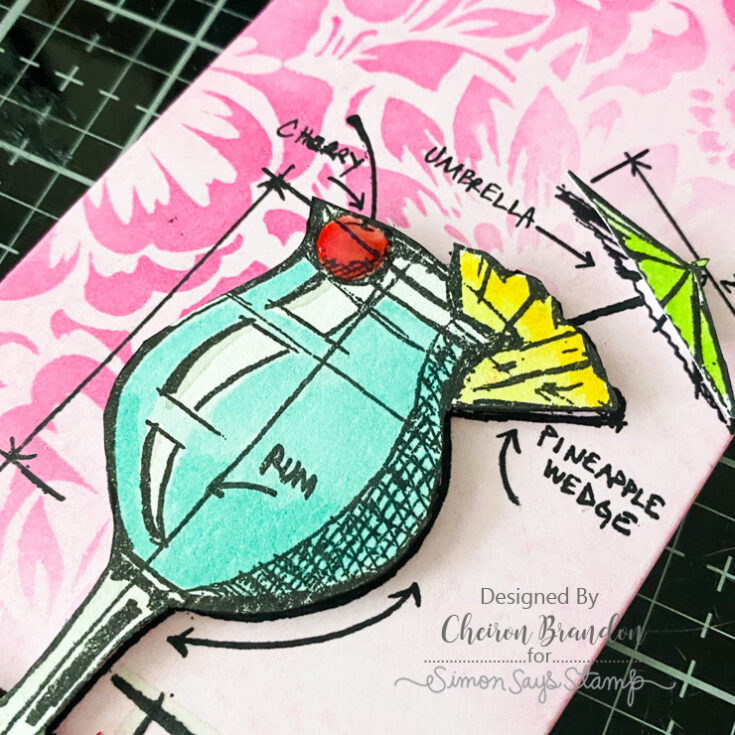
I stamped the stamp from the Cocktail Blueprints in Black Soot Archival Distress Ink onto my panel where I wanted my image to go. Don’t worry, we are going to add paper on top of it. On a separate piece of Distress Watercolor cardstock, I stamped the cocktail again. I colored it with Distress Reinkers in Salvaged Patina, Twisted Citron, Squeezed Lemonade, and Candied Apple. I cut the image out (don’t be precious about trying to cut out the cherry stem or the umbrella handle – as those are stamped on your main panel) and paper pieced it onto the stamped image on my panel with foam tape.
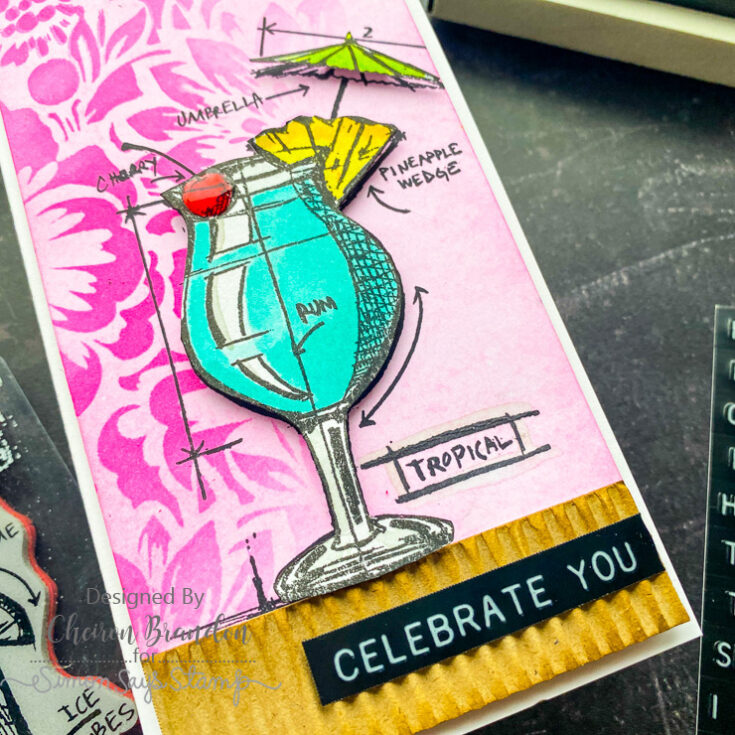
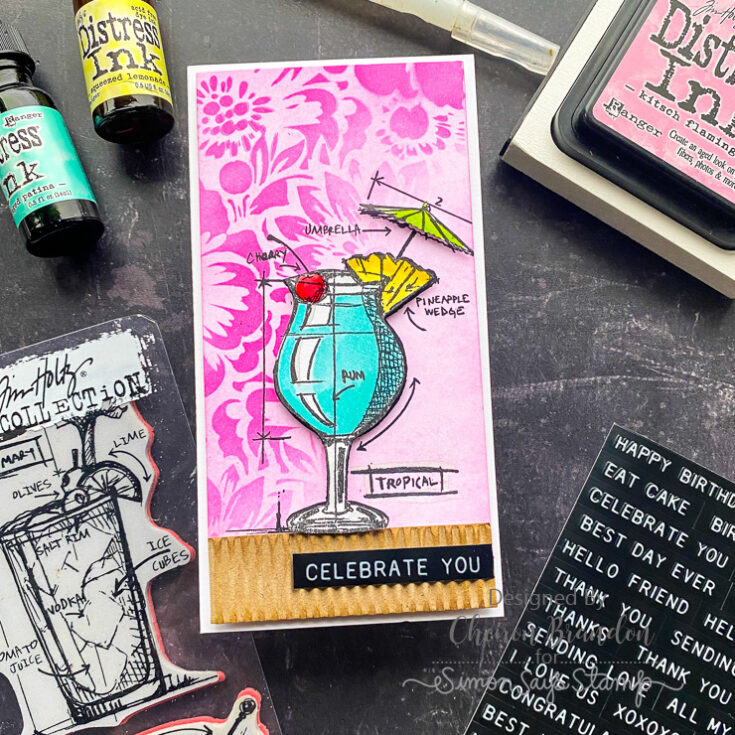
I added a piece of cardboard paper to the bottom and a sticker from the Idea-ology Sentiments Label Stickers and adhered the panel to a card base. To finish the card I added a bit of Glossy Accents to the cherry once to card was assembled to make it even more festive. Cheers!

SUPPLIES:
|


Thanks so much for stopping by, and the Cheiron for being our guest!
Yippee for Yana: Slimline Florals on A2 Cards 4 Ways

Hi friends! Happy Sunday! Please join me in welcoming back special guest Yana Smakula in the latest edition of our bi-monthly Yippee for Yana blog series! Read on and be sure to watch the video for more info! Enjoy!
Hi everyone, this is Yana Smakula, welcome back for another Yippee For Yana video! Today we are using a Slimline stamp set to make A2 cards. I have 4 different ideas all made using one single stamp. Very easy to make, it is all about the composition on your card. I am hoping my tips and ideas will be helpful and you’ll try them out for your cardmaking whether it is using this stamp set or another, maybe a similar stash you have in your stash.
The stamp set I am using is Slimline Florals. It is designed to work for Slimline cards, but with a little bit of out-of-the-box thinking, you can adapt these stamps to other size cards.
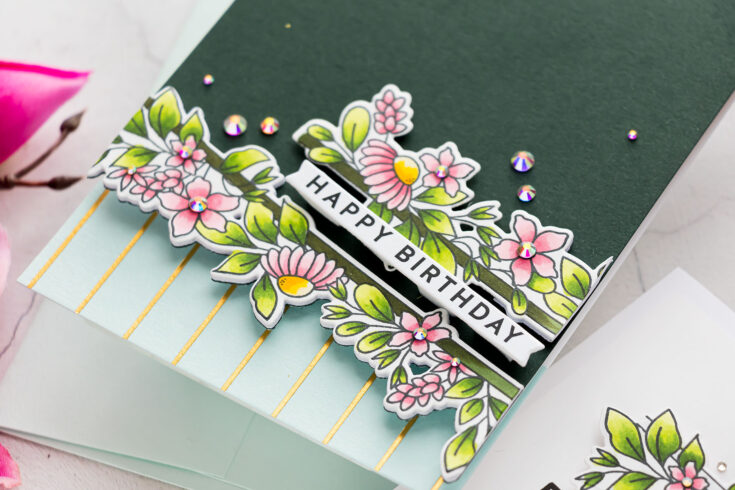
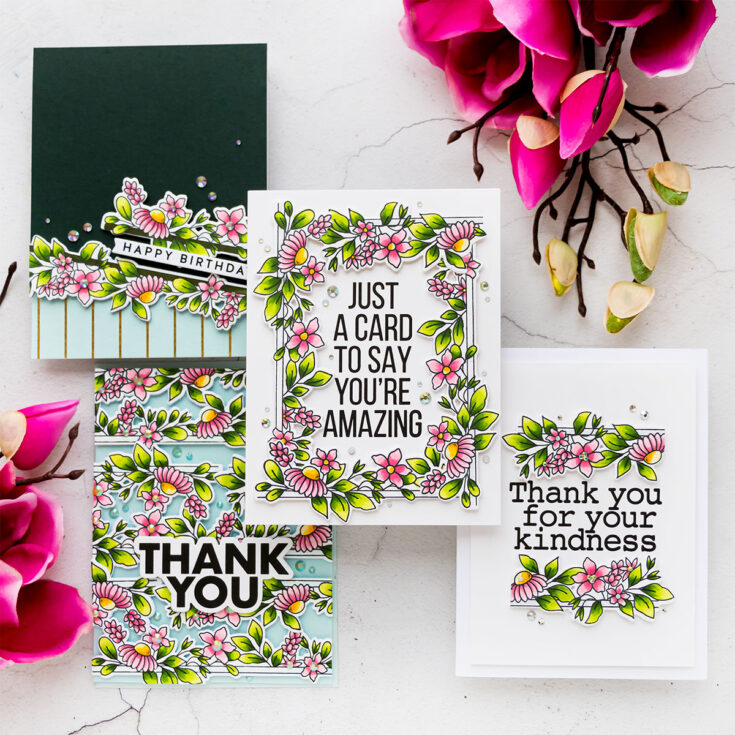
Card idea #1
For my first card, I wanted to use the stamp as is, as a border, but placed diagonally. I adhered a panel of Simon’s Midnight Green cardstock to an A2 white card base. Next, I figured out the border placement, I used the die and taped it over the card base with low tack tape.
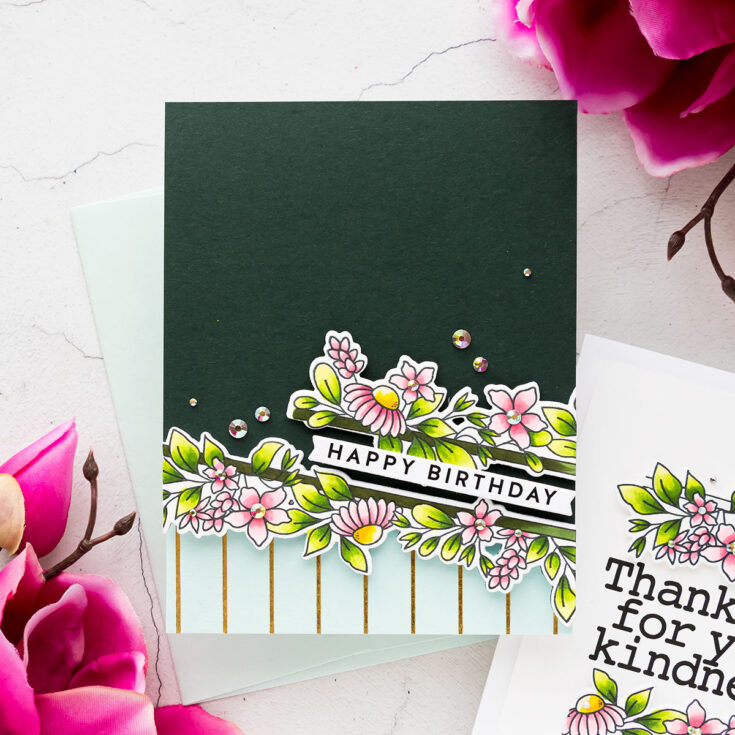
Next, you need to open your card base. I used a top folding card base to make it easier to make a partial cut. Bright it to your die-cutting machine and make the cut. You want to only cut the bottom part off.
Next, I die-cut 3 or 4 of these floral borders from white cardstock, just blank die cuts, I adhered the pieces together using glue and adhered to the back of the colored piece to create something that looks almost like a chipboard. Next, adhere the die cut over that partial cut.
I trimmed the excess off and used the leftover piece to continue the design. I added a sentiment using one of Simon’s pre-printed sentiment strips, these are fantastic to make a quick sentiment for a card. And I also added a foiled panel on the inside of the card – I had this panel sitting around on my desk for a long time and it felt like it worked well for this card. The background here was foiled using a Skinny Strip background plate from Spellbinders. I also added a couple of jewels and that finished my card idea #1.
Card idea #2
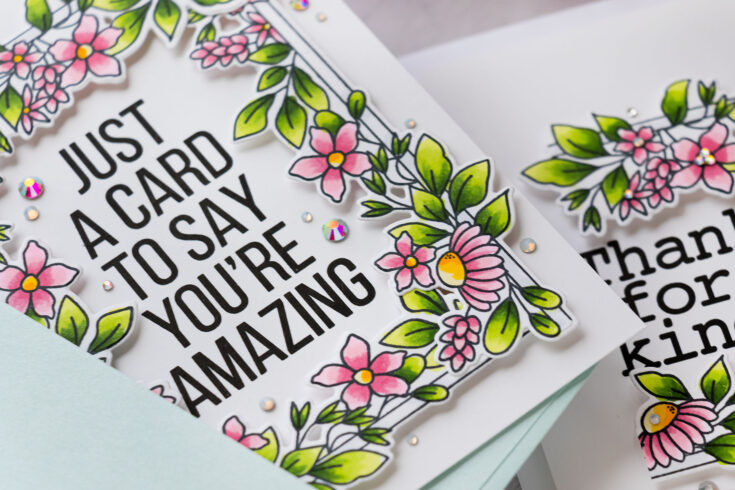
For my 2nd card I wanted to make a frame, but a frame for a smaller, A2 card. I used 3 borders to make a frame.
You do have a frame stamp included in the stamp set, but it is designed to work on a Slimline card. Because there’s that individual border stamp included, we can use it to make a frame for any card size needed. Here I am making for an A2, but you can just as easily make one for a mini slimline, for a 5×7 card, or a square, for example, a 5×5 card. So you can make the border work for you.
I first stamped a sentiment for this card and I used one from the XL Greetings 2 stamp set and with the sentiment in place, it allowed me to plan the frame placement. I carefully measured each border piece, trimmed it, and foam mounted it onto the panel using foam adhesive squares. Very easily done and I just overlapped the border pieces to make my frame.
Now I only used 3 pieces, so my frame wasn’t entirely perfect, but it worked for me. If you are making a larger size card, or if you aim for perfection – use 4 border pieces.
Card idea #3
I had some leftover pieces from cutting the borders when making my 2nd card, so I used them to create a different sort of frame for another card. I first stamped a sentiment in the center of the 3 3/4 x 5” panel and I foam mounted that panel onto an A2 white card base.
Next, I used the leftover pieces and framed the sentiment from the top and bottom. These aren’t perfect borders, just some leftovers, but you can see how well they frame the sentiment and finish this card off. It is a super simple design, but a very pretty and easy one to make.
Card idea #4
My last card idea for today features a custom background using these borders. I colored several, I think I had 4 and 4 ended up being quite enough to cover the entire card front. I foam-mounted them one by one, starting from the bottom and of course, I used the leftover pieces – I overlapped the die cuts quite a bit, I think that made it look a bit more continuous as if I used a solid background stamp.
Because I used individual die cuts, I was able to pop them up and add dimension to the background, and to me dimension is everything.
I finished this card with another XL greeting and I added lots of jewels to the flower centers and also to the background behind the images.
So there you have it – 4 ideas, 4 card compositions for using slimline border stamp on A2 cards. All of these are quite easy to make and I hope you’ll give these ideas a go yourself. Have fun stamping!
WATCH THE VIDEO:
SUPPLIES:
|


Thanks so much for stopping by, and thanks to Yana for being our guest!
Amore Laurafadora: Color Wheel
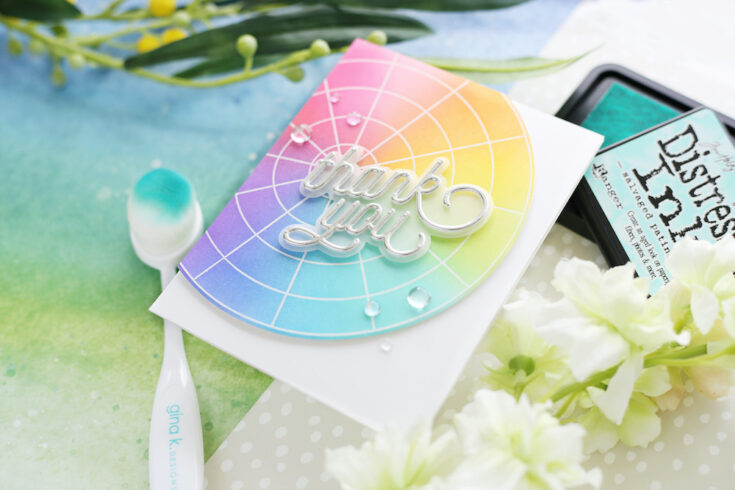
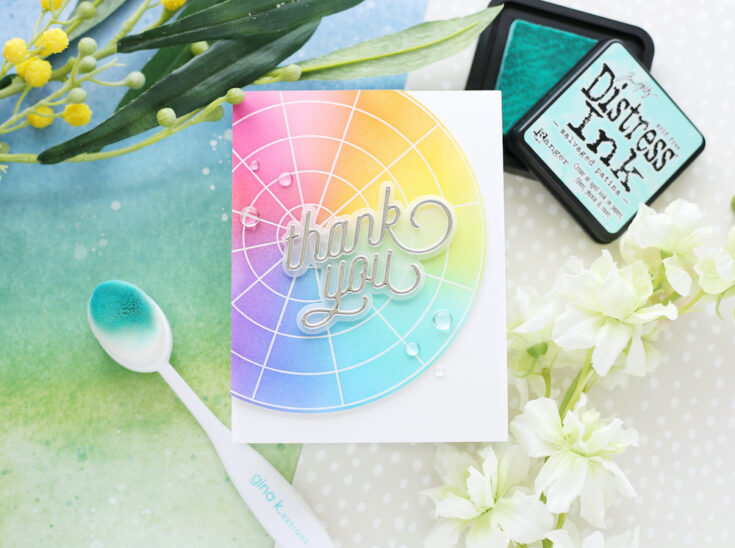
Hi friends! Happy Saturday! Welcome to the latest edition of our bi-monthly blog series Amore Laurafadora with Laura Bassen! In this gorgeous card she is showcasing our brand new Color Wheel cling stamp and Swoopy Thank you die set along with a gorgeous array of Tim Holtz Distress inks INCLUDING the brand new Salvaged Patina! Be sure to watch the video for all the details and enjoy!
WATCH THE VIDEO:
SUPPLIES:
|


Thanks so much for stopping by, and thanks to Laura for being our guest!


