Tim Holtz STAMPtember® Mini Masterpieces You Won’t Want to Miss!
Welcome to the second day of our fourth annual STAMPtember® celebration! WE ARE OVER THE MOON to feature this special project tutorial with Tim Holtz today!!!! Did you see the 2011 “Five on Friday” STAMPtember feature with Tim? What about 2012!? Tim’s 2012 STAMPtember feature was one of the most dynamic videos EVER! Fasten your seatbelt, because his 2013 project will knock your socks off! Card makers…… he is tickling our sweet spots with these Mini Masterpieces…..
mini masterpieces…

hello friends and welcome to the celebration of STAMPtember® here at SimonSaysStamp! i am honored once again to have been asked to be part of such creative festivities. no doubt this entire month Simon Says Stamp is going to be packed with stamping goodness. what i love about stamping is it’s by far the most versatile of our crafting tools (next to ink of course). i also think the endless variation of design and style means there’s a stamp to work for just about every kind of project. some of you might make cards, others might scrapbook, maybe you’ve found your way into art journaling, or perhaps you’ve let your creative spirit run free and have entered the world of mixed media – wherever you are on your creative journey, stamping has a place…
today i wanted to take things back to basics a bit and show a fun and simple project idea – mini masterpieces. these little guys can be used on their own, attached to a gift, tucked away into your page pocket projects, and the list goes on. the supplies are minimum and i love the fact that you can sit down and create many of these in no time. now on with our STAMPtember® tutorial…
supplies: (stampers anonymous) CMS164 tiny things; (ranger) distress markers, distress ink, archival ink, ink blending tool, glossy accents; (idea-ology) journaling tickets, custom fasteners, tissue tape, chit chat stickers, vial labels, paper string, mini clips, sanding grip; (core’dinations) kraft core mini pad; (tonic) scissors, paper distresser; (misc.) foam tape, fun option: clear gems.
when i’m creating these mini stamped beauties, i like to do things assembly-line style meaning instead of just working on one at a time, i do the steps to a small group. i find this method actually saves time, and you end up being quite productive without much added effort. don’t get me wrong, there’s still plenty of creative fun to be had…

step 1: let’s begin with some journaling tickets and the tiny things stamp set. i like working with journaling tickets as my foundation since they are relatively small, already cut, and have a background design ready to alter.
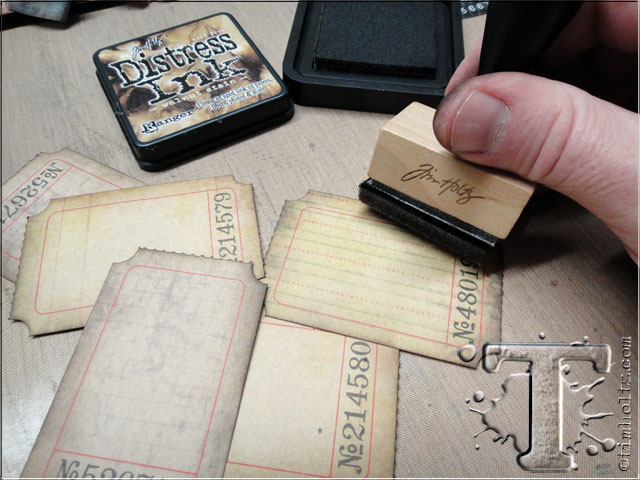
step 2: ink the edges of journaling tickets with distress ink using an ink blending tool.
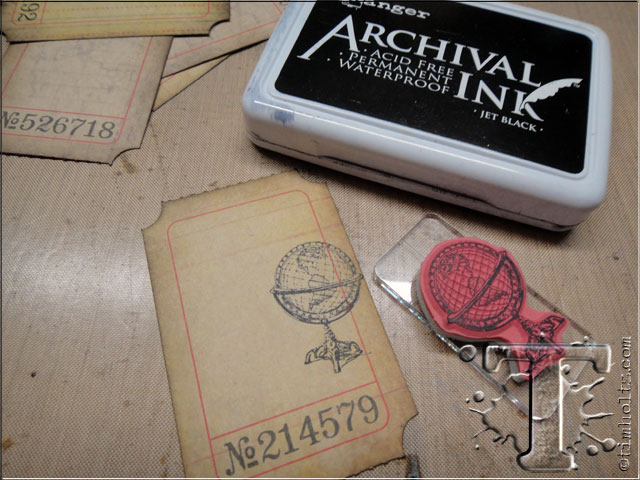
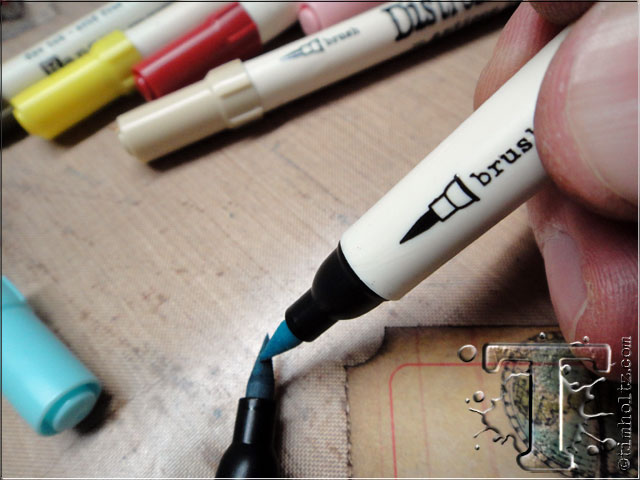
step 3: stamp each ticket with a single tiny image using jet black archival ink since we need a waterproof image to color.

step 4: color the images using the brush tip of distress markers.
step 5: for a simple way to blend colors, swipe the tip of a light color across a darker color of distress marker. *note: this will not contaminate your markers at all.
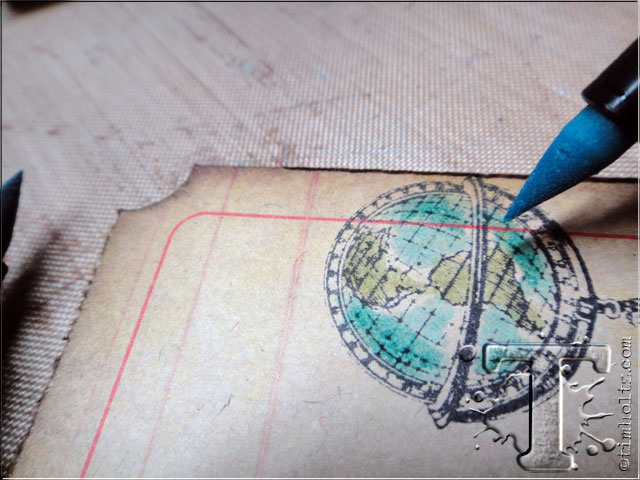
step 6: color from the outside edge in to achieve a blended gradation of color – cool huh?
step 7: continue coloring the image until your desired look is achieved.

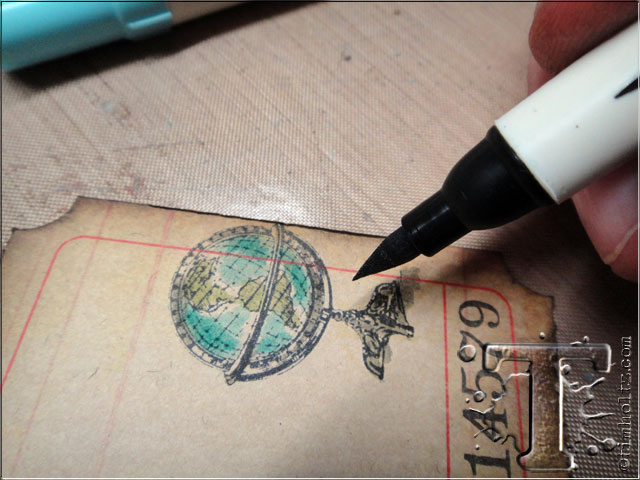
step 8: repeat coloring all of your stamped tickets. they honestly only take minutes to color and look great.
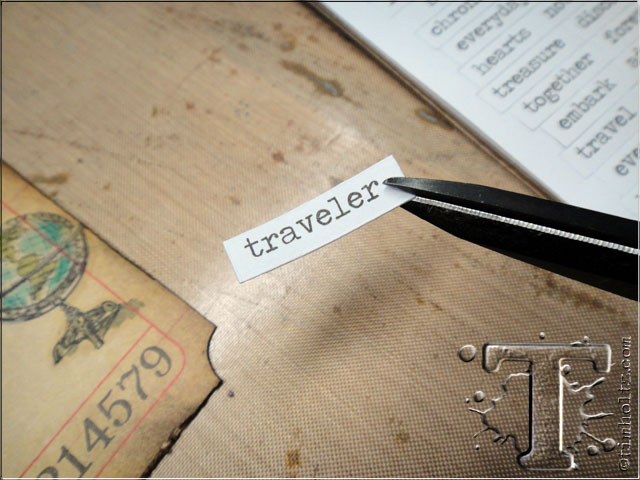
step 9: next choose a word or two from chit chat stickers and snip one end into flag points.
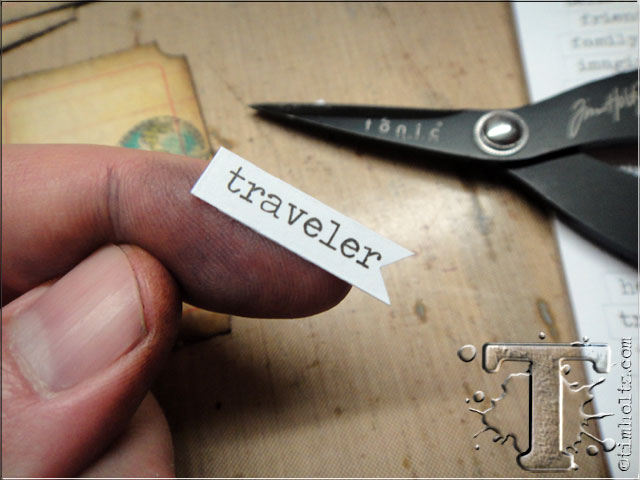
step 10: this is the effect we’re going for, i just think it gives a plain sticker a little character don’t you?

step 11: ink the edges of the stickers with distress ink using your blending tool and adhere them to the ticket. *note: the chit chat stickers have white and kraft stickers in the pack so you can switch them up if you want.
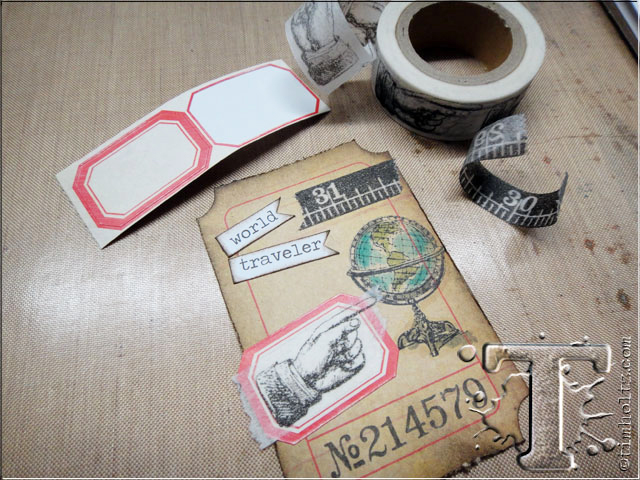
step 12: create a simple collage using things like vial labels and tissue tape. since these are adhesive backed elements, it’s simple to layer and even ink them.
step 13: once your ticket is finished the final step i like to do is drag a paper distresser along the edges. this will tatter the ticket, tape, and any other stickers, etc. that might be hanging off the edge.

step 14: i don’t want to over-embellish these so i chose to use custom fasteners. i like the fact that i can add just a little accent that works perfectly.
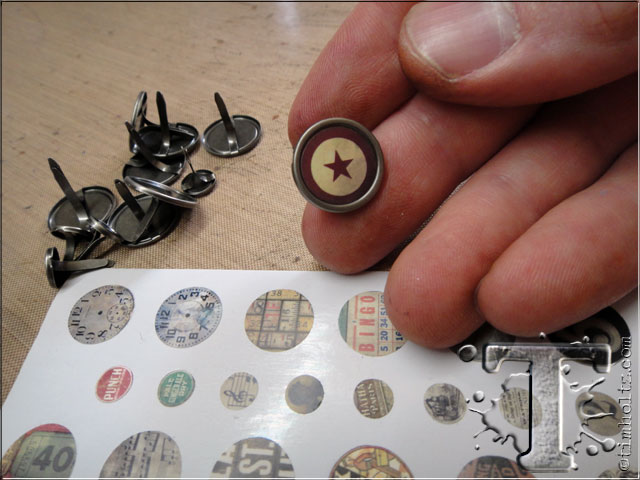
step 15: you have several options to “customize” your custom fasteners. the first is to simply remove one of the included stickers and adhere is to the fastener.

step 16: next apply the included epoxy sticker to magnify and give a dimensional finish.

step 17: even the tiny ones look great with the epoxy over the image.
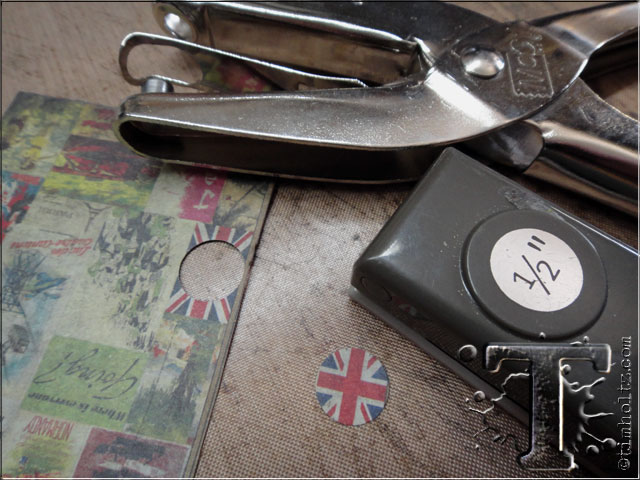
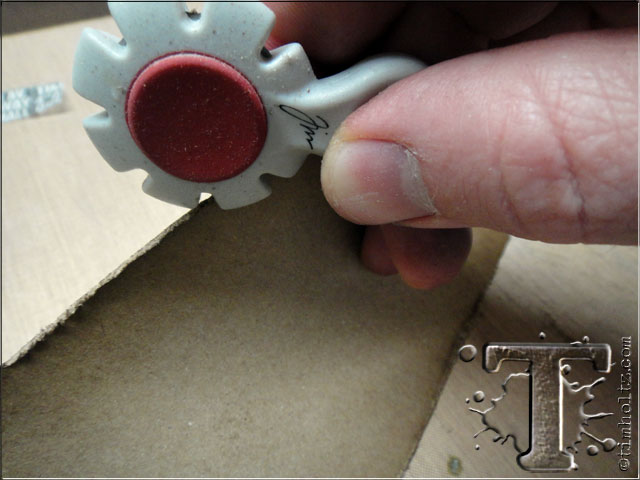
step 18: another way to customize these fasteners is using either a 1/2” punch for the large ones, or a standard 1/4” hole punch for the small ones. both sizes of fasteners are included in the pack so just find some images using paper scraps or photos. simply adhere the paper to the fastener with glossy accents and don’t forget to adhere the epoxy sticker over the top to finish.

step 19: if you want to create “bling” brads, just adhere a flat-backed gem with glossy accents. these are so inexpensive (and sold in several sizes and colors at SimonSaysStamp) and can easily be colorized with alcohol inks to match any project.
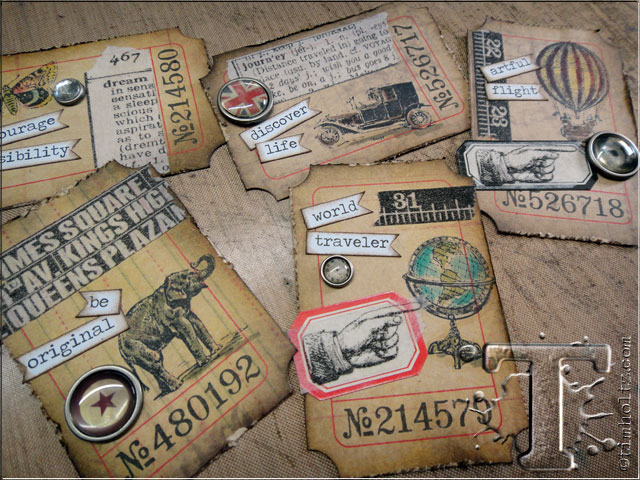
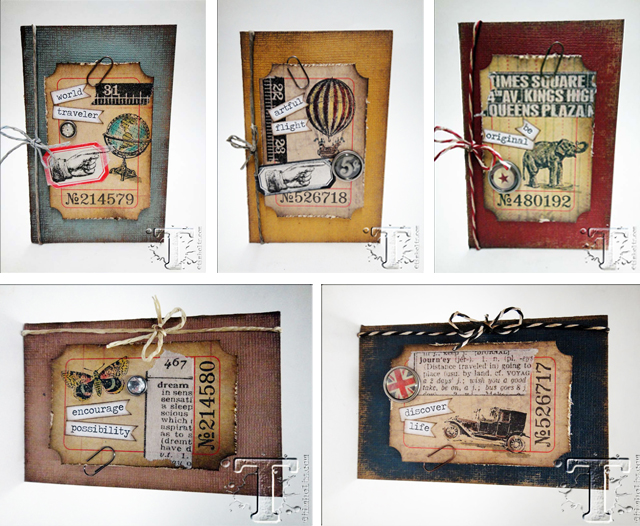
how fun was that? you see, just like that we have 5 cool little stamped collage tickets ready for whatever kind of project you want to make with them. today i decided to create a bundle of cool little cards, and the best part – no paper cutting needed. here’s how…

step 20: i start with the kraft core mini pad from core’dinations. this pad is actually sized for my sizzix bigz dies and texture fade embossing folders, but they are also the perfect size for these mini cards. select the colors you want for your card backgrounds.

step 21: score the paper in half lengthwise at 2 3/4” and fold in half.
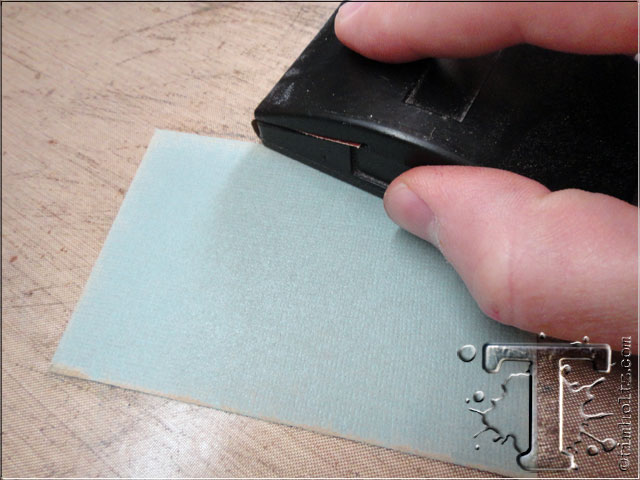
step 22: sand the edges of your cardstock using a sanding grip to reveal the kraft core.
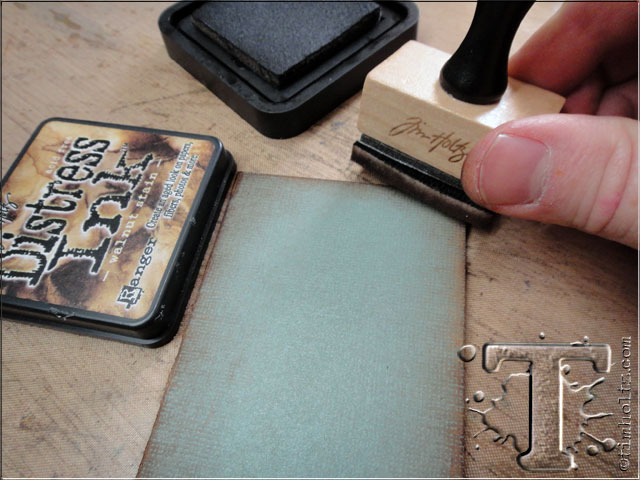
step 23: ink the edges of the card with distress ink using an ink blending tool. i love the way the kraft core inks up with distress – the perfect vintage.
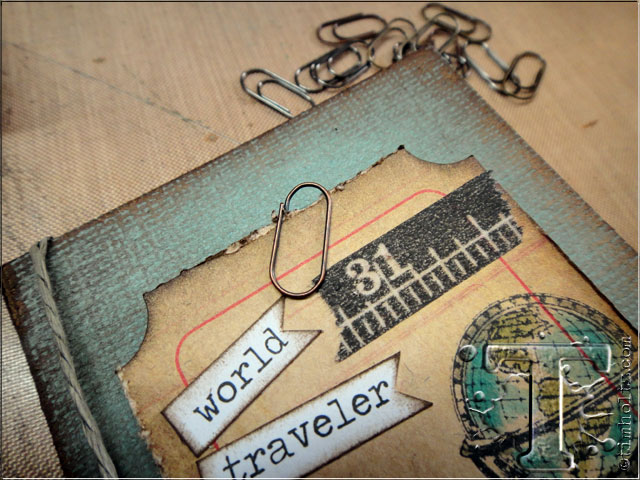
step 24: next adhere the ticket to the card using foam tape for a little dimension, and accent it with a mini paper clip.
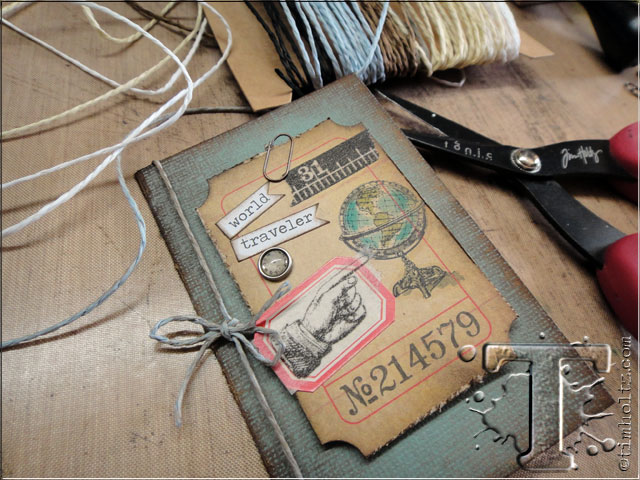
step 25: to finish the card, tie some paper string around the fold of the card, and finish off with a tiny bow. i love that the paper string holds shape better than twine, and it’s also inkable. how perfect is that?

so there we have it… 5 mini masterpieces of stamped goodness with so much detail and character in no time at all – just perfect. so happy STAMPtember friends! i hope you take time to celebrate the creative fun here at SimonSaysStamp all month long, i know i will. thanks for sharing the journey…tim
————————————————————————————————————————–
What do you think? We’d love to hear from you (and Tim deserves some great feedback for these masterpieces ;) Be sure to pop by Tim’s blog today! He has a very special coupon code for you in honor of STAMPtember! 20% off all of his stamps…all month long! Fun Fact: Tim’s stamps are made in the USA by Stampers Anonymous just about 100 miles from our Simon offices. You won’t want to miss his September Tag in his “12 Tags of 2013”
Be sure to follow Tim on Facebook, Twitter and Instagram. (@tim_holtz) Mario Rossi provides the greatest BTS (Behind the Scenes) on the web! (@mariojrossi)
THANK YOU TIM! We appreciate how hard you work to continue bringing great products and innovations to our industry! YOU ROCK!!
 |
 |
|
|
|
|
 |
|
|
|
|
|
 |
|
|
|
|
|
 |
 |
You won’t want to miss any STAMPtember activities! Enter your email address below and our blog posts will land in your inbox :)


Tim never fails to inspire and amaze!!!
Love Tim’s tutorial – great little projects. Which paper set is the Union Jack British flag from that he made the custom embellishment charm with?
Awesome!
As usual Tim’s projects just rock. Love his blog.
Awe…I’m in absolute awe over Tim’s creativity! Fabulous tutorial; fabulous projects!
c
Wow!!! Amazing cards!!! Love the step out!!
Absolutely amazing! That’s Tim! Just amazing. Love his mini masterpieces and what a great tutorial. Definitely have to try these; I started my 2013 SSS Stamptember Pinterest board. All the fabulousness in one spot.
Love these small cards, and everything tim holtz.
What a great little set of cards. As always, Tim holtz is amazingly creative!
Such Distress Fun! Thank you Tim for sharing the tutorial! I don’t use my tickets enough, so I can’t wait to pull them out today!
Love the step-by-step tutorial for these fun little pieces! It would be great to have a supply handy to use on cards or LO’s.
So much versatility packed into these! And of course when the master does it they look great but entirely doable. Thanks Tim and SSS!
WOW what a fab tute, love those mini stamps and the sanded back kraftcore finishes them off perfectly – thanks so much
Must go try it out!!
Sam xxx
S.U.P.E.R.
What awesome projects! I so love how he does more than one at a time. Great tips for making it fun and creative!
Very, very vintage. I love it! And I also love that new to me kraft core cardstock.
Love it !!!
What fun and easy pieces of work that can be incorporated into so many larger projects or maybe a lunch bag or brief case! Thank you Tim and SSS!
Awesome!!thanks for sharing.
I just love those cards Tim made. He is so inspiring. Thanks to Tim and Simon Says.
This guy has so many amazing ideas!
Waaaayyyyy to fun! Thanks!
Love these!!!!
What wonderful little cards. They are simple but pack a punch.
Thanks Tim for all your inspiration. Love the way you used the tickets.
Wow–these are truly masterpieces! Thanks for the inspiration!
Well he KNOCKED it out of the park again! Super ideas! Thanks Tim. You’re the best!!
Wow! Actually FIVE wows! Great tutorial. Thanks for sharing your many talents. Can’t wait to get started making some of these.
cool beans those are so awesome. Thats a great idea making them assembly line style. I’d love to have all the stuff to make those identical. those are great for any occasion and anybody
Love making cards and Tim’s are especially cool!!!
These are wonderful! But what do you use as an envelope????
Such an amazing group of cards. Tim continues to give us new techniques all of the time!
Love them all! What an amazing way to give a gift of cards to someone too!
Awesome tfs !!!
lovely products thank you for sharing.
great products thanks for sharing them with us today.
Thanks for this great tutorial, full of tips and great cards! ;-)
Tim’s projects are so much fun and he’s the ultimate teacher, giving great tips and techniques to help us in our creativity. What a fabulous STAMPtember this will be!!!!
Tim’s cards are absolutely AMAZING! Let’s face it, the guy is a true genius!!!
Absolutely wonderful! Have all but about 2 things to get started – will see what I can improvise.
Why of course I remember!! I find the SSS Stamptember posts are some of the most awesome! and this is another out of the park home run for Stamptember and Tim!! TFS
I can’t wait to create some tickets. Tim always makes it look soooo easy and fun!
Yay Tim!!! Love your little mini masterpieces – sweet little treasures. Happy Stamptember!
Great ideas thank you! I’d order from you but I don’t do computer transactions involving payments only over the phone sorry! And I’m right here in Columbus too !
FABULOUS mini cards Tim! Now I have more to add to my wish list :)
Tims has such amazing talent – and I love his inky fingers! These are little mini masterpieces.
They really are mini masterpieces! Thanks for the detailed step by steps!
Love Tim’s step by step tutorials! They always make sense and are so creative!
I love these mini masterpieces and can’t wait to make some different ones for my scrapbook layouts. I think they will make the perfect little cluster embellishment.
Wonderful tutorial, Tim is such a master!
Always a joy to take in what you’ve creted and your process!