Doodling with Debby: Easy Watercolor Background
Hi friends! Happy Sunday! It’s always a pleasure to share our monthly installment of Debby Hughes’ monthly card making blog feature, Doodling with Debby! Read on and be sure to watch the video! Enjoy!

Hi, it’s Debby here and for my Doodling With Debby video series for Simon Says Stamp this month, I made this card using a simple gradient wash of watercolours which pairs beautifully with the Tumbling Hearts stencil from Simon Says Stamp and Nuvo Glimmer paste. The result is a lovely backdrop for the You Are Loved Dies.

So, let’s jump into making this card and I started with the gradient wash of watercolours for the background. I used a lot of water to create the background, and so I taped the piece of Arches Cold Pressed watercolour card I used to a board to stop it warping. To create a smooth gradient of colour, I added a wash of clean, clear water over the whole panel. You could do this with a broad watercolour brush as I did or spritz the paper with a mini mister or use a household paintbrush. It doesn’t matter how you wet the paper but what you are looking for is an even sheen of water. When you tip the board to the light, you can see a soft sheen of water. You don’t want so much water that you have a lake because if you then add watercolour to that amount of water you will get the colour just puddling. Having a sheen of water prevents the puddling while encouraging the paint to move through the water. With that sheen of water, the paint gently spreads through the background. I started with a light wash of purples, whatever was on my palette mixed with Daniel Smith Rose Of Ultramarine and I blended this out by rinsing my brush often until it was the palest of colours. I took this purple halfway up the card. Then from the top down, I bought a wash of pale rich yellow. Again, what was on my palette and then mixed with Quinacridone Gold. I brought this down to meet the purple layer but again washing my brush out as I went so that the junction between the two colours is very pale. This background was inspired by a winter sky I saw with deep purple hues near the horizon and the warmth of the sky above.
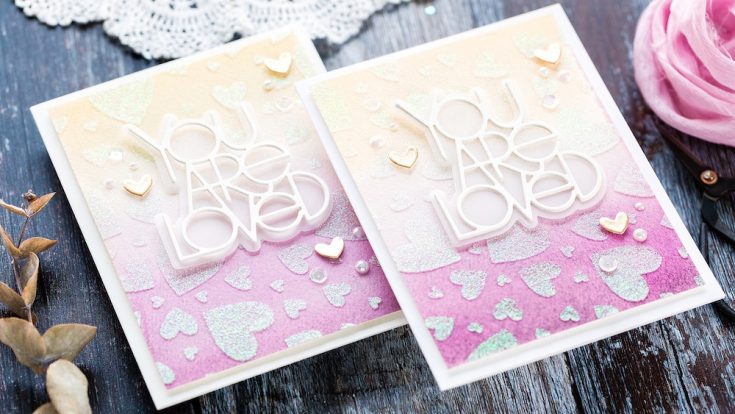
With the first layer down and with the paper still wet I added more depth of colour. I mixed Lunar Black in with my original purple mix, and as this dried the pigment settled into the valleys of the textured watercolour card giving a granulated effect. Again, I washed this layer out to the palest of colours by rinsing my brush in water bit by bit. Then I added a further yellow layer to the top with more richness of golden hues to the mix. I used a heat tool to dry the background and then while the panel was still taped to the board, I taped the Tumbling Hearts stencil over the top. I kept the card on the board as the Nuvo glimmer paste I swiped through the stencil is also a relatively wet medium and the board will hold the card from warping. I spread glimmer paste as if I’m spreading butter on bread by using a Ranger palette knife and a shallow angle to draw the glimmer paste over the stencil letting the paste settle into the heart-shaped openings. I worked the paste backwards and forwards over the stencil until I had the whole area covered and a smooth finish. I then lifted the blue tape holding the stencil in place and then everyone’s favourite part is lifting the stencil to reveal the glittery design. I used a heat tool to speed up the drying process.
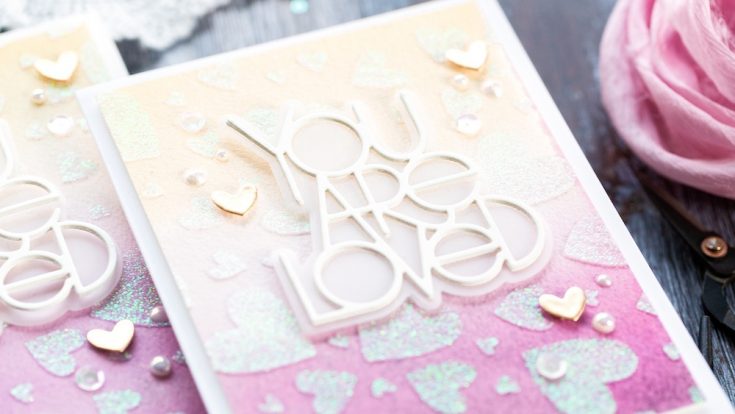
I kept the rest of this card clean and simple so that I didn’t cover up too much of the background. I chose the You Are Loved dies and cut the lettering three times from Ivory card and the shadow background piece from vellum. I then used Gina K Connect glue to layer the Ivory die-cut lettering pieces together. The nozzle of the tube makes it easy to dot small amounts of glue over the back of the lettering pieces and then stack one on top of the other. If you add too much glue, then dab off the excess on scrap paper before stacking the dies together, and then you won’t get any glue squidged out. On my original card, I glued the stacked dies to the vellum piece and I’m not quite sure why I changed my mind to do this next part as it is fiddly, and I’d already created dimension by stacking the dies. However, I did so here you go, I cut small pieces of foam tape and added them to the back of the stacked dies and then adhered them to the vellum. I then added more foam adhesive on the back of the vellum and added the piece to the front of the card. I added foam adhesive to the back of the panel and added it to a card base cut and scored from Ivory card.
When cutting out the You Are Loved dies, there are some optional hearts to add to the centre of the letter ‘O’s. I wanted to use these but scattered more randomly on the card front. I also wanted these to be in a warm gold embossed colour, so I took each heart die and pressed it into an ink pad of clear embossing ink. I then dunked the die in Antique Gold embossing powder from Simon Says Stamp and used a piece of blue tape to pick up the small die and then heat the powder until it melted. One coat wasn’t enough to cover the die, so I repeated the process a second time. I’m sure there is a more straightforward method to doing this, but I like keeping the die free so that the heated powder smooths over the edges and forms a beautiful shape when heat embossed. I repeated this process with three heart die cuts and then added small pieces of foam adhesive to the back of them and dotted them around the lettering in a triangle formation. I added Fairy Wings Nuvo Dream Drops and Glossy Pearls from Little Things From Lucy’s Cards and finally a few sequins.
That completes this easy watercolour background inspired by a winter sky and then jazzed up with a stencil and glimmer paste plus a simple die cut sentiment and a few sparkly embellishments. Thanks for joining me today and I hope you join me next time for Doodling With Debby.
Watch below or in HD on YouTube.
SUPPLIES:
|


Thanks so much for stopping by, and thanks to Debby for being our guest!


Debby – you never cease to amaze me with your beautiful soft watercolors. This was such a beautiful gradient for the background of your card. Sarah Simon’s watercolors are so gorgeous and her books are lovely…she also started a flower club for painting! Thank you Debby for another wonderful tutorial!
Absolutely gorgeous. The soft colours in the backgrounds and the vellum makes these so elegant. Of course the glitter doesn’t hurt either to up the WOW factor.
Really stunning work Debby.
I love your color choice, as usual, you are so gifted. I’ll go take a look at that book mentioned in your post. I’m always excited when I see something has come in from you.
Lovely water coloring once again using this great new die.
Debby, thanks for sharing this tutorial. I always learn so much from you.
What a beautiful card! I love the soft colors and the glimmer paste- they both give such a dreamy look!
Such a beautiful design and oh so pretty. And this watercolour with the stencil I think is easy enough for us novice water colours and card makers to create a similar look. I just love reading and watching all your video’s as your talent I hope can rub off on me somehow!
Such pretty cards!
This card is simple and beautiful and perfectly created. Thank you for the great tips for creating that background. I’m sure that if I had started with purple at the bottom and yellow at the top, I would have created brown in there somewhere, but now I know how to avoid that! :)
Just lovely!
Great instructional video. Love the gradient watercoloring and the glimmer paste effect. Beautiful card.
So very pretty & inspirational!
Wow Debby!!!! Absolutely Stunning cards!!!
JUST BEAUTIFUL, Debby!!! ;)<3
Beautiful! Your watercolor background is gorgeous.
Fantastic carD. The heart background look like glass with glitter in it. Beautiful.
Fantastic card.The heart background look like glass with glitter in it. Beautiful.
Beautiful background! You make me want to try this!
I learned so many things from this short video. Thanks for all your tips and may just try that water color background. Would be great on a Valentines Day card.
Beautiful and elegant, I love your card Debby!
Thank you so much for sharing your inspiration and the great video tutorial. Have a wonderful week.
So pretty!
Love you water colored background. The card is so pretty. Thank you for the inspiration!
So beautiful!!, love the color combo and the added sparkle from the glitter paste!
LOVE the soft colors on these sweet cards – thanks for the inspiration
Gorgeous cards, Debby. I love the soft colors with the heart background. The die cut sentiment is so pretty with the vellum frame.
Beautiful card!!!
Beautiful card! Love your watercoloring technique…
Thanks for sharing.
I love the soft wash of purple and yellow. Love all the sparkle.
Love Debby’s videos. They are filled with tips & her thought process is always fun to listen to as she creates her amazing projects.
I couldn’t get past when you added those microscopic foam pieces! You have more patience than I! Beautiful work!
The Color Combo of pink and yellow is Beautiful, I´ve never thought of that before and I love hte silver hearts.
Awesome creations! I especially love the added glimmer paste!
Soft pastels, just in time for spring.
Beautiful cards, love the stunning background!
Very pretty!
I thought I had commented already, but I don’t see it. So . . . these are so pretty! I love the soft color gradient and the fabulous sparkly hearts!
This card by Debby is simply beautiful—as always! I love the watercolor background (and appreciate her tutorial!). The glimmer paste stenciled design is so lovely!
Just gorgeous
Beautiful card. Thank you so much for sharing this technique this technique with us!