Stamping on with Suzz
The running joke in our house is that if it doesn’t move mom might stamp on it. I do look at things differently now that I have started stamping on different surfaces. I am going to walk through stamping on a few different surfaces with different inks to help you out from lessons I have learned along the way in my crafty explorations.
I have a big selection of inks in a variety of colors and I love using them for different reasons including surface being stamped on, color and medium that will be colored with.
A couple of ink basics:
Solvent inks work on all surfaces. My favorite solvent inks are the StazOn inks. They come in a great variety of colors and dry quickly. They provide clean sharp images. They are a solvent based ink which means they will dissolve with alcohol based markers or if you use the handy dandy StazOn Cleaner.
Archival inks work on a variety of surfaces but on a non-porous surface they take extra time to dry. They also come in a great variety of colors and have a quick drying time. The archival inks also provide a clean consistent image.
Versafine inks are a natural oil-based pigment ink. They are another quick drying ink that provides a clean image for detailed stamps. They are water-resistant which is perfect for . They come in a great selection of colors. They will stay moist on porous surfaces slightly longer than the Archival Inks to allow for heat embossing. . Another great ink to
Dye inks are water based and work well on porous surfaces but do bleed if water is applied. They have the biggest variety of colors and stay moist the longest when applied. The dye inks are more moist and tend to provide a softer edge with more bleeding. Memento inks work beautifully with your alcohol based markers.
Acrylic Paints are a wonderful medium to use with any surface but your image will have a softer uneven effect when stamping.
My first sample shows how the Stazon and Ranger Archival ink stamped on a glassine surface.
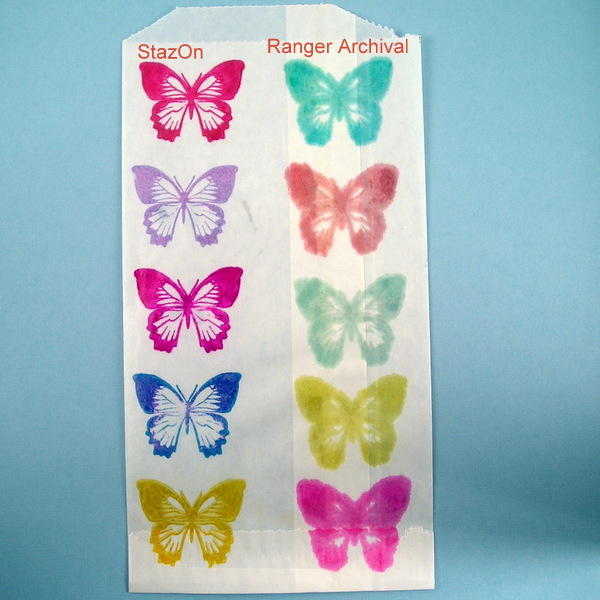
I stamped the left side showing off the pretty colors available in the StazOn inks. I stamped the right side with the Ranger Archival inks. The Archival inks stamped cleanly but after I left and came back they had absorbed into the bag and became fuzzy. These were brand new inks and had a lot of moisture. You will see in the second sample I used my black ink pad which was older and not recently re-inked.
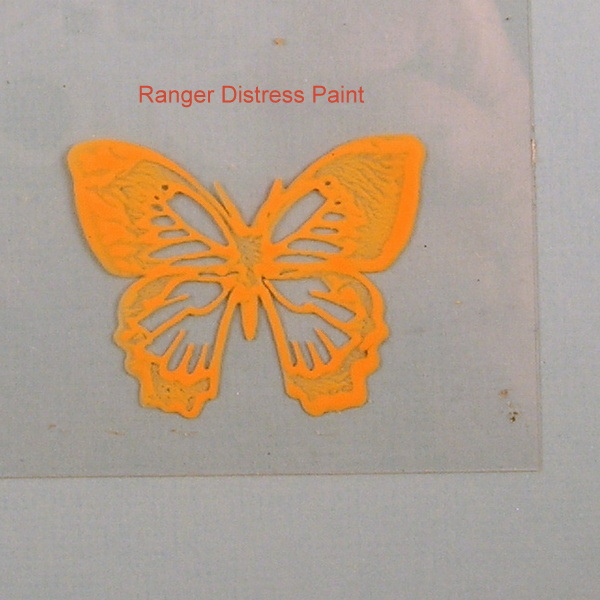
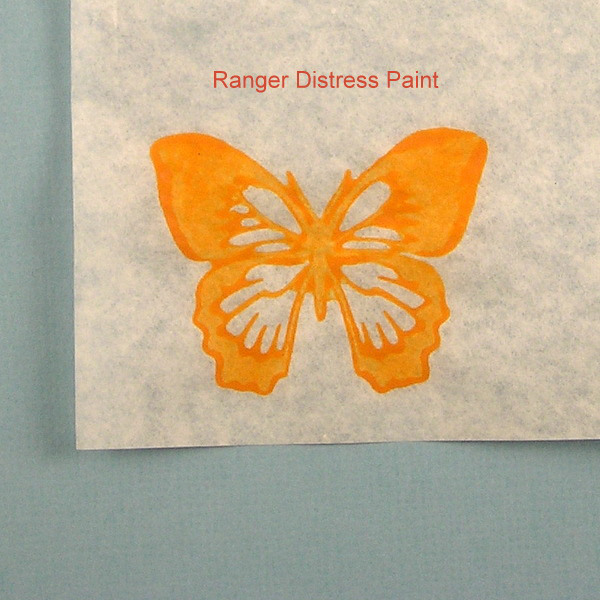
I stamped the same image using the Ranger Distress Paint on the Glassine bag:
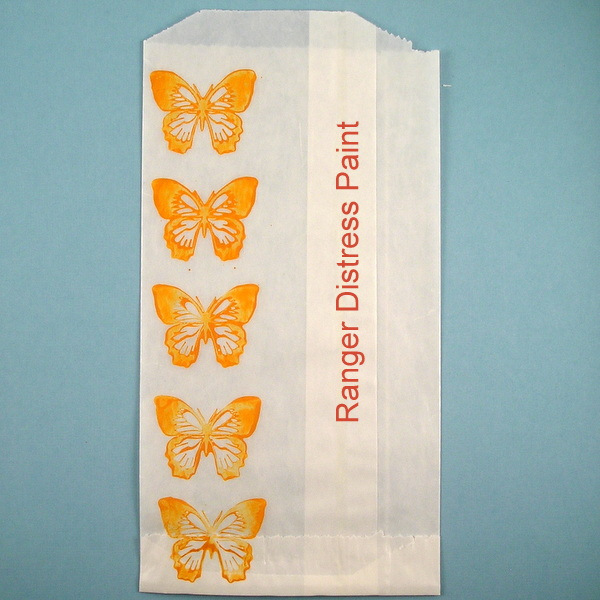
I love how the paint gave a soft effect with a beautiful pop of color.
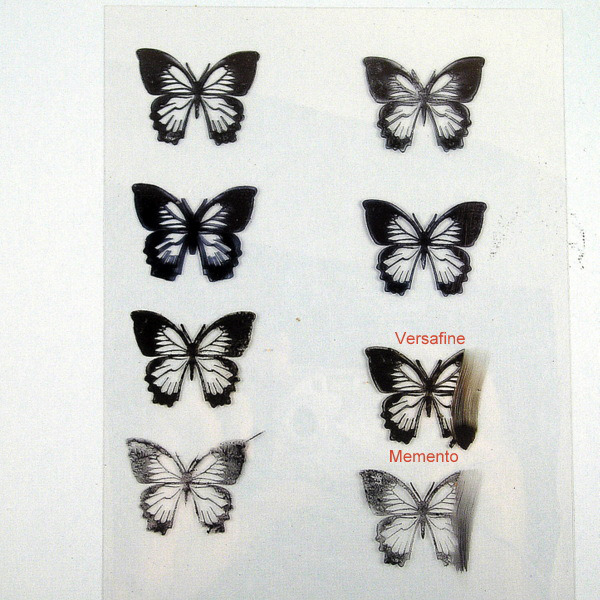
I showed each of the different inks in black stamped on the glassine bag:
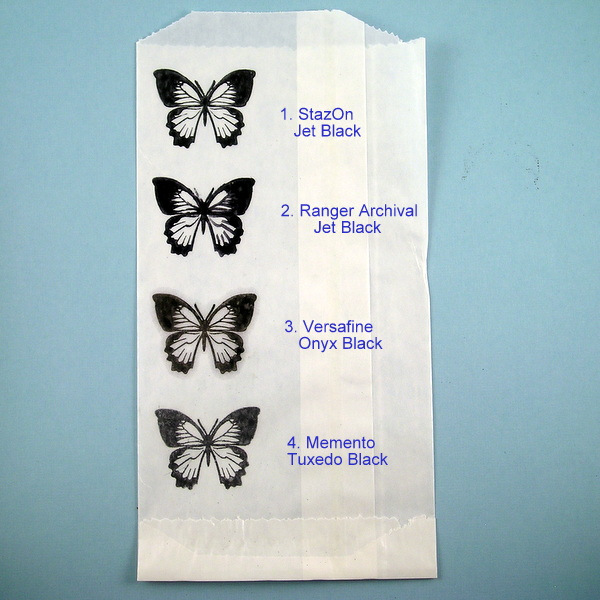
Each of these images look wonderful on the surface. The glassine surface is somewhat porous and took the images in all the inks. If the surface is not porous the dye inks and versafine will not dry.
Tip: If I stamp and it doesn’t stamp cleanly I will either use a marker or watercolor pencil to fill in the sections that didn’t completely stamp. The other alternative is to use a stamp positioner and re-stamp the image.
The next surface I stamped on was acetate which is not porous and a slick surface. This is similar to stamping on glass. When you stamp on either of these surfaces you have to be careful when placing the stamp to get a clean image.
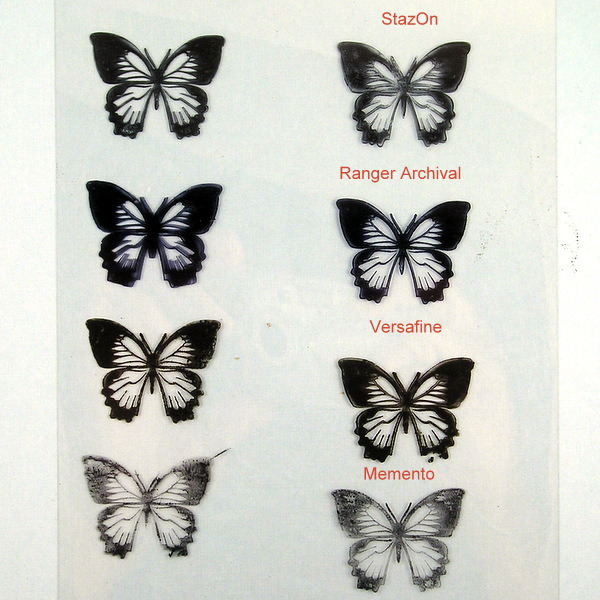
You can see that the StazOn, Archival and Versafine gave crisp clean image and the water based dye ink was much softer and blurrier.
The Ranger Paint Dabber applied to the stamp and then stamped gave such a lovely pop of color on the acetate. I can’t wait to play with this more.
I let the acetate with ink sit over night and then ran my finger over each image to show you which inks will never dry on the non-porous surfaces.
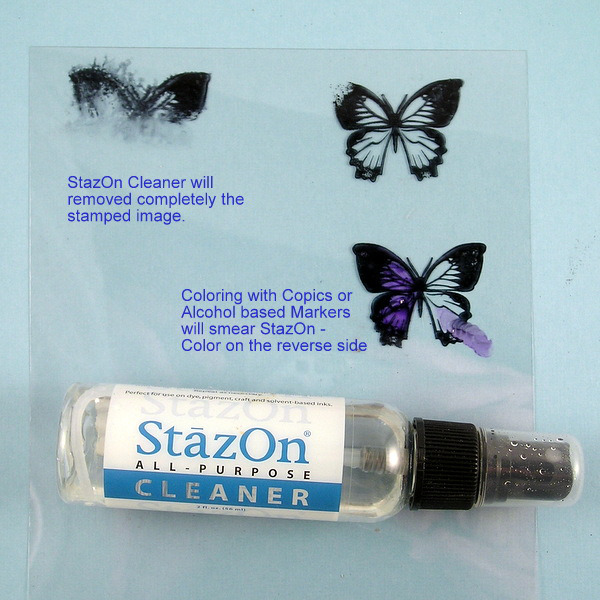
The best part of using the StaZon on a non-porous surface is if you stamp it and it doesn’t stamp cleanly or you don’ t like the placement you can use the StazOn cleaner and spritz it on soft cloth and wipe off the image completely.
Tip: to color the images you stamp on acetate turn over the acetate and color with alcohol markers, Sharpies or paint on the reverse side and you can apply your color without impacting your image.
Next I wanted to show stamping on tissue paper:
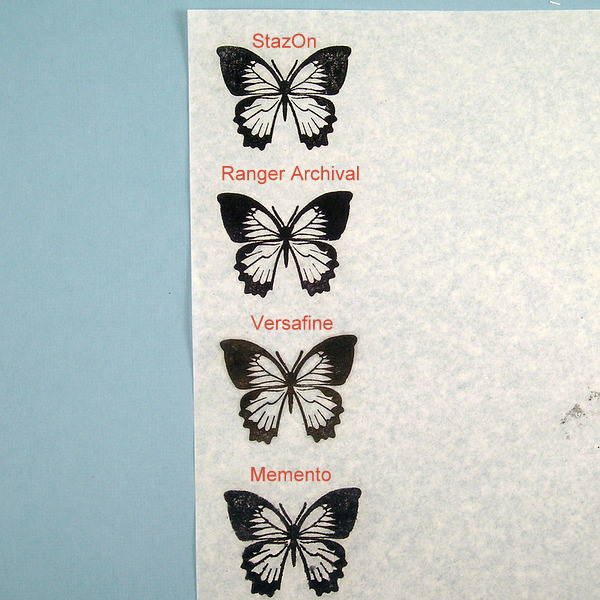
The tissue paper takes the ink as a matte cardstock would. The difference is that you can take the tissue paper and decoupage medium and layer the image over another background with a lovely translucent effect. The dye based ink will bleed if used for this technique.
The paint applied on the tissue paper added a lovely splash of color with a nice texture.
I love re-cycling wood pieces and there are two ways to apply ink on wood. Unfinished wood will take the ink as well as applying a coat of paint first. I showed how the inks worked on both surfaces.
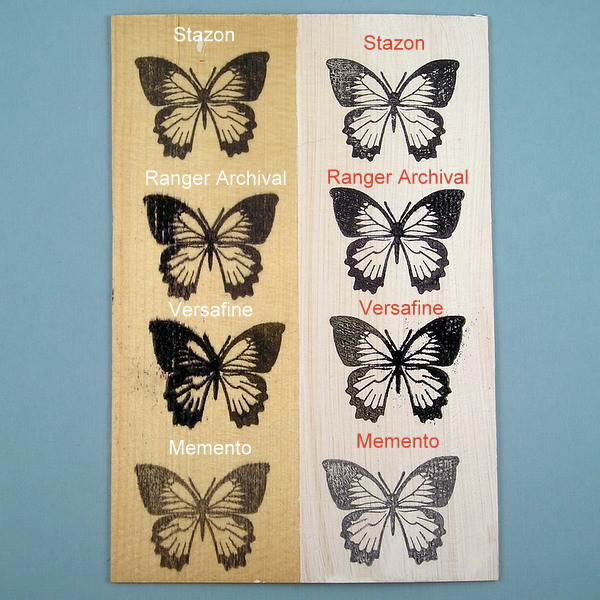
You can see which inks provided the crispest images and which bled into the wood. Depending on the effect you want with your images you can leave them with the softer effect of uneven ink on the image or you can touch them up with a marker, watercolor pencil, or color pencil. My other trick is to emboss the image while it is still wet to help fill in where the ink didn’t get as dark as I wanted.
My last surface is a piece of muslin that I had. Again I showed what you can do with a piece of plain fabric versus painting the background and then stamping on the surface.
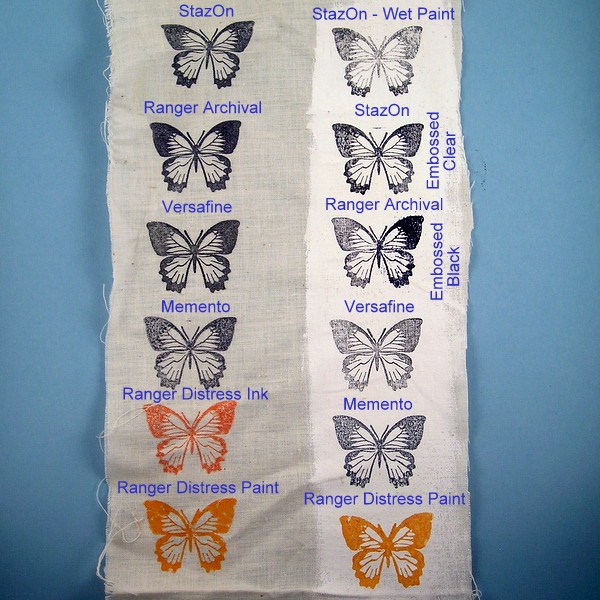
You can see I was impatient and stamped too quickly on my painted surface so I actually showed you what it looked like when I stamped too quickly on the first butterfly with Stazon on the painted surface.
To show what the embossing does with the stamped images I carefully applied black and clear embossing powders on the right wings of the butterflies. You can see the difference in the pop of color.
I was having so much fun trying out the different inks and paint on the surfaces I decided to create a muslin bag.
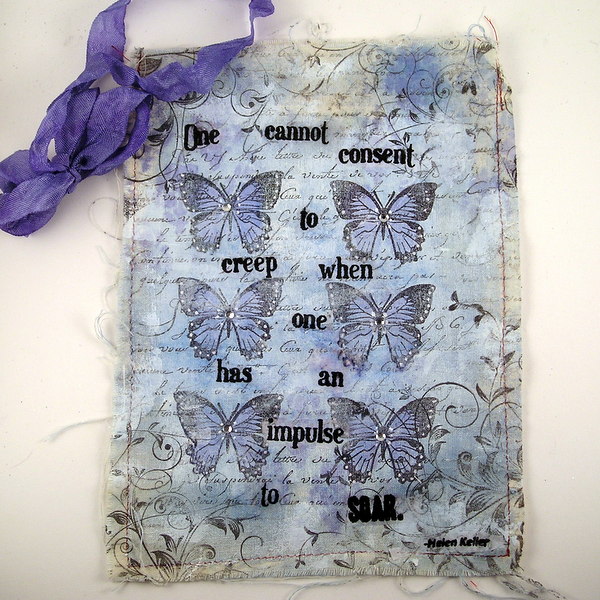
I painted the surface of the bag and added a soft background of glimmer mist. I then stamped over the surface using Versafine Black ink for the butterflies and the flourishes. I added the sentiment using Ranger Archival ink stamped on tissue paper. I cut it up and used decoupage to apply the tissue paper to the front.
Supplies Used:
Ranger Archival Ink – Black, Memento – Tuxedo Black, Versafine – Black Onyx, StazOn – Jet Black, Hero Arts – Artistic Butterfly, Hero Arts – Collage Friend, Tattered Angels – Glimmer Mist – Purple, Claudine Hellsmuth – White Acrylic Paint, StazOn – , Ranger Distress Ink – Ripe Persimmons, Ranger Distress Paint Spiced Marmalade, Glassine Bag, Clear Embossing Powder, Black Embossing Powder, Wood Paper, Stazon – Fuchsia Pink, Vibrant Violet, Blazing Red, Azure, Mustard , StazOn Cleaning Remover, Decoupage
Happy Inking,
Suzz

I love seeing how Suzz experimented with inks and surfaces – she’s given me all kinds of ideas.
Now – what are you waiting for? Join us in this week’s challenge! For the full rules, read the “challenge rules” posted in the side-bar here on our blog, and be sure to enter the challenge in the post below this one.
Challenge Badge

Spotlight Badge


Suzz, you are a rock star. This is so helpful to anyone who stamps.
Brilliant tutorial, great way to showcase the inks. Love love the bag, the butterflies are gorgeous and perfect sentiment. Tracy x
Thanks so much for this – I’m just about to invest in a few more ink pads and now I’ve a much better idea about what to spend my money on!
Great tips here. I enjoyed your lesson.
Thanks for the extensive tutorial and examples, which I’m saving for future reference! I know some of this, but the uses for the different inks are explained so well.
Suzz…this is a super tutorial! So much info about different inks and surfaces all in one place! Thanks so much for taking the time to experiment with all of this and then write it up so beautifully! <3 Candy
Oh… Suzz, this is very helpful and inspirational tutorial. Thank you for sharing all the tips and beautiful result. :)
What ink to use when was, by far, the most challenging concept to learn when I first started stamping. It’s complicated enough on plain paper but when you introduce other surfaces and other coloring mediums it can be frustrating if you don’t know the differences between inks. This is an exceptional demonstration and I compliment you for tackling complicated subject matter in such a clear and straightforward manner. No doubt, I will come back to this post for future reference and thank you for taking time to do this.
Great tutorial, Suzz. Very educational! Thank you! Hugs, Sandra
Suzz this tutorial is fantastic! I never know which ink to use , but here thanks to the examples it is easy to understand! I really need a tutorial like this! BArbarayaya
An amazing and extremely useful tutorial. Thank you!
Thanks a lot, dear Suzz, for all the wonderful samples – once more it’s eye-opening to me, though I already tried a lot of different surfaces by myself. But you never stop learning .. ;) this is the best proof. The results on muslin are most interesting to me – paint is better than stazon – unbelievable.
hugs serafeena
Such a detailed and very helpful post ! This post is must read for newbie stamper like me !
What an amazing resource! I came to stamping via scrapbooking and the book arts, and the variety of inks can be confusing. Detailed info like this is scarce, even from the manufacturers. I love it when someone explains WHY they chose a certain ink for a certain surface. This is so helpful. Thank you!!
Thanks so much for all the great information on the different types of ink. It ‘s so helpful to have a resource like this and will make ink choice much easier now! great job!!!!
This is a fabulous post Sue! Love all your different samples and the surfaces you stamped on. Next time I get a question about what ink to use for what, I’ll refer to this tutorial of yours.
A great post showing the different inks and surfaces. Thank you Suzz.
Great tutorial. Your bag is gorgeous.
Suzz what an awesome post! TFS all this info. and your bag is absolutely beautiful!! :)
Gorgeous project Suzanne! Thanks for sharing the difference in inks! Very useful for sure!
Great tutorial thanks for all the pics and explanations. So what exactly is the challenge for this post?
Never mind, I,just saw it way down here….stamp in anything but plain paper, my ipad keyboard was covering it up
What a great tutorial! Thank you for sharing!
Such a informative post, love how easy Suzz made it to understand and gorgeous bag at the end… the quote is one of my faves. TFS. Hugs xNx
Oh my goodness. I had no idea there was such a difference between inks. This is such a great guide, I’m Pinning it for future reference. Thank so much. Oh, and I love your butterfly bag. It’s absolutely beautiful!
Suzz, THANK YOU! This is THE best ink information that I have ever seen. I would encourage EVERY stamper to bookmark this. There is nothing worse than having a beautiful project ruined by using the wrong ink. This is so helpful. Thanks for sharing!
This is so useful Suzz, what a great visual way to demonstrate what all the different inks do, loved reading it and am going to save for reference! This is brilliant, thanks! You muslin bag is goegrous too! What surprised me most is how well the paints stamped on the different surfaces (at least in the hands of a master stamper like you lol….)
Fantastically useful – and great to have the samples on each surface to refer too. Can’t believe how cool the Distress Paint looks in every case!! Thank you so much for this, Suzz.
Alison x
Thanks for an awesome showcase of the different inks, I use StazOn, but always wondered if I should try another, I can say that I am happy staying with my tried and true ink after seeing the over all results!
Suzz — This was awesome. I’ve definitely bookmarked this and will pin this on my techniques board. Great investigation of inks and surfaces. I appreciate the time. It certainly will help in the future. Also, it provided me with some inspiration for this week. Hope to play along with this challenge. — Mary Elizabeth
A super useful post. Want to save this for future reference. Or maybe I just need to do the experiment myself. I’m a stamp and hope person. I see where I might be going wrong. Thanks for this.
Thanks Suzz! Great ink tutorial.
This is so fabulous! Thank you for all the tips!!!!
Hi, this weekend is pleasant for me, as this moment i am reading this great educational paragraph here at my home.