You are my Sunshine
Hi readers! Happy Thursday to you! Where did the week go? Another fast one! I hope that no matter where you are in the world, and however good or bad the weather may be, that this blog post brings a bit of sunshine into your day! It certainly did for me! I’d like to welcome back Dawn Woleslagle to our blog as a guest. Dawn is not only a wonderful artist, but the owner of WPlus9, the brand that we are featuring today!
Be sure to read on for some tricks and tips from Dawn on how to make this beauty! Enjoy!
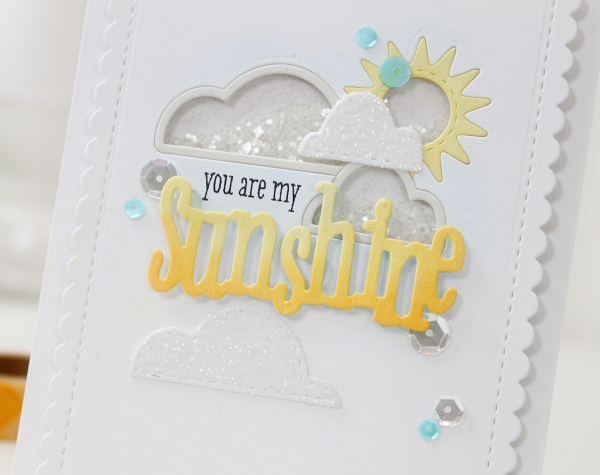
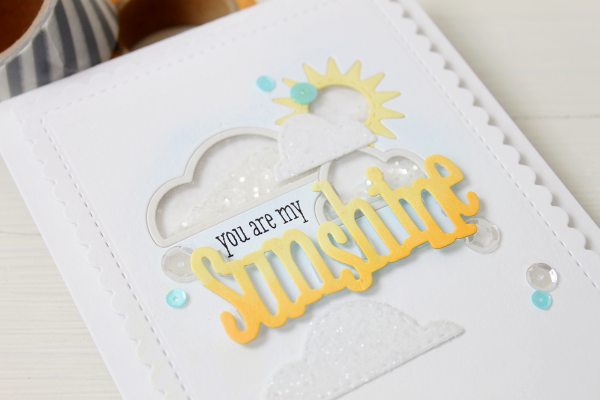
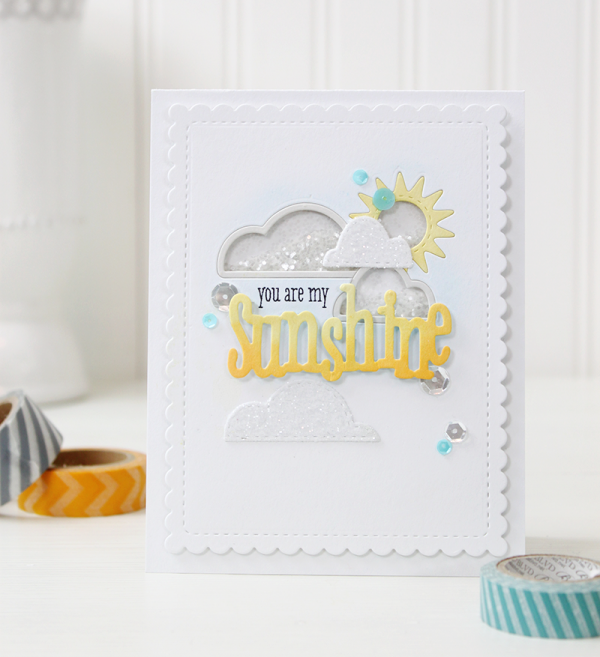
I don’t know about you, but I am so ready for Spring to arrive. That yearning was the inspiration of this cheerful card. And the Sending Sunshine stamp set along with the Sending Sunshine Layers die was perfect for creating this inlaid die cutting shaker card!
Once I had die cut my windows from the front panel, I used a sponge dauber to color the pieces that I would be fitting back into their negative spaces. If you are unfamiliar with either of these techniques, or just need a refresher – I use both in this video. I wanted to add a hint of blue, so before I assembled anything, I blended a little ink around my die cut windows using a Blending Tool. You could fill your shaker with sequins or seed beads or anything you’d like. But I’ve been loving the chunky course glitters lately, so that’s what I went with.
I colored the “Sunshine” die cut using a sponge dauber again, except this time I colored half with darker yellow and then blended a paler yellow in for the other half. I popped it up on the card using a little clear foam tape. I love using clear foam tape for die cut words, especially when they are detailed or dainty because you don’t have to worry as much about it being seen.
Glittered die cuts is another one of my all time favorites. Creating the glittered clouds was incredibly easy thanks to Adhesive Sheets. I just pulled the release film form one side of a sheet and adhered it to a piece of white cardstock. Then I die cut my clouds from the sheet. Make sure the adhesive side is face up or facing the die. This way the adhesive will be on the front of your die cut. Remove the release paper and then cover your die cut with glitter. Easy, and no liquid glue or spray adhesive needed. Score!
The finishing touches are courtesy of Pretty Pink Posh – the form of sequins of course! Sequins just make everything better. I hope you enjoyed today’s card and hopefully it brightened your day just a bit.
SUPPLIES:
 |
 |
 |
 |
 |
 |
 |
 |
 |
 |
 |
 |
 |
 |
 |
 |
 |
 |
 |
 |
 |
 |
 |
 |
 |
 |

Blog Candy Alert!! Follow our blog via email and comment on this post for a chance to win a special blog candy!
Congrats! Blog Candy Winner!
From: Let’s Fly!: Carla Hundley!
Please email Samantha ([email protected]) with your mailing address and the name of the blog you won from to claim your prize!


I really like the idea of using a stamp for part of the sentiment and a diecut for the rest.
Hi, Stephanie!
What a great new look for shaker! Love the cloud shapes! Got our first taste of spring and sunshine over the last couple of days…your card would cheer up even the gloomiest of days!
Beautiful!
This is such an awesome shaker card! Love the clouds and all the sparkle! Love it!!
So pretty and sparkly! I love shaker cards!
Wow Steph, such a pretty card, can imagine a foggy morning with the sun rays peeking through. Cute idea for a shaker as well. TFS :)
Just darling!
Oh, you did brighten my day. What a beautiful card. I absolutely love it. Wonderful!
OMG..What a Die Cut Sunshine Beauty! TFS the video link too.
I love the super versatile die collection for this card!
Just beautiful! Love all the different clouds and the way the ‘sunshine’ is coloured. Simply gorgeous!!
that’s an awesome shaker card !! love the ombre ‘Sunshine’
Какая яркая,позитивная,летняя! вроде простая,но такая классная идея!
LOVE EVERYTHING about this card!!!
Oh this is so gorgeous! Really shunes like a sun. Hugs! Mojca
Oh how cute! Love shaker cards!! :-D
WOW…. What a gorgeous and beautiful shaker card!!!
A much needed breath of Spring! I just love this card, Stephanie.
Gorgeous card – neat cloud shaker. I follow the blog by email.
So pretty! Who doesn’t love a shaker card?! Thank you for the inspiration.
What a beautiful way to welcome Spring! Thanks, Dawn for that beautiful card and your wonderful products.
So light and spring card! I really want to get it as a gift for Easter!
Just a lovely card! I love the glittered cloud and how you used the adhesive sheet on the die cut. I also love the sequins.
Lovely card!!
Wonderful to see a Sunshine creation that suits my nickname. Like the placement of all the dies & pieces.
Melissa
“Sunshine HoneyBee”
DELIGHTFUL card Dawn!!!
LOVE IT ALL – from your ombre sentiment to the sparkle in your sun & clouds – WOW!!!
Sending a big CONGRATULATIONS to Carla too – WTG Carla :)
I just LOVE this adorable shaker card!
What a great card! I love all of the great details!
This card put the biggest smile on my face! I have just experienced TWO days in a row of SUNSHINE and I’m wanting MORE! :)
Great card. I am waiting anxiously for spring too!
this is just adorable!
Beautiful card and definitely makes me think of spring
Oh my, this is so pretty!
Awesome card.
Love the sparkle on the clean white!!
<3 J
jwoolbright at gmail dot com
HerPeacefulGarden.blogspot.com
So bright and sparkly! Beautiful card!
This is so pretty!! Love it!!
Love the sparkle. Very cute design! Thanks for sharing this!
Very cute! Thanks for sharing!
Just gorgeous! Love the soft colors and beautiful details!
I just LOVE Dawn’s sunny card! The Sending Sunshine stamps and Sunshine Layers dies create cheery wishes that are sure to bring smiles! ♡
Pretty, pretty card! Love the sparkles!
A perfect card to brighten the dull day and remind me of days to come….sooner than later I hope!
Like how you worked in a shaker element with those clouds.
Oh Dawn, your card is amazing!
This card really did lift my winter weary spirits. Thanks.
shaker cards are the best!
stamping sue
http://stampingsueinconnecticut.blogspot.com/
Such an adorable Spring card!!
This is fabulous “Sunshine” to give to cheer someone on! So clever of you to make it a shaker!! ;)
Very cute and cheery card it just shines :)
Absolutely gorgeous and fantastic design! x