A Wendy Vecchi Flower For You!
Hi bloggers! Happy FRIDAY to you! I’m pleased to present you with a lovely tag from Wendy Vecchi as exclusive content for our blog today! This all originated from a ‘rescued’ tag of left over colors from another creation! If the outcome of this project doesn’t encourage you to recycle, I don’t know what will! :) Enjoy!

- I had a piece of manila cardstock that was used to wipe up some excess distress stain. It did nothing to inspire me & had been sitting there for 2 weeks. I came very close to dropping it in the trash…V E R Y…
- This is the piece that I rescued. Not real cute, it’s left over wild honey, peeled paint, scattered straw & broken china distress stains.
- I hate to waste things, so I used my new vintage mesh background stamp with cornflower blue archival & now it looked like this…BETTER already!
- The stamp didn’t cover the whole thing…& it worked well to have an unstamped area to work with, as you’ll see in a bit.
- Next, I cut a #8 manila tag to 5 1/2 inches tall. I am LOVING this size…try it! I inked over the tag with wild honey, broken china & peeled paint distress inks to create this background.
- Now back to my manila cardstock, I grabbed a small Fiskar’s hexagon punch & punched multiple pieces. (Or you can die cut this die. )Then, I started gluing them to my tag. I found that the pieces punched from the unstamped area fit in well!
- Next, I trimmed off the bits that were hanging off the edge, looking better!
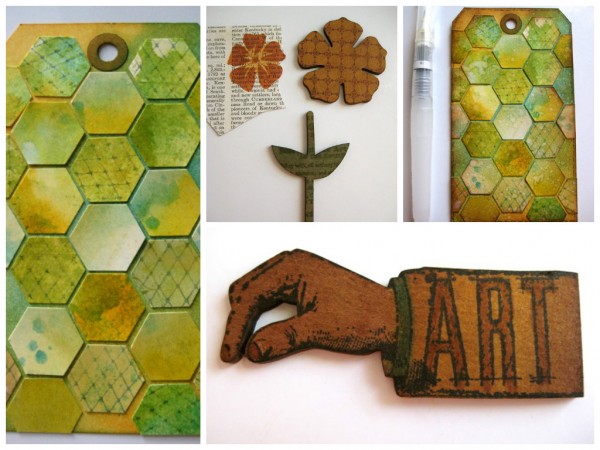
- I couldn’t waste the cut offs, so I added 2 of them to the left side, but made sure to stop & not cover the whole tag.
- I inked over the tag edges with rusty hinge on a blending tool to darken them, and then went over the whole tag very lightly.
- I used the detail waterbrush & tapped it on my finger over the tag to dispense tiny water drops. You’ll see in the photo above that the distress inks/stains react with water & this added another layer to my background. You’ll also see that the mesh stamped image is still perfect, because archival is permanent when dry.
- Next, I wanted to look into the embellishing. Since it’s STAMPtember & Simon Says Stamp is celebrating, I thought a flower would be appropriate. The art parts flower was inked with rusty hinge distress stain, dried, then stamped over with orange blossom archival, using the ornate dots background.
- The art parts leaves were inked with bundled sage distress stain & stamped with fern green archival, using a text stamp. The small flower on the left was stenciled onto a scrap of Clearly For Art, that I covered with a vintage dictionary page. to add paper to CFA, Glue N Seal works like magic. I used orange blossom archival with one of the flowers on the create a flower stencil.
- I cut out the stenciled flower, heated it & shaped it to create the flower center and colored the center of the flower with the scattered straw marker.
- I used the art parts hand with the coordinating stamp to create the hand to hold the flower. I inked the stamp with jet black archival & pressed the coordinating art part onto the inked stamp, dried it, then added color with wild honey on a blending tool. I stamped ART with jet black & colored in the letters with the rusty hinge distress marker…and the shirt sleeve with the broken china marker.
The final outcome…
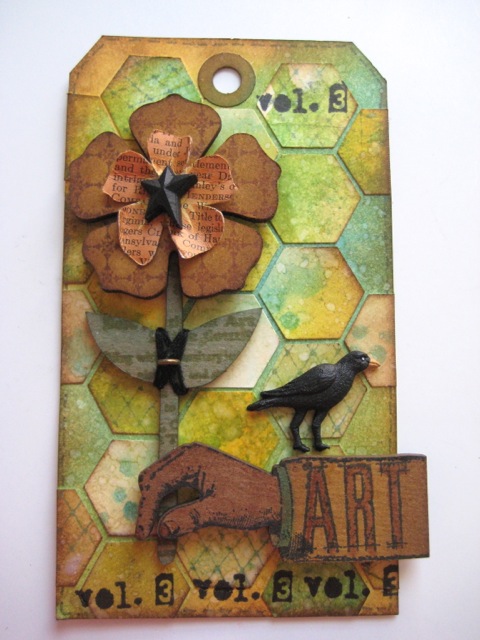
- Since this is my 3rd time participating in STAMPtember, I added vol 3 to the tag base…I bet you were wondering about that! To accent the art parts stem/leaves, I added some embroidery floss around the leaves, then added a screw eye to break up the black.
- the Blossom Bucket crow fit into the fall-ish colors I used and the tiny black Blossom Bucket star made a fun flower center. See above for the final tag with the finishing touches.
- So that’s the story of how one rubber stamp SAVED an ugly background from the trash!
Happy STAMPtember everyone.
remember to take time to…
make art!
wendy
SUPPLIES:
 |
 |
 |
 |
 |
 |
 |
 |
 |
|
 |
 |
 |
 |
 |
 |
 |
 |
 |
 |
 |
 |
 |
 |
 |
 |
|
|
 |
|
 |
.jpg) |
Thanks so much for reading today and thanks to Wendy for being our guest!
Bonus!
Be sure to head on over to Wendy’s blog for a special discount code you won’t find anywhere else!

Blog Candy Alert!! Follow our blog via email and comment on this post for a chance to win a special blog candy!
Congrats, Blog Candy Winners!
From:Lisa’s Painted Maple Leaf: Donna Whitten!
From: Holiday House Mouse Fun!: Andrea Garland!
From: Gift Tags with Laura Bassen!: Donna Cala!
Please email me ([email protected]) with your mailing address and the name of the blog you won from to claim your prize!


Wow! So creative!
This is really amazing!
WOW! Thanks for the inspiration! :D
The tag is awesome, I really love the background. Thanks for sharing!
I can’t wait to get my Studio 490 goodies!
Oh, how fun! Love the background with the different pieces.
Wow, great recycling!
Such a lovely tag and gorgeous BG!
<3 J
Such a great flower! Love, love, love this tag! :)
Really Nice project !!!
Hugs from France
Lunea ;)
This is such a gorgeous combination of colors, and I just love the hexagon background! :)
This is fantastic,
Very cool tag!
love, love, LOVE Wendy’s work – thanks for sharing this with us!
Sandra ltb
What a great tag… love the idea… Thanks for the inspiration.
wow, so cool
great tag
Your honeycomb pattern is so neat! I love your flower and the crow is a great addition. Thank you so much for sharing with us!
Great Tag. I just purchased the Wendy Veccchi inks and the colors are lovely.
Great Hexy background!
I had to pin this amazing tag! So gorgeous!!!
Wow – nice save.
Amazing tag. Love the background…great technique. Thanks for the inspiration.
Awesome tag. Love the hexagon background idea. Great colors, and love the vol. 3 too. Thanks for sharing.
Katie B.
That hexagon die makes this so much easier! Love the final result.
Well..with the way this turned out, I’m glad you didn’t throw it in the trash to begin with! Super great example of using everything! And it turned out awesome. (Love Vol. 3)!
I love the hexagons! I follow the blog by email.
I just bought some art parts. Can’t wait to use them!
This tag is just stunning.